It’s always like this in life: one thing is good, the other is bad. Exactly the same principle applies to various types of mechanical torque transmissions. Chain transmission was no exception here. On the one hand, there is nothing simpler, more reliable, lighter, more compact and cheaper than a chain drive.
On the other hand, we get eternal “hemorrhage” with stretching of the chain, wear of the sprockets, endless cleaning and lubrication, maintenance and tension of this very chain. But there is nothing to be done, the chain transmission has a lot of advantages over other types of mechanical transmissions, so these types of transmissions are used almost everywhere.
However, today we will not talk about the chain drive as such, but about a method for diagnosing the timing chain driving the camshaft of a scooter engine.
Replace or shorten?
A common problem is stretching, in which case the question arises: to replace the timing chain on a scooter or is it possible to shorten the timing chain. Shortening is a short-term measure that is applicable to products with little wear and will only be useful if the actions are performed correctly.
If the wear is minor, you can carefully remove 1 link and slightly extend the ride life. If the work is performed incorrectly, the spare part can be permanently damaged. In addition, you need to carefully ensure that when removing the link, the pitch matches, otherwise such a part can wear out and damage the camshaft sprocket.
How to adjust and tension the chain?
There’s no way you can tighten it or adjust it, and you don’t bother Google or Yandex search with such queries. The chain in the scooter engine is tensioned automatically. And if it has already stretched to such an extent that it begins to fly off or jump over the teeth, feel free to disassemble the engine and replace it with a new one. There are no miracles.
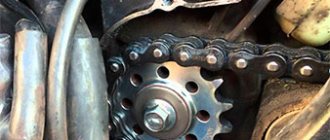
And I will prove this to you now. The chain in the engine is tensioned using a special tensioner, which operates in a fully automatic mode. As the chain stretches, the tensioner rod, under the action of an internal spring, comes out of the housing and tightens the chain. And the more the chain stretches, the more the rod will come out. But! The rod has a limited stroke: on a completely new chain it comes out about a third of its stroke and then, as it stretches, it comes out completely and then it won’t come out anymore. Therefore, the chain will no longer be tensioned! And all your attempts to correct the situation will lead to nothing.
Replacing the timing chain on an engine with engine disassembly
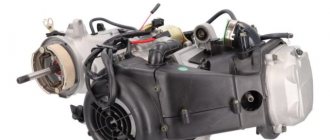
For disassembly you will need tools: generator and variator puller, kickstarter puller, 8, 10, 12 and 17 mm sockets, flat and Phillips screwdrivers and a hammer. The principle is simple: sequentially dismantle the covers, bolts and nuts, remove parts that interfere with getting to the chain. Do not forget to thoroughly clean and inspect structural elements and, if necessary, replace damaged ones.
- Remove the engine, drain the oil and thoroughly wipe and clean the parts. Next, remove the cooling casing and muffler. Using a puller, unscrew the bolts from the impeller and remove it from the rotor, fix it with the puller and unscrew the nut. Remove the rotor and remove the cover from the variator. Secure the impeller with a puller, unscrew the nut and remove the variator.
- Using a puller, remove the kickstarter gear, which is located under the variator. Clean all connectors, remove the bolts on the valve covers. Unscrew the bolts on the cylinder head and remove the camshaft bed, this way you will remove the scooter's timing chain tensioner.
- Pull the camshaft out of bed and remove the part. Remove and tidy up the guide bushings. Remove the retaining ring and pin from the upper end of the connecting rod and remove the cylinder head, cylinder and piston in sequence.
- You can get to the chain by following these steps: remove the bolts from the crankcase cover and remove it from the engine, remove the starter intermediate gear. Use a screwdriver or hammer to loosen the overrunning clutch nut and remove the rest.
- Remove the protective screen from the oil pump, place a metal stick under the chain, and remove the oil pump sprocket. Now you can remove and replace the spare part.
- Carry out all engine assembly steps in reverse order.
SCOOTER. ENGINE TIMING GEAR ASSEMBLY (50CC)
contents .. 60 61 62 63 64 65 66 67 68 69 70 .. 1. Install a new cylinder head gasket.
ATTENTION!
The cylinder head gasket is made of soft metal (copper, aluminum) and after tightening the cylinder head nuts it is deformed, thereby ensuring a tight connection. Reinstallation of the cylinder head gasket is not permitted. 2. Install the timing chain guide. 3. Install the cylinder head. 4. Set the piston to TDC according to the marks on the flywheel. This is usually the "T" mark on the flywheel. Align the mark with the tide on the engine crankcase.
ATTENTION!
The following operation is one of the most important when assembling the engine. It is important to align all the marks very accurately. An error in installing the chain even by 1-2 teeth will result in the engine not working correctly, and it will probably even lead to serious damage to the timing and cylinder-piston gas parts when trying to start the engine! 5. After making sure that the timing chain has not jumped off the drive sprocket on the crankshaft, install the camshaft into the cylinder head, at the same time putting a chain on its sprocket so that the marks on the camshaft sprocket are parallel to the plane of the edge of the cylinder head, and the cams are directed downward (inside the head).
6. Install the rocker arm support, orienting it according to the installation marks. Lubricate the cams and camshaft bearings.
On the rocker arm support are the letters “EX” - which means “EXHAUST” - release. The "EX" mark should be located above the exhaust valve.
ATTENTION!
• Check the correct axial alignment of the camshaft (make sure that the camshaft bearings are correctly positioned on the beds). It is likely that on some scooter models there will be an “IN” - “INTAKE” - inlet mark on the holder. Accordingly, the “IN” mark must be located above the inlet valve.
ATTENTION!
If the copper washers are severely deformed (flattened), they must be replaced, since if the washers do not fit tightly due to oil leakage, the pressure in the lubrication system will drop and the motor will quickly fail. Sealing this connection with any sealant is unacceptable. 7. Install sealing copper washers on the studs. 8. Screw on all four cylinder head nuts without tightening them. 9. We recess the working rod of the timing chain tensioner inside the housing. 10. Reinstall the timing chain tensioner and tighten its mounting bolts.
11. Insert the working bolt and the timing chain tensioner spring, tighten it. In this case, you can hear characteristic clicks - the ratcheting mechanism of the tensioner working rod will be activated, which, under the influence of a spring, will come out of the housing and tension the timing chain.
12. Sequentially, crosswise tighten the cylinder head nuts in 3-4 steps. The final tightening torque is 10-15 Nm (More accurate values can be found in the repair instructions for the specific scooter model). 13. Screw in and tighten the additional cylinder head bolts. 14. Using a socket wrench for the central bolt of the flywheel, or with your hands holding the flywheel, slowly turn the engine crankshaft clockwise 3-4 turns to make sure that the timing timing is set correctly and the piston does not collide with the valves.
15. We install the crankshaft at TDC of the compression stroke and once again check the correct installation of the camshaft according to the marks.
16. Adjust the valve clearances (see). 17. Rotate the crankshaft several turns and once again check that the valve clearances are set correctly. 18. Install the cylinder head cover and tighten its bolts. 19. Place the crankcase ventilation hose onto the fitting in the cylinder head cover. 20. Install the cylinder cooling casing.
ATTENTION!
Do not forget to remove the paper from the intake manifold if you covered it from dirt during disassembly. 21. Install the inlet pipe assembly with the carburetor.
ATTENTION!
In most cases, when installing an exhaust system, the exhaust pipe gasket will need to be replaced. It is better to replace it with a new one during assembly. 22. Install the exhaust system. 23. Fill the engine with oil. content .. 60 61 62 63 64 65 66 67 68 69 70 ..
How to replace the timing chain in an engine without disassembling the scooter engine
If the method described above seemed too time-consuming and complicated to you, we will describe an alternative; it will require a puller, pliers, a Phillips screwdriver and a replacement chain.
- Using a puller, partially remove one pin from the new chain and flare it.
- Next, remove the following parts from the engine: cooling casing, cylinder head cover. Remove the chain tensioner, remove the camshaft bed, the shaft itself and remove the sprocket.
- Center the puller with the pin of the old chain and push it out completely, it will not be useful. Match the links of the old and new chain and instead of a pin, stretch a wire to fix the structure.
- Using the cooling impeller, turn the chain counterclockwise to replace the old one with the new one. Remove the wire, unhook the old chain and connect the links of the new one. Check the alignment of the links and carefully fasten them together with pliers, using a shot, finally secure the links and check the mobility and correctness of the pin to avoid jamming.
- Reassembling the engine includes some special features. When installing the camshaft bed, check the valve clearances with a feeler gauge (it should fit freely between the valve and the bolt) after tightening the nuts. When installing the chain tensioner, unscrew the bolt on the tensioner from the top and use a screwdriver to push the rod back.
Scooters and mopeds have many advantages: lightness, maneuverability and convenience. One of the main ones is the ability to repair the scooter yourself. After disassembling the scooter and replacing the timing belt several times, you can perform the actions automatically, but do not forget that incorrect installation or installation can damage the chain and related parts. Therefore, it is necessary to strictly follow the sequence and check each step. You can combine replacement methods or choose a convenient one and use it.
The main disadvantage of lightweight transport is safety; the above advantages make the scooter less noticeable to other road users and complicates movement on dark roads. To increase the safety of movement, we recommend equipping the scooter with factory LED headlights from the Wesem-Light online store catalog.
Examination
Personally, I never check timing chains. I simply throw them in the trash, no matter how awesome they seem to me. For me, a chain is a consumable, just like a spark plug, oil or oil seal. But if you are important, or money is tight, you can use the old fashioned way.
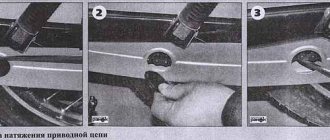
We stretch the chain along its length, hold it with our fingers and try to position it in a horizontal position
- If the chain describes an arc that looks very much like a 90-degree angle, then feel free to throw it in the trash.
- If the chain bends slightly and describes a small arc, then such a chain is quite suitable for further use
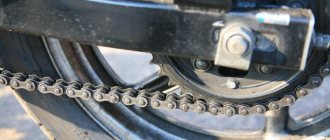
For clarity, I took a new and heavily worn chain, put them together and checked for horizontal deflection. As you can see: the new chain (above) described a barely noticeable arc, while the worn and useless chain sagged like snot, almost at an angle of 90 degrees.
The worn chain turned out to be almost a centimeter longer compared to the new one.
Which method is preferable?
It is logical that the first option with complete disassembly of the scooter engine is more complicated and takes more time and effort. But, as you can see, it is more reliable. Firstly, the factory integrity of the circuit is not compromised; secondly, when disassembling the scooter engine, you can see any defects, such as cracks, wear, change the seals, clean the parts.
The second option is more simplified and can be used when you only need to replace the chain. And you are confident in the quality of your work.
Final word
The scooter is a fairly popular vehicle and is in increasing demand. Because it leaves traffic jams behind, has low operating costs and is economical in terms of fuel and lubricants. Many people prefer to do scooter repairs on their own, especially since four-stroke engines are simple and reliable to use. Timely technical inspections, careful operation and the above article will allow you to enjoy riding this miracle of the Asian motorcycle industry for a long time.