What is thermal gap
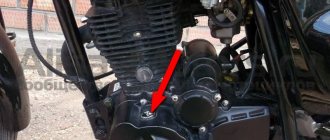
The term thermal clearance refers to the distance between the rocker arm and the upper end of the valve.
This allows for the inevitable thermal expansion of engine parts to ensure optimal operation of the valve mechanism. The disadvantage of having such a gap is the low stability of the engine when starting when cold, but it works great when fully warmed up. It should be remembered that the gap must be appropriate for the engine model. On older models, the alloys are less stable, so it is recommended to set this indicator to 0.1 mm. On more modern engines, the gap can be set within 0.05 mm.
Large valves in the heads of Ural 650
As you know, the shape of the KS heads of the Ural 650 came from five hundred, so it is somewhat inferior. Has anyone thought about or tried to enlarge the combustion chamber by boring, replace the seats by boring on a mandrel and push the valves in at least 42/38?
the valve was “shoved in”, it seems 40/37 foreign. intersected with RV "under 92"
I had to grind the plates and install reinforced springs. But the heads were new and the saddles were not worn out.
In principle, if you sharpen the seats a little and sharpen the valve, it is quite possible to install 42/38.
Dnepr 40/37 fits perfectly into IMZ 650 heads. Especially with already shuffling saddles, it allows old heads to return a second life.
IMHO, there is no particular need to increase the graduation rate much. 36-37 mm is quite enough for stock volume.
I suggest putting all your energy into the intake tract.
PS. TIT seems to have implanted huge valves, but how they didn’t intersect with each other remains a mystery to me. Only if with a narrow-phase RV, but then what is the point of increasing the flow area of the windows.
IMZ 650 38/35 KMZ 40/37 IMZ 750 41/38mm
nonsense. heads 750 rulez. At the same time, the fastening is like that of people
40/37 Dnieper ones were installed in the old heads, the saddles were loosened by hand. We didn’t notice much of a difference, the RV was standard. IMHO - it makes no sense to increase the valves on a 650cc engine. On the M-63, the intake tract was 25 mm, the carburetor diffuser was 24 mm (k-301), the compression ratio was 6.2, the power was 28 hp, on the M-66 the intake tract was increased to 28 mm, the compression ratio was increased to 7.0 power raised to 32 hp on the M67-36 the intake port was increased to 31 mm, the diffuser to 27 mm (k-301g) and the power was increased to 36 hp, on the IMZ-8.103 the intake port became almost oval 31/35 mm and the carburetor diffuser was first increased to 28 mm (k-63u carbs) and then reduced to 26 mm (k-65t) - this did not affect the power in any way. From my own experience I can say that with K-301 carburetors (24 mm) the engine works much more dynamically, without failures, than with K-301g (27 mm), the same with K-63, 65 carburetors - with a 26 mm diffuser, throttle response and thrust better than with a 28 mm diffuser. For the Urals, traction is much more important than maximum speed, IMHO.
Great excursion. Naturally, I’m not interested in the “pathetic” 650 cc, and not for the 750, not even the 825. There are 750 heads, they’re poppy, not round and they don’t have enough cooling fins, the question is, at least put in 42/38 valves, or better yet 44/38 or 46/40, for pistons at least 88, without grooving the spheres there is no way - the valves will hit each other, the compression ratio will be crazy and the pistons will be dangerously close to the valves. The German made a liter from a 750 IMZ - he relined the stock cylinders, it’s not clear that it’s almost a liter, what was going on with the cooling is also not clear. 2014 will not be the Year of the Liter. I feel it’s time to make my own with Volgov cartridges and such hefty self-sharpened shirts, I’ve already looked at the blank for 200, and the 750e heads won’t look good with them, like the Dneprov ones, with the latter they also bend the rods. Will there be enough meat if you grind the sphere 7 mm in depth and breadth? It’s a shame, but I’ve never held a 650 head in my hands. Mamzelev is silent about such a grooving procedure, but why not, you clamp it by the pin of the lid and use two feeds in coordinates and fine-tuning in volume? The studs will start to tighten, no problem, we’ll weld them and move them where needed, argon is within walking distance.
Why adjustment is needed
To understand why valves are adjusted in the Urals, let’s look at how the engine works with different adjustable clearances:
- With a small gap, especially if the pusher fits closely, low compression is observed. Even on a hot engine there is a gap. In this case, the engine operates unstably at any temperature; on a hot engine, characteristic knocking noises will be heard, and popping noises may occur in the carburetor;
- If there is a large gap on the valves, they do not open completely. At the same time, the combustion chamber is poorly ventilated and is also not sufficiently filled with the fuel-air mixture. This leads to unstable operation of the motor.
If there are strong deviations in the clearances, the engine operates very unstable, to the point of being unable to start. Adjustments are made to avoid these problems.
Sequencing
To do this, use a tool with a thickness of no more than 0.07 mm. The entire procedure should be carried out only on a cold engine, since even slight heating can throw off all indicators. In order to understand the clearance on the valves of a Ural motorcycle, focus on the feeling and the average value of 0.05-0.07 mm. Your dipstick shouldn't fall through, but it shouldn't require much force to push between the valve and rocker arm. Otherwise, adjustment is needed.
- To adjust, you will need to tighten or loosen the bolt located on the rocker arm. Before doing this, loosen the control nut. ATTENTION! These bolts are quite fragile and can easily break if over-forced, so use a comfortable tool and do not overdo it.
- Once the adjustment is complete, reinsert the dipstick. If it fits tightly, secure the bolt with a locknut.
- To check the correctness of the actions performed, after reassembly, start the engine and evaluate the changes in its operation. Excessive clattering and clicking should go away, and the engine should produce more dynamics and speed when driving.
As you can see, valve adjustment is a fairly simple process that all owners of domestic motorcycles have to become familiar with. Those who actively use a motorcycle can make adjustments once every month or two. If you are focused on mileage, in the absence of problems or extraneous sounds, you still need to check the gaps.
Required Tools
Before you start adjusting the valves, you should prepare the necessary tools. First of all, you will need a set of keys. In practice, you will only need one, but it is better to have everything on hand.
The motorcycle valves are directly adjusted using feeler gauges. Depending on the motor model, different probes may be needed. On the M 72 Ural, a thickness of 0.1 mm will be required; for newer engines, for example, IMZ, it is better to use 0.05 mm.
In fact, these are very conditional indicators. There is a small tolerance during adjustment, but under operating conditions of the power unit this does not affect its performance.
You will need to stock up on a small container to catch the oil; it can sometimes spill. Also, a rag will not be superfluous; it can be used to clean the engine from dirt. Let's see how to properly perform this repair.
Pistons and valve springs for boxers
With enviable frequency, questions arise on Opposite: which pistons to choose, is it possible to install Ural ones on the Dnieper or Dnieper ones on the Urals, how to distinguish pistons for 80 gasoline from pistons for 92, etc. and so on. Questions also arise about valve springs - is it possible to install non-standard ones, if so, which ones and how? What can be used instead of weak clutch springs?
This article will help you understand the diversity available.
So, PISTONS.
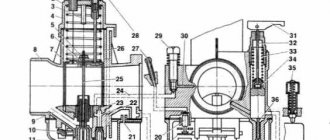
photo 1
Pistons are manufactured using different technologies (photo 1). Usually this is casting (for lower valves, as well as standard Ural and Dnieper valves). There is another technology called isothermal stamping (in common parlance they usually say “forging”, although this is not entirely correct). Both technologies have their pros and cons; In addition, sizes vary, so we will consider all options in order.
We look at Table 1 and Figure 1.
PISTONS FOR M-72 and K-750 are of interest primarily to antique lovers. They are not suitable for use in more modern motors due to the large distance from the pin axis to the bottom and the large mass. The pistons are interchangeable; they are distinguished by the presence of a groove for the second oil scraper ring on the pistons for the K-750 (photos 2 and 3).
STANDARD PISTON FOR 650 CC IMZ ENGINE (photos 4 and 5).
Cast piston with flat bottom, with two oil scraper rings. Provides a low compression ratio, requiring the use of gasoline with an octane number of 76-80. PROS: affordable price, widespread (in case of breakdown, you can find a spare piston or rings in any village), use of inexpensive fuel. Repair sizes available.
DISADVANTAGES: higher coefficient of thermal expansion compared to forged pistons, and, accordingly, a greater tendency to seize when overheated. Poorly resists burnout. Larger weight compared to forged pistons. Wide piston rings create increased friction against the liner, increasing mechanical losses. Losses can be partially reduced by removing the lower oil scraper ring, which will also reduce the weight of the piston. However, it is possible that oil consumption may increase.
STANDARD PISTON FOR 750 CC IMZ ENGINE (photos 6 and 7).
Forged piston with spherical bottom, short skirt and one oil scraper ring. Can be installed on both 750 and 650 cc engines. Provides an increased compression ratio, which requires the use of AI-92 gasoline. The pin is offset relative to the piston axis, which makes engine operation softer and reduces wear on the CPG. PROS: lighter than standard cast. Less prone to burnout. A lower coefficient of thermal expansion reduces the likelihood of a thermal wedge. Thin piston rings reduce mechanical losses in the ring-cylinder mirror pair.
CONS: high price. Low prevalence in spare parts. Use of Hastings rings in rare sizes. A reduced skirt THEORETICALLY could cause increased piston or cylinder wear. There are known cases of pistons burning out in the center when the mixture is very lean. There are no repair sizes.
PISTON MANUFACTURED BY “AUTOTECHNOLOGY”, STANDARD DIAMETER 78 MM (photos 8 and 9).
Forged piston with spherical bottom, standard long skirt, one oil scraper ring. The size of the rings is the same as on a forged Irbit piston. Installed on 650 and 750 cc engines. Provides an increased compression ratio for 92 gasoline. The pin is offset relative to the piston axis. PROS: with a full skirt, it has a mass as small as that of Irbit forged pistons. Exceptionally high quality of material (when struck with a finger it rings like crystal) and processing. Optimal skirt shape (barrel-shaped), providing improved lubrication conditions for the skirt. The price is at the level of Irbit forged pistons.
CONS: it is almost impossible to buy them anywhere other than Moscow. It is believed that the harder material of these pistons may cause accelerated cylinder wear. No repair sizes.
PISTON MANUFACTURED BY “AUTOTECHNOLOGY”, INCREASED DIAMETER 79 MM Piston produced by “Avtotekhnologiya”, increased diameter 79 mm (photos 10 and 11).
Structurally repeats the piston size 78 mm. It differs in the use of standard piston rings from the VAZ engine. PROS: Same as 78 pistons. Easily accessible rings make these pistons ideal for long trips. Some increase in working volume (up to 666 cubic meters). A good option for restoring a heavily worn motor.
DISADVANTAGES: the same as those inherent in pistons for size 78. A slight increase in weight can reduce the maximum engine speed.
I did not have a chance to examine the PISTONS FOR MOTORCYCLES FROM THE Kyiv PLANT personally, so the information is given from a third-party source: motodrive.com.ua The difference between them is in the bottom design and weight. All are equipped with standard opposed rings - 2 compression and 2 oil scraper rings per piston.
The disadvantages and advantages are the same as those of cast pistons for 650 cc IMZ engines.
PISTONS PRODUCED BY “AUTOTECHNOLOGY” FOR DNEPR MOTORCYCLES (photos 12 and 13).
They come with a diameter of 78 mm - for Hastings rings, and 79 mm - for VAZ rings. Forged pistons are structurally similar to the piston for the MT-10-32 engine with a trapezoidal displacer, but with one oil scraper ring. ADVANTAGES are the same as those of Avtotekhnologiya products for IMZ engines: low weight (noticeably less than the lightest cast ones), low coefficient of thermal expansion and tendency to jam, exceptionally high quality.
DISADVANTAGES are similar - low prevalence, concerns about accelerated wear of the cylinders.
I would also like to say something about the pistons with a diameter of 82 mm. The need for such parts is felt by owners of 720 cc Voyages, as well as tuning enthusiasts who want to bore their 650 cc engine to 720, or 750 cc to 825. Factory pistons for the 720 engine cannot be found on sale - “no, son, these are fantastic!".
The solution is to remake the car.
For example, a standard cast piston FROM a VAZ-2112 ENGINE (photos 14 and 15).
Remaking it is simple: make additional recesses in the bottom for the valves, bore the holes and press bushings into the opposite pin with a diameter of 21 mm. PROS: high prevalence of blank parts, ease of alteration. Using common inexpensive rings. Repair sizes available.
CONS: VERY large mass - almost 100 grams heavier than a forged piston with a diameter of 78 mm. Such a mass can negate all other work on boosting: the maximum engine speed will drop, the load on the crank and connecting rods will sharply increase. A cast piston will have a tendency to seize when overheated. Insufficient height of the sphere will reduce the compression ratio, which will have to be compensated by trimming the cylinder.
In short, this option is only suitable for resuscitating a 720 cc engine. It is absolutely not suitable for boosting; you need to look for lightweight, probably forged, pistons as blanks.
INSTALLATION RECOMMENDATIONS.
We install standard cast pistons in accordance with the books: we provide a gap between the cylinder and the piston of 0.08-0.10 mm for the Urals, 0.05-0.07 mm for the Dnieper. We place the piston pin into the piston with a tension of up to 0.0095 mm (for the Dnieper, a gap of up to 0.017 mm is possible).
Forged pistons, despite the fact that they have a lower coefficient of thermal expansion, are recommended to be installed with a gap of 0.08 mm, and for forced engines, which are characterized by high thermal loads, and 0.10 mm. The piston pin should have a sliding fit - that is, lubricated with engine oil, enter the piston when pressed by the thumb, but not fall out under its own weight.
VALVE SPRINGS.
Tuning enthusiasts or athletes often need to increase the stiffness of the valve springs in order to ensure that the valves do not collide with each other or with the piston at high speeds. As an alternative to opposed springs, valve springs from VAZ are usually offered - look at photos 17, 18 and table 2.
As we can see, in terms of dimensions, valve springs from front-wheel drive VAZs are closer to opposed ones, and complete with their upper and lower plates, they easily fit into the Ural heads (valve crackers differ slightly in the angle of the cone, however, VAZ plates work quite reliably with Ural crackers) . Classic springs are somewhat smaller in diameter and length, otherwise they are similar to figure-eight springs.
PROS: the increased stiffness of the VAZ springs reliably protects the valves and pistons from encountering torque, and also forces the valves to strictly follow the cam profiles at high speeds, which expands the operating range of the engine and allows increasing maximum power. Springs can be purchased at any auto store anywhere in the country.
CONS: the load on timing parts increases greatly, causing their premature wear. The ones that suffer first are the camshaft (rear journal) and especially the valve guides. The service life of these parts is reduced to 10-12 thousand km, so installing rigid valve springs is justified exclusively for athletes. Such springs are not suitable for civilian use.
OUTER VALVE SPRING FROM CLASSIC fits perfectly in size as a replacement for weak Ural clutch springs. They are much stiffer (see table 2), which allows you to increase the torque transmitted by the clutch. Usually 2 or 3, less often 4, Ural springs are replaced with classic ones, distributing them evenly. VAZ springs are almost four times stiffer, which ensures an increase in the clamping force of the clutch discs by 2, 2.5 or 3 times, respectively. However, the force on the clutch lever and the load on the cable also increase significantly.
PROS: Serious increase in torque that the clutch can transfer. This will be very useful for athletes and owners of highly accelerated engines, and simply for those who like to throw dirt on devices with a wheelchair drive. Availability of spare parts in any auto store.
CONS: catastrophic reduction in the life of clutch release parts. The cable lasts for a thousand to one and a half kilometers, and the slider and fungus lasts for a couple of hundred kilometers (a deep groove is rolled, after which the bearing crumbles; the only way to deal with it is to replace the ball thrust bearing with a bronze bushing). The large force on the lever greatly tires the hand when driving in the city. Often there is an effect of under-disengagement of the clutch, which makes it difficult to change gears and especially find neutral, making driving in the city very uncomfortable.
In short, another find for athletes, not suitable for everyday driving. With some stretch it can be recommended for use in rural areas with difficult road conditions.
Let me finish here. I hope the information collected will be useful to those who like to tinker with the Urals and Dnieper
VasyaPZ
opposit.ru
Adjustment on M-72 and Dnepr K-750 engines
This work is quite simple, but we will still describe it in detail. Before starting work, the motorcycle should be tilted to the side and a container should be placed under the engine to collect the oil. The settings are made in the following order:
- Using a wrench, unscrew the nut securing the valve cover;
- Drain the engine oil from the cavity;
- We install the piston in the cylinder at the top dead center of the compression stroke. To check the marks, it is worth removing the rubber plug from the engine crankcase. The engine is cranked using a kickstarter;
- Next, the use of the adjustment probe begins. It is used to measure the gap between the rocker arm and the valve. This indicator should be equal to 0.1 mm;
- If the gap is different, then it is worth making an adjustment. To do this, loosen the locknut and tighten the adjusting nut. After this, the locknut is tightened;
- Next, the engine is cranked by the kickstarter one more time, after which the correct settings are checked. If everything is normal, then we assemble the cylinder and move on to another.
This is how the valves on the Ural motorcycle are adjusted; the BSZ on the Izh Jupiter 5 has a slightly different configuration. Therefore, it is worth studying it in more detail.
Motorcycle URAL M67-36 — DRIVE2
They gave me a Ural motorcycle for my birthday. An ordinary Ural M67-36, my same age as I am, produced in 1980, with a mileage of 19,000. The motorcycle was found in the Ryazan region, in a village barn, littered with rubbish, where it stood idle for 20 years. They poured gasoline, put on the battery, and to the surprise of everyone the motorcycle started, but the way it worked, the sounds it made... It was decided to rebuild the motorcycle, without painting. I am completely satisfied with its original paint job; it is in good condition for this type of equipment. It took a year and a half to find spare parts and work.
At this stage, field tests are being carried out, carburetors are being adjusted, the electrics are constantly giving surprises, charging has disappeared, the Saruman ignition is a separate issue, the wires are different from the circuit, find it yourself)
Here is a list of spare parts. A new USSR crankshaft was purchased on Avito. Avtotekhnologiya piston (79mm) for AI92 gasoline Carburetors Pekar K 68. China, on one the needle immediately broke off, on the other the thread was not cut. I did not drill the carburetors. New sample heads. Valves:— Freccia inlet valve— Exhaust valve AE Germany— Ural plate under the VAZ cracker— Freccia guide New flywheel + modified disk from 412 Muscovite. Saruman ignition with optics + camshaft, pushers, bearings, seals, rubber bands , cables, etc.
The box is a new model, with reverse gear, the rear one flies out. We've gone overboard and it's crashing)
www.drive2.ru
Valve adjustment for Ural M-67, IMZ
On this engine the recommended clearance is 0.05mm. Therefore, you will need a probe with exactly this thickness. It also has slightly different saddles, but this does not affect the adjustment process. The motorcycle should also be tilted before starting work. The process goes like this:
- Remove the valve cover and drain the oil;
- Set the cylinder to TDC on the compression stroke;
- Checking the gap. If the distance does not correspond to the norm, then we will use the rotation of the valve stem.
This is how you can easily and quickly adjust the valves. This work is not difficult, but it will avoid many problems with the engine. Also, with properly adjusted valves, flow is reduced.
Valve guides from vases on the Dnieper (Ural)
When I came to the conclusion that the valve guides were Khan, I came to the conclusion that the only alternative was the VAZ ones. Replacement did not cause problems 1- the head needs to be washed (after heating, you can wash off the horseradish) 2- Heat it up, I heated it in the oven of a gas stove (about 15 minutes), if there is an opportunity to find an electric one * (it’s easier with it) 3- Knock out the old bushings (you can buy a mandrel for knocking out, order a turner or make it yourself) a turner I know couldn’t turn it in time and couldn’t buy it (because it’s not available anywhere) so I did it myself )) with an angle grinder from the cylinder mounting stud (if you have a Urals, it won’t work) the main thing is don’t even think about knocking out the bushings when it’s cold!!!! Anyone who says otherwise is simply not technically literate!!! (saw the consequences) only heating!!! knock out the bushings, not with strong blows, with proper heating it is not difficult (heating is also not difficult) 4- VAZ bushings (short from the classics) will become like family ones, if possible, ask
turner to make new grooves for the retaining rings (27mm from the end that looks into the combustion chamber)
this is not necessary, but it greatly simplifies installation. The most important thing is that the bushings are sold as a set, long ones can be sharpened into short ones))) 5- Before installation, do not forget to soak the bushings for 2 hours in engine oil, heat the heads again (15-20 min) and press in new bushings, but not split the bushing (this happened to me) modify your homemade mandrel so that it does not damage the end of the bushing (if you are imaginative, there will be no problems) If you have retaining rings, then relax and hammer in all the way, if not - make a mark instead of them and carefully hammer in 6- After pressing, you definitely need to go through the bushings with an 8mm reamer and you will have to ream the seats, this is not difficult (I can explain in detail), but finding cutters (countersinks) is more difficult and they are expensive (although the process itself will take 30 minutes maximum), VAZ ones are suitable, 90,60,120 degrees, in the MT book it says 15,45,75, but this is the same (I’m shocked) 7- Grind in the valves, the easiest way is to apply paste to the valve, put a fuel hose on it (25cm is enough) and scroll the hose between your palms for a couple of minutes, periodically checking the seat (1-1.5mm should be ground in), if everything seems normal, wipe the paste from the valve and try again, then wipe the paste from the valve and seat and a couple more turn the valve once, if everything is normal, check the valve tightness by turning the combustion chamber to the light and look into the intake/exhaust channel, if you can see the light, repeat the procedure. Wash the head so that no abrasive remains
8- Assemble the head, but place two paranite rings under the springs (this will increase the preload of the springs and better sealing of the valves), feel free to place the seals on the valves and do not believe anyone who says that they will not hold up there and that the valves will not be lubricated. Ceramic metal is porous and oil seeps through the bushing in a volume sufficient for lubrication
My motorcycle (MT 10-36) works fine with these bushings and so far no wear on the oil seals has been noticed, but the oil darkens much later (it hasn’t darkened yet)
If you have any questions, I will be happy to help)))
Alexz
opposit.ru
When is adjustment still needed?
Sometimes the valve seats begin to fit loosely against this cap. Then the valves need to be ground in. After this you need to set the correct interval. Knowing how to grind valves, you can also avoid many problems with the engine. For this work it is better to use lapping devices.
Previous post Modern tuning of Voskhod 3m
Next entry Motorcycle Ural - all modifications