Today, “budget” means of transportation, in particular scooters, are more popular than ever. The most common models on the market are those equipped with small-sized motors, which can be purchased in almost any store.
The popularity of such solutions is explained by their “budget” cost, good build quality and all components. Regardless of the scooter model, all its components, especially the motor, require constant maintenance, which is the key to its long service life.
Among the adjustments that need to be carried out regularly, the process of adjusting the valves causes particular difficulties. Often, many scooter owners do not dare to carry out this operation themselves, fearing due to their incompetence of damaging engine components. However, adjusting valves on bikes with engines up to 150cc is a completely solvable problem for any owner of this “iron horse” who has patience, desire, and also has the necessary keys and tools. Further in the article, the process of adjusting valves on mopeds will be described in detail, where models with 139qmb and 157 qmj engines will be considered as an example.
Why valves require regular adjustment
Many happy owners of absolutely any equipment, be it a bicycle or a car, after making its purchase, completely ignore its needs and requirements, which is fraught with the rapid deterioration of most components, in particular the motor. The main function of the valves is to supply the air-fuel mixture into the combustion tank, as well as to ensure the removal of processed gases.
The valves operate under conditions of constant high temperatures, which leads to expansion of the metal parts of the assembly and their gradual deformation. Frequent expansion of metals during heating, combined with deviation from backlash, can lead to inadequate operation of the valves - the pusher may jam and the valves will stop closing, or significant backlash will arise at the junction of these elements.
When an unacceptable amount of play forms in the intake valve, this prevents the air-fuel mixture from filling the reservoir, since its area becomes much smaller, and then a pusher malfunction is inevitable. When play occurs between the exhaust valve and the pusher, the ventilation process of the cylinder is disrupted. In both situations, the driver will experience a significant reduction in engine power and a number of other characteristics.
If we are talking about a large backlash for this unit, then its main signs will be characteristic clicks, and the consumption will increase significantly. To summarize, we can highlight a list of various signs indicating the need to check valves and their further maintenance:
- The motorcycle or scooter has become harder to start;
- The bike stopped starting altogether;
- During the trip, cases of engine failure occur;
- The scooter stalls when trying to start;
- A drop in engine power, leading to a significant decrease in maximum speeds;
- Characteristic clicks or clattering sounds are heard from the gas distribution mechanism;
- The mileage after replacing the elements of the cylinder-piston group exceeded 500 kilometers.
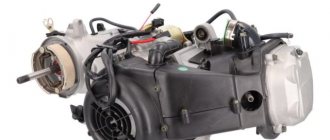
Gas distribution mechanism of the FMB 139 engine
The gas distribution mechanism of the FMB 139 engine is equipped with a camshaft located in the cylinder head. The valves are arranged vertically and V-shaped and are driven by a rocker arm, which in turn is driven by the camshaft lobes. This system is very similar to the Moskvich 412 timing belt, only there is only one cylinder and two valves.
The camshaft is driven by a chain drive. It, in turn, is driven by a gear located on the axis of the generator rotor, which is the axis of rotation of the crankshaft.
When to adjust valves
Advice!
Experts recommend carrying out the first adjustment of the unit and diagnosing backlashes after the first 500 km of motor vehicle mileage, and 5-7 thousand km thereafter.
Service work will also be required when troubleshooting engine problems, characteristic sounds, loss of power during acceleration, or when the bike stalls and it is impossible to start it.
To carry out repair work you will need a minimum set of keys and tools:
- Pliers;
- Crosshead screwdriver;
- A pair of horns for 8 and 9;
- Socket wrench 10;
- Probes 0.05 and 0.1 mm.
Probes
Attention!
The clearances on the scooter valves must be strictly 0.05 for the upper and 0.1 for the lower, so the feeler gauges must be exclusively of the same thickness.
Size of gaps
What I don't like about Chinese scooters is that they don't have any adjustment data. There is information about this on the Internet, but it is not always reliable.
It’s your right to believe me or not, but for my clients I adjust the gaps within the following limits:
- On engines of the 139QMB series (regular Chinese eighties), I set the gap to 0.05 mm - on both the intake and exhaust valves - the same.
- On engines of the 157 QMJ series (ordinary Chinese hundred and fifty) I set the intake to 0.05 mm and the exhaust to 0.07 mm
Preliminary work
Before repair work, the most initial, necessary diagnostics of engine components, inspection of repair accessories, assessment of weather conditions, etc. are carried out. To summarize, the list of preliminary work is as follows:
- The motor of the bike must be cold; it is advisable not to ride it before repairing;
- It is necessary to clean the engine elements from soot and dirt in advance, since dirt can get inside the valves;
- The temperature in the garage (or other place where repair work is carried out) must be above zero;
- The bike is rigidly fixed on the stand or in other convenient ways;
- The necessary set of keys and containers are prepared and are at hand.
How does a scooter carburetor solenoid valve work?
The starting enrichment on a 2t scooter and on a four-stroke moped works according to a fairly simple algorithm. On a cold power unit, the spool needle occupies the upper position. It is responsible for opening the fuel channel, and the position of the damper affects the volume of supplied air. The first revolutions when starting the engine cause a vacuum inside the emulsion channel, and gasoline is sucked into the engine.
The result is a highly enriched mixture, making it easier to start a cold engine. Before reaching operating temperature, the power unit needs to be fed with an enriched mixture.
The enricher in this mode performs the function of a parallel carburetor - fuel entering through the nozzle is mixed with air and directed to the engine.
The current generated by the generator of the running engine is supplied to the contacts of the heater that controls the thermoelectric valve of the intake system. Due to heating, the temperature of the powder drive increases, which causes the rod to gradually extend up to 4 mm. The force is transmitted to the pusher, which ensures the movement of the damper.
The starter enricher on a scooter works according to a fairly simple algorithm.
As the engine warms up, the spool with the needle lowers, followed by the air-fuel channel closing. After five minutes, the damper closes completely and the mixture becomes lean. Now the gasoline enrichment system on a warm engine is regulated by the carburetor.
After stopping the engine, the valve stops heating, and as a result of powder compression, the damper drive using a pusher and rod returns it to its original position. The system is ready for subsequent startup. The cooling and return process takes no more than two minutes. The enricher has a drawback - it works separately from the motor.
As a result, in the warm season, on a hot engine that does not need a rich mixture, the engine, when the thermoelement has cooled, is powered by a rich mixture.
How to adjust valves on a 4t 50cc scooter with a 139qmb motor
After making sure that all preliminary notes have been taken into account, you can proceed to the setup process:
- The seat is disassembled, its upper part is dismantled, and then the whole thing is twisted. Next, you need to remove four nuts in the niche itself, two nuts on different sides of the lock, and a few more nuts that hold and secure the bottom. There are two bolts under the carpet that should also be removed. Once these ten bolts are removed, access to the engine will be available.
- Adjusting the valves involves setting the piston to the TDC (top dead center) position, and therefore the cooler grille will need to be removed. To do this, you need to tighten the nuts on the grille body, after which the cooler opens.
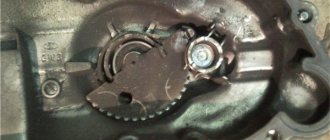
Rotor (cooler) - The next step is to dismantle the cover that covers all valve elements. The cover itself is usually held on by four bolts, after twisting them you will need to unscrew a couple more nuts securing the pipe.
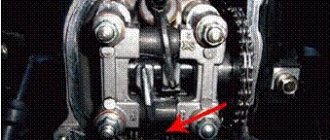
- Now the gas distribution mechanism will open in front of us. There will be several arrows visible on the body indicating the exhaust (lower) and inlet (upper) valves.
- Next, you will need to find such a position of the elements when the piston is located as close as possible to the valves. All calculations are carried out based on the positions of the marks on the generator rotor. Before tuning, you should look at the positions of the holes on the camshaft sprocket - it is necessary that they are aligned similar to those shown in the image below.
- From the camshaft we switch to the rotor, where you will need to find a small mark in the form of the “T” symbol. Having found the desired arrow, install a protrusion parallel to it, as in the photo below.
- This position corresponds to the TDC of the piston, but care should be taken - if there is more than one TDC, for example, as on four-stroke engines, it is necessary that all valves are closed and the holes of the timing sprocket are in the same position as in the photo above. To set the mark to the desired position, use a suitable wrench to turn the handwheel clockwise until the mark and the protrusion coincide. Moreover, if the valves move when the rotor moves, you need to rotate the rotor again to the “T” mark, until the valves stop moving.
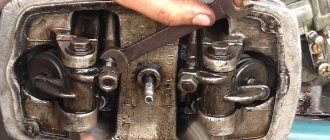
- The next step is to actually adjust the bike's valves. You should have a set of feeler gauges at hand, among which you will immediately need the 0.05th one, which is inserted into the backlash, as shown below. You can loosen the lock nut if the dipstick passes too easily, or, conversely, does not get into position. Now, holding the dipstick with your left hand, you need to rotate the adjustment bolt with your right. It is better for the probe to go into the backlash with some effort. When fixing the feeler gauge in the play, one hand firmly holds the adjusting screw, and the other hand tightens the lock nut. Afterwards, all that remains is to check the play one last time. There are cases when the clearances are immediately lost, to prevent this from happening, you will need to repeat the entire process again until the play is exactly under the feeler gauge 0.05. The same steps are performed to adjust the exhaust valve, but here a 0.1 mm feeler gauge is already used.
Valve adjustment - Once all valves have been adjusted and tightened, their operation should be tested. The test begins with the cooler rotating. After making a few revolutions, you need to again set the mark parallel to TDC, after which the two valves should be in the closed position. Finally, a final measurement of the backlash is made with the same feeler gauge at 0.05.
- After checking, the assembly of all elements begins in the reverse order. It is recommended to tighten all bolts, in particular those securing the valve cover. This is the final step in the valve tuning process on this bike.
To see how to adjust the valves on a four-stroke scooter, see the useful videos:
Iirbis virago (alpha) 110 – question for readers
pivo_msu Actually, here's the story. On the eve of the New Year, I said goodbye to city life and moved to my house outside the city. Naturally, I work in Moscow, and I go to work at least three days a week. In principle, now such trips do not pose a problem, because it is only an additional 50 minutes of time (plus what it was like when living in Moscow on the way from home to work). However, the summer season is ahead, and I, including myself, need to be at work on Fridays. You understand that I will have to go back home through traffic jams “in the name of all summer residents.” So I had the idea to buy a motorcycle, moped or scooter in order to get through traffic jams with less loss of time. The motorcycle has fallen out of favor as a class, because there is simply no time yet to obtain category “A” licenses and the extra money to purchase them. The scooter is not bad, but the maximum speed of 60 km/h can negate all the advantages of maneuverability in traffic jams. But, as it turned out, there are mopeds with an engine, according to documents, 49.9 cubic meters, but in reality all 110. Accordingly, the documents are like for a moped (you don’t need a license, and even after a beer get-together you can go), and the engine capacity is like a light one motorcycle, and a speed of about 100 km/h will suit me quite well. Further analysis of the situation showed that the Chinese company Irbis does such things. It should be noted here that initially I had an extremely negative attitude towards the Chinese automobile industry, which automatically transferred to their motorcycle industry. On the other hand, there is no alternative (documents from the moped plus a low price). So maybe there is an option to try.
At the moment, the price of the issue does not exceed 30,000. In principle, this is the amount that I can afford to spend, roughly speaking, right now, understanding that the price will rise by the season. In this regard, a question for readers - who will advise what? Tasks: I need a light motorcycle with documents for a moped (real maximum speed under my 85 kg + backpack is at least 90 km/h). Price no more than 30,000. Operating conditions: 70% - trips from home to work (100 km one way), in the summer on Fridays, when the car ride is very long. 30% - fishing trips not far from home, but perhaps with excess weight and on bad roads. Estimated annual mileage is 3000 km. Service life is at least three years. Possibilities for self-repair: Hands grow from where necessary (270,000 miles on domestic cars, in all that time I was in the service only twice, and I did everything myself, including replacing and overhauling the engine). But time and reliability are important.
It is important that the moped can be repaired in a day (maximum two) and that either the parts are available or they can be easily replaced with improvised means. And it is important that the “moped” does not break down on the road, or that a certain number of “weak” parts break down, which you can carry with you and replace on the road in 20 minutes
In this regard, who has experience in operating mopeds, “mopeds” and scooters - is such a concept against traffic jams realistic? Is the option with Irbis suitable, or would you recommend other options? This is the “question for the audience” today. I'm waiting for opinions.
Tags: How to adjust valves on an alpha 110cc moped
How to adjust valves on a 4t 50cc scooter with a 157 qmj engine
The process of adjusting the valves on this bike begins with gaining access to the cylinder head. The first step is to remove the container under the bike's saddle, which is secured with several screws. Having figured out how to gain access to the cylinder head, we twist the four bolts and remove the cylinder head from the engine. Next, we get access to the cooler body. On the one hand, if you don’t have time or circumstances interfere, you don’t have to completely dismantle the fan, limiting yourself to only removing the cover. However, it is better to completely dismantle it, since this will provide full and free access to the nodes and marks needed in the future. If you opted for the partial dismantling option, then to remove the plug, which the arrow points to, a regular screwdriver will be enough. The removed plug will provide a minimal overview, allowing you to see all the necessary rotor marks.
After gaining access to the rotor, take a 14mm socket wrench (you can try to do this with your hands, if possible), which is inserted into the generator casing, and, with some effort, rotate the rotor clockwise, while carefully looking into the hole on the casing. It is necessary to set the rotor to a position where the “T” mark is clearly visible in the hole, indicating the position of the piston at the TDC point.
Now we smoothly move on to the gas distribution unit. Please note that at this point all valves should be closed and the holes on the camshaft sprocket should be in the same position as in the case of the previous engine at this stage of tuning, shown in the photo above. If everything matches, you can move on to the next step. If the mark on the rotor does not match the one shown in the photo, then you will need to continue rotating the rotor until the mark is parallel to the protrusion. During the rotation process, we must not forget to carefully monitor the condition of the valves and holes on the star.
At this stage, some motorists may experience certain difficulties - for example, if the same holes on the sprocket do not match. Typically, this situation occurs due to chain stretching. If the discrepancy is small, then this is not a particular problem, and you don’t have to deal with this issue. However, a large discrepancy between the marks in the future is fraught with motor malfunction, and means that it is time to replace the chain:
- The locknut securing the top valve is loosened.
- A 0.05 feeler gauge is inserted under the valve, and the adjustment bolt is tightened with a wrench.
To check the tension, the probe should take its original place with a little effort and be removed almost freely. If any problems arise, the entire procedure is repeated until the desired result is obtained.
- Having finished with the intake valve, we move on to the exhaust valve. To adjust this valve, a 0.1 mm feeler gauge is used. The procedure itself is exactly the same:
- The screw is loosened.
- The dipstick is installed.
- All fastening screws are tightened and the backlash is measured one last time.
- This concludes the tuning of the valves on this bike. All that remains is to reassemble in the reverse order and test the new settings configuration in action.
For more detailed and visual information about adjusting the valves on a similar scooter, watch the video:
It may be noted that after adjusting the backlash, you can also diagnose the carburetor.
Tools
- Small pliers or special wrench
- Open-end wrench 9
- 14mm socket wrench or socket
- Socket wrench 8
- A set of measuring probes, preferably with a pitch of 0.02 mm
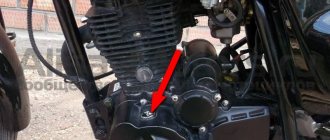
We free access to the cylinder head: depending on the scooter model, we remove the hood or seat tank. We find the valve cover there, unscrew the four 8mm bolts and remove it from the engine.
The valve cover looks like this. In my case, to get to it I had to remove the hood, saddle and seat tank.
After the mark on the generator coincides with the ledge on the engine crankcase, we check what position the camshaft is in. The camshaft should be in a position where both valves are closed. And it gets into this position every second revolution of the crankshaft since it rotates twice as slow.
The correct position of the camshaft is determined by its sprocket. The sprocket should become the large hole facing up, and the small holes and the marks that are knocked out near them should become parallel to the plane of the valve cover connector.
This is ideal, but in practice the asterisk rarely becomes the way we need it. And the chain is often to blame for this - and the camshaft begins to slightly fail to catch up with the crankshaft. If your sprocket has become a little crooked, then by and large it’s nonsense. But if you have it for some reason, then this problem needs to be solved very quickly - otherwise sooner or later the valve will bend.
Once again, check that the “T” mark on the generator rotor is opposite the protrusion, and that the camshaft sprocket is in the correct position. Unscrew the locknuts on the adjusting bolts.
We unscrew the adjusting bolts a little, insert a measuring probe between the valve and the adjusting bolt and, without removing it, tighten the adjusting bolt with our fingers, clamp the adjusting bolt with pliers and secure it with a lock nut.
After tightening the locknut, check how easily the dipstick moves. Ideally, the feeler gauge should move between the valve and the bolt with barely perceptible force.
- If the dipstick moves without effort, loosen the locknut and tighten the bolt a little.
- If the dipstick moves with difficulty or becomes jammed, loosen the bolt.
Communities › Daewoo Matiz Club › Blog › Intake and exhaust valves are jammed! Because of which ?
Hello everyone, please give me some advice! The first time I got into the engine to adjust the valves was at 70,000 miles, they did everything well, but I didn’t notice much of a difference! At a mileage of 83 thousand, problems arose with cold starting, everything is described in detail in my blog, so after starting the engine doubled and ran very unstable, I rushed to change it from the simplest: spark plugs, high voltage wires, both gasoline filters, washed the injectors, distributor cap, nothing did not help ! I went to the service station where they immediately told me that the valves needed to be adjusted, they did it, it turned out that the valves were clamped, the gaps were set to 0.20 and 0.30, but after 3250 km the engine started working unstably again when cold, under warranty they did the adjustment again, again all the valves were clamped! The question is why, is it really the problem with the seats or the valves themselves? As a result, they told me to come and check the gaps after 2000 km! Thank you in advance !
Troubleshooting the scooter's power system
When troubleshooting a scooter’s power system, it is assumed that the central piston group of the scooter is in order and creates sufficient vacuum at the inlet to “draw” gasoline into the combustion chamber, as well as the integrity of the scooter’s crankshaft seals and the spark plug are also in order.
To determine whether gasoline is entering the combustion chamber, the easiest way is to unscrew the spark plug and make sure it is wet. If the spark plug remains dry even after several confident pumpings with the kick starter, you need to go from the very beginning of the power system: find out whether gasoline is flowing from the tank to the scooter’s carburetor.
To do this, remove the gas hose from the carburetor and direct it into some container.
Let's remove the vacuum hose and create a vacuum in it using a rubber bulb or some other method. Gasoline should flow out of the supply hose. If this does not happen, you need to dismantle the tank and find out the reason for the failure of the scooter's automatic fuel valve.
If it turns out that fuel is being supplied from the tank to the tank, the next step is to check the presence of fuel in the float chamber of the scooter carburetor. To make sure of this, you need to unscrew the drain screw at the very bottom of the scooter’s carburetor, next to the fitting with a transparent tube on it. Fuel poured out of the tube - obviously gasoline was getting into the carburetor, the float chamber was filled with gasoline. In this case, most likely, the nozzle is clogged, or the piston jet does not create sufficient vacuum to “draw” gasoline from the carburetor.
The next step is to check the scooter's reed valve located under the carburetor. The reed valve is involved in the distribution of the working mixture, preventing it from flying back into the carburetor during the reverse stroke. If the reed valve is damaged, which is expressed even in slightly open petals, the piston scooter will not start even with a completely new one. However, if this was achieved in some way, for example, with the help of ether, the scooter’s engine will work more or less confidently, but in the future it will still be difficult to start. We dismantle the petal valve. There is no need to remove the oil supply pipes from the scooter carburetor pipe; it is much easier to remove the pipe along with the oil pump (for two-stroke scooters).
By looking at the valve petals in the light, you can diagnose the presence of a gap between the petal and its seat. Such a valve must be replaced, although repairs are allowed in extreme cases. After removing the petals, you can bend them a little
But, attention, this can only be done with your hands! The use of the tool is not permitted! Such a repair can be regarded as a half-measure, since it is obvious that fatigue has already accumulated in the petals, and quite soon the scooter will again experience starting problems, especially when the engine is cold. If we are sure that fuel is flowing into the scooter's carburetor (the jets are not clogged), the reed valve is in order, but the scooter's spark plug is still dry, we can try the following: by removing the scooter's air filter pipe, closing the carburetor channel with the palm of your hand, pump it confidently several times kick starter
The palm should be damp from gasoline. If this does not happen, you should make sure that the scooter’s piston group is creating sufficient vacuum. Even if the compression ratio is in order, the main seals may be damaged, allowing air from outside to pass through, instead of creating a vacuum in the carburetor, ensuring its operation. Damage to the scooter's seals can be diagnosed by the characteristic sweating around them by dismantling the variator and the scooter's generator rotor. If the spark plug is wet, but the scooter engine does not start, it makes sense to first check whether old gasoline is poured into the tank. If not, then there are probably problems with the scooter's CPG or ignition.
See also Carburetor problems.
Author – Lapaev D.A.