On the vast majority of Chinese-made two-wheeled dump trucks, the camshaft drive is implemented by a chain. I don't know what this is connected with. Maybe with some canons of Feng Shui known only to the Chinese... Or maybe this drive scheme was not chosen by the Chinese by chance, but in order to reduce production costs or for fundamental reasons. I don’t know, and I have no particular desire to argue about this.
For me personally, as a person who is constantly involved in repairing this kind of junk, timing chain drive is not a very preferable technical solution. The chain is always a problem. I'll explain why. During engine operation, the chain gradually stretches due to which the valve timing shifts by a significant angle, which at one “wonderful” moment can reach a critical value and the piston, while the engine is running, will hit the valve with all the consequences...
Also, there are often cases when the chain simply breaks or jumps over the teeth or falls off, which in most cases also leads to the piston hitting the valve. In addition, the mere fact that to replace the chain you will have to remove and disassemble the entire engine or, for example, when removing the cylinder head you will have to re-install the valve timing, causes me great irritation.
But time passes, and to my great joy, small-capacity “Chinese” engines began to appear in our area, equipped with a 162 FMJ engine in which the valve drive is implemented by rods from two lower camshafts. Many will say that this scheme is a classic of the automotive industry, and therefore outdated, inert, etc. One cannot but agree with this, but only that this drive is outdated and inert. In everything else, including reliability, durability and ease of maintenance, it has never been and probably will not be equal.
How I made a car trailer with my own hands
Registration of a self-made passenger trailer with preliminary examination turned out to be a solvable task! A self-made passenger trailer is better than a serial trailer! A video about how, having no money to buy a passenger trailer with a high load capacity, I had to use a creative approach and two months later I became the owner of a trailer that I am 100% confident in. Of course, it was not possible to fit into the budget of 100 bucks, but the trailer turned out to have very serious characteristics and it is worth comparing it rather with car transporter trailers. You must understand that a passenger trailer is just an iron cart! Due to ready-made components (trunnions, springs, bearings, coupling devices, shock absorbers, wheels) and simple tools (welding, grinders, drills), it is much easier to manufacture than its wooden ancestor.
Now there is an idea to make a removable living unit in the Teardrop style. I am engaged in the selection of optimal materials for this task.
Homemade tricycle from alpha
Alpha is an inexpensive (especially if you buy used) source material for various modifications that can only be assembled from it.
This time, watch how to make a tricycle with your own hands based on an Alpha motorcycle.
The author considers this modification to be a “drift trike”, the reason is that the rear wheels are used as wheels from scooters with “bald” tires, and the rear axle does not have a differential, and therefore, when making a sharp turn with “gas injection”, the rear part of the tricycle will drift.
The back of the homemade tricycle is made of a 20x40 rectangular profile, the bearings are welded into the frame, and an ordinary iron pipe is used as the rear axle.
Simplicity of design is, of course, good, but often such simplicity leads to fragility. The most dangerous thing is the place where the pipe is welded to the driven star flange; stresses and weakening from the welding are formed here and, after a while, the pipe simply breaks. To avoid this, it is advisable to use bolted fixation of the flange to the recess.
By the way, if you plan to drive off-road, then it is better to use a steel bar instead of a pipe (at metal depots it is sold as a “metal circle”).
The engine is standard, 125cc, and if you try to drive on public roads in such a homemade vehicle, it’s easy to get a fine. With a 49 cc engine, any homemade product is considered a moped and does not require registration, but here you can ride without license plates and lack of technical inspection and everything else that the traffic cop wants to drag in.
The chain had to be installed without tensioners, standard sprockets were used, due to the fact that the wheels on the rear axle of the homemade tricycle are smaller in diameter than the standard wheel of the Alpha motorcycle - the speed decreased and the power, accordingly, increased.
The disadvantage of using used engines is that the situation often happens with them: “yesterday it started, but today it doesn’t.” So before installing such an engine on your homemade product, you should carefully go through the engine, grind the cylinder, make sure that the carburetor and ignition are working correctly, check for compression and the absence of air leaks.
The first trips are the most exciting! It’s always interesting to see how the equipment you assembled with your own hands will perform on a real trip!
The first trips are often associated with breakdowns, all those jambs of the structure that were made during assembly come out.
And here is the same axle failure that I wrote about above! It’s good that the driver managed to control it, although he was pulled into the oncoming lane.
As you can see, converting a budget motorcycle into a tricycle is not difficult, but you need to approach the process wisely and not try to do it in a rush!
Konstantin, DIY tricycle
How to make a motorcycle trailer with your own hands
I present to the readers of the publication my version of a side trailer for a motorcycle. The highlight of the proposed design is the suspension unit. It does not have levers, springs or shock absorbers, which significantly complicate the design and require additional time and material resources. I solved this problem differently - instead of shock absorbers, I installed a spring, which not only provides a sufficiently soft ride, dampening vibrations from road unevenness, but at the same time also acts as an axle.
In the manufacture of the trailer, available parts from motorcycles and scooters were widely used. Thus, the main load-bearing element of the structure, the frame, was “borrowed” from the side trailer of an IZH motorcycle, found in a heap of scrap metal, awaiting its turn to be melted down. Having cut off all the excess, I got a frame with dimensions of 650x800 mm (of course, one can be welded, for example, from water pipes with a diameter of 50 mm). To attach the spring to the frame side members from below, I welded a transverse beam from two corners measuring 35x35x3 mm (or from a channel of a suitable size), which, to give greater rigidity, was connected to the rear cross member of the frame with a spacer made of a pipe with a diameter of 30 mm. I welded a carrier (32 mm pipe) to the beam and the front cross member, and at the front end of it I installed a coupling device—a steering rod from a truck. On the towing motorcycle I attached a swing arm from the same car, into the hole of which the tie rod end is inserted when driving with a trailer.
How to make a scooter trailer with your own hands
Dear visitors to the “ Samadekin Friend ” website, today we will look at detailed instructions on how to make a scooter trailer with your own hands. This scooter trailer is made of aluminum profile, namely its frame and coupling device, an aluminum box with a capacity of 100 liters is used as the body, the total weight of the trailer with payload is about 75 kg, has a registration number plate, backlight, brake light and turn signals . The design is a one-wheel trailer with a rotating coupling device.
Traveling on a scooter is very good; at its low speed you can clearly see the surrounding landscape and fully enjoy the beauty of nature, but the problem is that it is impossible to take a lot of payload with you, but only a backpack on your back. For this reason, it was decided to make a compact and lightweight aluminum TRAILER .
The frame is argon welded from an aluminum profile, a front wheel from a scooter is installed, and an aluminum box is used as a body. The swivel hitch is made from a wheel stand from a grocery shopping cart.
Materials
- aluminum profile
- scooter front wheel
- aluminum box with a capacity of 100 l
- brake light and turn signals
- swivel stand with wheel from a grocery cart
Tools
- argon arc welding
- corner
- hacksaw for metal
- ruler
- marker
- set of wrenches
- screwdriver
Single wheel trailer
It is considered a more convenient variety, but has its drawbacks. For example, the load capacity decreases and the braking distance increases. But there are significantly more advantages, and first of all this is a minimal impact on the handling of the motorcycle. There is only one wheel, which means that when making turns, the trailer will follow all the inclinations and will not delay movement.
Almost all of the models presented are created in the shape of a drop, and the reduced width will be an advantage for the city. Such a trailer is even smaller than the width of the motorcycle, so there will be no discomfort. The capacity is average, approximately 200-300 liters, and the load capacity is limited due to the presence of one wheel - about 50 kg. Externally, a high-quality trailer also excels at a two-wheeled model; manufacturers can paint the body or make it out of durable plastic. Please note that the stability of the trailer will be less than usual, especially noticeable when connecting and disconnecting equipment.
Project “Motortrain”, one-wheeled trailer for a motorcycle
It all started when I got tired of going on picnics loaded down like Eeyore. There is enough space under your feet in the scooter, a lot of things can fit in there, but you have to use the techniques of the fascinating Kama Sutra to ride.
It was decided to make a trailer. The two-wheeled option was immediately discarded, because... When traveling over rough terrain, the load on the motorcycle increases; you have to lay two tracks instead of using one.
A version of a one-wheel trailer was put into work; the idea was borrowed from the Internet. Because There was no pipe bender at hand, so the frame was welded from a square twenty pipe. I invented the bicycle myself, so I first cut the fragments according to the developed drawing, so that later a professional would put it all together. As he later explained to me, everything could have been done simpler, but since your hands are itching, why not scratch them.
After the assembly began, the thought came to me that the creation process should be recorded, darting like a hog behind the camera, I managed to photograph most of the stages
The first photos - a set of scrap metal “crazy hands” began to take on the shape of a product.
Then the swivel hitch assembly was welded, we had to cut off the crosspiece with forks from the Kumovsky Zhiguli driveshaft with swearing and singing
Then I thought about it and decided that the pocket did not have enough reserve and the central jumper was pinned into the frame, just in case, for rigidity
Motorcycle trailer drawings
The spring is assembled from three sheets from a GAZ-51 car (more can be done if desired). The bottom sheet is 900 mm long, the second is 700, the third is 600 mm (with a larger number, each subsequent one is 100 mm shorter), the package is tightened with a central bolt. The spring is attached to the transverse beam of the frame through a spacer measuring 35x70x500 mm made of hardwood with the same central bolt and two stepladders. At the ends of the lower spring there are mounted wheel suspension units made using parts from the IZH side trailer. If they are absent, you will have to resort to the services of a professional turner and turn out the missing parts.
The axle assembly is assembled separately, and only then holes are drilled in it for the mounting bolts in place. The design of the unit is clear from the figure: it is a split bushing in which the axle is clamped and, with the help of two angles and a plate, attached to the end of the spring. Due to the difficulty of drilling it, instead of holes at the ends, grooves with a depth of half the diameter of the fastening bolts are sawn.
The trailer wheels are from the first production Vyatka scooter, the hub is modified from the IZH motorcycle. A wheel that has become unusable is disassembled and the brake drum is cut off from the hub with a hacksaw, or a grinder, or on a lathe (only a shoulder 5-7 mm high is left); there should be no bead on the other side - the wheel will be attached to it. To do this, four holes with a diameter of 10 mm are drilled on the wheel disk. The hub is secured to the axle with a standard nut and cottered.
Adjustment
Preparing for work
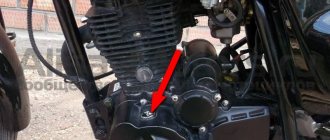
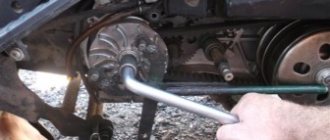
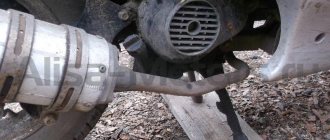
Before starting the adjustment, let the engine cool for a couple of hours or roll it into a warm room if it was left in the cold. Blow dust off the valve cover connector with a blow gun and wipe it clean with a rag. On the left side of the motorcycle, unscrew the plugs on the generator cover - there are two of them.
Remove the valve cover. The valve cover is located immediately under the gas tank and is attached to the head with three 8mm bolts.
Setting the piston to top dead center on the compression stroke
We insert a key or a 14mm socket into the hole in the generator cover and slowly turn the engine counterclockwise (to the left) until the rod actuating the intake valve opens it.
Why is this necessary?
The fact is that this engine does not have marks that show us the position of the camshaft. In turn, the camshaft rotates somewhat slower than the crankshaft and becomes in the position we need: at the end of the compression stroke, when the valves are completely closed - every second revolution of the crankshaft.
Therefore, we crank the crankshaft until the intake valve opens. The intake valve opens at the beginning of the intake stroke, followed immediately by the compression stroke, and after the intake valve opens, we turn the crankshaft to the left until the mark on the generator rotor next to the English letter “T” is exactly in the middle of the upper inspection window in the generator cover. This will be the position of the crankshaft and camshaft we need when the piston reaches its highest position during the compression stroke.
Let's repeat the algorithm again
- Turn the crankshaft counterclockwise
- We control the moment when the rod comes out and opens the inlet valve
- After opening the intake valve, we turn the shaft until the mark on the generator rotor next to the English letter “T” is strictly in the middle of the inspection window of the generator cover.
Adjusting the thermal gap between the valve and the rocker arm
After the piston and camshaft take the positions we need, we take a measuring probe; the manufacturer recommends setting the thermal gap in the range from 0.06 to 0.08 mm for both valves. And we try to insert it between the valve stem and the rocker arm adjusting bolt.
- If the dipstick passes without noticeable force, then unscrew the locknut on the adjusting bolt, tighten the adjusting probe so that the adjusting probe passes between the bolt and the valve stem with barely noticeable force. Once the required force of movement of the measuring probe is achieved, we fix the adjusting bolt with pliers and tighten the locknut. After tightening the locknut, we re-check the gap and, if necessary, correct it in the manner described above.
- If the probe does not pass between the valve and the adjusting bolt, we perform the same actions.
After the final adjustment, turn the engine a few turns with the key, position the camshaft in the position as during adjustment and check the clearance again. If necessary, we make adjustments. Apply sealant to the surfaces of the valve covers and plugs and tighten them in the reverse order.
We continue to make a motorcycle trailer
Next, we build a container for luggage. It is based on a wooden frame and timber with dimensions of 40x40, sheathed with 6 mm plywood, the product is painted in a motorcycle shade (or any other shade of your choice). Trailers with light metal sheathing are too noisy during transportation, especially in difficult suburban conditions, so the choice falls on plywood from the most economical materials. The box has dimensions of 90 by 60 and a height of 55 centimeters. The next stage is the installation of stops, turns, shields, connected using a folder/mother, so that other road users can see the actions of the driver and the dimensions of the vehicle. When we have a ready-made trailer for a moped, we can make a protective awning for covering it with our own hands.
Multi-Task Motorcycle Trailer
A long time ago, my brother wanted an efficient way to deliver newspapers along the road route and maybe also a way to get his two beagles to the dog park on his motorcycle. Side hacks and trailers were discussed, and finally we chose a trailer that fit the bill.
While exploring, we came across a one-wheel trailer. Several of them were for scooters and motorcycles. Lots of good ideas here, some of which were incorporated into my trailer design.
I thought something like this would be great for carrying things while traveling. Now that I'm retired, I seem to have the free time to take longer trips. So, after some thought, some sketching, and some specifications in mind, I contracted with a welder to build my trailer.
Close the hitch point. This high hitch height presented some problems. But I managed with what I had, and there are other trailers that are being lifted successfully. I may have installed the hitch lower after some time. It will take some time to figure out how to fit the hitch attachment into the available space without cutting holes in the plastic. This hitch has been slightly modified since this picture appeared. Some reinforcement was added to prevent the rear fender mounted tongue from bending, and closer tolerance bolts were used to remove any loose play in the fittings. This would allow for some pretty severe trailer wobble without these fixes. But now everything is fine.
In the manufacturer's workshop.
The test is suitable to make sure that it “hangs” normally on the scooter. Placed the pallet on the frame and took an employee size over 200 pounds for a short trip around the parking lot. He almost fell a couple of times from laughing so hard. I'm really surprised how stable this makes the scooter feel.
Close-up of trailer, swing arm. Nice welds!
Checking out what a pet rack looks like and how to make a tail light while still leaving a gap in the doors. Tell me, isn't that a car tire on the back seat of this scooter? …. Why yes, it is!
I decided to upgrade the trailer at a custom bike shop and have the diamond plate work done along with adding a taillight. In the driveway, assembled before wiring and painting were done.
The Honda Reflex rear fender, minibike shock, Honda CBR600RR tail lights and Yamaha Riva front wheel were all cheap ebay finds. The wiring, connectors, and chrome wire sheathing came from a local auto parts store and was relatively easy to install. The rattle can be painted and I also did the final assembly myself.
Nice diamond pad over empty brake drum. Replaced the old open bearing with a new sealed bearing for the axle on this side.
Rubber trim was later added to the hard thin edge of the front mudguard.
My very red 2007 Honda Reflex “Scarlet” pulls a custom “ROAMIN' CHARIOT” single wheel trailer. Just a 200 mile drive in the Thumb area of lower Michigan.
Finally finished trailer and license plate. My trailer was first shown during the annual Woodward Dream Cruise. A 32-mile loop through several cities along spectators and cars on crowded Woodward Avenue near Detroit Michigan. Vehicles of all kinds pass up and down the avenue, tires squealing, enjoying themselves and just having a great time.
This little trailer turns heads wherever it goes! When I was driving, my scooter was pulling a trailer, the guys asked: “What are you hauling with that?” Women and children said: “I want to ride. Can you take me?" I've been tempted several times to say to a few really good looking women, "You know, I could ask you the same thing" LOL!
Part 1 - VALVES
Extraneous sound when the engine is running, gas gaps, unstable engine operation, loss of power - one of the main causes of these ailments is unadjusted intake and exhaust valve clearances.
In order to adjust the valves on the Stels Flame 200, we need an 8 mm, 10 mm wrench, a flat screwdriver and a feeler gauge 0.05 mm thick, as well as an hour and a half of time spent usefully for business =). THE MOTORCYCLE MUST BE COLD! First, you need to prepare the motorcycle - remove the seat from it and move the gas tank (you can skip this operation, I did this to better photograph the valve elements).
The seat is held on by 2 bolts that Chinese engineers hid under the rear fender; unscrewing them causes the seat to be pulled back. The tank is held on by 2 small bolts; after unscrewing them, we also carefully move the tank back; you may need to disconnect the tube from the gas tap BEFORE TURNING IT TO THE CLOSED POSITION!
Remove the engine cover by unscrewing 3 8 mm bolts. 2 on the right and one on the left. After unscrewing the bolts, to make the cover easier to remove, tap it with your hand - it will come off easily.
Now our motorcycle looks like this:
On the left side of the engine, unscrew the inspection window cover with a flat-head screwdriver.
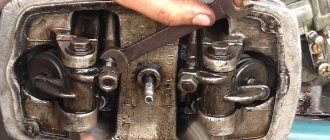
There is a shaft plug under the inspection window; by removing it with a hexagon, you can smoothly rotate the shaft. But we are not looking for easy ways =) The shaft can also be rotated by the rear wheel (in 5th gear it is most convenient) or by a kick starter. Now our task is to position the piston at TDC (top dead center), in English TDP this position corresponds to the shaft mark T|, it is important to know that the piston is at the top dead center during the compression and release cycle. We need a compression cycle, it’s easy to recognize: both valves must be closed, which means the rocker arms will be at the same height (you can look at the photo below where the valves are shown).
So, with God's help, we caught the T| on the compression cycle in the viewing window: Don’t be afraid if it doesn’t work the first time - it will work on the 20th =) we have no need to rush, the mark on the thread of the viewing window should correspond to the mark to the right of the letter “T”, a small deviation is absolutely not critical!
We proceed directly to the adjustment, the clearance of the intake and exhaust valves (the intake is located closer to the tail of the motorcycle, the exhaust to the front) according to the manual should be 0.05mm, but for the exhaust this value is small, it is also worth considering that on a hot engine the clearances increase significantly moto, so 0.05 is still normal for him. Rocker arms are arched metal elements, at the ends of which there are holes into which a pin and nut are screwed in. We need to adjust the gap between the pin and the valve (the metal disk supported by the spring). To do this, unscrew the nut that secures the position of the stud in the rocker arm; now you can lift the rocker arms with your hands and see with your own eyes the gap that we have to set to 0.05 mm.
For this we need a probe
We insert the required feeler gauge into the gap and twist the stud by hand so that the feeler gauge comes out and in with light force, fix the position of the stud with a nut and check the gap - the feeler gauge should not go through at all by 0.10 mm!
We repeat the operation for the second valve and assemble the motorcycle.
After adjusting the valves, my engine sound became cleaner, without extraneous knocks, and now starting when cold is much easier! The valve adjustment operation is effortless and quite simple on this motorcycle - so take the time to do it yourself!
Part 2 - CHAIN
I decided to clean the chain of my Stels because after this lubrication from the can the chain is more like a magnet for dirt.
We note the initial state of the circuit:
In advance you need to purchase kerosene, chain lubricant (I bought gear oil, which was thicker in stock), a toothbrush (you can buy a new one for yourself and use the old one), latex gloves (bought at a pharmacy for 6 rubles per pair).
Using a toothbrush and kerosene, we bring the chain to a new condition, while getting very dirty, swearing, and most importantly, don’t smoke! otherwise you might burn the motorcycle =) At the same time, you can clean the rear sprocket.
After drying the chain, lubricate the O-rings with grease in the required amount, wipe off the excess and be proud of yourself!
Motorcycle trailer
Usually a motorcycle is not afraid of any, even the most distant, distances and any roads. But if you need to transport sports motorcycles to the competition site, for example, you need to either use a truck or a trailer.
The motorcycle trailer is equipped with additional accessories to deliver your equipment in good condition to its final destination.
This usually includes the following devices:
When planning to install accessories on your trailer, be sure to do the following:
Rules for the transportation of motorcycles
Loading a motorcycle is carried out according to certain rules:
If you need to transport not one, but two pieces of equipment, then you need to install two stands. To unload a motorcycle, all actions are carried out in the same way as loading, only the opposite is true.
Homemade cargo trailer for motorcycle
A trailer can be made even at home with minimal use of metal-cutting machines - if you only have a welding machine, an electric drill and bench tools.
Fig.1. General view of a homemade motorcycle trailer:
1 — ball joint; 2 - drawbar; 3 — reflectors (6 pcs.); 4 — body side (plywood, s 16); 5 — wing (steel 15, s2); 6 — FP-132 flashlight; 7 — bracket (StZ, rod 010); 8 — wheel (3.5×18″); 9 — front support mounting bracket (StZ, sheet s5); 10 — front support (steel 15, pipe 20x20x2.5); 11 — electrical connector ONTs-VN; 12 — safety chain; 13 — wing mounting bracket (StZ, strip 40×5); 14 — mudguard; 15 — torsion bar units.
We had to abandon the balancer wheel suspension and use a torsion bar one. It is difficult to make a torsion bar with your own hands, so I took two such units from old BP-65 motorcycle side trailers. I dismantled the collet attachment points to the stroller frame and put plugs in their place, and connected the bodies together with six jumpers. Moreover, the distance of 168 mm between the axes of the torsion bars and the corresponding wheels was found purely geometrically: a perpendicular lowered from the coupling point to the line connecting the points of contact of the wheels of the road surface (with a combined track of the trailer and the tractor) divides it in half; track width is 1100 mm; the displacement of the hitch assembly relative to the trailer axis is 225 mm, and the distance between the center of the hitch assembly and the left wheel axis is 1560 mm. It turned out to be a good rigid bridge.
Fig.2. Diagram for finding the distance between the axles of the trailer wheels.
The welded frame of the trailer, made mainly of rectangular steel pipes, consists of the actual frame of the cargo platform with side posts, a drawbar with a strut and supports to which the bridge is welded, also reinforced with struts. The length of the front and rear struts depends on the side of the trailer - left or right.
Fig.3. Modified torsion bar assembly of the BP-65 trailer:
1 — torsion shaft coupling; 2 — torsion shaft; 3 — connecting rod axis; 4 — flange bushing; 5 - oil seal; 6 — connecting rod; 7 - buffer; 8 — flange bushing, small; 9 — body; 10 — adjusting bolt (3 pcs.); 11 — plug (StZ, sheet s5); 12 — shaft support bushing; 13 — thrust washer; 14 — retaining ring; 15 - oiler.
The body is made of multilayer plywood. Its front and side sides are attached to the racks of the cargo platform with bolts and screws, and the rear (reclining) side is attached to four hinged hinges. Homemade trailer wings are welded from sheet steel and fixed to the frame with three brackets each.
Fig.4. Homemade motorcycle trailer frame:
1 — drawbar (steel 15, pipe 40×4); 2 — scarves (StZ, strip 40×5); 3 — drawbar strut (steel 15, pipe 20x20x2.5); 4 - transverse beams (steel 15, pipe 20x20x2.5); 5 — spar (steel 15, pipe 20x20x2.5); 6 — tailgate hinges; 7 — torsion bar jumpers (StZ, sheet s5, 6 pcs.); 8 — torsion units; 9.13 — support struts (steel 15, pipe 20x20x2.5); 10 — connecting rod of the wheel suspension; 11 — wheel axle; 12 — support post (steel 15, pipe 40x20x2.5); 14 — side posts (steel 15, pipe 20x20x2.5).
The wheels are the same as those of a towing motorcycle, equipped with drum brakes actuated by the foot brake pedal using cable wiring.
The coupling device showed its good side - it is very reliable even when driving on a dirt road with a slightly overloaded trailer.
Making a trailer for a moped is as easy as shelling pears
Owners of mopeds need to remember that traffic regulations prohibit attaching a trailer to their vehicle. But outside the city limits, people often break the rules and hitch trailers, because it is very convenient for transporting vegetables, construction materials and other luggage. At first it will be a little inconvenient to drive with a homemade trailer, but then everything will fall into place.
Materials and tools for homemade work: • medium-sized cart. It should have wheels of about 8 inches and a trailed ground clearance of 30 cm; • a welding machine; • a saw; • a jigsaw; • paint; • a hammer.
Moped trailer manufacturing process:
When all the necessary devices have been assembled, we proceed directly to making the homemade product.
Step 1. Preparing the base
The cart capacity needs to be removed. Then you need to weld a frame from a pipe and a metal corner and attach it to the cart. The pipe will be the trailer's drawbar, and the frame will be a regular square-shaped frame with recesses for the wheels.
Step 3. Selecting and installing wheels
If you have a small budget, you can use the wheels that were on the construction cart. It is only necessary to strengthen the rims and replace the standard bearings with better ones. In practice, such wheels have proven themselves quite well, however, there have often been cases where the tire burst along the tread.
If financial capabilities allow, then it is best to purchase tubeless moped wheels. It’s best to install them right away; sooner or later the cart wheels will become unusable, but these ones will last much longer.
Another trailer option (discussion on the forum https://)
I wish my hands could do such beautiful work. Well done. I also think that a high single-point hitch can be problematic. Here's my setup:
patent pending
cargo / galley / double decker