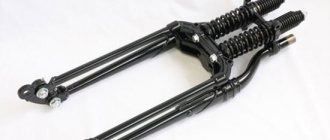
A bicycle fork performs shock-absorbing functions, smooths out shocks, reduces the load on the cyclist’s hands, and reduces wear on the frame and other elements of the bike. Periodically, it needs to carry out repair and preventative measures: applying new lubricant, replacing bearings, oil seals or other worn elements, aligning the steering tube and performing similar work. Before lubricating the suspension fork on a bicycle or replacing worn components, it must first be dismantled and disassembled into elements.
It is recommended to lubricate the oil seals after approximately 700 km, at least every season, and to sort out and treat the entire fork with a lubricant every 4000 km. If the vehicle is operated under conditions of increased exposure to sand and other abrasive materials, its fork will have to be lubricated more often. The need for preventive maintenance or repair of the fork is indicated by: creaks, knocking and other suspicious sounds while riding, jamming, unadjustability, play, turning or difficult movement of the steering wheel, cracks in the pants or legs and other similar defects.
Fork removal algorithm
To dismantle the front fork of an electric bicycle:
- Unscrew all components attached to the fork: brake caliper, speed sensor, V-brake or disc brake hydraulic line, fender, etc.
- Remove the bolts holding the stem to the steering tube. Unscrew the anchor bolt.
- Taking care not to touch the hydraulic line, remove and lower the steering wheel and stem.
- Remove the spacer rings and guide sleeve by carefully prying it up in the cut area with a compact screwdriver. Remove the race ring and bearing located at the top.
- Carefully remove the steering tube from the glass. Remove the bearing and the race ring located underneath. Remove the bicycle wheel by unscrewing the fasteners or loosening the eccentric.
Types of front suspension compression
Compression allows you to vary the rate at which the fork compresses, providing an even ride and smooth damping. On the professional level front fork, compression is available in three options:
- low speed,
- high speed,
- blocking.
The first type of compression stabilizes the position of the bike on uneven surfaces. Softness, accuracy of passing obstacles, comfort - all this is low-speed compression. In fact, its setting is preload, which was already mentioned above.
High-speed compression is responsible for reducing shock loads on the wheel, frame and rider. Slows down the shock absorber on landing, so the bike doesn't bounce.
Nipple for supplying air to the shock absorber
The fork lockout feature allows you to set the fork to 100% stiffness. By setting the suspension to a fixed position, the cyclist rolls the bike onto flat roads. For riding on rough roads, it is better not to lock the fork.
On some air models (for example, Dual Air), you can separately adjust the pressure in both the positive and negative chambers. Excessive compression in the negative part will make the fork excessively soft, and the bike itself will begin to sway while moving.
What and how to properly lubricate the front fork of a bicycle?
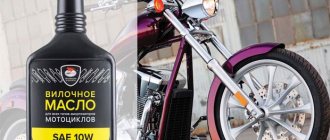
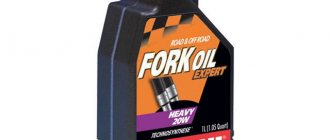
There are various options for lubricating a bicycle spring fork. Litol-24 lubricant is well suited for these purposes. It is intended for use in a wide temperature range (from -50 to +150 °C), does not thicken and confidently copes with its tasks. It is not advisable to pour liquid oils into the fork pants to avoid their dripping, dry operation of the mechanism, jerky functioning of the spring and other problems in the operation of the shock absorber.
In general, the choice of bicycle lubricants is very wide, but they can all be divided into 3 groups:
- Thick (consistent). Reliable and durable compounds that work well in a wide temperature range. But they are not easy to apply and attract dust. Thick compounds are ideal for processing bearings, lever bushings and other slowly rotating components. Popular greases are technical petroleum jelly, lithium, graphite and calcium compounds.
- Liquid. Easy-to-apply products that can be easily poured even into unassembled units. Excess of such products can be easily wiped off. But liquid lubricants change viscosity when the temperature changes and easily drain from surfaces. Industrial oil is used to lubricate a bicycle fork.
- Two-component. Such products consist of thick oil and solvent. They are convenient for processing prefabricated mechanisms. Popular types of 2-component lubricants are silicone, Teflon and wax. The latter requires more frequent updates.
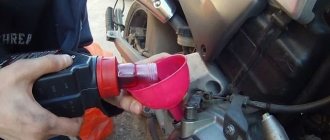
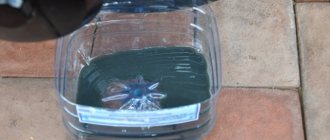
Now let's look at how to lubricate an electric bicycle fork by disassembling it. It is necessary to liberally apply lubricant to the spring, tamping the composition between its rings. Excess lubricant will escape through the hole for the rod and the stuffing box seals. Additionally, you need to apply a lubricant to the grooves of the cuffs and pants. All rubbing elements must be lubricated with a thin layer. Once the lubrication process is complete, all that remains is to assemble and install the fork back.
What kind of oil should I pour into the shock absorber?
Knowing what problems can arise if the fluid in the shock absorber is not replaced in a timely manner, drivers think about which product to buy.
Manufacturers of lubricant mixtures indicate the degree of viscosity on product packaging. The buyer should focus on these indicators, since each region has individual temperature and weather conditions.
Also, when choosing a lubricant, be sure to take into account that the thick mixture is ideal for roads without significant damage. The car loses maneuverability when driving on roads with a large number of potholes and uneven asphalt.
Assembly and installation of the fork after lubrication
To assemble and put the fork back, you need to perform the steps described above in reverse order:
- Install 2 rods on the legs and springs. Lock the adjustments on the fork legs.
- Place the limiters and stops located below on the rods.
- Install seals. Secure the pants to the fork legs. Tighten the bolts.
- Place the assembled fork. Secure the steering stem and other dismantled elements.
- If there are any plays in the steering tube, eliminate them.
After installing the lubricated fork back, grease will leak through the cuff of her pants, and this is normal. Gradually, excess lubricant will come out and its release will stop. But for some time after lubrication, you will have to wipe off any excess applied composition after each rental.
What difficulties may arise
- When inflating a bicycle air fork, if you don’t know the required pressure, and you don’t have a table from the manufacturer’s website. In this situation, it is recommended to gradually pump up the shock absorber and test the fork for stiffness. It should not be tight, and should not sag under your weight by more than 30%. This method cannot be considered very accurate, but it will give the necessary performance of the fork until you get a table and adjust the pressure.
- When specially adjusting the spring load, it is very difficult to turn the knob. This could be due to quite a few reasons. The easiest way to turn is to apply a little force using pliers. Allowing you to fix the lid and turn it, but without fanaticism. The disadvantage of this method is that you can easily damage the regulator cover, which is made of low quality plastic.
How to lubricate an electric bicycle fork without disassembling it?
For complete lubrication, the fork must be disassembled. Without disassembling, you can only clean it using silicone grease or industrial oil. Just drop a little oil where the fork legs enter the pants, press on the handlebars and move up and down so that the oil penetrates deeper. After this, all that remains is to wipe off the excess oil and return the protective boots to their place. After this operation, the fork legs remain almost dry, with a thin layer of lubricant. Dirt sticks to the oil weakly and can be cleaned off without any problems by the anthers.
Varieties
In most cases, the systems are installed at the front of the bicycle and are called a suspension fork. The name speaks for itself: the shock and vibration damping device is located in the part of the frame to which the front wheel is attached. There are several types of front shock absorbers:
- Hard springs.
- Spring with elastomeric damper.
- Airborne.
- Oily.
The first type includes the simplest and cheapest devices. They consist of rigid metal springs built into the legs of a bicycle fork. The springs of such shock absorbers are not supplemented with a damper, which is why they are ineffective when driving over rough terrain. But they are actively used on road bikes for comfort.
Spring-elastomeric shock absorbers include a rigid metal spring and a rubber damper located in the center of the fork tube. This type dampens vibrations much better than the previous one, and can be actively used when driving over small and medium-sized irregularities. A significant disadvantage of elastomeric shock absorbers is the low cold resistance of the rubber damping pin: as the temperature drops, the ability to dampen vibrations is significantly reduced.
Fork and spring-elastomeric shock absorber
Air shock absorbers are highly efficient compared to spring shock absorbers. Air pumped inside the fork is used as a shock softener and vibration damper. Disadvantages: deterioration of the sealing properties of the cuffs and air transmission, as well as the high price of forks.
Oil shock absorbers are divided into two subgroups: oil-air and oil-spring. The “spring” on them is the air pumped into the bicycle fork and a steel spring, respectively. A cartridge filled with oil is used as a damper.
Oil cartridge
Another type of shock absorber is also widespread - rear, which eliminates the residual force effects of the drive wheel. Most of the shock loads still fall on the front wheel, so rear shock absorption systems are used as additional ones. They are similar in design to the front ones. A bicycle with two shock absorbers is called a dual-suspension bicycle.
Signs of dysfunction
In order for the fork to work for a long time, the bicycle owner must perform maintenance on this important unit from time to time.
Necessary preventive work includes:
- applying lubricant;
- replacing seals;
- to align the steering tube;
- bearing replacement.
Lubrication is given special importance. It provides high-quality shock absorption and reduces wear of components. It is performed every 400 km. If the bike is not used so intensively, then this procedure still needs to be performed once a season. Separately, the oil seals are lubricated after 700 km.
These are very average recommendations. It all depends on how you use the bike. If it is used daily on difficult routes, then lubrication should be performed more often.
The service life of bicycle components is shortened by poor-quality surfaces or terrain. It wears out especially quickly when driving on sand and abrasive materials. Experienced cyclists identify fork dysfunction by characteristic sounds. The need for debugging or replacement of dilapidated elements is determined by knocking or squeaking while riding.
In addition, typical wear symptoms include:
- backlash;
- tight adjustability;
- difficult steering movement;
- jamming.
Finally, daily visual inspection can reveal visible defects. If cracks are found in your legs or pants, immediate action must be taken.
Bicycle hub repair and maintenance
For successful subsequent assembly, it is better to repair the hub on a removed wheel, but without dismantling the spokes. The process steps are as follows:
- The cassette is removed from the axle using a special tool (puller or whip).
- The locking ring opens.
- The washers and bulk bearings (industrial bearings) are removed. The main thing is to remember the location of the parts so that you can assemble them correctly later.
- Bearing diagnostics. Defective parts are replaced with new products. If they are not yet worn out, they should be cleaned of dirt using a solvent.
- Complete axle removal.
- Cleaning the housing from dirt. To do this, you should use only a soft cloth, wiping each cavity with it.
- All elements are consistently lubricated. First, a small amount of the substance is distributed along the walls of the housing. Bearings can be lubricated more abundantly.
- The final process of repairing a bicycle rear wheel hub. Reassembly is carried out in the reverse order, including installing the stopper and tightening the fasteners.
When tightening the rear wheel hub, do not use too much force. The bicycle should move freely, and not barely drag.
conclusions
Maintaining a bicycle suspension fork is not an easy procedure, and it is advisable to entrust it to competent mechanics. Their help is especially relevant in situations where the suspension fork is working with certain difficulties, and you need to find out the cause of the problem. But if you have free time, skills and tools, you can perform suspension fork maintenance yourself at home.
In addition, you need to regularly carry out preventive measures - it is recommended to lubricate the fork legs with silicone grease before each rental. It does not harm rubber, does not attract dust, copes with its tasks perfectly and does not cause difficulties when wiping off excess.
Our previous material provides practical advice for beginners and experienced cyclists on how to ride an electric bike to get a new riding experience.
Bicycle pedal structure
The design of bicycle pedals, in their principle of operation, is very similar to the front wheel hub. Unless, instead of spokes, a platform is attached to it under the cyclist’s foot, and on its axis there is a thread with which it is attached to the connecting rod. Therefore, below we will consider what a bicycle pedal usually consists of. But before that, it should be clarified that today on the bicycle parts market, pedals are divided into three (this is not counting the division for different bicycles) main groups: classic, platform and contact.
Classic
One of the most common types of bicycle pedals, having a classic form factor that we could see on old Soviet bicycles. Although modern models have undergone some restyling and have received improvements in terms of ease of pedaling. They are quite reliable (with the exception of the cheapest Chinese bicycle pedals) and easy to maintain. They consist of: a housing, inside of which there is an axle, bearings, a cone, a washer and a lock nut; two linings secured to the sides of the body with bolts; optionally, reflective reflectors may be present. Instead of bulk bearings, industrial ones can be used. Also, the housing for these pedals can be made entirely of plastic, representing a monolithic structure.
They can be used on almost all types of bicycles, from mountain bikes (MTB) to road bikes, although they are very rare on the latter. The only place where their use is not advisable is on stunt bikes, or as they are also called BMX bikes, as well as on freeride and downhill bikes. The latter is due to the fact that during various jumps the pedals experience very significant loads, which they simply cannot withstand.
The advantages include prevalence, light weight (as they can be made of plastic), low cost and ease of maintenance.
Platforms
The form factor of this type of pedal is a monolithic wide platform made of aluminum or magnesium by casting or milling (although some are made from high-strength plastic). In fact, the part body is one whole product, inside which there is also a threaded axle, bearings, a washer and a locknut. They can additionally have reflectors and hook pins screwed into the body. The latter prevent the sole from sliding on the bicycle pedal.
The advantages of this type of pedals include increased strength, which is why they are often used on BMX bicycles. Although they can also be installed on mountain, road and city bikes. Not recommended for road use due to its heavy weight.
Cons: A little more expensive and heavier than classic pedals.
Contact
Clipless pedals are mainly used on mountain or road bikes. Although some bike travelers install them on hybrid bikes. The main difference from the previous ones is the hook, which engages with a mechanism on the sole of specialized cycling shoes. This design allows you not only to push the pedal when driving down, but also to pull it up, which increases pedaling efficiency and reduces the effort expended when rotating the pedals.
Best articles: Bicycle rear hub structure: how to disassemble, assemble, bicycle rear wheel structureBut the complication of the design leads to an increase in the price of this type of pedal, plus it requires additional financial costs for the purchase of special cycling shoes.
We have looked at the main varieties, but we will talk about other types and how to choose pedals for a bicycle in one of the following articles.