Installing the ignition of IZh motorcycles involves adjusting the maximum distance of the switch contacts. And the second most important moment is the spark. On single-cylinder IZh motorcycles with a G-36 M 1 generator, the gap is set by turning eccentric 1 to the right or left, with screw 2 loosened. Before installation, turn the crankshaft and stop for a moment at the maximum contact divergence. In this position, adjust the gap. We set the maximum distance between the contacts to 0.35 mm - 0.45 mm.
It is recommended to set the ignition timing by removing the cylinder head. The piston must be within the dead center distance specified in the manufacturer's instructions. For example, for Planet 3 - (3.5-4.0 mm), Planet 4 - (3.0-3.5 mm), Planet Sport - (3.5-3.8 mm). In this position of the piston a spark should form. Adjustable by turning the entire jackhammer with the 10 bolts loosened.
On IZH-Yu motorcycles, the gaps between the switch contacts are adjusted in the following order: by turning the crankshaft with a pedal start, set one of the switches to the position of completely opening the contacts and, by loosening screw 4 using eccentric 3, set the gap, which should be 0.4-0 .6 mm. Then the gap is set in the same way on the second pair of contacts.
The ignition installation of IZh motorcycles is carried out with the spark plugs turned off. Inserting the dipstick into the hole under the spark plug in the right cylinder and turning the crankshaft using the kick starter, find top dead center and in this position make two marks on the dipstick: one at the level of the hole, and the second 2-3 mm higher. Then crank the crankshaft again using the kickstarter until the top danger reaches the point where the first m t mark was made. In this position, the contacts of the switch installed on the lower base should begin to open. Adjustment of the opening of the contacts is achieved by turning the base with loosened screws 2 and 7, which, having found the opening moment, are tightened. The tensile strength is determined using a light bulb connected to the switch terminal and ground.
After establishing the ignition timing in the right cylinder, proceed with the same operation and in the same sequence in the left one, turning the upper base of the switch with loosened screws 1 and 7.
Ignition Izh Planetka 5: options and adjustment functions
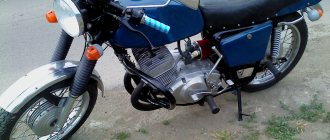
Probably, motorcyclists, despite the enormous selection of modern cars offered by foreign companies, trust Russian brands more. One of the favorite models of two-wheeled vehicles among Russian buyers to this day remains the IZH bike, which was produced at the Izhevsk Automobile Plant from 1987 to 2008.
Ignition of the IZH Planet motorcycle: installing and adjusting correctly
In any vehicle, ignition affects the overall performance of the engine. Moreover, if the settings are incorrect, starting the engine as a whole will be difficult. In this article we will talk about such legends of the domestic automobile industry as IZH motorcycles. How to correctly set the electronic ignition on the IZH Planet 5 motorcycle and what you will need for this - read below.
Installation and configuration instructions
In IZH Planet motorcycles, be it version 3, 4 or 5, the ignition installation in accordance with the diagram must be carried out using the device that came with the motorcycle. But since it is not so easy to find this device today, we will make do with improvised means. Non-contact ignition is configured by adjusting and setting the gap of the distributor contacts. An equally important nuance is the correct setting of the moment of sparking.
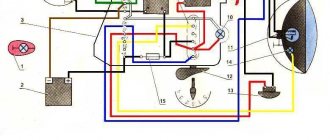
Diagram and designation of parts of the IZH distributor
If your IZH Planet 3 is equipped with a single-cylinder internal combustion engine with a G-36 M generator device, then in this case the procedure for setting the gap is carried out by turning the eccentric, marked in the diagram with the number 1. In this case, bolt 2 according to the diagram must be loosened, and the eccentric itself is turned or right or left. Before setting the BSZ on products from the IZHMASH plant, the crankshaft must be turned. It rotates until the moment of greatest divergence of contacts occurs. It is in this position that the ignition of IZH Planet 5 is adjusted - you need to ensure that the maximum gap on the contacts is around 0.35-0.45 mm.
According to experts, the ignition system should be adjusted with the cylinder head removed. In this case, the piston itself must be located in a position where it does not reach the dead center; to find out what the clearance should be in this case, you need to use the instruction book. For example, in versions 3 this parameter should be 3.5-4 mm, in Planets 4 - from 3 to 3.5 mm, and in Sports versions - from 3.5 to 3.8 mm. It is in this position that the spark will appear. The adjustment procedure in this case is performed by turning the interrupter assembly, while the bolts marked in the diagram as number 10 must be loosened.
Assembly diagram for IL
Adjusting the ignition, in particular, setting the gaps between the contacts of the interrupter device, should be performed in the following order:
- First of all, the crankshaft is turned by the kick starter.
- One of the interrupting elements is set to the contact opening position. In this case, the bolt marked number 4 in the diagram must be loosened.
- Next, using the eccentric number 3, the gap is set; this figure should be from 0.4 to 0.6 mm. After this, the same actions are carried out with the second pair of contacts.
It should be noted that the entire procedure must be carried out with the candles unscrewed. When you place the dipstick in the corresponding hole for the spark plug in the right cylinder, you need to turn the crankshaft with the kick starter. You need to find the top dead center and having found it, you should make several marks on the dipstick - one of the marks should be placed at the level of the hole, and the other should be located slightly higher - about 2-3 mm. After this, the crankshaft must continue to be turned, this is done until the upper mark reaches the position in which the first mark at top dead center was set (the author of the video is Garage in the USSR).
In this position, the elements of the interrupter assembly, which is located on the lower surface, will begin to open. It should be noted that the procedure for setting the contact opening is done by turning the base, but to do this you need to loosen the bolts numbered 2 and 7. And when you can make the adjustment correctly, these screws will need to be tightened. As for directly determining the moment of rupture, it can be detected thanks to a light bulb, which must be connected in advance to the body ground and the distributor terminal.
After the torque on the right cylinder has been set, the same procedure is performed in a similar way only on the left cylinder. In general, the situation is similar, only in this case it is not the lower, but the upper base that rotates, and in this case, bolts 1 and 7 should be loosened.
Golden rules for tuning the ignition on Jupiter: cheat sheet for IZhovodov
Many owners of Izhmash equipment set the ignition themselves. This process is not difficult if you understand the structure of the system and the principle of operation. The article provides instructions on how to set up the ignition on a motorcycle, including the IZ Jupiter 5.
In what cases is ignition adjustment necessary?
During the operation of the vehicle, the owner faces many problems. The most serious failure is related to the engine. In order to spend significant funds on major repairs, it is necessary to monitor the technical condition of the motorcycle and carry out preventive work, including adjusting the valves and valves (video author - Hana Rulyu).
If you do not monitor the SZ, then the motorcycle engine may not reveal its full potential and will not work at full capacity. This can lead to a reduction in its service life. An ignition adjustment is necessary if the engine is running poorly, the muffler or carburetor is firing. True, before setting up the SZ, you should make sure that the cause of the malfunction is in it.
It happens that the flywheel bolt, which connects the two halves of the crankshaft, comes loose, begins to play and does not work well. Sometimes he even cuts the key.
Setting up the SZ may be necessary after repairing the ignition switch Izh Jupiter 5. The installation and connection itself are carried out according to the diagram.
SZ diagram of the IZh motorcycle
Step-by-step guide to installing and adjusting the ignition
To carry out the setup, you need to prepare a special tool, a tester, and a light bulb with two wires. A caliper will be needed as a depth gauge. To set the gap it is convenient to use a special feeler gauge.
Setting up SZ on IZ Jupiter 5 consists of the following steps:
- First open the generator cover.
- To make it more convenient to work, remove the right cover from the crankcase.
- Using the generator bolt, turn the crankshaft clockwise. It is necessary to ensure that the breaker contacts open to the maximum distance.
- Unscrew the screw a little and turn the eccentric. It is necessary to set a gap between the contacts equal to 0.4-0.6 mm. After this, tighten the screw well.
- Rotate the crankshaft in the direction of movement of the clock hand. The piston should be installed at TDC.
- You need to turn the crankshaft in the opposite direction, that is, counterclockwise. In this case, the piston should not reach TDC; a distance of approximately 3.0-3.5 mm should remain. By loosening the screws, you should establish the beginning of the contact closure. After this, the screws must be tightened tightly.
- To determine if the contacts are open, use a test light with wires. One wire must be connected to the breaker hammer terminal, and the other to ground. After turning on the ignition, when the contacts are closed, the light should light up.
- If BSZ is installed on IZ Jupiter, then there is no need to set the gap. To determine the moment you need to use a tester. The device should be set to measure voltage. The probes must be connected to the 2nd and 3rd contacts of the DC. While the modulator is not in the DC, the voltage reading on the tester should be 7 V. At the moment when the modulator is in the DC, the voltage reading should be in the range from 7 to 0 V. At this moment, a spark is formed.
- The procedure must be performed on each cylinder. It is advisable to start adjusting the gap on the left breaker. When the left breaker is configured, you can move on to the right one.
SZ motorcycle IZH
Having learned how to configure the electronic contactless SZ on the fifth model, apply your knowledge to set up the SZ on IZ Jupiter 3.
Ignition Izh Planet 5: features of setup and adjustment
Many motorcyclists, despite the enormous selection of modern motorcycle equipment offered by foreign companies, prefer Russian-made brands. One of the popular models of two-wheeled vehicles among domestic buyers to this day remains the IZH motorcycle, which was produced at the automobile plant in Izhevsk from 1987 until 2008.
The Izh Planet 5 motorcycle, the production of which took place during the years of perestroika, was intended primarily for use on hard road surfaces. The model was equipped with an electronic engine starting system. Therefore, for a long time, the motorcycle was in greatest demand among representatives of the middle income level. At the same time, some motorcycle equipment was manufactured with not quite modern contact breakers, due to which many owners of such “bikes” often encounter problems setting up the ignition of the Izh Planet 5 motorcycle.
How to properly configure the ignition of Izh Planet 5
It is preferable to carry out and regulate the ignition of the Izh Planet using a special tool, which at one time was included in the factory kit of each individual model. But if you don’t have such a tool, you can use a regular caliper.
So, to set up the launch system on Izh Planet 5, you will need the following tools:
- a probe or light bulb operating on 12 volts with two wires;
- depth gauge (vernier caliper);
- special feelers for accurately measuring gaps.
To correctly install the Izh Planet ignition, you first need to remove the cover from the generator. Alternatively, for convenience, you can also unscrew the right cover on the crankcase.
Next, to adjust the ignition of Planet 5, you should perform the following steps one by one:
- turn the crankshaft clockwise until the breaker opens as much as possible;
- loosen the bolt a little while turning the eccentric;
- set the necessary gaps (0.4 - 0.6 mm);
- tighten the bolt again;
- turning the crankshaft clockwise again, set the piston to the TDC mark;
- turning the crankshaft in the opposite direction, place the piston at a distance of 3 - 3.5 mm to the TDC mark;
- loosen the bolts;
- set the beginning of contact opening;
- tighten the bolts again and turn on the Planet 5 ignition.
To determine when the opening begins, use your light bulb.
To do this, you need to connect the light bulb using one wire to ground, and connect the other wire to the terminal. Then you need to turn on the ignition of Planet 5. The engine should start when the contacts open: this will be indicated by a lit light bulb. Having unscrewed the bolts a little, in order to set the ignition on the Planet, you need to turn them all the way (again, clockwise). At this point, the light will stop glowing. Then slowly turn the contacts in the opposite direction again until the light comes on again. At this time a spark should appear. This is how you can adjust the ignition of the Izh Planet.
If your motorcycle is equipped with a contactless engine starting system, then there is no need to set gaps, since the moment of spark formation can be determined using a special tester. In this case, to install the ignition on Izh Planet 5, you will need:
- install the device correctly to measure voltage (up to 20 volts);
- connect the device to the 2nd and 3rd contacts of the Hall Sensor.
How to set the ignition on Izh Planeteka 5 without a micrometer
Ignition configuration on the IZH Planetka 3, 4 and 5 model.
To find out when the opening begins, use a light bulb. To do this, you need to connect the light bulb with wires from the textbook to ground, and connect the other wire to the terminal. Then you need to turn on the ignition of Planet 5. The engine should start when the contacts open - this will be indicated by a burning light.
See:
Having slightly unscrewed the bolts to install the ignition on the Planet, you need to turn them all the way (and clockwise). The light bulb will not shine here. Then slowly turn the contacts again, in the opposite direction, until the light comes on again. At this moment a spark should appear. So, of course, regulate the ignition of the Izh Planetka.
Adjusting the electronic ignition system on Izh Planet 5. How to set the ignition on the Planet?
If you are the owner of an IL, the ignition of Planet 5 electronic type can be adjusted in the following way:
- set the advance angle (3.5 mm to the top dead center mark, in this case the sensor will show a pulse only when the modulator leaves the gap);
- start the engine.
If you are the owner of an IZH Jupiter 5 motorcycle, then you will be interested in an article on setting up electronic ignition on an IZH Jupiter 5
As a rule, this option for setting up the ignition on Izh Planet 5 works without problems. Moreover, as a reserve for installing the ignition on Izh Planet 5, you can use a contact system for starting the power unit.
So, we figured out how to set the ignition on the Planet. With proper adjustment of the engine starting system, your motorcycle will start normally, and you will be able to experience all the delights of driving such a two-wheeled vehicle.
how to correctly set and adjust the ignition on Izh Planet 5 - prg-rb
how to correctly set and adjust the ignition on Izh Planet 5
- I'll correct the mistake. when the modulator is not in the hall, it shows -zero.... and when it is there it shows 7V, that’s when the modulator comes out then there’s a spark..
- First, we need to acquire (make, buy, underline what is needed) a special tool. 1) Tester (12 volt light bulb with two wires or a store-bought one) If you have a BSZ installed, it is better to use this tester device. 2) we need a depth gauge; this could be a caliper, or a special device. 3) Feeler gauges for measuring the gap. We set the ignition on the Planet.
Ignition on IZ Planet. Tips for setting up.
Dear friends, please help me set up the ignition on P3. I've had my brains for about a week now. I've read a lot of smart and other books, but it still doesn't help. I do everything exactly as stated in the article from one forum given below, but the bike does not always start, sometimes when it works, failures appear, as if the spark has disappeared. but he manages to catch it himself. if the motor sits for about 20 minutes, then it is even more difficult to start it, it happens that it simply does not start, but shoots into the pipes (sometimes very loudly). I think the ignition is late. but by connecting the battery to 12V (the bike has 6V), it starts immediately. I have a couple more questions. The article says: “Before reaching the top point by 3.0 - 3.5 mm, the cams should open.” I did the same, looked at the light bulb. but it turns out that by unscrewing the base itself and turning it counterclockwise, the ignition turns out to be in the earliest position. There is simply nowhere to turn further. Please tell me how to fix this problem. I bought a new breaker yesterday. ps-generator on the bike is 6v, if that matters. THANKS IN ADVANCE .
How to install electronic ignition on IZ Jupiter 5
To improve their motorcycle, many drivers install an electronic ignition system on it. Which in turn has a positive effect on the operation of the productive element. Its dynamics are improved, the unit operates much smoother without interruptions. At idle speed, changes for the better will be immediately visible. Also, the converter element will respond better after applying gas to the handle. And starting the engine will not be difficult even with a weak battery charge. That is why most drivers are so willing to purchase electronic ignition for IZ Jupiter 5.
Installation process
It won’t take much time to replace the ignition, maybe a day. The necessary parts can be removed from the Oka vehicle. Electronic ignition is a set of wires, a generator, a two-terminal ignition coil, a Hall sensor and a switch.
There is no need to make any changes directly to the generator itself. You just need to remove the cams and, where there is space, attach a Hall sensor. It is very important that the modulator plate passes through the slots of the sensor itself. Thanks to the modulator plate, smooth ignition operation is ensured.
Unstable sparking is often caused by an incorrect design of the so-called magnetic flux contactor. In this case, you need to carefully study its placement in relation to the sensor. Overlapping of the magnetic circuit or magnet is unacceptable in the open state of the contactor, while the closed state of the contactor implies complete overlap of these two elements. If this is not the case, then most likely the sensor will emit weak signals to the switch. As a result, unstable engine operation will be observed.
To make a modulator you will need a steel disk with a cutout of 0.8-1 mm. It is important to maintain a ratio of closed to open periods of 2:1. The angle of the cutout in the modulator depends on the type of main power unit. If the main power unit is 1-cylinder, then the angle is 120 degrees. On 2-cylinder engines, an angle of 60 degrees is maintained. The width of the cutout starts from 11 mm and more, but not less. You should also know: a spark occurs when the modulator “opens” the sensor. This is very important when setting the ignition timing.
Before installing electronic ignition on the IZH Jupiter 5 motorcycle, check that there are no large plays on the generator shaft. If they are, you should replace the generator bearings in order to get rid of the “bumpiness”.
How to set the ignition?
When setting up the ignition, problems often arise with setting the signal advance angle. A voltmeter will help fix this problem. Looking ahead, it should be said that a device designed for a minimum of 15 V and 10-50 kOhm (internal resistance) is ideal. A voltmeter is connected directly to the terminals. Next, you should bring the piston to the position at which sparking occurs. Then turn on the ignition and turn the modulator until the readings on the device change. You can track the charge on the spark plug by the voltage on the sensor, which should jump. This value is equal to tenths of a volt close to the on-board power supply of the equipment. As soon as the spark is “groped”, you need to fix the position of the modulator directly on the generator shaft. This is usually done with a bolted connection. When adjusting the ignition, constantly short-circuit the high-voltage wires to the frame of the unit. Otherwise, excessive load on the ignition cannot be avoided, which can lead to its failure.
Adjusting the ignition of the Izh-Planet motorcycle
There is no need to tell you once again how difficult it is to start a “planet” with an incorrectly adjusted ignition. There were all sorts of funny things that happened because of a faulty ignition, some people’s sneakers flew high into the sky, some people’s shoe soles burst, sometimes there were even injuries, and very serious ones, there were even cases when the engine started in the opposite direction. All these troubles with the winding claw kicking back into your foot can be avoided if you adjust the ignition timing in a timely manner.
It is most convenient to make adjustments using a special device, which was once supplied by the manufacturer with every motorcycle; those days, as we know, are long gone, therefore, in order not to waste time looking for a device, you can get by with an ordinary caliper.
We begin work on setting up the ignition by adjusting the gap between the contacts of the breaker (0.4-0.6 mm). To do this: turn the crankshaft by the generator rotor bolt so that the contacts of the breaker diverge as much as possible.
Ignition installation for IZH motorcycles
Installing the ignition of IZh motorcycles involves adjusting the maximum gap of the breaker contacts. And the second most important point is sparking. On single-cylinder IZh motorcycles with a G-36 M 1 generator, the gap is set by turning the eccentric 1 either to the right or to the left, with screw 2 loosened. Before installation, you need to turn the crankshaft and stop it at the moment of maximum divergence of the contacts. In this position we adjust the gap. We set the maximum gap at the contacts to 0.35 mm - 0.45 mm.
It is advisable to set the ignition timing by removing the cylinder head. The piston must be located within the dead center distance specified in the manufacturer's instructions. For example, for Planet 3 – (3.5-4.0mm), Planet 4 – (3.0-3.5mm), Planet Sport – (3.5-3.8mm). In this position of the piston a spark should form. Adjustable by turning the entire breaker with loosened bolts 10.
On IZH-Yu motorcycles, adjustment of the gaps between the contacts of the breaker is carried out in the following order: turning the crankshaft with a kick starter, place one of the breakers in the position of completely opening the contacts and, loosening screw 4, using eccentric 3 set the gap, which should be equal to 0, 4—0.6 mm. Then set the gap on the second pair of contacts in the same way.
The ignition installation of IZh motorcycles is carried out with the spark plugs turned out. By inserting the probe into the hole for the spark plug in the right cylinder and turning the crankshaft with a kick starter, find the top dead center and in this position make two marks on the probe: one at the level of the hole, and the second 2-3 mm higher. Then turn the crankshaft again with the kick starter until the upper mark reaches the place where the first mark was made. m. t. In this position, the contacts of the breaker mounted on the lower base should begin to open. Setting the opening of the contacts is achieved by turning the base with loosened screws 2 and 7, which are tightened after finding the opening moment. The moment of rupture is determined using a light bulb connected to the breaker terminal and ground.
After establishing the ignition timing in the right cylinder, proceed to the same operation and in the same sequence in the left one, while turning the upper base of the chopper with screws 1 and 7 loosened.
Izh Jupiter-5 adjustable ignition
This article describes in detail the topic: Izh Jupiter-5 ignition adjustment, but let’s start a little with a preface.
Content:
If now motorcycles from foreign manufacturers predominate on the roads, then literally 20-30 years ago only domestic Izh “Jupiter” and “Planet” rode on our roads. 2 years difference in production, identical appearance, there are not many differences in them, but still Jupiter-5 wins due to its two-cylinder engine and its easier starting.
- Two-stroke, two-cylinder 347.6 engine;
- Air or liquid cooling system;
- Automatic clutch release mechanism;
- Drum brakes;
- 18 wheels;
- The steering wheel has a conventional instrument panel (speedometer, ignition lamp, etc.);
- Two shock absorbers. Setting up the ignition on Izh Jupiter 5 must be done in compliance with all rules. To do this, you need to know the exact algorithm of actions when carrying out this event. Therefore, in this article we will describe in detail how to set the ignition on Izh Jupiter-5.
Setting up contact ignition on Izh Jupiter - 5
Let's take a step-by-step look at how to set up contact ignition on this device:
- Align the piston of the desired cylinder: - insert a screwdriver into the cylinder - rotate the crankshaft while holding the screwdriver
- Take a ruler and place it next to the screwdriver.
- Rotate the crankshaft, holding the screwdriver down with your finger so that it is level. We find a dead point.
- Turn the crankshaft in the opposite direction (1.5-2 mm).
- A spark is generated when the cam opens, locate the two adjusting bolts.
- Take a light bulb with two contacts, connect one to ground, the other to the contact.
- Turn on the ignition switch.
- You need to find the moment when the light comes on (the moment it lights up, the start occurs), and when it goes out, the contact closes on the contrary.
- Turn off the ignition, do and adjust the same with the second cylinder
Ignition adjustment Izh Jupiter - 5
After all the adjustment manipulations are done, the turn comes for an operation called Izh Jupiter-5 - ignition adjustment.
It is better to produce from the following devices:
- Device K-25 - has an indicator head that fits into the holes for spark plugs or bushings and a knob with divisions from the tool
- Lamps 12 V, 2 W - with their help you can determine the moment of opening the necessary contacts of the breakers. The lamp must be connected to ground and the breaker terminal of the corresponding cylinder (for this, lamps with wires are used at the end), on which the ignition timing is adjusted.
Scooter ignition
Ignition from a scooter on the Izh Jupiter can work without a battery. Before setting it up, we need three details:
- Scooter switch;
- Ignition coil;
- Inductive original sensor (must have a single wire output).
The DC switch is powered from a 12 W network, also the on-board network of the motorcycle is 12 W, the switch has 4 wires, the first of which is plus, the second is minus, the third is to the coil, the fourth is to the inductive sensor. We reliably connect the negative wire from the switch to the negative wire from the motorcycle (ground), and connect the positive wire that goes to the standard coil to the positive wire of the switch.
Ignition coil connection:
- We connect the negative wire to the ground of the motorcycle;
- we stretch the second wire to the switch and connect it to the output under the coil
In order not to pull an additional wire to the inductive sensor through the entire engine, you can use the wire that connected the contact group and the standard ignition coil.
To do this, you need to take the wire from the switch that goes to the inductive sensor and connect it to the wire that went to the standard coil. Next, remove the capacitor and connect the inductive sensor. Particular attention must be paid to positioning the generator cover. It needs to be installed properly and not touch anything when rotating.
To do this, you need to shorten the cam a little and also make notches on it that prevent the modulator itself from turning. It is also worth observing the parameters of the gap between the modulator and the inductive sensor, which should be within 1-1.5 mm. When installing the ignition, you need to know that the spark strikes when the modulator leaves the sensor, and not at the input.
Once electronic ignition from a scooter is installed on a motorcycle, its performance will improve significantly. In particular, it will start much better (this will be especially noticeable when the battery charge level is low). Speed gain will also improve noticeably. The motorcycle will idle smoothly, which indicates proper engine operation.