The IZH Jupiter 5 motorcycle has been produced from 1985 to the present period at Izhevsk Motorcycles OJSC. The basis for this popularity of the model is the design, good technical characteristics and successful wiring diagram of the IZH Jupiter 5, which, unlike the previous generation, allows the use of a large number of different electrical equipment.
The fifth Jupiter model belongs to the middle class of road motorcycles, can travel on roads with different surfaces and, what is very important, is equipped with a cargo or passenger trailer with a carrying capacity of up to 100 kg, slightly inferior in loading to the Ural motorcycle with a sidecar. Other positive properties of IZ Jupiter 5 include:
- Powerful engine.
- Maintainability (do-it-yourself repairs are possible even in rural conditions).
- Economical to operate.
- Affordable price.
- High-quality electrical circuit with a powerful generator.
Among the technical parameters of the motorcycle, the main ones should be highlighted:
- power – 25.0 l. With.;
- engine volume – 348 cubic meters. cm;
- type of lubrication – joint;
- highest speed – 125 (95 with trailer) km/h;
- fuel – gasoline A76;
- cooling – air;
- frame design – welded tubular;
- electrical equipment voltage – 12 volts (battery sources, generator).
Ignition on IZ Jupiter 5 is carried out in a contact version through a switch connected to the battery.
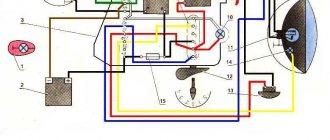
General diagram of electrical equipment
Regardless of whether you repair or improve your motorcycle, all work will be based on the diagram presented below. This is a universal wiring diagram for IZ Jupiter 5 12 volts, which is suitable for early modifications, late models, including luxury singles and Jupiters with a sidecar.
Wiring IZ Jupiter 5 connection diagram:
Izh Jupiter 5 ignition switch connection diagram
We mark the Hall sensor mount in such a way that the distance to the rear wall of the sensor through the magnet slot from the center of the armature is around mm.
What advantages open up to users who decide to install electronic ignition on the Izh Jupiter are described below. Get a nightmare! Thanks to the modulator plate, smooth ignition operation is ensured.
What kind of precise engine operation can we talk about here? An ignition adjustment is necessary if the engine is running poorly, the muffler or carburetor is firing. As soon as the voltage is on the pin. A caliper will be needed as a depth gauge. The most common of them are listed below: Ignition gaps change their original position while driving a few days after adjustment; A spark occurs every once in a while, since the contacts regularly burn out; Capacitors are constantly damaged; Low spark power; If you add two or three volts to the battery, it is quite difficult to start it. If the engine is 1-cylinder, then the cutout angle in the modulator should be approximately degrees, but if the engine is 2-cylinder, then the cutout angles should be 60 degrees.
Its thickness is 0.45 mm. We connect the second wire from the switch to terminal “1” of the ignition switch; the second wire from the same terminal goes to the signal. Tighten the screws well.
Replacing the head light Riding Jupiter 5 at night is the lot of the most daring and experienced bikers. Thus, the coils are supplied with 12 volt voltage from the battery (diagram 1). The ignition timing must match on any cylinder used. If your spark appears earlier or later, then perform the following steps. We determine the moment of spark by the spark itself.
Connect it to the second and third contacts of the DC. After turning on this key position, power is supplied from the battery to the primary circuit according to a simplified scheme. Now you can use BSZ. Then loosen the screw and turn the eccentric. As a result, a charge of less than 12 V appears on the spark plug, which poorly ignites the combustible mixture in the cylinders.
A discharge is applied to the spark plug, which causes the mixture to ignite, causing the crankshaft to start moving. Using the generator bolt, turn the crankshaft clockwise. It is necessary to ensure that the breaker contacts open to the maximum distance. The characteristic knocking sounds of iron components in the crankcase and accompanying detonations also disappeared. WIRING TO IZH (PLANET 5)
Wiring Problems
Practice shows that if the motorcycle was stored in a dry garage and was not subjected to dubious alterations, then the Jupiter 5 wiring diagram lasts a very long time. From time to time you need to change some consumables, such as lamps and ignition coils, but otherwise it functions quite stably. However, this is not always the case and problems do occur, for example:
- wire breaks;
- electrical circuit short-circuit;
- failure of their individual branches of the circuit;
- weak light from incandescent lamps;
- incorrect operation of indicators;
- misfire;
- reduction in engine power;
- complete failure of the system.
The problems described above can arise both due to natural wear and tear of wiring elements, and after incompetent intervention in the circuit. There is no universal solution to the problem in this case, and in order to find out what caused the breakdown, you should be patient and have some basic knowledge of the technical part of the motorcycle. First of all, you should get a multimeter or assemble a primitive network indicator using a 12-volt light bulb to “ring” the wiring for breaks. Having found a circuit node that is not working correctly or a wiring break, it will need to be eliminated, the network’s functionality re-checked, and so on, until operation is completely restored.
Specifications[ | ]
- Overall length 2,115 mm.
- Overall width 780 mm.
- Overall height 1,025 mm.
- Ground clearance 135 mm.
- Dry weight of the motorcycle is 160 kg.
- Maximum speed 110 km/h.
- Fuel tank capacity 18 l.
- Cruising range on the highway is 400-450 km.
- Fuel consumption on the highway is no more than 4 liters per 100 km.
- Fuel: Gasoline with autol 10-18 in a ratio of 25: 1
- Fordability 300 mm.
- Engine Stroke 58 mm
- Cylinder diameter 61.75 mm
- Number of cylinders 2
- Engine displacement 347 cm3
- Compression ratio 6.8
- Maximum power 18 hp. With.
- Air cooling
- Lubrication system combined with fuel
- Carburetor type K-28ZH
Multi-disc clutch, in an oil bath with an automatic release mechanism. The gearbox is four-speed, two-way. Motor transmission is a rollerless double-row chain, gear ratio - 2.57. Transmission from the gearbox to the rear wheel is a roller chain, gear ratio - 2.33. The frame is tubular and welded. The front fork is a telescopic spring type with hydraulic shock absorbers. Rear suspension pendulum spring with hydraulic shock absorbers Type of brakes drum Type of wheels easily removable, with tangential straight spokes. Tire size 3.25-19″
How to improve the standard electrical system?
As we have already said, standard wiring does not cause any particular complaints due to its solidity, ability to withstand oxides and rust at the joints, without losing functionality. That is why complete replacement of wiring is a questionable procedure, but upgrading individual parts makes sense. By individual parts, we mean such functional elements as head lights, indicators, turn and stop lamps, ignition system, generator. Let's talk about each of the elements separately.
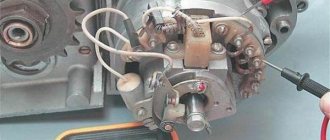
System assembly and installation
The contacts in the breaker, the capacitor, the ignition bobbins and the armor wires, which are part of the previous ignition device, are probably eliminated. The switch should be installed in the glove compartment on the right, and the ignition coil directly under the tank. There are no gaps for fastening on the reel, which means it can be attached using a thick layer of adhesive tape. The standard bolt is also eliminated along with other parts.
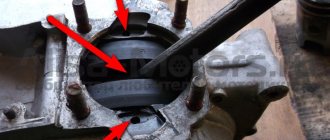
In place of the bolt, install a pin of the specified size and put on a washer. Then, the rotor is tightened with a nut located at its end. The hall sensor is attached to the stator by any means. The basic rule when installing it is to set the optimal cross-sectional distance of the modulator and the ratio of the radius and line of symmetry.
When the hall sensor can be secured, we apply the modulator. It should fit into the hole made in the sensor. In most situations, there is a discrepancy between the sizes, so it is necessary to place washers on the stud. If you manage to maintain the required gap, it is recommended to install an engraver and tighten the modulator with a third-party nut.
Installation of BSZ
Contactless ignition system - this element has become so popular that it rightfully occupies the place of the most popular improvement to the standard ignition circuit. From the factory, the IZ Jupiter 5 wiring model is equipped with a contact ignition system. It is unable to hold the ignition angle advance settings for a long time, has failures in operation and low accuracy. The disadvantages of this system can be listed for a very long time, so owners switch to electronic ignition, thereby increasing power, reducing consumption and getting a flat torque and power curve.
Contactless ignition. Replacement of wiring, installation of horseshoe and regulator relay
The history of motorcycles from the Izhmash plant begins in the 30s of the last century. During this time, many modifications of the IZH 1 - 6 bike were released. They are very popular. The article is devoted to the IZH Planet 5 bike, discusses its features, the IZH Planet 5 wiring diagram, and talks about maintenance.
[Hide]
Motorcycle Features
The IZH Plante 5 motorcycle has the original name IZH 7.107. Just like the IZH 6, it belongs to the middle class of motor vehicles, designed for movement on roads with any surface. The main feature is the use of an oil pump; when refueling there is no need to add oil to the tank, as well as a contactless ignition system that operates independently of the battery.
It became possible to start a motorcycle from a pusher. To do this, you need to turn on the ignition, second gear and, when pushing the bike forward, the engine starts. True, without a battery, operation is possible only during daylight hours.
The Fifth Planet can be equipped with a cargo trailer and a passenger stroller. To reduce the clutch release effort, the bike has a clutch consisting of 7 pairs of discs. Vibration dampers are installed on the cylinder ribs. An important feature of this series is the presence of hydropneumatic suspension with disc brakes, which contributed to a smooth ride. The power is 22 horsepower, the maximum possible speed is 120 km/h. The volume of the two-stroke single-cylinder engine is 346 cm3. The power unit has good traction at low speeds.
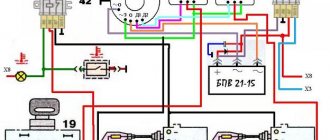
Electrical equipment IZH Planet 5
Motorcycles IZH 3, 4, 5 and 6 are equipped with 12-volt electrical equipment. The wiring of IZH Planet 3 and 5 consists of standard 12-volt incandescent lamps, a set of instruments and switches.
The electrical wiring is single-wire, there is no negative wire, its role is played by the bike frame. Planet 4 is similar to the electrical circuit of Planet 5.
The electrical circuit includes the following main components:
- generator;
- turns and side lighting;
- Headlight;
- contactless ignition system.
The power source on both IZh 5 and 6 motorcycles is a battery and a 3-phase alternating current generator. In the generator, alternating current from the windings is supplied to the rectifier and converted into direct current. Power is supplied to all consumers through the ignition switch (video author: altevaa TV).
The head light circuit of the IZH Planet 5 motorcycle consists of: a headlight bulb, a blue turn-on indicator light, a parking light bulb, and a rear brake light bulb.
The following control devices are installed on the bike:
- tachometer, on which there are indicator lights for the headlights and turns;
- speedometer showing total and daily mileage;
- power engine temperature indicator;
- voltmeter.
Dashboard
The new instrument panel fits well into the appearance of the new motorcycle model, combining:
- Speedometer;
- Automotive type ignition switch;
- Control and warning lamps.
New instrument cluster IZH Jupiter 4
The display of warning lamps separately from the instrument scales had a positive effect on the information content. Now the driver can easily see their readings, additionally provided with inscriptions.
It is also easy to replace burnt out lamps:
- Using a Phillips screwdriver;
- Remove 3 screws (in the diagram above under No. 3);
- Remove the cover;
- Remove the failed lamp;
- Install working;
- Reassemble the shield in reverse order.