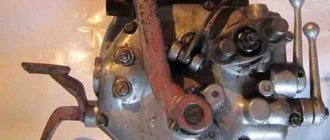
Disassembly
For disassembly it is necessary to remove: — the clutch release rod with the release bearing parts; — starting lever; — a disk with two fingers of an elastic coupling of the cardan transmission from the secondary shaft; — right crankcase cover with manual speed control lever; - fork guide shaft; - shift forks; — unscrew the screws of the front cover; - after this, alternately hitting the primary and secondary shafts with a copper hammer; — remove the front cover with shafts and gears.
If necessary, disassemble the mechanisms: - disengaging the clutch; — foot switch; — manual switching; — gear shift forks; - launcher; - a cover with shafts and gears of constant mesh.
When disassembling the clutch release assembly, you should pay attention to whether there are any traces of crushing or twisting of the square end of the rod, whether the felt seal of the rod is damaged, whether the cylindrical end of the rod rotates freely and without jamming in the tip, whether the thrust bearing balls are falling out of the separator, whether the rubber ring (clutch slider seal).
Pay attention when disassembling the foot switch. For wear, crushing and breaking off the working edges of the pawls and the teeth of the selector sector. For jamming of the spring when compressed in the countersinks of the pawls. To loosen the return spring thrust screws, and also check whether the lever or the axis of the foot shift lever is bent and whether its finger is worn out, and whether the seals are in good condition.
When disassembling the manual speed control. It is necessary to make sure that there are no cracks in the place where the sector is welded to the roller and that there are no scuffs on the working surfaces, and also check whether the shift sector oil seal is in good condition and whether the shift lock ball is not stuck.
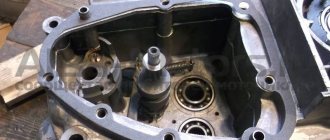
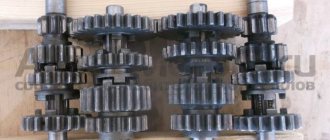
It is not recommended to disassemble the cover with rollers and constant-mesh gears unless clearly necessary, but you should only make sure that the gear teeth are in good condition, that the movable couplings are reliably engaged with the constant-mesh gears, that the movable couplings are easy to move and that the gearbox bearings are in good condition.
Return to contents — ↑
Removal and repair of Ural motorcycle gearbox
To remove the gearbox without unscrewing the motor, you need to do the following:
- Remove the rear wheel from the motorcycle.
- Remove the cardan drive.
- Remove 1 bolt and 3 nuts securing the gearbox to the engine.
- Then the gearbox can be pulled out of the motorcycle frame and you can begin to inspect it.
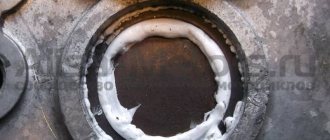
Repairing a Ural motorcycle gearbox involves replacing worn gears, followed by adjusting the gear shift mechanism. You should also pay attention to the seals - their wear will cause oil leakage, as a result of which the Ural motorcycle gearbox will operate in conditions of insufficient lubrication.
Fault Inspection
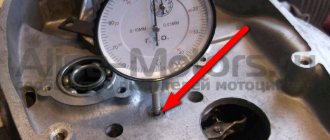
When inspecting the parts, you should check the ease of movement of the forks along the rod. Condition of fork stays and ring grooves in movable couplings. The amount of axial movement of the forks in the groove of the engagement couplings.
The following malfunctions may occur in the trigger mechanism: - wear, crushing or chipping of the pawl; — jamming of the pawl pusher; — breakage of the pawl spring; — bending the ends of the return spring of the starting pedal; — damage to the working end of the buffer pin; — cracks in the starting lever; - wear of the oil seal.
Return to contents — ↑
List of models [edit | edit code]
Road motorcycles [ edit | edit code]
- IMZ M-72 (1940-1961) - the first motorcycle of the Irbit plant, a copy of the BMW R71, was modernized throughout its production, the latest model even received a short-lever fork and aluminum wheel hubs;
- IMZ M-52 (single) (1950-1957) - a model with the chassis of the M-72 and a 500 cm³ engine. Only a limited edition of 678 motorcycles was produced;
- IMZ M-61 (1957-1963) - a transitional model with the chassis from the M-72 and a new engine (650 cm³), the travel of the front fork and rear suspension has been increased. The front fork has been changed. The crew section has been lightened;
- “Ural” M-62 (1961-1965) - new gearbox, increased suspension travel, automatic ignition timing introduced, camshaft cam profile changed to reduce wear. The steering has been changed (chain throttle and duralumin clutch and brake levers);
- “Ural-2” M-63 (1963-1971) - a frame with a pendulum suspension of the rear wheel on spring-hydraulic shock absorbers (later a similar suspension was introduced on the sidecar wheel), ground clearance was significantly increased due to the introduction of a new exhaust system.
- “Ural-3” M-66 (1971-1975) - the engine was significantly modernized, the power increased to 32 hp. With. Engine durability has been increased due to full-flow oil purification and the use of a new crankshaft design. The motorcycle has direction indicators and new lights;
- "Ural" M-67 (1973-1976) - twelve-volt electrical equipment was used. The design of the motorcycle frame has been changed;
- “Ural” M-67-36 (1976-1984) - due to changes in the design of the cylinder heads, the use of K-301G carburetors with an increased diffuser diameter and an increase in the diameter of the exhaust system, the engine power was increased from 23.5 to 26.5 kW. (36 hp). The right turn signal on the motorcycle itself has been removed.
- “Ural” IMZ-8.103-30 (1985-1986 [ source not specified 2336 days
]) - the frame and rear suspension, optics, electrical equipment were modernized, a brake was installed on the sidecar wheel, instead of two mufflers, one was installed on the right side; - “Ural” IMZ-8.103-10 (1987-1994) - differed from the previous model by the presence of reverse gear, slightly lighter weight, noise and fuel consumption;
- “Ural” IMZ-8.103-40 Tourist - equipped with a lever front fork;
- “Ural” IMZ-8.123 Solo - a single unit based on the IMZ-8.103-10, engine power 40 hp. pp., 18-inch wheels;
- "Ural" IMZ-8.1037 GEAR-UP;
- "Ural" IMZ-8.1243 Voyage;
- "Ural" IMZ-8.1024 Cobra;
- “Ural” IMZ-8.1238 Wolf (1999-2011) - a motorcycle in the chopper style [3] [4] ;
- "Ural" IMZ-8.1036 Retro
Sports motorcycles [ edit | edit code]
- M-35;
- M-52S for road racing;
- M-52K for cross-country competitions;
- M-61K for cross-country competitions;
- M-62K for cross-country competitions;
- M-75M;
- M-76;
- M-77 for road racing.
- M-80;
- K-1000 for cross-country competitions;
- “Cross” IMZ-8-201 for cross-country competitions.
Gearbox assembly
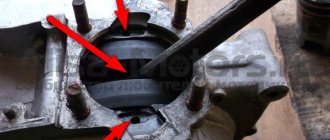
Reassembling the gearbox follows the reverse order of disassembly. First, the trigger shaft assembly with gear is installed into the hole in the rear wall of the crankcase. Then place the crankcase with the front hole up; after that, placing a paper gasket, insert the primary and secondary shafts assembled with a cover and bearings into it and press them into the rear wall of the crankcase with light blows of a hammer. Then the trigger shaft is put in place.
When installing the front bearing sleeve of the trigger shaft, it must be turned counterclockwise so that the spring is sufficiently wrapped and the starting pedal is sharply thrown back to its original position until it stops against the spring-loaded buffer rod.
After this, the parts of the gear shift forks, manual and foot shift, thrust bearing and rod are installed. After assembling the box, it is necessary to adjust the operation of the foot switch.
Similar articles:
- Adjusting the K-52 carburetor of the Ural motorcycle
- Carburetor repair
Return to contents — ↑
Messages [1 to 20 of 40]
1↑ Topic from olegich 10-12-2012 22:57:12
Topic: please help me how to properly remove the box from the Urals without removing it from the motorcycle
Explain to a beginner how to remove the gearbox from the Urals without removing the engine from the motorcycle
Edited by olegich (10-12-2012 22:57:48)
2↑ Reply from mexanik62 11-12-2012 10:32:54
Re: please help me how to properly remove the box from the Urals without removing it from the motorcycle
Place it on the center stand Remove the rear wheel Remove the final drive Remove the fork Remove the elastic coupling Remove the clutch lever and whatever else you can remove from the clutch Remove the box just don’t forget about the clutch rod
3↑ Reply from olegich 11-12-2012 14:17:31
Re: please help me how to properly remove the box from the Urals without removing it from the motorcycle
Place it on the center stand Remove the rear wheel Remove the final drive Remove the fork Remove the elastic coupling Remove the clutch lever and whatever else you can remove from the clutch Remove the box just don’t forget about the clutch rod
how to remove main gear
Added: 11-12-2012 10:17:31
and you can remove the box without removing the main gear
4↑ Reply from mexanik62 11-12-2012 15:02:59
Re: please help me how to properly remove the box from the Urals without removing it from the motorcycle
Unscrew 2 or 4 nuts (depending on who) securing it to the fork leg
you can remove the box without removing the main gear
It is necessary to remove the engine mounts and move it forward (remove the silencers naturally)
5↑ Reply from [Leshy] 11-12-2012 15:58:14
Re: please help me how to properly remove the box from the Urals without removing it from the motorcycle
Unscrew 2 or 4 nuts (depending on who) securing it to the fork leg
you can remove the box without removing the main gear
It is necessary to remove the engine mounts and move it forward (remove the silencers naturally)
Why unscrew the divglo? I’m on the Dnieper 10, in my opinion, I removed the box without unscrewing the engine, you just unscrew the box, and then you’ll figure it out) and also, to pull it out, the platform on the battery is bent a little, and there will be a small problem with the clutch) but not It’s difficult, I took it off in about 30 minutes) you’ll figure it out
6↑ Reply from VlAiSLAV 11-12-2012 19:20:29
Re: please help me how to properly remove the box from the Urals without removing it from the motorcycle
Unscrew 2 or 4 nuts (depending on who) securing it to the fork leg
you can remove the box without removing the main gear
It is necessary to remove the engine mounts and move it forward (remove the silencers naturally)
Why unscrew the divglo? I’m on the Dnieper 10, in my opinion, I removed the box without unscrewing the engine, you just unscrew the box, and then you’ll figure it out) and also, to pull it out, the platform on the battery is bent a little, and there will be a small problem with the clutch) but not It’s difficult, I took it off in about 30 minutes) you’ll figure it out
on the Dnieper it is on the Dnieper. here the Ural won’t roll with it, there’s a little less space there, so you have to push the engine forward a little
7↑ Reply from Shaman 11-12-2012 19:22:50
Re: please help me how to properly remove the box from the Urals without removing it from the motorcycle
in the Urals it can also be removed without unscrewing the engine
8↑ Reply from partizan 11-12-2012 19:50:37
Re: please help me how to properly remove the box from the Urals without removing it from the motorcycle
Olegych, the main gear means the gearbox (the one that turns the rear wheel). in the Ural, everything can be removed just as easily: you take off the wheel (rear); unscrew the brake rod from the lever on the gearbox; unscrew that same gearbox (main gear); disconnect the speedometer cable from the box; take off the clutch cable; unscrew three nuts and one bolt (fastening box to the block); you move the box back, while kicking it slightly to the bottom - it jumps out! The most you can resort to is a large screwdriver or a mounting tool so you don't have to pull it with your hands. GOOD LUCK!
9↑ Reply from olegich 11-12-2012 22:28:06
Re: please help me how to properly remove the box from the Urals without removing it from the motorcycle
I'll do it in the spring, but right now I'm doing the general
Added: 11-12-2012 18:28:06
And after I take it all off and then put it back, nothing will need to be adjusted?
10↑ Reply from mexanik62 11-12-2012 22:30:12
Re: please help me how to properly remove the box from the Urals without removing it from the motorcycle
Clutch and brake
How to check the starter retractor relay: video and description
First of all, diagnostic work should begin with checking the starter. To carry out the check, one turn of the key in the ignition is enough. If the device does not work, you will hear characteristic clicks, which confirms that the element is faulty.
Next, you should bridge the contacts, which are represented by two copper bolts located on the relay cover. If the device starts to spin, then most likely the solenoid relay needs to be repaired.
At the same time, another option is also possible. In this case, disconnect the starter
It is important to do everything extremely carefully, because the rotational force of the mechanism is relatively high, so the likelihood of injury is quite high
After completing the dismantling procedure, we place the part on the ground. Using a wire, we connect the contact terminal with the positive one, as well as the ground of the starter with the ground of the battery. After such operations are completed, you should see the relay start up, which is accompanied by a characteristic clicking sound. If the relay activation is not detected, we begin to inspect the contacts - most likely, they are slightly burnt.
Another symptom is a characteristic click from the ignition system, but the starter never starts working. Finally, a sign will also be the mechanism running idle after the key is turned. At the same time, we see that the engine has not started.
If you don't know how to check the operation of the starter relay, the video on our website will help you figure it out. In it you will find a detailed description of how exactly to carry out a comprehensive diagnosis of this unit.
Features of installing an additional relay on the starter
To install a relay on the starter, you will need:
- wires 1.5 mm2;
- flat female connector - 5 pieces;
- flat male connector - 1 piece;
- 4-pin relay with metal. ear (from 30 to 40 A);
- 2 ring tips for 6 and 8 mm.
Having secured additional relay at a convenient point for you, connect the wiring to the starter. Pull off the red wire from the flat input of the traction relay and insert the “folder” with the wire of the new relay into the connector. Place a wire with an 8 mm tip onto the + terminal and tighten it with a nut. And put the wire from contact 30 with the “female” onto the free contact. Tighten the new and standard wires with a clamp. Then screw the short wire from the new relay to ground. After finishing the work, be sure to hide all the wiring in the corrugation to protect them from moisture.
What is the design of the gear-six starter?
The VAZ 2106, produced after the 1980s, has a starter with an end manifold model 35.3708. Earlier cars from the Volzhsky plant had a different gear mechanism installed - ST-221, which was equipped with a cylindrical manifold. Their structure is approximately the same, so they are completely interchangeable.
Let's take a closer look at the design of the mechanisms that interest us, using model 35.3708 as an example. The “six” gear starter consists of the following main parts: