Setting the timing belt on a delta moped
1. Install a new cylinder head gasket.
ATTENTION!
The cylinder head gasket is made of soft metal (copper, aluminum) and after tightening the cylinder head nuts it is deformed, thereby ensuring a tight connection. Reinstallation of the cylinder head gasket is not permitted.
2. Install the timing chain guide.
3. Install the cylinder head.
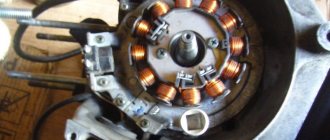
4. Set the piston to TDC according to the marks on the flywheel. This is usually the "T" mark on the flywheel. Align the mark with the tide on the engine crankcase.
ATTENTION!
The following operation is one of the most important when assembling the engine. It is important to align all the marks very accurately. An error in installing the chain even by 1-2 teeth will result in the engine not working correctly, and it will probably even lead to serious damage to the timing and cylinder-piston gas parts when trying to start the engine!
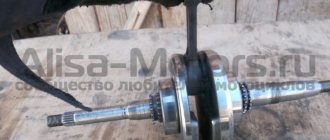
5. After making sure that the timing chain has not jumped off the drive sprocket on the crankshaft, install the camshaft into the cylinder head, at the same time putting a chain on its sprocket so that the marks on the camshaft sprocket are parallel to the plane of the edge of the cylinder head, and the cams are directed downward (inside the head).
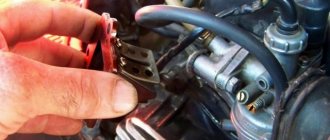
6. Install the rocker arm support, orienting it according to the installation marks. Lubricate the cams and camshaft bearings.
On the rocker arm support are the letters “EX” - which means “EXHAUST” - release. The "EX" mark should be located above the exhaust valve.
ATTENTION!
• Check the correct axial alignment of the camshaft (make sure that the camshaft bearings are correctly positioned on the beds). Probably, on some scooter models, the holder will have a mark “IN” - “INTAKE” - inlet. Accordingly, the “IN” mark must be located above the inlet valve.
ATTENTION!
If the copper washers are severely deformed (flattened), they must be replaced, since if the washers do not fit tightly due to oil leakage, the pressure in the lubrication system will drop and the motor will quickly fail. Sealing this connection with any sealant is unacceptable.
7. Install sealing copper washers on the studs.
8. Screw on all four cylinder head nuts without tightening them.
9. We recess the working rod of the timing chain tensioner inside the housing.
10. Reinstall the timing chain tensioner and tighten its mounting bolts.
11. Insert the working bolt and the timing chain tensioner spring, tighten it. In this case, you can hear characteristic clicks - the ratcheting mechanism of the tensioner working rod will be activated, which, under the influence of a spring, will come out of the housing and tension the timing chain.
12. Sequentially, crosswise tighten the cylinder head nuts in 3-4 steps. The final tightening torque is 10-15 Nm (More accurate values can be found in the repair instructions for the specific scooter model).
13. Screw in and tighten the additional cylinder head bolts.
14. Using a socket wrench for the central bolt of the flywheel, or with your hands holding the flywheel, slowly turn the engine crankshaft clockwise 3-4 turns to make sure that the timing timing is set correctly and the piston does not collide with the valves.
15. We install the crankshaft at TDC of the compression stroke and once again check the correct installation of the camshaft according to the marks.
17. Rotate the crankshaft several turns and once again check that the valve clearances are set correctly.
18. Install the cylinder head cover and tighten its bolts.
19. Place the crankcase ventilation hose onto the fitting in the cylinder head cover.
20. Install the cylinder cooling casing.
ATTENTION!
Do not forget to remove the paper from the intake manifold if you covered it from dirt during disassembly.
21. Install the inlet pipe assembly with the carburetor.
ATTENTION!
In most cases, when installing an exhaust system, the exhaust pipe gasket will need to be replaced. It is better to replace it with a new one during assembly.
Source
Video on this topic
repair of alpha tensioner 149 fm.
Replacing timing rollers 139FMB (1P39FMB)
Why does the timing chain rattle in Racer Alpha? and how to remove it!
Subscribe to the channel and post how!
#41 How to determine the alpha chain stretch of a magnifying glass?
Subscribe to the channel) Link to vk-https: //vk.com/id352703079 My group vk-https: //vk.com/club116536286.
Modification of Delta with a tricky time change
How to replace the oil pump sprocket without disassembling the clutch basket. Chinese moped Delta 72cc.
replacing a Gm chain in an ALFA moped
Spare parts for scooters in Belarus Online store in Belarus https://scooterbaza.by/ Group in contact https://vk.com/scooterbaza.
Alpha 110 (Change timing chain)
They brought in a moped (Alpha 110) with a complaint about a foreign knocking noise in the engine, as it turned out that it was loose timing chain. Foam.
Replacing the camshaft tensioner and Delta timing belt
Repair of a Chinese moped. There was a strong blow to the engine.
Alpha 110 (Replacement of magnet chain)
Foam filter for Alfa moped https://goo.gl/MF6F3b Digital thermometer.
How to set the timing phase and what is ignition timing
Our VKontakte group In this video I will tell you how the ignition timing differs from. A LITTLE BIG: : com/littlebigbandofficial soundcloud: soundcloud.com/littlebigrussia vk: vk.com/littlebigband twitter: twitter.com/LITTLEBIG_BAND website: thelittlebig.com Send by email Booking (Ru, USA) Booking (Europe): 33,608 815 807 Fabristi www.base-productions.com Music: Ilya Prusikin, We Love Lyrics: Ilya Prusikin, Alina Pasok, Eldar Dzharakhov LITTLE BIG production: Idea: Alina Pasok Script: Alina Pasok, Ilia Prusikin, Eldar Dzharakhov Director: Alina Pasok, Ilya Prusikin Co-director: Yuri Muzichenko Additional director: Alexander Pavlov Executive producer: Anastasia Antipova Line producer: Ekaterina Mironova Stylist and art director: Vadim Ksenodokhov Stylist assistant: Rada Sokolova Location: Dmitry Chernov Coordinator: Ivan Veselov Assistant: Eduard Gaisin, Roman Konshin, Ivan Savchenko Casting: Anastasia Antipova, Vasilisa Lubenko Actor coordinator: Vasilisa Lubenko MUAH: Masha Francisch Assistant Muah: Anna Sokolova Hairdresser: Svetlana Tilishevskaya Gaffer: Stas Gerasimov Lighting technician: Pavel Ilyuk, Igor Savchenko Editing: Alina Pasok, Ilia Prusikin Color: Dmitry Novikov VFX , CG: Maxim Semenov Sound design: Stas Kravets
Starring: Ilya Prusikin Sonya Taurskaya Polina Sokolova Zhenya Meck Nikita Gorin Tatyana Andriyanova Irina Grigorieva Marina Tsurkova Yulia Shelobugina Khachatryan Arthur Svetlana Deykun Camila Larisse Elena Lisenkova Nadezhda German Svetlana Ivanova Zoya Timofeeva Nikolay Goncharov Leonid Paranin Mikhail Simonov Valery Sizov Denis Makotra Anatoly Toporov Yuri Ivanov Technical equipment. Lenfilm
Checking the timing belt by marks on the Delta EX 50 moped
Roman Khimchenko 2 weeks. back
And if it doesn’t match WHAT to do
Vladimir Voronov 2 weeks. back
Set it to match.
Valentin Sidorov 1 month ago
Thank you for the video. Everything is described carefully and clearly, in Russian. If you continue to make videos like this, I will be all for it!
Vladimir Voronov 1 month ago
It's nice. )) And of course there will be new videos, just wait a little.
Danil Pugachev 1 month ago
Vladimir Voronov 1 month ago
Yes! Another thing, don’t install two gaskets; it won’t make things any better; an increase in the combustion chamber will result in a drop in power.
Danil Pugachev 1 month ago
Hunter38767 3 weeks back
And if you have a 50cc head and a 72cc piston, then you need to change the head.
Danil Pugachev 1 month ago
Hunter38767 3 weeks back
You can't have two gaskets, look, the valves may be overtightened, unscrew the two caps on the head, and look at the gap, it should be 0.05 on the feeler gauge. But if they hit the piston, then there is no gap.
Sergey Vasiliev 1 month ago
Vadim, thank you, I read a lot of useful information, thank you very much, I will be glad to see new videos on alpha, I’m really looking forward to it
Arkady Novoselov 1 month ago
well done thank you for you!
Danil Pugachev 1 month ago
Alpha 110 (Timing chain replacement)
Foam filter for Digital Temperature Indicator.
Before you start adjusting the valves
Therefore, after purchasing a new Alpha RX, I checked the valve clearance. For this procedure I had to buy a set of probes. In our case, you will need a probe with a thickness of 0.05 mm.
In order to calmly begin adjusting the valves, I had to unscrew the safety bars. For this we need a key of 8.
To get to the valves, you need to unscrew the valve covers located on the top and bottom of the cylinder head. To do this we need a 17 wrench. I used a spanner.
Setting TDC on Alpha
To start adjusting the valves on the Alpha moped, you need to set the top dead center. To do this, remove two covers on the rotor cover. Rotate the rotor until the T mark appears.
To accurately control this process, you need to remove the timing sprocket cover. To do this, on the opposite side you need to unscrew the clamping bolt, which can be unscrewed with a 10mm wrench. Remove the timing chain sprocket cover carefully so as not to damage the gasket.
The star has a mark in the form of a dot. It should be aligned with the mark on the head body.
To easily turn the engine mechanisms, I unscrewed the spark plug, reducing the compression to nothing.
Now you can begin adjusting the valves on the engine.
How to set the timing phase and what is ignition timing
Our VKontakte group In this video I will tell you how the ignition timing differs from. A LITTLE BIG: : com/littlebigbandofficial soundcloud: soundcloud.com/littlebigrussia vk: vk.com/littlebigband twitter: twitter.com/LITTLEBIG_BAND website: thelittlebig.com Send by email Booking (Ru, USA) Booking (Europe): 33,608 815 807 Fabristi www.base-productions.com Music: Ilya Prusikin, We Love Lyrics: Ilya Prusikin, Alina Pasok, Eldar Dzharakhov LITTLE BIG production: Idea: Alina Pasok Script: Alina Pasok, Ilia Prusikin, Eldar Dzharakhov Director: Alina Pasok, Ilya Prusikin Co-director: Yuri Muzichenko Additional director: Alexander Pavlov Executive producer: Anastasia Antipova Line producer: Ekaterina Mironova Stylist and art director: Vadim Ksenodokhov Stylist assistant: Rada Sokolova Location: Dmitry Chernov Coordinator: Ivan Veselov Assistant: Eduard Gaisin, Roman Konshin, Ivan Savchenko Casting: Anastasia Antipova, Vasilisa Lubenko Actor coordinator: Vasilisa Lubenko MUAH: Masha Francisch Assistant Muah: Anna Sokolova Hairdresser: Svetlana Tilishevskaya Gaffer: Stas Gerasimov Lighting technician: Pavel Ilyuk, Igor Savchenko Editing: Alina Pasok, Ilia Prusikin Color: Dmitry Novikov VFX , CG: Maxim Semenov Sound design: Stas Kravets
Starring: Ilya Prusikin Sonya Taurskaya Polina Sokolova Zhenya Meck Nikita Gorin Tatyana Andriyanova Irina Grigorieva Marina Tsurkova Yulia Shelobugina Khachatryan Arthur Svetlana Deykun Camila Larisse Elena Lisenkova Nadezhda German Svetlana Ivanova Zoya Timofeeva Nikolay Goncharov Leonid Paranin Mikhail Simonov Valery Sizov Denis Makotra Anatoly Toporov Yuri Ivanov Technical equipment. Lenfilm
The ignition adjustment on the Alpha moped is carried out similarly to the Racer and Delta models, which in the vast majority are equipped with the same power units.
Many owners of these mopeds experience difficulties in this matter, since the specifics of the engines of Chinese mopeds are quite different from the usual Soviet and post-Soviet models.
Alpha's electrical system consists of:
The system itself operates on a single-wire principle: the power source is connected to the consuming node by only one wire , while the functions of the second are assigned to the metal parts of the moped and the steel frame itself.
When wondering how to set the ignition on an Alpha moped, motorcyclists act on two principles:
Correct ignition setting implies a symbiosis of both points. It is important, following all the technical requirements of the manufacturer, to adjust the operation of the starting system according to your personal needs. The exclusive use of manuals (even official ones) is problematic due to constant modifications of the electrical systems of models produced from the assembly line.
Anyone, even a beginner, knows that a precisely set ignition is the key to controllability and high dynamics of a vehicle. In the case of Chinese mopeds, namely Alpha, Delta and Racer, the manufacturer stipulates that the ignition is set exactly from the factory and cannot be adjusted. But in practice everything is somewhat different.
How to tension a chain on an Alpha moped - step-by-step instructions
To simplify access to the necessary components, first remove the rear left passenger footrest. The moped must be placed on the center stand. It is also advisable to unscrew the bolt and remove the exhaust pipe. If this is not done, the ratchet heads cannot be used.
Next, take two keys - 17 and 14 mm. You need to unscrew the nut to loosen the wheel axle. The nut is unscrewed, but not completely. With the second key you need to hold the axle on the reverse side so that there is a stop. If you don't hold it on the reverse side, the axis will spin.
Let's start adjusting the valves
Let's start with the intake valve, which is located at the top of the cylinder head. We'll need a key for 9. Yes! Not 8, not 10, but 9! Good thing I had a set of sockets in the car. But it is better to use a spanner wrench, which conveniently unscrews the pusher fixing nut on the rocker arm.
Then we need a feeler gauge with a thickness of 0.05 mm, which must be inserted between the pusher and the valve stem. By rotating the pusher, we reduce or increase the thermal gap until the probe moves with slight tension. After tightening the fixing nut, we again check the gap with a feeler gauge, which could have gone astray.
In a similar way, we begin adjusting the exhaust valve.
To change or not to change?
Suppose you are overhauling your engine: changing oil seals, crankshaft, gaskets and other devices, but you doubt whether to replace the timing chain with a new one or not. If you have any doubts, change it for a new one at the first opportunity. And now I will explain why.
See for yourself: a chain has an average service life of approximately 18,000-20,000 km of a scooter (personal experience), approximately the same as the average service life of the engine itself. And for example, after driving 6,000 km, the crankshaft jammed or the engine leaked, or something else happened that requires complete disassembly of the engine. Naturally, you disassemble the engine, replace the crankshaft with a new one, and leave the chain, which by that time has exhausted a third of its service life.
And what happens? The chain, after 12,000 km, will exhaust its service life and become unusable, but the crankshaft and other parts will be in good order and whether you like it or not, you will have to halve the engine again, because of the chain alone. Is it necessary? The chain is a consumable. Never skimp on it!
Personally, I never check timing chains. I simply throw them in the trash, no matter how awesome they seem to me. A chain is a consumable item for me, just like a spark plug, oil or oil seal. But if you are important, or money is tight, you can use the old fashioned way.
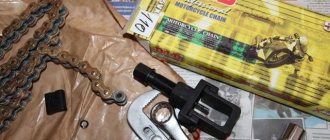
How to replace the timing chain of a scooter engine?
It’s very simple, my friends: you remove the engine from the frame, disassemble it and replace the chain with a new one. There are no special secrets in this matter, just as there are no special ways to deceive fate without disassembling the engine. The chain can only be replaced by completely disassembling the engine.
There is, of course, one guy on YouTube who rivets an old chain , then rivets a new one, connects both chains, pulls out the old one, starts a new one, and then rivets the whole thing back, but this is porn. I don’t suffer from such crap, since the result of such repairs is not always predictable.
The timing chain is in no way designed to be riveted or riveted. During the riveting process, it can easily be pulled or twisted, and this is a sure way for the engine chain to fly off the sprocket, and then, with luck, maybe everything will work out, or maybe the valves will bend. And one more point: a beginner will not be able to rivet a chain efficiently. This work is not as simple as it might seem at first glance. Therefore, don’t suffer through this bullshit and disassemble the engine.
Valve adjustment on Alpha
I want to touch on an interesting topic that everyone has heard about, but not everyone understands its essence - let's talk about valve adjustment.
A little theory.
First, a little theory. Where did the need to adjust the valves come from and why is the thermal gap needed?
Any four-stroke engine has at least two valves: an intake valve, through which the working mixture enters the combustion chamber, and an exhaust valve, through which exhaust gases exit. Part of the valve is constantly located in the combustion chamber and therefore the valve becomes very hot. And as we know from school physics courses, bodies expand when heated. Moreover, the stronger the heating, the greater the expansion.
The valves in the engine are always in a “spring-loaded” state, while the valve plate is pressed very tightly to its seat - the valve seat. This ensures that the valve closes tightly.
To open the valve, you need to press on it. In our case, the valve is pressed by a rocker arm, which moves under the influence of the camshaft cam.
Now let’s imagine that the engine is cold (it stood for several hours and all the parts cooled down to “room” temperature). If you start the engine, the valves will begin to heat up quickly and, as a result, lengthen. If you do not leave it room for expansion (the gap between the rocker arm and the valve stem), then the moment will come when the valve will elongate so much that it will not fit tightly to its seat and will begin to leak gases from the combustion chamber. This leads to a loss of engine power and can also lead to overheating and burnt valves.
For this reason, a gap is left between the valve and the rocker arm. Engine manufacturers calculate how much the valve extends when the engine is running. Therefore, the operating instructions indicate the optimal thermal clearance values. If you follow the recommendations, at the operating temperature of the valve the gap will be minimal, so that the valve can close completely, but at the same time the rocker arm would be almost close and the valve would open as wide as possible and there would be no impact (“clattering”) of the rocker arm on the valve.
IMPORTANT: the clearances are set on a cold engine, when the valve has not yet had time to lengthen.
What happens if the valves are adjusted incorrectly?
Very often on various forums questions are asked: “What will happen if the valves are adjusted incorrectly?” There are two possible options:
- If the gap is too large, this is the most harmless option. If the gap is too large, then the valve shank and rocker arm will wear out more, since the rocker arm will hit the valve with a running start. The valve opening height will decrease slightly, due to this the filling of the combustion chamber will deteriorate and the engine efficiency will drop. But these changes are hardly noticeable. The engine sound will also be stronger and a characteristic clattering sound will appear. In general, engine operation will not be affected.
- If the gap is too small, when the valve heats up, it will “press” against the rocker arm and the valve will no longer fit tightly to the seat. The fuel-air mixture and exhaust gases will escape through the resulting gap. The release of exhaust gases will cause the valve to overheat and burn out. Engine compression will drop and, as a result, efficiency.
Thus, too little clearance is much more dangerous than too much. It is for this reason that it is not recommended to set gaps “by ear” without feeler gauges. If there is a feeler gauge between the rocker arm and the valve, there will already be a gap between the rocker arm and the valve, unless of course you clamp it with great force.
Why combine tags?
The valves must be adjusted in a position where the rocker arm does not press on the valve stem, that is, the valve is closed. When a four-stroke engine is running, both valves are closed at the end of the compression stroke, so for ease of adjustment, align the mark on the camshaft sprocket with the mark on the head housing. This position corresponds to the top dead center - the end of the “compression” stroke and the beginning of the “power stroke” and both valves are closed at this moment and can be adjusted.
By and large, it is not necessary to clearly combine these marks, because both valves close already at the beginning of the compression stroke and do not open until almost the end of the power stroke, that is, the valves are closed at least half a revolution. That is, there is nothing to worry about if you “overshoot” the mark a little, or if you don’t reach it a little (within reasonable limits, of course).
For some reason, some “craftsmen” in their video instructions combine the “T” mark on the crankshaft flywheel. It is not necessary to do this to adjust the valves. For one revolution of the camshaft, the crankshaft makes two revolutions, and the mark will coincide twice: once at the end of the compression stroke, and the second time at the end of the exhaust stroke (when the exhaust valve is still open and the intake valve is preparing to open).
What should the valve clearance be on an Alpha?
The intake valve clearance on most engines is usually less than the exhaust valve clearance. This is due to the fact that the intake valves heat up less. They are cooled by fresh air flows.
The thermal clearance of the intake valve for the 139FMB engine is 0.03 mm. For the exhaust valve, the gap is 0.05 mm.
From theory to practice.
It's actually quite simple:
- The engine must be cold. If not, wait a couple of hours for it to cool down to “room” temperature.
- Place the moped on the center stand. Turn off the ignition (so as not to accidentally start the engine).
- Unscrew the side cover of the engine head. It is better to stock up on a spare gasket, since the gasket usually breaks when removing this cover. Or you can put it on a heat-resistant sealant.
- By rotating the crankshaft, we align the mark on the head sprocket with the mark on the head body. The crankshaft can be turned using the kickstarter foot. But this is inconvenient, because... The kick is on the right side of the moped, and the mark is on the left. You can unscrew the plug on the generator cover and rotate the crankshaft through it by putting the “head” on the nut securing the generator rotor. To make it easier to rotate the crankshaft, you can unscrew the spark plug.
- Using a 17 wrench, unscrew the head plugs intended for adjusting the valves. One cover is on top, the second is on the bottom.
- Unscrew the lock nut of the adjusting screw with a 9mm wrench and slightly unscrew the adjusting screw.
- We take a flat feeler gauge and insert it between the valve stem and the adjusting screw. For the intake valve you need a 0.03 mm feeler gauge, for the exhaust valve - 0.05 mm.
- Carefully tighten the adjusting screw so that the probe moves with little resistance. In this case, the dipstick should not “bite”.
- Holding the adjusting screw, tighten the locknut and check that the gap has not changed.
- We perform a similar operation with the second valve.
- We assemble everything in reverse order. After assembly, we start the engine to check that everything is done correctly and there are no oil leaks anywhere.
Usually the entire operation takes no more than half an hour. With experience you can do this much faster.
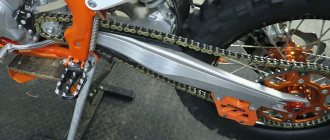
Checking and adjusting the moped drive chain
The chain drive is one of the most loaded components in a moped.
If the chain is loosely tensioned, that is, it sags a lot, then at the moment of a load change, this excess supply of chain will first be selected, and then, when its free play ends, a sharp blow will occur, harmful to all elements of the transmission. And it’s unpleasant for the driver himself to drive such a moped that jerks whenever the gas is opened or closed, especially in a sluggishly creeping traffic jam. The second disadvantage of a sagging chain is that when the tension is weak, its unloaded shoulder tends to move in a straight line by inertia, which is why it rests imperfectly on the sprocket teeth, thereby wearing them and itself out. The life of the drive chain depends on lubrication and adjustment. Failure to maintain the drive chain promptly can result in premature wear or damage to the chain and sprockets. Chain maintenance work includes cleaning it from dirt, lubricating the links, or boiling it in molten lubricant. Cleaning the chain and lubricating its links can be done without removing the chain from the moped, using a brush, special liquids and lubricant in aerosol packaging.
To weld the chain, it must be removed from the moped, washed in kerosene and boiled in lubricant (the lubricant consists of 95% solid oil and 5% graphite powder) at a temperature of 70-80°C. It is recommended to carry out the first welding of the chain before use.
A routine check of the drive chain tension is carried out every 500 km.
The check includes:
- Turning off the engine, place the moped on the central support stand;
- engage neutral gear;
- remove the inspection hole cap on the chain casing;
- check the chain tension (normal sagging of the drive chain should be within 5-10 mm with a force of 10 kgf;
- Turning off the engine, place the moped on the central support stand;
- engage neutral gear;
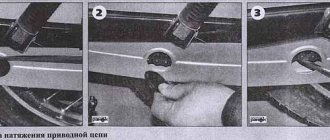
- loosen the rear wheel axle nut;
- by tightening the adjusting nuts on the left and right sides, achieve normal chain tension;
- tighten the rear wheel axle nut;
After the adjustment is completed, you need to check if everything worked out as expected. If the wheel is level, the marks on the tensioners on the right and left show the same thing, and the chain has the desired slack, then everything is done correctly. All that remains is to lubricate the chain.
Read also: Ford Kuga 2 size lamp
A distinctive feature of a moped from a scooter is that the former has a chain instead of a belt, so sooner or later quite typical breakdowns occur with Alpha mopeds. The chain tends to stretch over time, after which movement becomes quite problematic. You can tension the chain yourself; no special skills are required. But know that you don’t need to tighten the chain on the Alpha moped too much; the free play should be from 2 to 3 cm, otherwise you will face much bigger problems.
So, if you don’t know how to tighten the chain on an alpha moped, follow the instructions below.
First of all, remove the passenger footrest so that it does not interfere with tensioning. Then place the alpha moped on the center stand. But some experts recommend tensioning under a certain load on the moped, because on the center stand your vehicle will be supported by weight; after tensioning the chain, you will notice that it has become even more tense, like a string. This oversight leads to serious damage; many say that an overtightened chain after 1 thousand km leads to a breakdown of the entire clutch mechanism.
How to tension a chain on an Alpha moped
Next, you will have to unscrew the nuts of the central axle of the wheel, this will help loosen the wheel axle. To do this, a 14mm wrench is suitable, after that you will have to unscrew the nut located on the same axis, but then, in the case of the Alpha moped, a 24mm wrench will do. After this, we proceed to adjust the chain; on the same axis there is a chain tensioner with a nut, just enough tighten it, this will require a 10mm wrench.
You will have to tighten the nut until you feel that the chain is tensioned. In this case, the teeth should not fall on the edge of the chain, check this, and only then can you begin the final procedure - tightening the axle nuts back. Tighten these nuts well, but do not overtighten them. That's all, as you can see, tensioning the chain on an alpha moped is quite simple.
Photo report: How to check the timing chain of a scooter?
It’s always like this in life: one thing is great and the other is bad. Exactly the same principle applies to various types of mechanical transmissions. Chain transmission is no exception here. On the one hand, there is nothing simpler, more reliable, lighter, more compact and cheaper than a chain drive.
On the other hand, we get endless hassle with stretching the chain, wear of the sprockets, endless cleaning and lubrication, maintenance and tensioning of this very chain. But there is nothing to be done, the chain box has a lot of advantages over other types of mechanical transmissions, which is why these types of transmissions are used almost everywhere.
Read also: Tax Inspectorate transport tax
In general, now we will not talk about the chain drive as such, but about the method of diagnosing the timing chain driving the camshaft of a scooter engine .