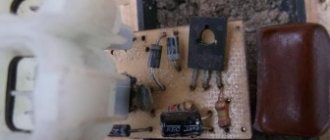
The heating system in the cabin of the 2114 model is not a reliable component of the car. Active use of the heater during the cold season leads to regular breakdowns of the structure. Failure of the stove fan, leaking faucet, malfunction of the thermostat - this is an incomplete list of possible breakdowns. The stove tap is the weak point of the structure, because It is made of plastic, which loses its shape over time. Independent replacement of the VAZ 2114 stove tap is often accompanied by the installation of new type taps. In the article we will analyze the causes of the breakdown and provide instructions with explanations for doing the repair yourself.
Useful video:
Signs of malfunction of the VAZ 2114 heater valve
Most often, a malfunction occurs in the cold season, when the interior heater is used at full capacity. Breakdowns are also possible in warm weather. Constant use of the temperature regulator in the cabin leads to rapid wear of the plastic parts of the faucet. We list the main symptoms of a malfunction of this element:
- The appearance of a greasy coating on the surface of the windshield. This is typical when there is antifreeze leaking from the valve body. In addition to the fact that in the event of such a breakdown, the warm airflow ceases to function normally, antifreeze vapors have a negative impact on human health;
- Stopping the supply of warm air indicates that the regulator is jammed inside the faucet;
- The main sign of a malfunction is the appearance of a coolant leak under the carpet on the driver's side. It is recommended to check this area for leaks regularly.
Useful : Design of the VAZ 2114 stove
In addition to stopping the supply of warm air, a broken faucet leads to a constant leak of antifreeze. This increases the risk of reducing the coolant level to a minimum, which is very dangerous for the engine. Sooner or later, replacing the heater tap on a VAZ 2114 is necessary on any car of this model. Even timely maintenance of the heating system does not guarantee that this unit will not fail. It's all due to a design miscalculation by the engineers. Making a faucet that constantly contains hot liquid from low-quality plastic is a clear miscalculation. Minimal deformation of the valve body leads to antifreeze seeping into the driver’s feet. Also, owners of model 2114 complain about the lack of o-rings and rubber gaskets in the design of the regulator. Instructions on how to change the stove tap will be presented below. First, let's look at the necessary list of tools that will come in handy when replacing an element with your own hands.
How to identify such causes of failure?
The first, as well as the second reason, can be very easily recognized, even visually. To do this, it will be necessary to remove this valve from the car itself. The third reason, namely loss of tightness, can only be recognized because there will be small traces of antifreeze on the carpet located at the bottom of the cabin. Due to such leaks, there may be leaks that are located in the places where some pipes connect to the main heater.
If such traces appear, then you should find the leak location. Then, if a drip appears from the tap, then this will be a clear sign that traces of antifreeze will be on the body.
Necessary tool
Difficulties that may arise when performing work are associated only with the inconvenient location of the faucet. Otherwise, the replacement process will not cause problems. Before starting work, prepare the following tools and materials:
- Pliers for removing stuck pipes;
- Flat and Phillips screwdrivers;
- New heater valve for VAZ 2114;
- A rag for cleaning up smudges and a small container for draining antifreeze;
- Canister with new antifreeze for topping up;
- A set of wrenches (wrenches 10 and 13 are useful).
To simplify the work, drain the antifreeze from the car radiator in advance. Next, proceed to study the instructions on how to replace the stove tap with your own hands.
A little theory
The heated liquid moves from the thermostat to the tap, and then it either enters the radiator “30” or exits directly into the outlet pipe. These are two different cases corresponding to the extreme positions of the engine (MAX/MIN). If you look at the drawing, everything will become clearer.
This is what the heater assembly looks like
Shown here: 6 – outlet hose; 8 – supply hose; 7 and 27 – clamps (4 pcs.); 26 – internal outlet hose (to the radiator); 28 – supply internal hose (from the radiator), 33 – clamp.
Where is the heater valve located on the VAZ 2114?
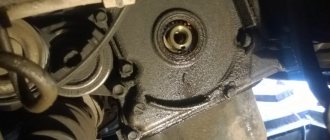
The location of the heater tap is such that to remove it you need to act both inside the car and under it. The faucet itself is hidden near the heater radiator and is visible after removing the side decorative panel trim on the driver's side.
Without removing the pipes leading to the tap, it will not be possible to remove the body from its seating location. To freely dismantle the faucet, you need to understand where the pipes are located under the hood.
As you can see in the photo, in addition to the two pipes, nuts prevent free dismantling. If you rarely unscrew them, they can turn sour and stick. Therefore, before starting work, you should treat their surface with lubricating liquids, for example WD-40. Breaking off these studs will seriously complicate the job, so take your time and let the lubricant work for 10-15 minutes.
Useful : How to remove the heater motor on a VAZ 2114?
What to do if there is a leak in the heater core?
We have already found out that the cause of fluid leaking into the car body may be a leak from the radiator of the heating stove.
Remember, if you notice antifreeze leaking inside your car, never delay repairs even for a short period! Most antifreeze contains toxic substances, the entry of which into the body through the respiratory tract is very dangerous for your health.
Next, you will read about replacing a leaking furnace radiator:
- First you need to pour antifreeze. Next, you will need to disassemble the panel in the cabin (console, glove compartment, sides). Unscrew any screws and bolts, and also for convenience, collect them in a small container (for example, a glass or wooden box). Please note that there is an invisible screw on the console and you should not forget about it.
- After you remove everything unnecessary and give yourself access to the radiator, you will need to first loosen the clamps on the pipes and then free them, of course, not forgetting about the container for draining the antifreeze that will flow out of them. Next, you are faced with the task of removing and replacing the VAZ 2114 stove, and in particular the heating radiator.
- Assembly is completely different. Secure the working radiator in place. A little advice for making it easier to put on rubber pipes, which experienced car owners reveal. The bottom line is that you need to lubricate the fittings with soap. It is advisable to install the clamps in good working order, having purchased them in advance complete with the radiator.
- Next you need to assemble the panel, installing the glove compartment and everything else. When assembling the panel, we advise you to pay attention to ensuring that everything is secured correctly. Check the adjustment of the cables after installing and fastening them, pay attention to the fastening and functioning of the valve and faucet.
- It is very important when you pour liquid into the radiator to check that there are no air pockets. In order to avoid them, you will need to remove one of the hoses and release the air from it, and then install it again in the same place.
If you followed our instructions and were able to install everything as needed, then the problem of antifreeze fluid leaking will no longer bother you, and since the cabin will become warm and comfortable, your trips will become much better!
Replacing the stove tap
After preparing and processing the rusty nuts, you can begin to remove the element. If you are planning to install a new faucet, consider a modified sample with metal elements. Follow these steps as you work:
- Unclench the clamps on the pipes under the hood and drain the remaining coolant into a container.
- Inside the car, unscrew the decorative panel trim on the driver's foot side.
- Remove the internal pipes and also drain the remaining antifreeze.
- To release the faucet, take a spanner and crawl under the car to access the mounting nuts. Unscrew them.
- To remove the membrane cable you will need pliers. Also, for better access to the cable, you can remove the panel trim on the passenger side and climb from there. There is no need to remove the glove compartment.
- The last step is to remove the faucet from its seat.
There is no point in repairing a worn faucet, because... You will not be able to achieve a perfect fit of the elements to each other. The best repair option in this case is to install a new type of regulator. Poor responsiveness of the temperature controller may be caused by work performed. Therefore, it is recommended to change the heater valve cable when it stretches. Also, when doing this kind of work, you can replace the pipes going to the cooling radiator. The heating system is an important element in the cold season, so it is better to keep it in good condition. The control cable can be left as old, but only if its length is maintained. A stretched element will not allow you to accurately regulate the air supply temperature.
Useful : What to do if the stove does not work?
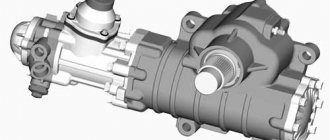
Operating principle of the device
The heater valve serves as a tool for controlling the flow of coolant that flows through the radiator of the so-called heater. It is opened with the onset of cold weather, when there is a need to warm up the windshield and interior. Passing through the radiator, the working medium heats the air pumped by the fan. In the warm season, there is no need for additional heating, so the tap must be turned off.
It is easy to control the flow of warm air when the system is working properly: in winter, to open the tap, just move the lower lever to the right (“red zone”) on the climate control panel in the cabin. Accordingly, in the summer, in order to shut it off, you need to turn the tap to the left (“blue zone”). We should not forget that we also need a stove in the summer. At this time, it serves for ventilation. The damper, which blocks the flow of coolant in a small circle through the radiator or bypasses it, is actuated by a cable from a lever on the panel.
Checking the stove tap
The best way to check the faucet for leaks is to wet the carpet under the feet of the driver and passenger. At first, the worn part will not make itself felt, but only until the antifreeze leaks out under your feet. It’s difficult not to notice the smell of antifreeze in the cabin.
Mechanical failures will make themselves felt during operation. A jammed temperature regulator, lack of response to moving the handle, or lack of tension on the regulator are a clear sign of a broken cable or broken plastic eyelet.
What will be needed for repairs?
Please note that replacing the VAZ 2114 stove (that is, the radiator) can be done in 2 ways: with removing the dashboard and without dismantling the dashboard. Professionals prefer the first method. That is, master mechanics of any service station replace the radiator with a 2114, having first disassembled the top down to the screw. Only someone who has already assembled and disassembled the dashboard with their own hands can handle this work. There are a lot of subtleties and nuances.
Speaking for us, we will replace the VAZ 2114 heater radiator without removing the dashboard.
By the way, there is another way to change the radiator. Craftsmen cut out the bottom of a VAZ 2114, calmly climb under the radiator and quickly remove it.
But again, only highly qualified craftsmen can qualitatively change the design of the machine. We won't interfere there, out of harm's way.
For this job we will need:
- Screwdriver Set
- A set of keys
- A pair of new clamps for the diameter of the radiator pipes
- New radiator. By the way, it’s better to take something imported, for example, Fenox RO0004C3 (it costs twice as much as the original)
- New antifreeze for the heating system
By the way, pay attention to the article about the advantages and disadvantages of various types of radiators .
Now let's look at the question of how to replace a VAZ 2114 stove without removing the panel (not the entire stove, but only the radiator).
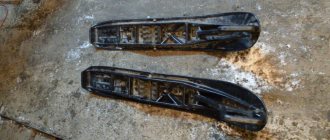
Which heater tap to choose?
Useful video:
When an old part wears out, it is logical to purchase a modified version of it to prevent problems in the future. Regulator options with metal and ceramic parts are now available for sale. They are more durable and resistant to temperature. Let's consider several options:
- A modified spare part from AvtoVAZ with article number 21080-810115000 is available in stores at prices ranging from 180 to 250 rubles . Low price, presence of metal elements, average quality;
- A ceramic faucet from Luzar with article number 2108-8101150 is sold at a price of 300 to 500 rubles . High quality, ceramic elements, average price;
- The Tsn-Citron company, with article number 8.5.2, offers a budget option for 170 rubles. Medium quality. There are metal elements.
We recommend that you do not save on purchasing a new element of the heating system, because... its unexpected failure will bring a lot of problems.
Articles
- 2108-8101204-20 – internal outlet hose;
- 2108-8101200-20 – supply internal hose;
- 2108-1300080-10 – clamp;
- 2108-8101150 – crane (AvtoVAZ);
- 2108-8101150-12 – faucet with ceramics (Yavva LLC);
- 21082-8101208 – external outlet hose;
- 2108-8101206 – external supply hose.
Replacing the VAZ-2115 heater tap most often worries the owner of a domestic vehicle in two cases - if the switch has soured or the motorist has discovered an antifreeze leak that has occurred in the housing.
Heater valve VAZ-2115
The VAZ-2115 heater valve, which required repair due to the first problem, is most often changed in the spring-autumn period, when with the onset of the first noticeable cold or spring warmth, the motorist does not turn on the switch, fixing it only in one extreme position (closed or open) . As a rule, souring of an element occurs due to its being in one position for a long time.
In turn, replacing the stove tap due to a second malfunction is the result of normal aging of the seals.
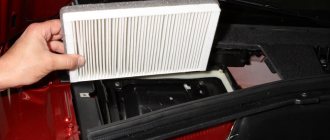
The heating must always be in working order, if, for example, the first case does not threaten the car owner with huge problems in the future, then the second situation should be paid attention to immediately, the cost of the consequences of such an antifreeze leak can result in a cost that is several times higher than the price of the faucet. It is worth noting that, along with other important procedures, qualified specialists recommend replacing the stove filter every fall; this element of the system is often clogged with leaves and other debris, which reduces the flow of air entering the cabin.
Assembly nuances
When installing, it is better to immediately connect the control mechanism cable to the damper lever, and only after that install the faucet into the engine shield. This will make assembly easier.
When replacing the faucet, we replace all the clamps, and coat the joints of the pipes with the fittings with heat-resistant sealant.
After assembling and filling the cooling system with antifreeze (topping up), we check all connections for leaks. Often air pockets form in the heater radiator, which must be expelled, otherwise the stove will not work. It would be a good idea to check the connections between the pipes and the faucet for leaks the first time after replacement.
Finally, we note that often the cause of a malfunction of the stove tap is a jammed damper. To prevent this from happening and to ensure that the unit lasts as long as possible, use the tap during periods when it is least used - open and close it so that the valve does not stick. These measures are quite enough to maintain the mobility of the shut-off part of the faucet.
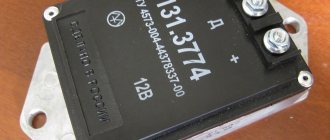
WHICH TAP IS BETTER?
All owners of VAZ 2114, 2115 and other models unanimously claim that the original faucets that are equipped with the stoves of these cars are the most unreliable. The locking mechanism is a rubber membrane. Aluminum housings are susceptible to corrosion and quickly turn sour. True, the price of these parts is low - 80-120 rubles. Apparently, the price is calculated on the fact that the faucets will change every season.
Ceramic faucet is considered the most wear-resistant
But car owners don’t want to crawl under the car every time it gets cold, spoil their shoes with leaking antifreeze, and freeze inside the car. Yes, and this is a troublesome task - replacing the faucet on the VAZ 2114 stove. Therefore, motorists give preference to more reliable models of faucets:
- ceramic, their locking mechanism is made of ceramic plates, and the body is made of high-quality plastic;
- Ball valves, the locking element of which is a ball with holes.
Most VAZ 2114 owners prefer the Yavva ceramic faucet as one of the highest quality and most reliable. Although these models have lower heat transfer than ball models. The latter are susceptible to oxidation, but to a lesser extent than the duralumin models of AvtoVAZ cranes.
How to determine if a faucet is broken
Diagnosing a breakdown is easy. In the first case, its cause is oxidation of the elements of the locking mechanism. This leads to the fact that it simply stops moving in any direction.
When you try to move the crane control lever, it will not budge. Trying to tear off the mechanism by using force is fraught with breaking the lever, breaking the cable, or mechanical damage to the crane itself.
Violation of the tightness of the device causes failure of the seals, which for the most part are made of ordinary rubber, which reacts with both antifreeze and antifreeze. A puddle of coolant on the front passenger's foot mat or an oily white coating on the windshield, which is its evaporation, will help you understand that the faucet is leaking. But in this case, you will need to make sure that it is the faucet that is leaking, and not the heater radiator itself or the pipe.
Node malfunctions
There are three faults in the valve of the VAZ-2114 stove, but if they occur, the unit must be replaced, since it cannot be repaired.
Crane breakdowns:
- Incomplete opening/closing of the channel. It occurs due to wear at the junction of the axle and the shut-off valve. As a result, a significant backlash appears, due to which, even when the valve lever is moved to the extreme position, the damper does not open the channel completely. This malfunction negatively affects the performance of the stove.
- Gate valve jammed. This happens because the tap has not been used for a long time and the moving element has become stuck and does not move. Attempts to open with force result in the rupture of the connection between the axle and the valve or the formation of strong backlash, which causes the valve to also become inoperable.
- Loss of tightness. The tightness of the unit is ensured by seals on the damper axis. If these elements are worn out or damaged, the liquid flows out through the mounting hole of the axle. This malfunction does not affect the performance of the stove, but antifreeze leaks will appear in the interior.
The first two faults can only be identified visually by removing the valve from the car. As for the loss of tightness, a symptom of a breakdown will be traces of antifreeze on the floor mat in the cabin. And since a leak can occur due to leaks at the junction of the pipes with the heater elements, when leaks appear, first of all, find the location of the leak. If the faucet leaks, there will be traces of antifreeze on the body.
Repair process
- We turn off the car, open the hood, remove the wires from the battery and place a container under the antifreeze drain from the stove
- We switch the temperature controller to the strongest heating mode
- Slowly unscrew the plug for draining the liquid from the heating circuit. If you remove it quickly, antifreeze may splash on the generator. Some also unscrew the cap on the antifreeze tank itself so that the liquid drains faster
- We go into the salon and move the seats towards the rear seat + recline the backrests + cover the seats with a large piece of oilcloth, and lay an old blanket on top
Please note that replacing the VAZ 2114 heater radiator without removing the dashboard takes a lot of time, so please be patient
- Unscrew the central pillar. We unscrew the fasteners to the floor (on the right and left sides) + self-tapping screw on top + side fasteners. Please note that some screws are covered with a plug.
If the VAZ 2114 stove is being replaced (we are talking about the radiator), it is best to disassemble the elements of the dashboard according to the manual (technical passport), where the location of the fasteners is noted in detail, since the VAZ 2114 is presented in various modifications. For example, there are VAZ 2114 models with a player, they have one fastening scheme, while the VAZ 2114 in the simplest configuration has a completely different connection scheme for the dashboard elements.
- We remove the glove compartment (the photo below shows its mounting diagram)
- We unscrew the dashboard mount so that the entire dashboard shakes. This point is important for removing the radiator. That is, in order not to remove the entire tidy, we will simply move it away without disassembling it down to the screws. Replacing the VAZ 2114 heater radiator continues
- Now we have access to the adjustment cables for the heating tap of the stove. Remove the ends of the cables on the driver's and passenger's seats. They simply fall off the eyes of the adjusting levers
- Removing the radiator protective casing
- Remove the clamps securing the pipes (can be from the hood or from below)
- Now, in order to replace the VAZ 2114 stove without removing the panel (that is, the radiator), you will need a partner. Together with the second pair of hands, we lift the dashboard a little and pull it towards ourselves to take out the old radiator and push the new one in there. At this stage you need to be extremely careful. The torpedo must be moved with the utmost care so as not to damage anything anywhere.
Please note that when the radiator is removed, liquid may leak from it. There are many known cases where newbies simply poured antifreeze into the on-board electronics, naturally rendering them inoperable. So, let's bleed off the liquid thoroughly.
- We assemble the new radiator in the reverse order (clamps, cover, cables, etc.)
We recommend: Vehicle intake system
To make it more clear how to replace the VAZ 2114 heater radiator without removing the dashboard, check out the video instructions:
Pay attention to one more point. Having put everything back together, you need to fill the circuit with new service fluid. After refueling, you need to bleed the heater (heat the interior), then turn off the engine and, if necessary, add antifreeze to the tank.