CDI electronic ignition The
CDI electronic ignition system is not that complicated and is easy to diagnose if you understand how it works. The CDI ignition (Capacitor Discharge Ignition) consists of several main components (in the diagram):
C—chargeable capacitor; D - rectifier diode; SCR - switching thyristor; T - ignition coil.
There are many variations of this scheme, let's look at the principle of operation. Capacitor C is charged in turn by rectifier diode D, and then discharged through the SCR thyristor to step-up transformer T. At the output of the transformer we receive a voltage of several kilovolts, due to which a breakdown of the air space between the electrodes in the spark plug occurs. This is all! It's that simple!
But making the entire mechanism on the engine work is much more difficult. The classic CDI ignition circuit is a two-coil design, first used on Babette mopeds. One coil is a charging coil (high voltage), the second (low voltage) is a thyristor control sensor. Both coils are connected to ground with one wire. We connect the output of the charging coil to input 1, and the sensor to input 2. The spark plug is connected to output 3.
A circuit assembled using modern components begins to produce a spark when input 1 reaches approximately 80 Volts; the optimal voltage is considered to be about 250 Volts.
Recommendations for owners of Alpha mopeds
To ensure safe and enjoyable trips on this vehicle, you must follow these rules:
- do not move away immediately, so as not to provoke an overload of the engine. It is especially not recommended to start abruptly at full speed for a long time in the cold season. Temperature changes lead to the formation of condensation and its effect on the inside of the engine;
- If the above signs of malfunction appear, immediately inspect the ignition system. Black thick smoke will indicate that disassembling the motor is required;
- refuel only with high-quality fuel to prevent rapid engine wear due to poorer purification of gasoline and detonation of fuel with a lower octane number;
- After adjustment, you should immediately check the result - ride the moped at moderate speed on a flat road, listening to the sounds inside the engine.
By following all the instructions, you can achieve moderate gas mileage and reduce moped maintenance costs.
Each trip will go smoothly if you drive carefully and pay attention to any deviations from the normal operation of the moped. Proper engine starting is the key to its longevity
CDI Scheme Variations
How a Carbon Monoxide Detection Sensor Works
Let's start with the sensor. A coil, a Hall sensor, or even an optocoupler can be used as a sensor. In the CDI circuit of Suzuki scooters, the thyristor opens with the second half-wave of voltage taken from the charging coil - the first half-wave charges the capacitor through the diode, and the second half-wave opens the thyristor. A wonderful circuit with a minimum of components.
If the engine had a chopper ignition, then it does not have a coil that could be used as a charger. Very often a step-up transformer is used, which allows the voltage of the low-voltage coil to be raised to the required voltage.
Model aircraft engines save every gram of weight and every millimeter of size, which is why they do not have a rotor magnet. Sometimes a small magnet is glued directly onto the motor shaft, next to which there is a Hall sensor. The capacitor is charged through a voltage converter, which makes 250V from 3-9V from the battery. We will not consider the voltage converter circuit in detail in this article, I will only say that the most widely used circuits are those based on self-oscillators, PWM controllers and inverter type.
If we use a diode bridge instead of diode D, then we can remove both half-waves of voltage from the coil. Therefore, it is possible to increase the capacitance of capacitor C, which will strengthen the spark.
Final actions
You should put rubber caps on the armor wires, and insert the latter into the candlesticks or coil above. If you skip this step, the motorcycle will stall when riding in rainy weather, as moisture will get into the battery.
By inserting spark plugs into the tip, it will be possible to maintain excellent contact between the battery and the volume of the vehicle. Now you will need a pre-purchased set of wires. The switch, coil and hall sensor are connected by wiring. She needs to be isolated. Of the entire mass, only a common plus is required.
Features of ignition by capacitor discharge
Operating principle and types of metal detectors
The above Capacitor discharge ignition system, which can be purchased in many parts of the post-Soviet space, has several disadvantages. So, in the structural part, the creators made it quite complicated. In addition, the pulse level, which is insufficient in duration, is another disadvantage of CDI. Nevertheless, one of the advantages of capacitor ignition is the presence of a steep front of a high-voltage pulse. This point is very important when using such electronics in Soviet motorcycles, the spark plugs of which are very often filled with excessive amounts of fuel due to the presence of poorly designed carburetors.
Thyristor ignition operates without the use of additional current generation sources. The latter (in the form of a battery) are needed only to start the electric starter or start the motorcycle with a foot (kick starter), for example.
When discussing the prevalence of electronic ignition from a capacitor charge, it should be noted that it is actively used on foreign chainsaws, scooters and motorcycles. For the Soviet motorcycle industry, its use was uncharacteristic. But in some of our cars, such as GAZ and ZIL, the CDI electronic ignition system was often installed. Reviews of its successful operation clearly contribute to this.
- Back
- Forward
Advantages of the CDI system
Capacitor ignition also has its advantages, including a steep front of high-voltage pulses. This characteristic is especially important in cases where CDI ignition is installed on IZH and other brands of domestic motorcycles. The spark plugs of such vehicles are often filled with large amounts of fuel due to incorrectly configured carburetors.
For the operation of thyristor ignition, the use of additional sources generating current is not required. Such sources, such as a battery, are only required to start the motorcycle using a kick starter or electric starter.
The CDI ignition system is quite popular and is often installed on scooters, chainsaws and motorcycles of foreign brands. It was almost never used in the domestic motorcycle industry. Despite this, you can find CDI ignition on Java, GAZ and ZIL cars.
Ignition setup steps
What is a choke, its application and principle of operation
The first possible breakdown is checked with a stroboscope; to do this, you need to check whether there are measured risks in the ignition synchronization. Rarely does anyone have an expensive strobe light for free use, but if you have the opportunity to ask your friends for it, then it’s better to start working with this check.
In order to start checking the synchronization of the marks on the system, you need to thoroughly warm up the moped motor. There is no need to strain the moped too much.
Connecting a strobe
After this, you should connect the strobe. If the technician is working with the device for the first time, he must first carefully study the operating instructions. Two wires come from the device, one of which should be connected to the moped’s power supply, and the second induction wire is connected to the spark plug.
A simple strobe for setting up the ignition of a moped
As soon as a spark appears on the spark plug during startup, the bright light of the strobe will indicate this. Now you should direct this light that appears to the location of the measuring marks and see how they are located relative to each other. If everything is correct, the risks are exactly the same, then the setup went as expected, no further adjustment is required.
Adjusting the ignition timing
If the measuring marks are not synchronously coupled with each other, or they are not visible, then you will have to adjust the start of the moped. More precisely, you will have to adjust the ignition timing. Different models of Chinese mopeds may have different adjustment methods. Therefore, before starting work, it is necessary to study the documentation attached to the moped. Adjustments must be made in accordance with the instructions.
Further work requires a careful approach and strict adherence to safety measures, since you will have to inspect and adjust the system with the engine running.
Equipment Features
Let's go back to the strobe
To operate, you need a type of this device that is equipped with a special sensor for counting the rotation of the hot shaft - this module is worth paying attention to
If a strobe light that does not have such equipment falls into the hands of a master, then it is necessary to slightly adjust the progress of the work. It is necessary to check the engine starting at idle speed. But there is also a nuance here - you should be sure that the idle speed works accurately.
The result of the test should be a position of the measuring marks in which the ignition will work perfectly. Once such a situation has been identified, it must be set. Further adjustments to other parameters are not recommended.
Testing on another scooter
If you are wondering how to check the switch on a Honda-Dio scooter, then in this case you do not need another Honda-Dio to complete the procedure. We will talk about the interchangeability of switches on scooters a little later, but now you need to understand that you can get accurate readings if you have another scooter nearby. This method is the simplest and most common.
You need to disconnect the switches on both scooters, and then connect the element under test to the other scooter. If everything works perfectly, this will mean that there is nothing wrong with the switch, meaning the problem should be looked for in some other area. Naturally, this is additional work, but the fact remains that you learned how to check the serviceability of the switch on a scooter, you performed the test and got the result. If the problems remain, then you have found it - you will need to repair or replace the switch, but this will also be written about later.
At this point, it's time to move on to another very interesting method - imitation.
Operating principle of electronic ignition
Diagnostics of the CDI ignition system is very simple, as is the principle of its operation. It consists of several main parts:
- Rectifier diode.
- Chargeable capacitor.
- Ignition coil.
- Switching thyristor.
System layout may vary. The operating principle is based on charging a capacitor through a rectifying diode and then discharging it to a step-up transformer using a thyristor. A voltage of several kilovolts is generated at the output of the transformer, which leads to air space between the spark plug electrodes.
The entire mechanism installed on the engine is somewhat more difficult to make work in practice. The dual-coil CDI ignition design is a classic design that was first used on Babette mopeds. One of the coils - low voltage - is responsible for controlling the thyristor, the second, high voltage, is charging. Using one wire, both coils are connected to ground. The output of the charging coil is supplied to input 1, and the output of the thyristor sensor is supplied to input 2. The spark plugs are connected to output 3.
A spark is supplied by modern systems when it reaches about 80 volts at input 1, while the optimal voltage is considered to be 250 volts.
What is capacitor ignition?
“Ignition by capacitor discharge” (and this is how the above abbreviation “Capacitor discharge ignition” is translated) represents a special electronics system, which has received another interesting name among the people - Capacitor. Sometimes the latter is called “thyristor ignition”, since the switching functions in it are performed by a part called a Thyristor.
The principle of operation of this unusual for many admirers of retro technology is the use of a capacitor discharge. In contrast to the contact system, CDI (reviews of which are mostly positive) does not use the ignition interrupt principle. However, the contact electronics also had a capacitor, the main mission of which was to eliminate interference and reduce the intensity of sparking at the contacts.
Separate “Capacitor discharge ignition” units are designed for direct accumulation of electricity. Such details appeared almost half a century ago. Since the 70s of the last century, powerful capacitors began to complement rotary-piston engines, used primarily in the creation of vehicles. In many ways, this type of ignition is similar to systems that accumulate electricity. However, the difference in them is also noticeable.
How does CDI work?
The above motor electronics element is based on the use of direct current, which is not capable of passing through the primary winding on the coil. The latter is contained in an already charged capacitor connected to the coil. The voltage in such an electronic circuit, in most cases, is quite serious, reaching several hundred volts.
Among the mandatory elements for ignition by capacitor discharge of motorcycle and auto engines, you can see a voltage converter (the main mission of which is to charge storage-type capacitors), the storage capacitor itself, a coil and an electric key. The latter can be represented by both thyristors and transistors.
History of creation
The operating principle of this system is based on the use of a capacitor discharge. Unlike the contact system, CDI ignition does not use the interrupter principle. Despite this, contact electronics have a capacitor, the main task of which is to eliminate interference and increase the intensity of spark formation at the contacts.
Individual elements of the CDI ignition system are designed to store electricity. Such devices were first created more than fifty years ago. In the 70s, rotary piston engines began to be equipped with powerful capacitors and installed on vehicles. This type of ignition is in many ways similar to electricity storage systems, but it also has its own characteristics.
Broken ignition as a cause of engine failure
First of all, I would like to talk about what can cause a four-stroke scooter engine to fail, and whether misconfigured ignition should be blamed for this. Answering this question, we can answer with one hundred percent confidence that an incorrectly configured or simply faulty ignition may well become the cause of engine failure. However, it is too early to blame everything on a faulty ignition system until you check the main parts that affect the performance of the engine. Let's talk about them in more detail.
The first and perhaps most obvious is a lack of fuel or a clogged carburetor. Before you start trying to adjust the ignition, thoroughly clean the carburetor and make sure that fuel is flowing to the engine. Also, check that the carburetor is providing sufficient air supply.
The second, most common reason why an engine refuses to start is faulty spark plugs. Make sure that the spark plugs used in the scooter are not punctured and have a good enough spark. Simply replacing the spark plugs usually helps.
If you are completely convinced that there are no more reasons for the engine not to start, then you can dig deeper and look for the problem in an incorrectly configured ignition. Let's figure out how to set the ignition on a scooter.
Switch on car and scooter
Many car enthusiasts may be surprised, since they know that checking the switch on a car is a matter of minutes. To do this, you just need to use a voltmeter, which sometimes even comes directly with the car. You just need to know where to connect what, and no problems arise at all. However, in the case of a scooter, things are a little different.
If you want to know how to check the performance of the switch on your scooter yourself, then you should remember that you will not be able to achieve accurate measurements if your switch remains in the same place where it always is. All this will be discussed more specifically a little later, but for now you just need to understand that checking the switch on a car and on a scooter are slightly different things, so you shouldn’t think that the process will be identical. Read on and you will learn how to test the switch on a scooter with a multimeter, just like on a car, and what are the disadvantages of this method.
Setting up OZ
The point of ignition tuning is to get a spark at the right time. If the coils on the stator are made stationary, then the only way is to rotate the rotor magnet relative to the crankshaft journal to the desired position. If the rotor is mounted on a key, you will have to saw through the keyway.
If you are using a sensor, you need to select its optimal position.
The ignition timing angle (IAF) is set according to the engine reference data. There are several methods that allow you to determine the moment of spark formation, but I will not deliberately consider them. Using “collective farm” methods, I made a mistake more than once. The most correct, accurate and reliable tool in this matter is a car strobe light. We turn the rotor to the position in which sparking should occur, put marks on the rotor and stator. We turn on the strobe, it has a wire with a clamp, which we hang on the high-voltage wire of the ignition coil. We start the engine, illuminate the marks with a strobe light. By changing the position of the sensor, we achieve coincidence of the marks.
Testing the switch
In order not to waste time, the test should begin by checking the electrical impulse that accumulates in the switch and at the right moment goes to the ignition coil.
We take a control light and connect one end of it to the green ground wire, the other to the black and yellow wire of the ignition coil. We turn the engine with the starter.
- If the light does not light, check the modules that ensure the operation of the switch
- If the light comes on, the switch and the modules that ensure its operation are working properly and the reason for the lack of a spark should be sought not in the switch, but, for example, in the ignition coil, ground or wires supplying current to it
If the switch and the modules that ensure its operation are in good working order, a 3W light bulb should glow at half-glow when the engine is cranked by the starter.
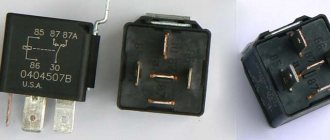
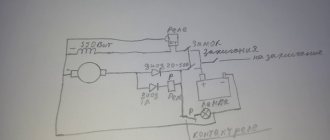
Ignition circuit components
The ignition circuit is an important part of the scooter's electrical system, without which it simply will not work without proper assembly. The circuit includes a coil, spark plug, switch, generator, CDI ignition module
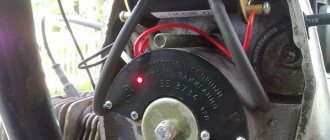
The latter looks like a small block, on one side it is plastic, on the other it is filled with compound. It is for this reason that when a unit fails, it is completely replaced without trying to disassemble it.
The CDI module has outputs for connecting five conductors. It is usually located quite close to the battery, can be mounted on the scooter frame or have a special cell. Most often, the CDI unit is located closer to the bottom of the vehicle, so it is not easy to reach. Without this element the system will not work.
Relay regulator
The relay regulator is colloquially called a stabilizer. This element is needed in order to rectify the voltage and stabilize it to the required level, which is suitable for the operation of the scooter’s electrical appliances. In Chinese and many Japanese models you need to look for it in the front of the vehicle, usually under the fairing. During operation, the radiator of the part becomes very hot, so it is placed where it can receive air cooling.
During operation, the generator produces alternating current, which is supplied first to the relay-regulator, and then moves on. The relay converts alternating voltage to direct voltage, in addition, it stabilizes the voltage to 13.5-14.8 Volts. If the voltage is less, the battery will not be able to charge; if it is more, there is a high risk of failure of the electrical system.
The regulator usually has 4 wires. They differ in color; in a standard diagram, the green wire is always ground. Red is under constant voltage. White supplies the regulator relay with the voltage supplied by the generator: this is alternating current. The yellow wire also goes from the generator to the relay regulator. The relay converts the voltage, turning it into a pulsating one. After this, the voltage goes to lighting fixtures, which are the most powerful consumers. Some models have an illuminated dashboard, additional lighting, running lights or other types of suspension. All this is powered by the same wire.
It is impossible to stabilize the voltage that powers the lamps. It can only be limited using a relay regulator to a level of 12 V. Even when operating at low speeds, the generator produces an excessively high voltage, which is not suitable for operating lamps and other lighting devices. If the relay-regulator is faulty, the dimensions or lamps that will be turned on at that moment may burn out.
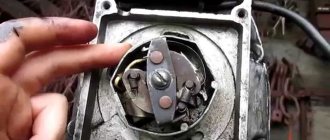
However, the device itself is not particularly complex. If you disassemble it, inside you can find a printed circuit board, an electronic circuit with a BT151-650R thyristor, a diode bridge for which 1N4007 diodes are used, one powerful 1N5408 diode, in addition, there are wiring elements that include the following: low-power SMD transistors, capacitors electrolytic, zener diode and various resistors. It is this simplicity that leads to the fact that the relay often cannot withstand heavy loads and breaks. Therefore, it doesn’t hurt to have a spare one and carry it with you: it changes quickly.
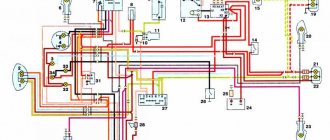
Electrical wiring
Properly connected wiring made from quality wires is important in any vehicle. You can buy a ready-made one or assemble it yourself, but it is recommended to follow the colors, this will help you figure out what goes where if repairs are necessary.
Ignition switch and its features
All of the above elements of the ignition system are combined into one system, which is controlled using the ignition switch. This part has a key for convenience. Essentially this is a switch that can be placed in different positions.
Most often, the lock has three operating positions, since it is universal for a large number of equipment, but two positions are usually used in circuits. The first position causes the red and black wires to short, allowing voltage to flow from the battery into the electrical circuit. Afterwards you can use the starter and start the engine. The second position, on the contrary, interrupts the circuit, which leads to the battery being disconnected and the engine turning off. If the lock is faulty and you need to start the scooter, you can simply connect the two wires together.
Switch and circuit device
How to check the switch on a scooter if you don’t even know what it is and where to look for it? This is why you need to start small. The first thing you need to do is find out what a switch is. In fact, everything is quite simple, since a commutator is an element of the electrical ignition circuit in a vehicle that produces a low voltage pulse that is transmitted to the ignition coil. In isolation from the overall picture, the definition does not look very clear, so it is worth considering the structure of the entire circuit.
So, the main element here is the generator, which generates the operating voltage in order for the switch discussed in this article to work. As mentioned above, using the energy of the generator, the switch generates a pulse for the ignition coil, but not just a pulse - namely a low voltage one. The ignition coil, in turn, generates a high voltage pulse at a specific moment in time, which is transmitted to the spark plug. The spark plug is screwed into the cylinder head and, upon receiving a high-voltage pulse, ignites the combustible mixture, which powers the engine. Well, now you know how the electrical circuit works in a vehicle, which will allow you to better understand how to test the switch on a scooter.
Setting the ignition timing
This operation will need to be carried out if the risks do not correlate with one another. It is recommended to use a strobe light that has a sensor for counting crankshaft revolutions. If this element is missing, you will need to check the engine starting at idle speed.
Motorcycle carburetor
To learn how to quickly adjust the carburetor on a moped, watch the video:
Complete ignition settings are carried out as follows:
- the crankcase is disassembled, and the maximum permissible gap for a full circle of shaft rotation is set on the contact group;
- the piston is placed in a position that coincides with what is indicated in the instructions for the moped;
- the stator fastenings are loosened, it is adjusted to the position where the contact closes.
Everything is put together in reverse order. Ignition must be either synchronized or slightly advanced (but literally by a fraction of a second). The advantage of the latter method lies in the fact that the spark is produced a little earlier than the piston inside the cylinder reaches its top dead center. This manipulation results in a low increase in power and easier engine starting, which is especially important in regions with temperature changes and simply in the cold.
Useful videos with step-by-step instructions:
Ignition setup steps
The first possible breakdown is checked with a stroboscope; to do this, you need to check whether there are measured risks in the ignition synchronization. Rarely does anyone have an expensive strobe light for free use, but if you have the opportunity to ask your friends for it, then it’s better to start working with this check.
In order to start checking the synchronization of the marks on the system, you need to thoroughly warm up the moped motor. There is no need to strain the moped too much.
Connecting a strobe
After this, you should connect the strobe. If the technician is working with the device for the first time, he must first carefully study the operating instructions. Two wires come from the device, one of which should be connected to the moped’s power supply, and the second induction wire is connected to the spark plug.
A simple strobe for setting up the ignition of a moped
As soon as a spark appears on the spark plug during startup, the bright light of the strobe will indicate this. Now you should direct this light that appears to the location of the measuring marks and see how they are located relative to each other. If everything is correct, the risks are exactly the same, then the setup went as expected, no further adjustment is required.
Adjusting the ignition timing
If the measuring marks are not synchronously coupled with each other, or they are not visible, then you will have to adjust the start of the moped. More precisely, you will have to adjust the ignition timing. Different models of Chinese mopeds may have different adjustment methods. Therefore, before starting work, it is necessary to study the documentation attached to the moped. Adjustments must be made in accordance with the instructions.
If it is not clear where these measuring marks should be located, you should carefully inspect the generator flywheel, as well as the flywheel housing, and they will immediately show up.
Further work requires a careful approach and strict adherence to safety measures, since you will have to inspect and adjust the system with the engine running.
Equipment Features
Let's go back to the strobe
To operate, you need a type of this device that is equipped with a special sensor for counting the rotation of the hot shaft - this module is worth paying attention to
If a strobe light that does not have such equipment falls into the hands of a master, then it is necessary to slightly adjust the progress of the work. It is necessary to check the engine starting at idle speed. But there is also a nuance here - you should be sure that the idle speed works accurately.
The result of the test should be a position of the measuring marks in which the ignition will work perfectly. Once such a situation has been identified, it must be set. Further adjustments to other parameters are not recommended.
Ignition coil
If everything looks intact, check the ignition coil. To do this, disconnect it (remembering how the wires are connected) and use a multimeter to check the resistance of the windings.
The primary winding is made of thicker copper wire. Its terminals are connected to two terminal connectors at the end of the coil. It has a small number of turns and therefore its resistance is low, approximately 0.5-5 Ohms. One wire of the coil is connected to ground - you need to check it, attach one multimeter probe to the nearest metal part of the moped, and the second to the coil connector. The resistance should be close to zero.
The high-voltage coil consists of several thousand turns of very thin copper wire, so its resistance should be on the order of 2-5 kOhms. The resistance must be measured between the coil contact connected to ground and the core of the high-voltage wire.
In this way, we will check the coil for a break, but without special equipment we cannot check for other coil faults, for example, an interturn short circuit, so we will leave the coil alone for now, also because a coil without visible mechanical damage is most likely working.
The principle of operation of ignition in a 4-stroke scooter engine
Modern scooters are equipped with contactless systems. They are considered the most reliable and easy to use, do not require complex connections, and provide a constant good spark on time. However, the setting is still important; even the presence of a spark does not always allow the fuel mixture to ignite, since its power also plays a role.
The main reasons for the operation of the ignition system are quite simple: its task is to create a spark to detonate the fuel mixture. If this does not happen, you need to carefully examine each node and find out why the spark disappeared.
- In order to check whether there is a spark at all, you need to unscrew the spark plug and apply it to the engine ground; this can be done using metal objects that are not covered with paint. You cannot hold it with your hand: if there is a spark, it can give you an electric shock, and the discharge reaches 40,000 volts, which the coil creates.
- If the spark plug does not produce a spark, it must be replaced with a new one; You can also check it using a special device that can be bought at a car store. It is inexpensive, it is a faster and safer way.
- If the spark plug is working, but there is still no spark, you will have to use a multimeter, with which you can check the wiring of the scooter, find a break or a faulty element.
- You also need to check the generator. It is an important element without which the scooter will not work. You will need to measure the resistance: to do this, you need to disconnect the ignition coil from the wiring, then measure the resistance between ground and the generator. This is usually a black wire with a red stripe. If the resistance is normal, it will be about 80-150 Ohms. If the device malfunctions, the resistance will be significantly less or absent altogether.
- After this, you need to measure the resistance that the coil produces. To do this, a multimeter is connected to its terminals. One of the terminals is connected to the magnetic circuit. If there is no resistance, a coil malfunction is diagnosed. If it is there, but weak, it is worth checking the wiring or the place where the coil connects to it.
- If everything is in order, but there is still no spark, you will need to check the wiring: to do this, you need to select two points to which the multimeter will be connected. One of the points should be the switch or ignition coil, the second should be the generator block. The wires may either be broken or there may be a short circuit between them. If the circuit is fully operational, check the ignition unit. It rarely fails, so it is dealt with last, when more likely causes of failure have been excluded.
Broken ignition is the cause of engine failure
An incorrectly configured or faulty ignition often causes engine failure. It would be wrong to immediately climb into the cylinder and examine the insides of the scooter, especially since this will not solve the problem. Before touching the ignition system, you need to check for other reasons why the scooter may not work.
- The simplest thing is the lack of gasoline in the tank. Quite often, owners forget to refuel their vehicle, and such a trivial reason can be overlooked.
- The carburetor may be clogged, which prevents the formation of a mixture suitable for driving.
- The carburetor needs to be cleaned regularly, so it doesn't hurt to check whether fuel is flowing from it into the cylinder. It is possible that the fuel pipe is clogged. The jets and other parts of the device may become clogged with debris, which causes little fuel to flow or, conversely, the engine does not have enough air, and therefore it does not start.
- The scooter may also refuse to start if the fault is caused by spark plugs. They may be wet or not produce a normal spark. It is advisable to have a spare set and check with it. In any case, the spark plug needs to be unscrewed and inspected.
- If, after checking all the components, you are convinced that they are in order, you can check the ignition system in the manner indicated above and proceed to setting it up if everything is in order with the technical part.
Power check
In order for a spark to jump between the spark plug electrodes, the commutator capacitor must be charged from something. And it is charged either from a battery or from a generator. Means what? Right! We check whether power is supplied to the switch.
Before you start measuring power, let’s determine what type of switch is on your scooter. Visually, switches of the DC CDI type are twice as large as AC CDI. But this is not an exact criterion. The most accurate criterion is to look at the output of the high-voltage coil of the generator:
- If it is not activated, it means that your scooter is equipped with a DC CDI type switch
- If enabled, then vice versa - your scooter is equipped with an AC CDI type switch
The output of the high-voltage coil of the generator is located in the same place as the output of the generator itself: we are looking for where the wires coming from the generator are connected to the on-board network of the scooter and if one of the two wires with round terminals is not connected, then the coil is not activated
How to set the ignition on a scooter - contact system
Now we will learn how to set the ignition on a moped, walk-behind tractor or scooter. The scheme of actions depends on the type of spark creation system; it is known that there are only two of them - contact and non-contact (contact-transistor). Their main difference lies in the principle of operation. All old models of scooters, mopeds and walk-behind tractors had contact ignition. Currently, the second option is mostly used, since it is more advanced and tens of times more reliable.
Contact ignition is based on a mechanical interruption system. In the closed state, low voltage current flows through the primary circuit. When a contact in the secondary winding system opens under the influence of electromagnetic induction, a current surge occurs with a high voltage, and then the distribution block works with it. Ignition different from the norm may be early or late. It is displayed on a distributor; this device combines a circuit breaker and a distributor. Most often, this part is installed on the crankcase, but there may be other assembly specifics; you need to look at the instructions for the design and operation of the vehicle. The adjustment procedure is as follows:
- Having previously disassembled the crankcase, on the contact group we set the maximum permissible gap for a full circle of shaft rotation.
- Next, set the piston to a position whose distance from the engine dead center corresponds to the technical documentation.
- Now we loosen the stator mount and adjust it until the contact closes.
- Now we put all the details in place and admire the result.
Signs and causes of moped motor malfunction
Among the main manifestations of a breakdown of the ignition system are the following factors:
- the moped does not start the first time or does not start at all;
- it takes a lot of effort to start the engine;
- presence of burning on the candle;
- excess noise when the engine operates while driving and idle;
- inability to gain sufficient speed without effort.
- Correct ignition settings can eliminate the following problems in the operation of the moped:
- fuel detonation;
- increased gasoline consumption;
- reduction in power at low speeds;
- noticeable knocking not only when driving, but also when the engine is running without moving;
- strong heating of the motor;
- presence of pops.
Setting up a timely spark supply will also extend the operation of the piston system and the entire engine in general due to the absence of gasoline accumulation inside the engine - carbon deposits do not increase, leading to coking and unusability of the engine in general.
Incorrectly set ignition is associated with other problems, including the installation of the piston system. The reasons for the failure of the moped ignition are:
- incorrectly installed ignition coil;
- wear of the piston system, which leads to the release of gases from the inside and the release of fumes onto other components;
- physical damage to the vehicle due to a fall or accident.
It is necessary to constantly monitor the condition and correct connection of the ignition coil, since it is this part that increases the voltage, resulting in a spark. Lack of sufficient voltage prevents a spark from forming and starting the moped engine. There is a way to diagnose the ignition coil to understand what needs to be replaced, and not just adjusted correctly. You need to take a tester (multimeter) to measure the levels. It is worth considering that a digital tester is preferable, since the needle may not pick up the slightest fluctuations.
The tester probes need to be connected to the terminals of the ignition coil, and the multimeter itself must be switched to resistance measurement mode. After this you will need to apply voltage. An indicator of up to 5 Ohms is considered normal (but not lower than 0.5 Ohms) - the optimal level. Next you need to do everything with the secondary winding:
- one probe is connected to the coil terminal (supply);
- the second must be attached to the spark plug cap;
- you need to look at the value on the screen.
Checking the ignition coil with a multimeter
The norm for the secondary winding is two to three kilo-ohms. If the indicators do not correspond to those mentioned above, you will need to replace the ignition coil, and not just adjust the corresponding system.
Video on how to check the ignition coil on a moped:
Advantages of the CDI engine
Consumers who have experience using a car equipped with a CDI engine note that:
- the service life of the engine and individual parts subject to the greatest wear has increased;
- during operation, CDI produces less noise than conventional diesel engines;
- thanks to the increase in torque, the car is more controllable and obedient;
- There is virtually no vibration felt while driving.
In addition, improving environmental performance is very important for European consumers - this is another important advantage due to which buyers choose cars with CDI.
Generator and ignition sensor
You can check the generator and sensor without removing them from the engine.
We switch the tester to the AC measurement mode for the 2V range or, if your tester has such an option, for 200mV. With one probe we touch any metal part of the scooter or engine, with the other probe we touch the sensor wire (in the picture above it is labeled as a Hall sensor, but in fact it is an inductive ignition sensor). We turn the engine with the starter and look at the multimeter display. If the numbers are flashing on the display, it means the sensor is generating a signal and everything is fine with it. Otherwise, the sensor is faulty or the wire is broken.
Buying a switch
Purchasing a switch is the easiest and fastest way out, since you do not waste time, effort, and the cost of this mechanism is not so high as to save much on it. This is really the most reasonable solution that you can come up with in a situation where your switch has burned out. However, again, it is very important that you check everything correctly, do not use only a tester, but carry out a full procedure for checking the switch so that you can say with certainty that this is the reason. Otherwise, you will just spend money on a new part, but your scooter will still not function.
Results
- The absence of a spark when power is supplied to the coil requires checking the high-voltage circuit and ground.
- If the high-voltage circuit and ground are fully operational, then the problem is most likely with the coil itself.
- If there is no voltage at the coil terminals, measurements are taken on the switch.
- If there is voltage at the switch terminals and there is no voltage at the coil terminals, the reason is most likely that there is no ground on the coil or the wire connecting the coil and the switch is broken - the break must be found and repaired.
- The absence of voltage on the switch indicates a malfunction of the generator, the switch itself, or the induction sensor of the generator.
The method for checking the CDI ignition system coil can be used not only for motorcycles, but also for any other vehicles. The diagnostic process is simple and consists of a step-by-step check of all parts of the ignition system to determine the specific causes of problems. Finding them is quite simple if you have the necessary knowledge about the structure and operating principle of the CDI ignition.
Ignition system diagnostics
Checking the serviceability of the CDI system is a fairly simple procedure that every car or motorcycle owner can handle. The entire diagnostic procedure consists of measuring the voltage supplied to the power coil, checking the ground connected to the motor, coil and switch, and checking the integrity of the wiring supplying current to consumers of the system.
The appearance of a spark on the engine spark plug directly depends on whether the coil receives power from the switch or not. No electrical consumer can operate without proper power. Depending on the result obtained, the check either continues or ends.