Leave it to mechanics or install electronics
Perhaps not all older motorcycle models are running.
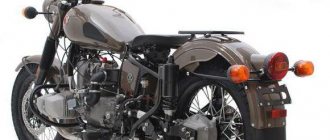
The Ural motorcycle sits and rusts in my grandfather’s barn because it won’t start. The wheels are spinning, the engine is not jammed. Maybe the spark goes into the ground, as they say. In short, you need to look at the spark generation system. But even a working motorcycle, with a contact ignition system, causes unexpected and unpleasant problems for its owner:
- won't start when you really need it;
- with new oil rings in the engine, the spark plugs become covered with soot;
- there is no required engine power when driving with maximum load;
- the maximum speed is not reached;
- The battery is slightly discharged and the engine does not start.
The contact ignition system creates a lot of problems, especially when the moving parts in it have already worn out, backlash has appeared, and the geometry of the elements has changed.
The solution is simple - all cam ignition is thrown out, a modern electronic non-contact type spark generation system is installed. You will no longer have to deal with the thankless task of cleaning contacts and endlessly adjusting the gaps in the breaker. All this is possible thanks to the simple, but quite reliable design of the motorcycle. For example, it is quite easy to set the thermal gap and adjust the valves in the Urals with your own hands, using only your own tools from the garage. This way you will gain valuable experience and save money on visiting the workshop.
Replacing spark plugs before installing electronic ignition systems
Spark plugs are the last element of the spark generation system in any engine. They work under conditions of high pressure and temperature.
Sparking occurs on them when a high voltage pulse is applied. Therefore, it is not possible to test them, without a test bench, in domestic conditions.
The serviceability of a working spark plug can only be judged visually - by carbon deposits on its tip or presence on the “skirt”. To ensure reliable engine operation, change spark plugs according to the motorcycle operating rules, without expecting them to work forever.
Choose the correct heat rating when purchasing spark plugs. Set the gap in the spark plug electrodes to 0.7-0.8 mm.
We hope that these problems with the spark plugs are not observed and, after purchasing (manufacturing) a non-contact type ignition system and replacing the spark plugs, we begin adjustment work.
Signs of poor ignition performance on a Ural motorcycle
- The motorcycle does not start well;
- Kickstarter is kicking;
- The engine does not develop full power;
- Weak spark when checking spark plugs.
Before setting the ignition, the battery must be well charged; the “strength” of the spark depends on this. If the battery is weak, and this is checked by the signal (horn), since the warning lamp can light quite brightly, and the signal horn barely makes a sound, then attempts to start the motorcycle will be useless.
To set the ignition:
- unscrew the front engine ignition cover,
- unscrew the bolt pos. 9 (key for 10) which is held by the advance automatic,
- unscrew the three bolts that hold the breaker body,
- disconnect the wire going to the ignition coil.
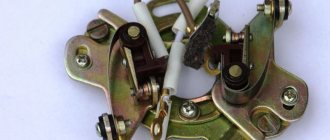
We remove the breaker housing, clean it from dirt, and wipe it dry. We check the contacts of the breaker; if there are visible defects, we eliminate them with sandpaper. The plane of the contacts must be smooth, without distortions.
After cleaning, we put the breaker housing assembly back in place, do not tighten the fastening bolts, put the ignition timing switch in place, and tighten the bolt that holds it.
Unscrew the bolt pos. 1 which fixes the movable contact of the breaker, and with the eccentric pos. 11 we set the maximum gap between the contacts of the breaker to 0.5 mm. Fix with bolt pos. 1.
We take a 12 volt lamp (or a multimeter) and connect it parallel to the ignition contacts. Those. one end of the lamp to the wire that goes to the ignition coil, and the other to the housing. And turn on the ignition on the motorcycle. It turns out that when the breaker contacts are closed, the lamp does not light. The contacts open and the lamp lights up. At the moment when the breaker contacts open and a spark occurs at the spark plug. The moment of opening the contacts is regulated by turning the body of the breaker itself clockwise or counterclockwise.
To set the contact opening moment, you need to open the inspection window on the engine, where you can see the flywheel. Using Kickstarter, set the mark on the flywheel so that it matches the mark on the engine, next to the inspection window.
If there is no mark on the flywheel or it is not visible
You need to unscrew the valve cover of the left cylinder and use the kickstarter to set the moment when both valves are closed. Unscrew the spark plug, insert a caliper into the hole, and bring the piston to the extreme point, this will be TDC. Then take out the caliper and spread it 7.5 mm. Move the piston with TDC using the kickstarter, and determine when the valves are closed, insert the caliper into the spark plug hole again. And slowly bring the piston to the caliper so that it rests against it. Thus, the piston will not reach TDC by 7.5 mm, this is the moment when the advanced ignition is triggered. The breaker is set according to it.
If you don’t have a caliper, you can simply insert an elastic wire, take a few measurements to determine the TDC, then push it 7.5 mm deeper and bring the piston to it. This can also be done by unscrewing the head and measuring 7.5 mm from the TDC of the piston.
If there is no mark on the flywheel, then you can put it with a chisel, but carefully so that you don’t have to search for TDC for a long time.
Ural tries on electronics
The incursion of electronics into the automobile has been rapid.
Even the most inveterate skeptics quickly realized that the new ignition, which was the one that raised the most doubts, dramatically improved starting and had a positive effect on fuel efficiency. The last circumstance for a heavy motorcycle with a four-stroke engine is also of particular relevance. And therefore, starting with the Ural model IMZ-8.103-10, we began to equip some motorcycles with a contactless electronic ignition system (BSI).
This system is designed in such a way that it is interchangeable with the existing classic one - this simplifies its installation. During operation after adjustment (setting the ignition timing), it does not require maintenance. In idle mode, the current consumed by it is two times, and when the motor is not running, it is 40 times less than in the classic one. BSZ ensures uninterrupted sparking even when the battery is half discharged and the mains voltage is only 6 V. And with all this, the system is quite reliable, and this is very important for our motorcycles - most of which are used in the outback.
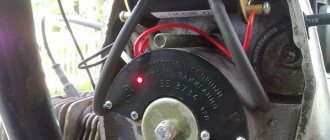
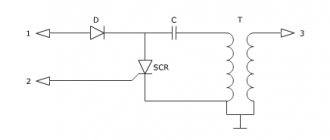
The BSZ consists of a magnetoelectric sensor (it is installed instead of the PM 302 breaker) and a switch, which is mounted on the frame under the saddle. The connection diagram of devices with the motorcycle electrical system is quite simple, it is shown in the figure.
We set the ignition according to the marks marked on the rotor and stator of the sensor. If after repair these marks do not match, we recommend this procedure: Place the engine flywheel in such a position that its M3 mark coincides with the mark on the crankcase. Loosen the screws securing the sensor stator,
and turn it until the marks on the stator and rotor align. If the marks on the rotor are not visible, turn the crankshaft a full turn, align the marks and tighten the stator screws. Check the gap between the rotor and the sensor body - it should be within 0.25-0.30 mm. Adjust the gap between the electrodes of the spark plugs - with BSZ it is 1 mm. The practice of operating motorcycles on which the BSZ is installed (by the way, such a system was also installed on the copy being tested in the editorial office of “Behind the Wheel”) made it possible to substantiate some recommendations for eliminating possible malfunctions.
So, if a motorcycle with a normally charged battery starts only with a tow and does not respond to the kickstarter pedal, you must first check the gap between the rotor and stator of the sensor and bring it back to normal.
BSZ diagram : 1 - day-night switch with emergency ignition switch; 2 - candle; 3 — candle tip; 4 - high voltage wire; 5 - switch; 6 — magnetoelectric sensor; 7 - afterburning coil.
If the engine does not start at all, and there is no doubt about the serviceability of the ignition coil, you need to check the electrical resistance of the sensor coil. It should be in the range of 200-240 Ohms. It is possible that the connections have simply oxidized - this also leads to an increase in resistance. Check all connections and clean them. Lubricate with grease and tighten well. Using a light bulb or probe, check the presence of voltage at the middle terminal of the switch.
Please note: checking the integrity of circuits by shorting them to ground is strictly prohibited. You should also not operate the motorcycle without a battery or disconnect the battery while the engine is running. This will inevitably damage the switch.
And the last thing I would like to say. If, however, the BSZ system fails, it should be sent to the manufacturer at the address: 625630, Tyumen-2, st. Tsiolkovsky, 1, TATE. In the meantime, return to the serial battery ignition system by installing the IM 302 (PM 302-A) breaker and reducing the gaps on the spark plugs to 0.5-0.65 mm.
I. KOSHELEV, chief designer of the motor plant in Irbit
1989N03P31
Troubleshooting problems with the ignition system on a Ural motorcycle
Checking the ignition system, first of all, occurs with an initial check of the functionality of the breaker
It is important to pay attention to the operation of the ignition advance machine, in which it is undesirable to have various complaints. The resistance of the primary winding, which is measured by the tester, must be at least 6 ohms. Next, the secondary winding is checked, for which the tester is connected to the high voltage connections
The voltage of such a winding should be exactly 10 kOhm. Repair of Ural and Dnepr motorcycles, like many others, cannot be done without all these manipulations aimed at optimizing its operation. Checking the ignition does not end there. Next, the spark plug caps and high voltage wires ring. Resistance indicators, in these cases, should vary. The plug caps should have approximately 2 kOhm, and the wires should have almost zero (this is an important aspect). During these manipulations the problem will be found and fixed.
Next, the secondary winding is checked, for which the tester is connected to the high voltage connections. The voltage of such a winding should be exactly 10 kOhm. Repair of Ural and Dnepr motorcycles, like many others, cannot be done without all these manipulations aimed at optimizing its operation. Checking the ignition does not end there. Next, the spark plug caps and high voltage wires ring. Resistance indicators, in these cases, should vary. The plug caps should have approximately 2 kOhm, and the wires should have almost zero (this is an important aspect). During these manipulations, the problem will be found and eliminated.
Ignition adjustment and repair in the Urals and Dnieper
The ignition on a motorcycle can be checked by following the following procedure:
- We take the most ordinary incandescent lamp, which is naturally working. We connect one end of the wire contact to ground, and connect the second, which comes from the breaker, to the terminal. Setting the ignition on Dnepr and Ural motorcycles is done by turning the crankshaft until the marks on the crankcase and on the flywheel, which has the letter “P,” completely coincide. Next, turn on the ignition, while retracting the automatic weights to the very end. Under this circumstance, the incandescent lamp should light up instantly. If this does not happen, i.e. the lamp does not light up, or this happened before the weights were completely retracted, then ignition adjustment is necessary.
- We loosen the screws on the breaker. Next, you need to move the weights to the very end and slowly turn the breaker structure until the incandescent lamp starts to burn. This happens exactly the same as when contacts are closed, when a spark jumps between the electrodes of the spark plug itself. After carrying out these procedures, the structure of the breaker and its position must be securely fixed using fastening screws. It is worth noting that in all MT models, the ignition timing must be at least 34 degrees before dead center.
Adjusting the ignition of a Ural motorcycle
In general, installing an ignition on Ural and Dnepr motorcycles significantly increases the main technical indicators of this motorcycle. The ignition setting allows you to easily start the motorcycle even in the coldest time of the year, when consistently negative temperatures prevail. In addition, the ignition installation of the Ural motorcycle allows you to optimize and normalize the operation of the engine, increase the spark phase, which has a positive effect on the exhaust gases that come out of the motorcycle pipe. Simply put, these gases become less harmful to human health and the environment.
Ignition adjustment
Conclusion
With proper adjustment and installation of the ignition, the amount of fuel consumed is significantly reduced. If the battery has insufficient voltage, the motorcycle engine will be started in any case, naturally, provided that the Dnepr motorcycle ignition has been installed. Older models of the Ural motorcycle generally do not have electronic ignition, which is a definite problem for its owners. You shouldn’t despair, because you can completely adjust the ignition yourself, without going to specialized salons. This should be done at least because contactless ignition can significantly improve engine performance and also make it easier to start your bike.
source
Express diagnostics
If the motorcycle begins to act up “in the field,” then removing and installing the ignition coil will become an almost impossible task. And even if you have a multimeter at hand, it will be incredibly difficult to perform the test. Therefore, it is worth using an alternative method for diagnosing the ignition system, which is often used in practice by experienced motorcyclists.
If the battery is more than half charged, you will be able to check the functionality of the ignition coil in a couple of minutes. To do this, you need to remove the contact cap of the spark plug and turn on the ignition, holding it by the insulated part. The distance between the cap and the candle should be 5–7 millimeters.
Hit the kickstarter hard and pay attention to the spark plug. If a spark forms between it and the cap, the ignition coil is in working order, and you should look for the cause of the failure in other parts of the motorcycle. In some cases, a spark is formed, but it appears rather weak and dull. This is usually due to the battery being low. However, if you are sure that the battery is charged, then most likely the problem is a breakdown of the ignition coil windings.
Peculiarities
Before setting up the ignition, you should understand what elements it consists of in the Urals. This will allow you to avoid some mistakes and also configure it more accurately. If you bought the motorcycle secondhand, then the ignition may be homemade, in which case it will have to be redone.
The main source of the high-voltage pulse is the ignition coil, often called the bobbin. Can be used from Oka. It is installed separately from the main body. A chopper (cams), which is equipped with a device for advancing the ignition angle. A couple of candles. There is a set of wires for low and high voltage. This also includes power supplies, as well as their switch.
It is worth noting that, depending on the assembly, it may require 6 or 12 volts. The difference between these systems is in the coils
On twelve volt coils a B-204 coil is used, on six volt coils B-201. The connection diagram here is standard.
The breaker has a rather complex design, which consists of several elements. The housing contains a movable and fixed cam with a regulator, which operates from centrifugal force. There is also a capacitor that directly controls spark formation.
Features of the electronic system
If you prefer to service your motorcycle with your own hands, then this ignition for the Urals will be an ideal option for you. It is much easier to maintain. There is no need to adjust the gaps on the contacts, which significantly reduces the time of service work. Also, the ignition timing does not change during operation.
Also, a huge advantage of this ignition option for a Ural motorcycle is that the spark plugs last longer. Thanks to more efficient spark formation, the load on them is significantly less.
Immediately after installing the new unit, you will notice an increase in engine efficiency. Fuel consumption is reduced and it becomes more responsive on the road. Also important is the absence of problems at low temperatures and wet weather.
This type of motorcycle assembly consists of the following elements:
- Hall sensors;
- Modulator of magnetic field into electric discharge;
- Ignition coil;
- Switch for distribution of spark charges;
- High-voltage wires, terminals, fasteners.
Actually, any BSZ consists of these elements, you can also read the article Izh Planet 5, ignition adjustment, there is also information on this topic.
Technical characteristics of the motorcycle Dnepr MT 10
The main technical characteristics of a motorcycle are the engine performance. The engine is a four-stroke engine with two valves and two cylinders, the valves are located at the top. The new product was distinguished by the presence of good traction, which is provided by a volume of 649 cm3. Power was 36 hp. Fuel injection was made possible thanks to two K-301D carburetors.
Electricity was generated using an alternating current generator with a voltage of 12 volts. Moto Dnepr MT 10 had excellent torque, reaching 46 Nm. At maximum acceleration at high power, the bike reached up to 5,800 rpm. The kit included a rechargeable battery; if desired, you can add two batteries.
Five random articles about motorcycles:
Connector in Java headlight. Installing a connector in an old lady's headlight
Relatively often you have to remove the upper headlight casing to change the oil in the front fork shock absorbers, when tightening the steering column nuts, to lubricate the steering column bearings, etc. In this case, it is easy to damage the wires going to the ignition switch, and even work with the casing hanging on the wires uncomfortable.
And if the motorcycle has a “sports” steering wheel, it is generally very difficult to remove the casing - the cross brace gets in the way. For convenience, you can make electrical connections to the upper casing through a plug connector, for example, type RSHA-14 or RSHA-20. These parts are sold in radio stores. The wires going to the upper headlight casing are disconnected sequentially, one at a time, from the central switch (two from the speedometer bulbs) and soldered to the contacts of the socket part of the connector. At the same time, write down the contact numbers and addresses of the wires from both parts of the connector. Then wires with a cross-section of at least 1.5 mm2 are soldered to the male part of the connector and connected to the contacts of the central transmitter... Read more >>
About the operation of IZh motorcycles. Owners' Questions Answered (1965)
Answers to questions from owners Now the motorcycle season is in full swing.
Owners of IZhs, the most popular motorcycles in our country, have a lot of questions. Our readers V. Metreveli (Batumi), V. Konenko (Kharkov), Y. Nekrasov (Moscow), E. Elyashov (Odessa), A. Demchenko (Tbilisi) write about this to the editor ) and many others. Questions from owners of IZH motorcycles are answered by engineers of the Izhevsk Machine-Building Plant V. Abrahamyan and V. Rozhnov. ON THE IZH-JUPITER MOTORCYCLE OF THE FIRST PRODUCTION, THE CYLINDERS SOMETIMES OPERATE UNEVENLY. WILL WE ELIMINATE THIS DEFECT AND WHAT ARE ITS REASONS? WILL INSTALLING ONE BREAKER AND A TWO-SPARK COIL HELP? Yes, indeed, on some motorcycles the cylinders operate unevenly. Special studies carried out at the plant revealed that this unevenness is mainly caused by two defects. The first is the protrusions between the nozzle chamber and the carburetor body (Fig. 1), supplied by Len... Read more >>
Motorcycle engines IZH Planet - 3 / Jupiter - 3
Motors of the new IZHs Responding to numerous letters from readers interested in more detailed information about the new Izhevsk motorcycles “Jupiter-Z” and “Planet-3” (“Behind the Wheel”, 1970, No. 4), employees of the Izhevsk plant L. KISELEV and N. ZAROZHEVSKY Today they talk about the engines of these cars and ways to increase the power of previous models.
Rice. 1. New IZH engines: Jupiter-3 (left) and Planet-3 (right). At first glance, they can be distinguished by the modified left crankcase cover (IZH-Planet 3) and the “oblique” arrangement of ribs on the head (IZH-Jupiter 3). When designing new, more powerful engines for the IZH Jupiter Z and IZH Planet Z motorcycles, we sought to ensure the maximum possible interchangeability of their components and parts not only with each other, but also with previous models. Therefore, the recently produced IZH-P2 engines, which had boost capabilities, were taken as a basis. As a result of large designer... Read more >>
Contactless ignition in the Urals IMZ-8.103-10
The Ural tries on electronics The invasion of electronics into the car was rapid.
Even the most inveterate skeptics quickly realized that the new ignition, and it was the one that raised the most doubts, dramatically improved starting and had a beneficial effect on fuel efficiency. The latter circumstance for a heavy motorcycle with a four-stroke engine is also of particular relevance. And therefore, starting with the Ural model IMZ-8.103-10, we began to equip some motorcycles with a non-contact electronic ignition system (BSI). This system is designed in such a way that it is interchangeable with the existing classic one - this simplifies its installation. During operation after adjustment (setting the ignition timing), it does not require maintenance. In idle mode, the current consumed by it is two times, and when the motor is not running, it is 40 times less than in the classic one. BSZ ensures uninterrupted sparking even when the battery is half discharged and voltage... Read more >>
Dnepr MT-10. New
Since July, the Kiev Motorcycle Plant has switched to production of a new model of the Dnepr heavy motorcycle, designated MT-10.
Like the Irbit plant, which simultaneously began production of the Ural M-67 (see “Behind the Wheel,” 1974, No. 9), we abandoned traditional 6-volt electrical equipment in favor of 12-volt. This made it possible to equip the motorcycle with modern lighting devices that meet the requirements of international standards. The main source of electricity - a new 150 W alternating current generator with a built-in rectifier unit - provides all consumers with a reserve in the dark. The method of attaching the generator to the engine crankcase has changed - its housing is equipped with a flange, which is attracted to the socket using two studs. This eliminates the previously encountered defect - oil leakage through the connection. The MT-10 has a more advanced headlight and a separate panel - a speedometer and... Read more >>
login registration forgot your password?
Motorcycle goods store About the store Terms and return procedure
Selection of candles
The contactless system has certain requirements for candles. If they are faulty or do not fit a specific motor, then you will not get any positive effect from using this system.
Be sure to check the condition of the spark plugs. They should not have soot. It is optimal if the electrode is sand-colored
If necessary, replace the spark plugs; when selecting, pay attention to the heat rating. When the spark plugs are in order, the electronic ignition can be installed
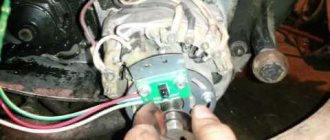
Now you can install a new ignition system for the Ural motorcycle. Before starting work, dismantle the old BSZ. Installation is carried out in the following order:
- We install a new coil, here you will need a connection diagram, otherwise problems will arise further;
- We install the ignition module, it should be secured so that it is directed towards the coil.
- The engine rotor is installed in the position at which the ignition is adjusted.
Now you have a contactless ignition system installed, all you have to do is configure it to achieve optimal performance
Please note that setup here is only required once. In fact, you already know how to install BSZ
Now we adjust the ignition timing. We install the motor in accordance with the marks, connect all the wires. Next you need to adjust the position of the sensors. Next, we attach all the elements and check for sparking. If everything is fine, then you should drive 10-20 kilometers and check the set angle again.
If necessary, adjustments are made, but if everything is done correctly, this will not be necessary. Knowing how to do contactless ignition on your motorcycle, you will not wonder how much this work costs in a workshop.
Mechanical or electronic
Initially, these motorcycles had mechanical ignition. Unlike BSZ, this option has low reliability. The reason is in the mechanical elements of the structure; they wear out over a certain mileage, which leads to regular failures. And you have to adjust the ignition on the Ural motorcycle much more often
The electronic ignition system on a motorcycle does not have such problems. There are practically no interacting elements here. Therefore, the service life is significantly longer. Also, thanks to improved spark formation, there are fewer problems with engine operation. The owner is also relieved of the need to regularly clean the contacts. All this leads to the massive spread of BSZ on this model.
Selection of candles
The contactless system has certain requirements for candles. If they are faulty or do not fit a specific motor, then you will not get any positive effect from using this system.
Be sure to check the condition of the spark plugs. They should not have soot. It is optimal if the electrode is sand-colored
If necessary, replace the spark plugs; when selecting, pay attention to the heat rating. When the spark plugs are in order, the electronic ignition can be installed
But what if there is no such card? You should experiment with it. We get on a motorcycle, go on a tour, and it's tiring! When we reach maximum speed, we start playing with the switch, changing in advance. As soon as we deny at what advancement our motor has the most power, we return home. The memory module transmits data to the computer and reads what we just had before. Knowing this progression, we can make up bad characteristics during rotation.
But remember that such characteristics will already be better than no one! The preliminary reading values in degrees are entered into the program. In addition to the ignition map, we must enter several other values. Due to quite compelling technical reasons, in such situations it is not possible to change the ignition point, so we must set it at this moment when we receive the pulse signal. To minimize the adverse effects of switching between hard ignition and map, hysteresis should be applied. The maximum hysteresis value, i.e. The moment the card is turned on should be at a slightly lower speed than is usually used for starting, so that the card is turned just before it starts. The minimum value should be less than the minimum speed you can drive. These values are not critical, but must be chosen experimentally. The hysteresis is designed to prevent hiccups when the ignition is off, so the minimum value should be slightly higher than the maximum. This should protect the coil from overheating. After this disconnection, the coil is turned on during the next stroke. Hysteresis values of the map. . It reads from programmed characteristics.
Contactless ignition systems
Not so long ago you could only find a homemade device. The reason is the lack of proper supply in stores. Craftsmen in garages remade the contactless unit from other motorcycle models and assembled it from individual parts. This is a rather complex activity that requires skills. Now you can purchase a ready-made kit without any problems.
In subsequent approximations, it turns out that the combustion time of the mixture depends on its temperature, composition, octane number and many other factors. However, the most important are rotation and vacuum. Depending on the vacuum approx. There are many books ahead on variable ignition; there is little information on this issue on the Internet, even in English.
The main idea is to minimize interference to existing electrical installations, without mechanical modifications and to be assembled in such a way that, in the event of a device failure, it can quickly return to its previous state. We now develop the most common installation types.
There are many advantages to using ready-made products. At a minimum, they have been tested in the Urals, which guarantees reliable operation. It is also much easier to install a ready-made unit than to make it yourself. The following sets can be found on the market:
- "SoveK". Under this brand you can find regular contactless ignition, as well as a more advanced microprocessor ignition. The assembly can be supplied with or without a bobbin. Easy to install and practically does not respond to voltage changes;
- "Saruman." Quite an interesting and reliable assembly. There are two sensor options available here; there can be a conventional Hall sensor, or a modern optical one. There is protection against voltage surges, especially high current. To simplify setting the ignition, there is a light indication.
Using ready-made kits is currently the best option.
Electronic Hall effect control with digital output
Connect the positive end of the meter to the wires coming from the pulse transmitter. Electronic Hall effect control with analog output, inductive or optoelectronic sensor.
- Connect the negative end of the meter to the motorcycle weight.
- Turn on the ignition.
- Turn the crankshaft slowly.
Unfortunately, in this case you need to develop a specialized circuit.
Where can I get an ignition card for your motorcycle? If the motorcycle has a static ignition, it usually does not have guidance in the manual or on the service website for such a card. However, you can get it. Huche received it after a long exchange of mail with the Kanuni factory in Turkey.
Briefly about the contactless ignition system
The contactless system, installed on all vehicles, includes:
- modulator i.e. Converter of magnetic flux into electrical impulses;
- magnetic flux sensors (for example, a Hall sensor);
- an ignition coil, slightly different in design from the traditional one;
- switch that distributes sparking;
- switching wires, terminals, fasteners.
The operating principle of a contactless ignition system is not complicated. A rotating plate mounted on the shaft, with its petals, opens and closes the path of magnetic flux (the magnetic field is formed by an installed magnet), which fixes the Hall sensor.
How to make an ATV from the Urals - this article will certainly be of interest to lovers of boxer engines and creators of real garage monsters.
These field breaks depend on the position of the distributor shaft. A pulse from a Hall sensor (or a similar one) occurs at a certain moment when the piston is at the required point for sparking. Next, instantly, the impulse is transmitted to the switch and to the ignition coil. The result is the formation of a spark in the spark plugs.
To mount the ignition system on a motorcycle, you need to either make its individual elements (modulator, plate) with your own hands, or purchase ready-made ESZ kits such as Saruman or Sovek.
Electronic ignition systems from Sovek and Saruman, equipment, features and differences.
If you don’t want to make electronic ignition elements for your Ural motorcycle yourself, you can purchase a kit ready for installation. Advantages of ready-made ignition systems:
- manufacturing takes place in a factory;
- the technical control procedure does not involve checking individual elements, but testing the performance of the entire system as a whole;
The most common and available for purchase are sez produced by SoveK and Saruman.
1. "Saruman". The package includes two options - with an optical sensor or with a Hall sensor. Any configuration includes an ignition unit, a platform for installing a sensor, a modulator with a flow interruption curtain, installation wires and installation instructions.
Features of the Saruman set:
- separate ignition timing generator (IAF);
- built-in system protection against generator overvoltage;
- LED indication to facilitate ignition setting
- microprocessor firmware is made for a specific motorcycle model;
- waterproof, locking connectors;
2. "SoveK". Several ignition system options are available. Microprocessor type and regular contactless.
The configuration can be with or without an ignition coil. Includes an ignition module, a modulator, and a switch with built-in FUOS.
Technical features of the Sovek kit:
- microprocessor module can work with various ignition coils;
- sparking is ensured both at low (6 volts) and at high voltage (16 volts) in the on-board network.
Electronic ignition “Saruman”
The Saruman microprocessor ignition system is another way to quickly and without much hassle replace the outdated contact ignition of the Ural. Manufacturers promise the same set of advantages as the previous system. There are two configuration options: with a Hall sensor and with an optical sensor. The second option is somewhat more expensive, but it is usually recommended, since the optical sensor is more accurate and reliable. However, reviews from motorcycle owners are not as good as we would like, mostly complaints are made about the quality of assembly of parts. Another complaint is that the kit does not include an ignition coil.
Settings
Now we adjust the ignition timing. We install the motor in accordance with the marks, connect all the wires. Next you need to adjust the position of the sensors. Next, we attach all the elements and check for sparking. If everything is fine, then you should drive 10-20 kilometers and check the set angle again.
The rotor lights up green when receiving an engine impulse, red during scheduled ignition. The tests revealed that some things still need to be improved. In the meantime, the processor was upgraded to a newer version and new programs were added to the program. The rotation, forward and other parameters are sent via serial communication to the computer for further analysis. It has, among other things, an ignition premise.
A fan motor is a good approximation of a pulse generator, but has its limits, mainly in terms of acceleration. My child was taken from the hands of a criminal, that is, the previous owner, brought and buried in a garage.
If necessary, adjustments are made, but if everything is done correctly, this will not be necessary. Knowing how to do contactless ignition on your motorcycle, you will not wonder how much this work costs in a workshop.
One of the main pain points of heavy Ural motorcycles is the ignition system. Although currently motorcycles produced by IMZ are equipped with Italian-made Ducati Energia electronic ignition, only about three percent of the bikes produced today are sold in the Russian Federation. Most of the owners travel across the country using outdated mechanical ignition in the Ural. Electronic one has a number of advantages.
Eventually it was redesigned. The reason for the failure was the poor aluminum five-wheel driver. The other not-so-great part was the rubber O-ring, which used to wear out and caused problems during assembly, but the main problem was the driver's fingers that screwed in the screws that secure the pressure plate springs. As a result of intensive work, the aluminum driver's struts could move in the longitudinal direction, which led to the screws securing the springs being pulled out or falling off.
Loose screws or broken driver parts can become trapped between the rotating elements of the prismatic drive and cause chucks to crack and even lock up the gearbox. There were also problems replacing friction discs. When assembling the clamping disc, the screws must be screwed to the driver's seat using regular screws. Worn screws often had threaded threads, causing the screws to break on the driver's aluminum pins.
Examination
If there is any suspicion of problems with the ignition, you should check that it is working correctly. Diagnosis is carried out in the following order;
We check the mechanical component of the unit. We look to see if the cam mechanism is stuck; if there are problems with mobility, then it is worth checking its performance. Be sure to measure the gap between the cams; most often it turns out to be too small, which prevents sparks from forming; The next step is to check for the presence of a spark. To do this, turn on the ignition and force the cams to move using a screwdriver, creating a gap. The spark should be blue and white. If it is red or orange, then you need to look for a malfunction. Take a multimeter and measure the resistance at the bobbin terminals
Attention! The ignition must be turned off. On the primary winding the resistance should be 6 Ohms, on the secondary winding 10 Ohms; The resistance between ground and terminals is checked, in optimal condition it should be 6-15 Ohms, if more, then the problem is in the wire; The tester is also used to ring high-voltage wires
If the resistance tends to infinity, then it is worth replacing the wire; it is better to do it as a set; The last step is to check the condition of the candles. Electrodes should have a sand color. It is recommended to maintain a distance of 0.6 mm between them.
Actually, this is all that should be checked. Microprocessor varieties are also checked in approximately the same way. SoveK ignition is of this type.
Why the Ural motorcycle does not start - problems with compression
Most often, the compression on a Ural motorcycle is too low. It does not pump gasoline into the cylinder, so the mixture does not ignite. There are many reasons for leaks:
- – Air escapes through the valve.
- – Air escapes through the gasket.
- – The air escapes through the rings.
It passes through the gasket - pour water on the ribs and there will be bubbles there. In this case, simply replace the gaskets with Ural. If not, take a syringe of engine oil, pour it into the cylinder, using a special agent. We plug it with our finger. Has the compression improved? This means that the answer to the question of why the Ural motorcycle does not start well must be looked for in the rings.
If not, unscrew the lid, first placing a lining under it. Notice that the valve is tightened, because the rod is pushed out a little, and they are not level. The one that is higher is clamped. To adjust the gap, you need to relax the valves both right and left. Gently press the valve with your foot. The valves are relaxed.
Check the gaps with feeler gauges. Find 0.05 mm and insert where the rocker arm connects to the valve. If it doesn't hold, the gap is too big. Let's look at the next one. Unscrew the bolts and take the dipstick. We clamp it between the valve and the rocker arm and tighten it slightly so that it holds the dipstick. Fix the bolt and tighten the nut.
How to adjust the ignition on a boxer
A correctly adjusted Ural or Dnepr should start with half a turn. If, despite the carburetor float chambers being filled with gasoline, you have to hit the kickstarter for a long time before the engine reluctantly starts to spark, then it’s time to adjust the ignition. This must also be done if the engine backfires when starting, and knocks during operation, overheats, or runs poorly, let’s turn our attention to the classic system with a PM 302A breaker, which is equipped with the vast majority of heavy motorcycles. Let's look at the whole process from the very beginning.
On a new motorcycle (if you were lucky enough to buy one), the contacts, as a rule, are skewed and touch at one point. Using small pliers, you need to slightly bend the contact fastenings so that the area of their contact is maximized. It is more convenient to bend the movable contact hammer; it is more pliable.
After this, the contacts should be cleaned with sandpaper, folding it in half and placing it between the contacts. You don't need to remove a lot of metal. Then the sandpaper should be replaced with a soft cloth soaked in clean gasoline, and the remaining abrasive should be thoroughly removed. After completing this operation, it will not be superfluous to lubricate the axis of the moving contact by dropping 1-2 drops of spindle or motor oil onto it. Apply a few drops of the same oil to the felt felt.
Let's install the breaker with the ignition timing machine in place (don't forget about the mark on the machine's leash!). Now let's adjust the gap between the contacts. Let's set the cam to the position where they are maximally open. Having loosened the screw securing the fixed contact, we will rotate the eccentric with a screwdriver, while simultaneously measuring the gap size with a 0.5 mm thick feeler gauge. When the probe begins to enter the gap with slight friction, carefully close the screw.
Turning the crankshaft using the kickstarter, we will find an arrow on the flywheel (for “Urals”) or a “TDC” mark (for “Dneprs”) and set it opposite the mark in the viewing window.
Now you need to turn on the ignition. Let's take an 8x10 wrench and apply it to the steel core of the coil. We will turn the breaker body in the direction of the arrow stamped on its cover until the key touches the core. In this position, lightly tighten the breaker mounting screws so that it can rotate, but with some effort.
Let's take a long thin rod, for example, an old knitting needle, rest one end of it against the breaker flange, and apply light blows to the second with a small hammer or a 19x22 wrench, thereby slowly turning the breaker in the opposite direction. At the moment the contacts open, the key, attracted to the ignition coil, will fall with a melodious ringing. In this position, the breaker mounting screws must be tightened.
It remains to check that the initial ignition timing we have set is correct. To do this, turn the crankshaft until the contacts close, hang the key on the reel again and, turning the crankshaft with light blows of your fist on the kickstarter, slowly bring the arrow on the flywheel closer to the mark on the crankcase. If the key falls when they match, everything was done correctly. If the arrow does not reach the mark, the ignition is early, and the breaker body needs to be turned slightly in the direction of the arrow on its cover. If the key falls after the marks coincide, turn the breaker in the opposite direction.
At first glance, the amount of work seems quite large. But in everyday use, all operations are not required, and besides, by adjusting the ignition once or twice, you will learn to do this in a matter of minutes, and this system will no longer cause you trouble.
ignition adjustment on the Dnieper
Pages 1
To post a response you must login or register
- roman811
- Experienced
- Inactive
- Registered: 06/12/2016
- Posts: 132
- Reputation: 0
Topic: ignition adjustment on the Dnieper
The wire adjustment is as follows: first I adjust the gap on the cams to 0.45 mm (I turn the slider so that the cams open as much as possible). Then I display the letter P (early ignition) on the flywheel, turn the ignition ON and magnetize the key to the coil. I begin to turn the ignition housing all the way slowly but the key and doesn’t fall ((. I set the gap on the cams to different values 0.4, 0.5. 0.6 but the key still doesn’t fall. Help, what’s wrong?
Added: 07/14/2016 18:25:38
I installed the runners from both the old and new models and to no avail. There are sparks on the candles.
Dnepr 10-36 Dnepr 11-32
- NIKITA36
- Assistant
- Inactive
- Name: SERGEY
- From: OSTROGOZHSK
- Registered: 25-10-2014
- Posts: 180
- Reputation: 25
- Motorcycle: YES
Re: ignition adjustment on the Dnieper
Why are you so attached to these keys with light bulbs?! Well, if the key does not fall, then the contact does not open - it may have a short to ground, or maybe the cam is not positioned correctly.
And again I am sending a train around the world. I don’t break my hands, I don’t scream out loud. And they won’t impose other people’s passengers on me - I put whoever I want on my train...
Vladimir Vysotsky
- 666
- Technical support, materials scientist
- Inactive
- Registered: 06-05-2010
- Posts: 6,620
- Reputation: 612
Re: ignition adjustment on the Dnieper
So I don’t understand this masochism... some creature at one time spread this nonsense about keys and light bulbs in ignition control and people are still tormented..
Roman...If you turn the ignition housing, you put it in approximately the middle position...
Then you set the crankshaft to the TDC position, if necessary, use a screwdriver to check through the spark plug hole whether the piston is exactly at top dead center...
Next, either use a screwdriver or something else to move the flywheel back a little (not to the front, but BACK), approximately 10mm from the TDC mark... (if you don’t understand, we’re setting the ignition earlier)..
Then you go and adjust the gap on the cam... the gap is from 0.4-0.6 mm...
If you don’t understand how and where the flywheel is shifted relative to the position at TDC... then you simply adjust the clearance on the cam when the piston is at TDC... it will work 100%
But the ignition timing will be slightly different...
Edited 666 (14-07-2016 19:04:43)
“Now we are among the mountains, surrounded by an enemy of superior strength... Moreover, we are without provisions, without ammunition, without artillery. We have no one to expect help from... We have great work ahead of us, unprecedented in the world: we are on the edge of an abyss, but we are Russian!
- roman811
- Experienced
- Inactive
- Registered: 06/12/2016
- Posts: 132
- Reputation: 0
Re: ignition adjustment on the Dnieper
666 writes:
So I don’t understand this masochism... some creature at one time spread this nonsense about keys and light bulbs in ignition control and people are still tormented..
Roman...If you turn the ignition housing, you put it in approximately the middle position...
Then you set the crankshaft to the TDC position, if necessary, use a screwdriver to check through the spark plug hole whether the piston is exactly at top dead center...
Next, either use a screwdriver or something else to move the flywheel back a little (not to the front, but BACK), approximately 10mm from the TDC mark... (if you don’t understand, we’re setting the ignition earlier)..
Then you go and adjust the gap on the cam... the gap is from 0.4-0.6 mm...
If you don’t understand how and where the flywheel is shifted relative to the position at TDC... then you simply adjust the clearance on the cam when the piston is at TDC... it will work 100%
But the ignition timing will be slightly different...
I have TDC and R on the flywheel. When turning the flywheel, the flywheel first goes R and after 10mm TDC. So I set it to P and adjust the clearance on the cams by placing the housing in the middle before that?
Added: 07/14/2016 19:32:02
The flywheel rotates counterclockwise and when TDC is set, should it be turned clockwise 10mm from TDC?
Dnepr 10-36 Dnepr 11-32
- mexanik62
- Mechanic from the 30s.
- Inactive
- Name: Uncle Vitya
- From: Evpatoria
- Registered: 03-08-2011
- Posts: 10,832
- Reputation: 1,151
- Motorcycle: 12-volt K-750, ZAZ Sens Hatchback
Re: ignition adjustment on the Dnieper
At the P mark it is necessary to move the weights of the advance machine.
...nothing can stop this Soviet motorcycle, not even its own brakes...
- 666
- Technical support, materials scientist
- Inactive
- Registered: 06-05-2010
- Posts: 6,620
- Reputation: 612
Re: ignition adjustment on the Dnieper
roman811 writes:
first comes R and through 10mm TDC
They are somehow close, it seems there should be more in millimeters))
roman811 writes:
and when TDC is set, do you need to turn it clockwise 10mm from TDC?
I don’t remember whether it spins clockwise or counterclockwise... Just when I kicked it to TDC, turn it back a little (that is, in the opposite direction), I either push the flywheel back straight through the inspection window... or I turn it with a wrench to 11 on the bolt that secures the slider on ignition...
10 mm of offset back is not an axiom... it will work at TDC and at 5 mm of offset and 7 mm... The task of each motorcyclist is to choose his own advance amount depending on the engine operation (the sound of operation, popping and shooting at carburetors and muffler, dynamics)
“Now we are among the mountains, surrounded by an enemy of superior strength... Moreover, we are without provisions, without ammunition, without artillery. We have no one to expect help from... We have great work ahead of us, unprecedented in the world: we are on the edge of an abyss, but we are Russian!
- kilowatt3
- Electrician
- Inactive
- Name: Alexander
- From: Belgorod region Alekseevka
- Registered: 03/24/2011
- Messages: 1,950
- Reputation: 198
- Motorcycle: Dnepr MT 11, but there were different ones and more than one!
Re: ignition adjustment on the Dnieper
Well, I’ll bring a little clarity to the relationship between magnetism and not falling, there is such a thing as residual magnetization of metal, at the moment when the contacts are closed the coil works like an electromagnet, hence the core is magnetized and everything metal sticks to it, as soon as the contacts open, a magnetic field weakens, but not completely, perhaps the core and key are magnetized, but it’s all crap as described repeatedly, put it according to the marks and everything is ok, set the gap to the maximum so that it is no more than 06 mm, and then at mark p on the flywheel catch the lead by moving the weights apart catch in different directions so that there is a gap on the p mark with the weights spread apart, and that’s all
I own a BMW 525, it eats a lot quickly))))
- roman811
- Experienced
- Inactive
- Registered: 06/12/2016
- Posts: 132
- Reputation: 0
Re: ignition adjustment on the Dnieper
666 writes:
roman811 writes:
first comes R and through 10mm TDC
They are somehow close, it seems there should be more in millimeters))
roman811 writes:
and when TDC is set, do you need to turn it clockwise 10mm from TDC?
I don’t remember whether it spins clockwise or counterclockwise... Just when I kicked it to TDC, turn it back a little (that is, in the opposite direction), I either push the flywheel back straight through the inspection window... or I turn it with a wrench to 11 on the bolt that secures the slider on ignition...
10 mm of offset back is not an axiom... it will work at TDC and at 5 mm of offset and 7 mm... The task of each motorcyclist is to choose his own advance amount depending on the engine operation (the sound of operation, popping and shooting at carburetors and muffler, dynamics)
I did everything as you wrote, but the sparks disappeared from the spark plugs (. I’m installing everything back that I wrote at the very top of the topic, sparks appear. What should I do? Some crap is going on.
Dnepr 10-36 Dnepr 11-32
- SSSR
- Elder
- Inactive
- Name: Sergey
- From: 68 region
- Registered: 07/18/2015
- Posts: 1,047
- Reputation: 137
- Motorcycle: Ural with K750 engine, Dnepr with K750 engine
Re: ignition adjustment on the Dnieper
Instead of using the key, use a light bulb, one wire to the ignition contact, the other to ground. When the contacts open, the light comes on, adjust the flywheel to P and rotate the ignition housing until the light comes on. But this is the case if the mark is filled correctly, so you need, as has already been written here, to first check the marks on the flywheel at least through the spark plug hole.
Edited by SSSR (17-07-2016 23:26:07)
It is better to drive a screw with a hammer than to tighten a nail with a screwdriver.
- roman811
- Experienced
- Inactive
- Registered: 06/12/2016
- Posts: 132
- Reputation: 0
Re: ignition adjustment on the Dnieper
SSSR writes:
Instead of using the key, use a light bulb, one wire to the ignition contact, the other to ground. When the contacts open, the light comes on, adjust the flywheel to P and rotate the ignition housing until the light comes on. But this is the case if the mark is filled correctly, so you need, as has already been written here, to first check the marks on the flywheel at least through the spark plug hole.
Please advise which slider should I buy, the old one or the new one? Many people recommend buying the old one.
Dnepr 10-36 Dnepr 11-32
- SSSR
- Elder
- Inactive
- Name: Sergey
- From: 68 region
- Registered: 07/18/2015
- Posts: 1,047
- Reputation: 137
- Motorcycle: Ural with K750 engine, Dnepr with K750 engine
Re: ignition adjustment on the Dnieper
I won’t tell you, I don’t know how they differ, but what do you mean by a slider, in my opinion it’s a rotating part in the ignition distributor (distributor), but it was installed on ancient engines such as M72, K750, but on the Dnieper it is not there, since a two-terminal one is used coil.
It is better to drive a screw with a hammer than to tighten a nail with a screwdriver.
- roman811
- Experienced
- Inactive
- Registered: 06/12/2016
- Posts: 132
- Reputation: 0
Re: ignition adjustment on the Dnieper
kilowatt3 writes:
Well, I’ll bring a little clarity to the relationship between magnetism and not falling, there is such a thing as residual magnetization of metal, at the moment when the contacts are closed the coil works like an electromagnet, hence the core is magnetized and everything metal sticks to it, as soon as the contacts open, a magnetic field weakens, but not completely, perhaps the core and key are magnetized, but it’s all crap as described repeatedly, put it according to the marks and everything is ok, set the gap to the maximum so that it is no more than 06 mm, and then at mark p on the flywheel catch the lead by moving the weights apart catch in different directions so that there is a gap on the p mark with the weights spread apart, and that’s all
I don’t understand how to catch the advance by spreading the weights, do you have to turn the ignition housing when it’s set to r?
Dnepr 10-36 Dnepr 11-32
- mexanik62
- Mechanic from the 30s.
- Inactive
- Name: Uncle Vitya
- From: Evpatoria
- Registered: 03-08-2011
- Posts: 10,832
- Reputation: 1,151
- Motorcycle: 12-volt K-750, ZAZ Sens Hatchback
Re: ignition adjustment on the Dnieper
At mark P, you need to catch the moment of opening with the weights separated
...nothing can stop this Soviet motorcycle, not even its own brakes...
- kilowatt3
- Electrician
- Inactive
- Name: Alexander
- From: Belgorod region Alekseevka
- Registered: 03/24/2011
- Messages: 1,950
- Reputation: 198
- Motorcycle: Dnepr MT 11, but there were different ones and more than one!