Hello, dear readers. I present to your attention an article devoted to motorcycle-type carburetors. Surely many of you have ridden a motorcycle, and some even own one. Maybe you've been to a karting track and competed excitedly on the track, listening to the whistling of tires and the roar of the engine. Or maybe you just arrange your dacha on weekends using gas-powered tools. In these and many other cases, we are dealing with small-displacement internal combustion engines controlled by a carburetor. But what is this detail? What is it for and what does it consist of? What characteristics are affected and how are they regulated? You can find answers to these and a number of other questions in this article.
Let's specify the issues that are considered during the course of the story.
- The first part will discuss the main issues of the formation and ignition of a combustible mixture.
- The second part is devoted to the main metering system, it also describes the methodology for selecting the main fuel jet by analyzing the condition of the spark plug.
- The third part is devoted to the shape and design features of the diffuser and throttle valve.
- The idle system is discussed in the fourth part; in addition, it discusses the operation of the system in transient modes.
- The fifth part discusses a number of carburetor auxiliary devices, describing their purposes, designs and adjustment methods.
- The sixth part is devoted to carburetors with constant vacuum at the nozzle, which are widely used on four-stroke engines.
Today we will consider only the first part.
Due to the large volume of material proposed for study, parts of the article will be formed as separate publications. PS I understand that material of this kind is only indirectly related to the theme of the portal. However, even here in the transport category there are articles devoted to a homemade two-stroke internal combustion engine and even a steam engine. These examples motivated me to publish my work. In addition, publication on such a reputable and well-indexed resource as Habr will help disseminate the material and bring it to an audience interested directly in carburetors. Enjoy and, I hope, useful reading!
Tuning the carburetor of a two-stroke engine
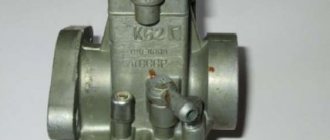
One of the main components in the fuel mixture supply mechanism in a vehicle such as a scooter is the carburetor.
Before moving directly to the description of the adjustment process, let's talk about why it is needed at all. Carburetor - a device that ensures the formation and supply of a fuel mixture (consisting of air, gasoline and oil) directly to the engine
What exactly is the purpose of a carburetor? In a nutshell, this is a device that ensures the formation and supply of a fuel mixture (consisting of air, gasoline and oil) directly to the engine. That is, the quality of this mixture and, accordingly, the power that the power unit produces depends on it.
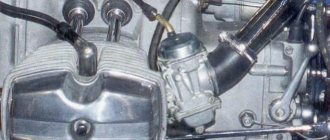
Scooters typically use carburetors of a type called “float” carburetors. The main element is a Venturi tube, which houses a damper that regulates the amount of air supplied to the mixture, as well as a needle that supplies gasoline. By unscrewing the throttle, we thereby open the throttle and raise the needle, increasing the amount of air-fuel mixture entering the engine.
Naturally, the movements of the valve and the needle must be clearly synchronized to ensure its (mixture) homogeneity. The float chamber is designed to ensure the constant presence of gasoline in the tube. The principle of its operation is based on the fact that when the fuel level drops, the float lowers and opens a channel for supplying gasoline to the tube. When it is full, the float rises and closes the valve, thereby stopping the flow of fuel.
If the scooter's engine power drops, it is impossible to start the engine or the engine stalls - these are signs of a carburetor failure
Signs that the carburetor is faulty may include:
- Engine power drop
- Inability to start the engine
- The engine stalls.
Another way to assess the quality of the carburetor (more precisely, the correctness of its operation) is as follows - unscrew the spark plug and look at its color. If it is white, it means the fuel mixture is lean, that is, there is too much air in it, and if the spark plugs have a black tint, it means the carburetor is “pouring” too much fuel. With any of these options, one thing is clear - it needs adjustment.
It should be noted that, globally, this process does not depend on the engine stroke, therefore the answer to the question of how to correctly adjust the carburetor on a Chinese 4t scooter and how to correctly adjust the carburetor on a 2t scooter will be the same. Let's now move on to describing the sequence of actions.
A few words about the required frequency of adjustments
Of course, it is better to perform such maintenance more often, without waiting until the engine begins to stall or simply does not start. It is recommended, as a preventative measure, to perform this procedure approximately once every six months.
adjusting the carburetor 2T scooter
There are two main types of engines: two-stroke and four-stroke . In two-stroke engines, all operating cycles (the processes of inlet of the fuel mixture, exhaust gases, purge) occur during one revolution of the crankshaft in two main strokes. Engines of this type do not have valves; their role is played by a piston, which, when moving, closes the intake, exhaust and purge windows. Therefore, they are simpler in design. The power of a two-stroke engine with the same cylinder dimensions and shaft speed is theoretically twice that of a four-stroke engine due to the greater number of operating cycles. However, incomplete use of the piston stroke for expansion, poorer release of the cylinder from residual gases and the expenditure of part of the generated power on purging lead to an increase in power by only 60.70%.
The engine consists of a crankcase in which the crankshaft and cylinder are mounted on bearings on both sides. A piston moves inside the cylinder - a metal cup surrounded by spring rings (piston rings) inserted into grooves on the piston. Piston rings prevent gases generated during fuel combustion from passing between the piston and the cylinder walls. The piston is equipped with a metal rod - a pin; it connects the piston to the connecting rod. The connecting rod transmits the linear reciprocating motion of the piston into the rotational motion of the crankshaft. All rubbing surfaces and bearings inside two-stroke engines are lubricated using a fuel mixture into which the required amount of oil is mixed. The figure shows that the fuel mixture (blue color) enters both the crank chamber of the engine (this is the cavity where the crankshaft is fixed and rotates) and into the cylinder. There is no lubricant there anywhere, and even if there was, it would have been washed away by the fuel mixture. This is the reason why oil is added in a certain proportion to gasoline. The type of oil used is special, specifically for two-stroke engines. It must withstand high temperatures and, when burned together with the fuel, leave a minimum of ash deposits.
How to adjust the carburetor on a scooter
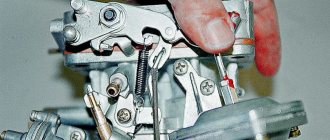
This procedure can be conditionally divided into two parts - adjusting the idle speed and adjusting the quality of the carburetor mixture. However, first, the carburetor must be removed and cleaned.
Refer to your vehicle's manual to ensure proper disassembly. Thoroughly clean all its channels, as well as the jets. Unscrew the spark plug - even if it does not have the visual defects described above, it is better to replace it. Fortunately, their price is usually not high. On the fuel metering needle, find the locking ring and install it in the middle groove. After all these steps, install the carburetor back.
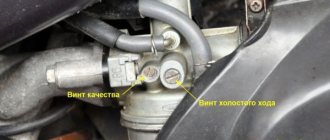
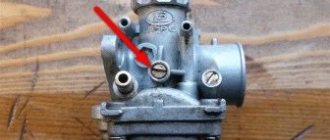
After checking and cleaning, which we have just completed, we proceed directly to the adjustment. You will need to find elements such as the screw that regulates the quality of the fuel mixture (hereinafter referred to as the KTS screw), as well as the idle screw. Screw the KTS screw all the way (this is done clockwise), and then unscrew it one and a half turns, and then start the engine.
Using your scooter's tachometer reading, adjust the idle speed screw so that the engine speed is at 1800 rpm. Go back to the KTS screw and, by rotating it, achieve maximum engine speed, then tighten the screw half a turn. Find the idle screw again and return the speed to 1800 rpm, while not forgetting to check the operation of the engine by ear - there should be no failures or extraneous sounds.
When the specified value is set, you need to check the operation of the power unit. Turn the lever that controls the throttle a couple of times, adding gas and releasing it.
If you don’t hear any extraneous noise in the sound of the engine and it doesn’t stall, the carburetor adjustment has been made correctly, that is, you can safely get on the scooter and go about your business.
If the problem is not resolved, then it is necessary to look for the cause in other components of the vehicle.
It is worth noting that sometimes adjustment is not enough - it is also necessary to check and, in some cases, adjust the fuel level in the float chamber.
Locate and unscrew the butter screw, which is located at the very bottom of the device. Next, you should lift the tube and check the fuel level. It is necessary to carry out these actions with the engine running, and keep the upper edge of the tube slightly above the carburetor itself. The fuel level should be slightly lower than the junction of the lower and upper parts of the carburetor.
Video tutorial on adjusting the carburetor on a scooter:
If the level is lower than required, you will need to remove the cover and adjust the timing of the valve by carefully bending its holder (this should be done in very small ranges). You can perform this entire procedure at the very beginning, so if you don’t want to remove the part once again, start the process of servicing the fuel system by adjusting the fuel level in the scooter’s carburetor.
Purge problem
The higher the crankshaft speed, the more power. But the design of two-stroke engines has this peculiarity - the faster the piston begins to move, the worse the combustion chamber of the cylinder is purged, since the exhaust gas supply and exhaust windows remain open for a very short time.
Chamber purging is the removal of gases and injection of fuel into the cylinder from the crankcase. Fuel begins to be sucked in and remain in the crankcase as the piston moves upward. Then, when the piston goes down, the inlet port closes and the purge window opens, through which a new portion of fuel is supplied and the gases of the previous spent fuel mixture are expelled (see the figure above, in the middle).
This simple design of a two-stroke engine eliminates the need to install a gas distribution mechanism (GRM), a purge pump, valves and a lubrication unit.
Purging while a two-stroke engine is idling (idling) is carried out differently. During operation at XX, purging is carried out by opening the damper to a small angle. This kind of purging is not of high quality, so at idle speed, as many have probably noticed, the engine of a chainsaw or lawn mower does not work stably. As for a chainsaw, for example, Echo (Echo), then you need to pull the choke halfway.
A single-cylinder two-stroke engine has a contour blower, that is, a slot blower. At the bottom of the cylinder in the wall there is a special slot through which gas distribution occurs. During the compression and power strokes, that is, when the piston is up, the intake and purge ports must be closed.
Contour purge - this pre-piston volume (cylinder under the piston) is a purge pump. This design makes it possible to make engines of the smallest dimensions.
You can adjust the carburetor of a lawn mower yourself
Petrol mowers, like all petrol-powered garden tools, are not difficult to maintain equipment.
You can and should repair and configure yourself. For example, adjusting the carburetor of a lawn mower with your own hands is a matter of five minutes. The carburetor from a lawn mower is a component in the power system. In it, like any carburetors, the process of mixing air and fuel (gasoline) takes place for further supply to the engine cylinders.
In this process, the main thing is the correct proportion of fuel and air, for which the carburetor is adjusted.
Chainsaw carburetor design
The carburetor works on the principle of a spray gun.
In essence, this is a spray gun. Even blondes know how a spray bottle works. We press the rubber bulb and air is pressurized into the sprayer. The atomizer is connected by a thin tube to a bottle into which liquid is poured. The air in the atomizer carries along the liquid from the bubble, and the output is a mixture of liquid and air.
Analogy between a carburetor and a spray gun:
The amount of supplied air is regulated by a throttle - a special rotary damper. By pressing the throttle handle, we open the throttle, and when we release it, the return spring returns the throttle to its original position. At the same time, the engine speed changes.
Main problems and malfunctions of the carburetor.
Mesh filter. There are usually only two problems with this element:
- Blockage.
- Breaking.
In order to find out the cause of the breakdown, unscrew the fuel filter cap to remove the strainer. If dirt has simply accumulated on it, then washing it in gasoline or blowing it out will help.
If there is visible damage to the mesh filter, be sure to install a new one. There may also be damage to the fuel supply pipe (during repairs, it is practiced to check this element).
In most cases, the carburetor starter does not function due to blockages. Acetone or the same gasoline should be used for washing.
Blowing clogged carburetor parts with compressed air is an acceptable and convenient repair practice.
The throttle body, carburetor parts, intake or exhaust pipes - all of these parts are subject to depressurization. You can definitely check it in a primitive way - spread soap foam on the problem area.
Setting the gasoline level and the correct position of the float in the chamber
A correctly adjusted fuel level in the float chamber does not allow the spark plugs to get wet and the engine to stall. In the chamber where the floats and jets are located, there is a valve that provides fuel supply. The correct position of the floats determines the closing or opening phase of the valve and prevents fuel overflow in the carburetor. The position of the floats is changed by slightly bending the fastening bar.
Gasoline level is monitored with the engine running using a tube made of transparent material attached to the drain point and raised up. The gasoline level should be a few millimeters below the flange mounting of the cover. If the level is insufficient, remove the cover and adjust the needle firing phase by slightly bending the metal antennae.
The principle of operation of a lawn mower carburetor
The throttle valve determines the amount of air supplied, and engine power directly depends on this.
Fuel is sucked into the carburetor system by a pump (its membrane). Then it passes through the fitting in the carburetor. The liquid then moves through the inlet and outlet valves of the pump. Filtered with a mesh. It moves along the needle valve into the membrane chamber.
Step-by-step operation of the device:
- Air supply into a tube with an air baffle (damper). The partition regulates the intensity of the air flow.
- The fuel supply system is necessarily narrowed with a diffuser to increase the flow rate.
- Gasoline through the float chamber and the nozzle tube with a narrowing. A chamber with a float regulates the temporary volume of gasoline. In the float chamber the pressure level is neutral, and in the tube with a narrowing it is already low. Due to the pressure difference, fuel penetrates through the nozzle.
- Accelerating air flow promotes the transfer of fuel (gasoline) and its atomization. As a result, an air-fuel mixture of the required proportion or density is formed.
- The air-fuel mixture enters the engine cylinder through the fuel pipe.
The level of air density in the system depends on the area of the open air damper. The wider the throttle is open, the greater the fuel consumption and power.
Simply put, adjusting the carburetor on a lawn mower is creating an optimal fuel mixture due to the correct air supply.
How to increase power
Like 4-stroke engines, 2-stroke engines can be improved, so-called chip tuning.
To increase the power of the internal combustion engine, you can do the following:
- Bore the exhaust hole so that the exhaust gases escape completely.
- Improve the blowing effect. Purging is the removal of exhaust gases and filling the working volume of the cylinder with a new portion of the fuel mixture. It must be done so that fuel can be injected into the combustion chamber through the inlet window. If fuel does not enter the combustion chamber in the required volume, fuel will accumulate in the engine crankcase. Therefore, for high-quality filling of the working part of the cylinder with fuel, it is necessary to increase the diameter of the exhaust window opening (exhaust gas emission).
- You can use a swirl diffuser on a carburetor. A swirl diffuser is also called a zero diffuser. Due to this diffuser, more fuel will enter the cylinder in a shorter period of time.
- Mount a special resonator on the muffler, suitable for the speed of the specific engine. The resonator makes sure that the unburned fuel mixture returns back to the cylinders. This is effective when incomplete combustion of the mixture occurs in the cylinder.
In order for the part of the cylinder under the piston to be filled completely, it is necessary to inspect the inlet and outlet channels; perhaps there are scratches, burrs, or chips on the holes. Such small defects affect the speed of movement of fuel and gases.
For a better effect of increasing power, the cylinder head (cylinder head) can be milled and then ground.
It is not recommended to reduce the weight of engine parts, since due to an increase in the difference in the counterweight and a violation of the center of gravity, the end runout of the flywheel and crankshaft may increase.
How to adjust the carburetor on a lawn mower
Before adjustment, the filters must be thoroughly cleaned according to the maintenance instructions.
Further adjustment of the lawn mower carburetor is done with your own hands using adjusting screws. There are three in total:
Right (L) – adjusting the fuel mixture for low speeds.
You need to find the maximum idle speed. To do this, slowly turn the screw (L) to the right and left.
To adjust, turn the screw a quarter turn counterclockwise.
Lower (T) – is responsible for adjusting the engine at idle.
- clockwise – increase;
- counterclockwise – decrease.
For correct adjustment of idle speed it is typical:
- stable operation of a cold engine;
- not over-revving a hot engine;
- there is a large reserve of revolutions for the trimmer head;
- stable operation of the engine when changing position (sharp raising or lowering of the knife).
Left (H) – mixture adjustment at high speeds. (The screw is adjusted last).
The overall adjustment of maximum speed, engine power, temperature and gasoline consumption depends on the left screw (H).
Setting up the carburetor of a lawn mower with the last screw is done as follows:
- Open the throttle to full, while releasing full throttle. Turn the screw clockwise until the speed drops (in this case, use your ear).
- Turn the screw as slowly as possible counterclockwise until the engine runs rough.
- Then turn back just a little, barely hearing stable, smooth operation.
- For a more visual application of skills, it is more convenient to consider the work of an experienced user:
It is interesting that from the point of view of the author of the video, the setting (its correctness) is determined by the color of the spark plug, and not just by the engine speed and stability.
Correctly adjusting the carburetor with your own hands in this case means combustion of the fuel mixture without residue; the color of the spark plug should be light brown.
Adjusting the carburetor of a brush cutter in practice - video
Why do you need to regulate?
During the adjustment process, the scooter carburetor needle is adjusted, the position of which affects the proportions of the air-fuel mixture, as well as a number of other adjustments.
Adjusting the scooter carburetor needle is done during the adjustment process
Each tuning operation has a different effect on engine operation and fuel preparation:
- adjusting the idle speed ensures stable operation of a running engine when the transmission is turned off;
- changing the quality of the air-gasoline mixture using a special screw allows you to deplete or enrich it;
- adjusting the position of the carburetor needle affects the change in the quality of the fuel mixture;
- Ensuring a stable level of gasoline inside the float chamber avoids flooding of spark plugs.
A power unit with an adjusted carburetor operates stably in any conditions, is economical, throttle response, develops rated power and maintains speed, and does not cause problems for its owner.
Adjusting the carburetor on the generator
There is a problem with the Chinese Firman SPG 950 generator (two-stroke engine 1E45F, volume 63 cc). The carburetor appears to be delivering an overly rich mixture. Fuel consumption is too high, the engine smokes, unburnt oil drips from the muffler, although the mixture is 1:50 according to the instructions.
There is only one adjusting screw on the carburetor, yellow brass. Adjusting it does not produce noticeable results. The output voltage is normal, the speed is normal.
What is the best way to deal with this situation?
2valeriy111 Disassemble, wash, blow out jets
The generator is practically new, and it has this flaw from the very beginning. It just sat in the box for a long time, its warranty has already expired. I think the problem is initially incorrect factory settings.
valeriy111 wrote: I think the problem is the initially incorrect factory settings.
And I think, based on
valeriy111 wrote: There is only one adjusting screw on the carburetor, brass, yellow. Adjusting it does not produce noticeable results.
that a speck has gotten into the jet, or maybe the float is poorly adjusted (if there is one
)
There is nothing to regulate there except the fuel level. If a speck gets into the jet, the engine will become lean, not rich. If the mixture is very rich, then after a while the spark plug will run out. If this does not happen, then everything is normal. Because little gasoline means little lubrication. But in your case, on the contrary, everything is OK. Because this is a two-stroke engine and a rich mixture is good for it. Remove the muffler. It happens that the tube at the entrance to the muffler box has a plug - just a welded washer with two small holes (apparently a Chinese engineer came up with this for additional noise reduction
. In general, there is a high probability that the muffler is clogged
What then regulates the screw on the carburetor?
It is unlikely that the muffler is clogged with deposits - the generator has not yet operated for 30 hours. As for the puck, I'll see if that's true.
What then regulates the screw on the carburetor?
the quality of the mixture at idle... which is not used in this generator... and partly the transition mode from xx to medium speed. Only chainsaw carbers and go-kart engines have screws that regulate the amount of gasoline. In other units, the amount of gasoline is dosed by jets.
Thanks for the tip, I'll look into it.
There were problems with such generators when synthetic chainsaw oils were used. The fact is that the speed and temperature in the saws are much higher.
The oil used is semi-synthetic Liqui Moly for two-stroke engines, API TC class.
I have the same Generator. Practice SPG 950. Same garbage. Hard to start when cold. And the fuel level apparently changes on its own (it smokes, sometimes it doesn’t smoke during operation). I tried to reduce the gap a little. It seems like I started working more equally.
What kind of gap are we talking about?
The oil used is semi-synthetic Liqui Moly for two-stroke engines, API TC class.
very good oil! Drygatel is probably just happy
The oil is very good! I would say - with a decent headroom! By the way, I’m going to put such an engine on a children’s kart, so to speak - an anti-crisis option. In Karaganda, such generators cost about a hundred bucks
*What kind of gap are we talking about?*
The gap in the spark plug, because It seemed to me that there were gaps in spark formation.
Yes, I have already changed three spark plugs, no results. Maybe put a candle with a slightly lower heat rating?
Fuel consumption is too high, the engine smokes, unburnt oil drips from the muffler, although the mixture is 1:50 according to the instructions.
1. Fuel consumption is too high. From what calculation do you assume that it is too high?
the engine smokes and should smoke, because there is oil in the fuel
- Unburned oil drips from the muffler This is how it should be... in a two-stroke, the oil should lubricate first and not burn. A striking example is castor oil, used in high-speed two-stroke engines.
If the spark plug (by heat number) does not correspond to the operating mode of the engine - in your case, it is over-enrichment and if the heat number is slightly higher than the actual mode, then Yes - it will be underheated, there will be gaps in sparking..ignition))) Then install a Komsomol... spark plug with a regular jig-type car. If possible, a photo of the candle, skirt and electrodes. The website ngk.ru has a lot of information on candles
I have a BEG-650, the same nonsense. The carburetor is practically impossible to adjust, the engine runs unstable all the time with popping noises - the mixture is over-rich. I adjusted the level of the float chamber, but as practice has shown, it is practically impossible to achieve its constancy; if you do it a little, it will start everything fine, then it won’t start at all. What really helped: the float chamber communicates with the atmosphere - structurally this is illiterate because The filter in front of the carb creates a vacuum at the inlet, which contributes to excess pressure in the float chamber; as a result, fuel in large quantities simply flows into the manifold. I brought the tube from the hole located on the side of the carb (the chamber communicates with the atmosphere) into the air blower body. And I also placed a foam ring under the stop of the air damper axis; this Chinese design dangles too much in the axial direction, which may also correct the unstable operation. So far nothing else has come to mind, but the device began to work, even pleasantly, the exhaust is not visible and there are no pops, it works quite quietly.
Tips and tricks
Setting up the carburetor on a 4t 50cc scooter is an important and responsible procedure for servicing motorcycle equipment.
When performing adjustment operations, it is important to follow a number of rules:
- perform adjustments only after the engine reaches operating temperature;
- rotate the adjusting elements smoothly, observing the operation of the engine;
- Make sure there is no debris inside the fuel chamber and the jets are clean.
Before starting work on setting up the carburetor, you must study the operating instructions and clearly determine the location of the quality and idle screws. If you have a 150cc scooter, the carburetor adjustment is done in a similar way. After all, the process of regulating the fuel system is the same for engines of different powers.
Methods for adjusting and tuning a scooter carburetor
The carburetor is an important part, without which the engine will not work. How to set up the carburetor on a scooter determines how smoothly and correctly the engine will run and whether it will be possible to start it in cold weather. The task of this unit is to mix gasoline with air in certain proportions, resulting in the formation of a working mixture, the composition of which determines the behavior of the power unit. The standard ratio should be 1 to 15, if you need the scooter to idle well, you can lean the mixture a little by making 1 to 13; enriched mixture - 1 to 17. For a more in-depth study of the design of a scooter carburetor, we recommend reading the article “The design of a scooter carburetor and the principle of its operation.” Well, now let's learn everything about adjusting the 2-stroke and 4-stroke carburetor of a scooter.
COMBUSTIBLE MIXTURES
For the combustion of gasoline in the cylinders of a motorcycle, it is necessary that the fuel meets air, the meeting point of gasoline and air is the carburetor, and a mixture of these substances is formed here. For normal combustion of air, the mixture changes its composition depending on the time of year, engine load and other factors. Even small errors can lead to deviations in carburetor operation.
negatively affect engine performance.
Signs: motorcycle revs and speed decrease, spark plug is black or dark brown;
In addition to these types, there are 2 more intermediate ones, in which the manifestations of symptoms are weaker than in the extremes - these are “enriched” and “depleted” mixtures. In these options the excess is insignificant.
How to adjust the carburetor on a scooter
Knowing how to adjust the carburetor on a scooter, you can get rid of many problems, make sure that the vehicle starts immediately, runs smoothly and does not fail in hot or cold weather. For this, the carburetor, depending on the model, has either only a needle or special adjusting screws.
Adjusting the carburetor on a scooter, if there are adjusting screws, occurs as follows: when the screw is rotated clockwise, the mixture becomes richer, and counterclockwise, accordingly, it becomes leaner.
The procedure must be carried out in the following order:
You also need to take into account little things that may be present on some scooter models, but not on others. For example, before adjusting the carburetor, you need to check the condition of the fuel filter. If it is very dirty, it is recommended to replace it, since even if the carburetor is new and well tuned, a clogged filter will prevent the mixture from flowing in the correct proportion.
Diagnostics
Before installing the air filter, turn on the ignition and jerk the kickstarter foot several times until the engine starts.
If it does not start, then the most common reason is that the cold start system is malfunctioning.
We check this way: cover the carburetor hole with your fingers to maximally enrich the mixture with gasoline, and continue to push the kickstarter.
If the engine starts and the speed does not drop during operation, then look for the reason in the cold start system.
If the cold start system is working properly, then after starting the engine the speed will rise and gradually, within 10 minutes, begin to fall. On a warm engine, gradually unscrew the large screw (amount of mixture) until the speed drops to medium, confident idle.
At the same time, drops of gasoline should not splash or pour out of the carburetor.
Features of setting up the carburetor of a 2-stroke scooter
The carburetor on the 2t scooter is slightly different in design and does not fit the 4t motor. The question of how to set up such a device worries all owners of two-stroke machines.
Most Chinese models have a fairly simple carburetor without unnecessary adjustments. The enrichment here is mechanical, although if you are tuning a scooter or you have a Japanese model, the enrichment can also be electric. In order to use the mechanical option, you must first pull the trigger on it, and then try to start the equipment.
Adjusting the carburetor of a 2T scooter is not difficult, but it does require some patience. In order to do this, you will need to disassemble the carburetor: first you will need to unscrew the top cover. The needle in it is fixed with a staple; it needs to be pulled out. The quality of the mixture is adjusted in the same way as described above. A feature of the push-pull system is that the needle affects the quality of the mixture only in a certain position. If the throttle valve is raised to its maximum, only the main fuel jet will be responsible for the fuel mixture. Sometimes the idle speed system interferes with it. Depending on what carburetor you have installed.
For a cold start, you need to use a starting enrichment, which must be closed after the engine warms up; Simply put, it's a suction. In such carburetors, the fuel level plays an important role. It is also regulated by mechanical intervention in the operation of the float chamber. It is configured in the same way as in the four-stroke version. In fact, the carburetor for 2t engines differs from models for engines on a 4-stroke scooter only in jets and some other parameters, but it is designed similarly, and therefore is regulated in the same way.
see also
Principle of operation. The entire working cycle in the engine is carried out in two strokes
1. Compression stroke. The piston moves from the bottom dead center of the piston (in this position the piston is at the bottom dead center, hereinafter we call this position for short BDC) to the top dead center of the piston (hereinafter TDC), blocking first the purge and then the exhaust window. After the piston closes the exhaust window in the cylinder, compression of the combustible mixture that previously entered it begins. At the same time, in the crank chamber, due to its tightness and after the piston closes the purge windows, a vacuum is created under the piston, under the influence of which a combustible mixture enters the crank chamber from the carburetor through the inlet window and the slightly open valve.
2. Power stroke. When the piston is positioned near TDC, the compressed working mixture is ignited by an electric spark from the spark plug, as a result of which the temperature and pressure of the gases increase sharply. Under the influence of thermal expansion of gases, the piston moves to BDC, while the expanding gases perform useful work. At the same time, going down, the piston creates high pressure in the crank chamber (compressing the air-fuel mixture in it). Under the influence of pressure, the valve closes, thus preventing the combustible mixture from entering the intake manifold again and then into the carburetor. When the piston reaches the exhaust window, it opens and exhaust gases begin to be released into the atmosphere, the pressure in the cylinder decreases. With further movement, the piston opens the purge window and the combustible mixture compressed in the crank chamber flows through the channel, filling the cylinder and purging it of exhaust gas residues.
Ignition principle. Since the fuel mixture takes time to ignite, the spark appears at the plug a little earlier than the piston reaches TDC. Ideally, the faster the piston moves, the earlier the ignition should be, because the piston reaches TDC faster from the moment of spark. There are mechanical and electronic devices that change the ignition angle depending on engine speed. Almost for scooters before 2000. There were no such systems and the ignition timing was set based on optimal speed.
Features of tuning the carburetor of a 4-stroke scooter
Adjusting the carburetor of a 4t scooter is quite possible with your own hands and should not cause any difficulties, the main thing is to act according to the instructions described above. It’s not always possible to adjust; the carburetor on a 4t scooter works right away. You will have to be patient: you may have to repeat the procedure several times until you get a result that suits you. The smooth operation of the engine, the ability of the vehicle to start in cold weather, and what kind of piston wear will depend on how to correctly configure the carburetor in a 4t scooter.
4T scooters are usually equipped with similar carburetor models, so the VLC carburetor adjustment scheme described above is also applicable to other types of devices.
How to adjust engine idle speed
Work on setting up the power system is carried out after the engine has warmed up to operating temperature. All types of carburetors installed on scooters are equipped with a screw designed to regulate idle speed. Changing the position of the adjusting element allows you to ensure that the engine operates at stable speeds during idling.
Depending on the vehicle model, the adjusting elements are located in different places, so you need to carefully study the instructions and determine where the idle speed adjustment screw is located on the scooter.
Rotating the screw in a clockwise direction allows you to increase the crankshaft speed. Turning in the opposite direction, accordingly, ensures a decrease in speed. To perform adjustment operations, it is necessary to warm up the power unit of the scooter for a quarter of an hour.
Lubrication system and fuel preparation
The operation of a two-stroke engine requires effective lubrication of moving parts. There is no centralized separate lubrication system with an oil pump, like in four-stroke engines, so oil is added to gasoline in a ratio of 1:25 - 1:50. The resulting composition, being in the piston and crank chambers, lubricates the connecting rod bearings, cylinder walls and piston rings. When the air mixture ignites, the oil burns and is removed along with the exhaust gases.
The motor oil must be special - for a two-stroke engine, usually it is marked 2T on the canister. The use of conventional automobile oil is unacceptable for a number of reasons:
Lubricant can be supplied to a two-stroke engine in two ways. The first and simplest is to mix it with fuel in the required proportion. The second is a separate lubrication system of a two-stroke engine, when a composition of fuel and oil is prepared immediately before entering the engine in a special pipe. In this case, a separate oil tank is installed, and its supply is carried out using a special plunger pump.
This system is widely used on modern motorcycles and scooters. In addition to ease of use (now you no longer need to add oil to the tank by eye every fill-up), serious oil savings occur because its injection depends on engine speed. At idle speed the oil proportion can be as low as 1:200.
Lifehacks for the last time
- — Before adjusting, you need to check that the air filter is clean and soaked in engine oil. How to clean the air filter, read the article: Scooter maintenance.
- — If the rubber cuff on the quality screw is torn, then it can be replaced with a cuff from the quality screw of the classic Lada carburetor.
- — On Suzuki Sepia models, lets 2,
In the latest models of Honda Dio 34 everything is simpler. The carburetor has only one large screw, which is used to regulate the XO. The small one on dio 34 is located under the plug.
The first time the setup will take 15 - 20 minutes, and then everything will be automatic. Feel free to get down to business and share your experience in the comments.
Subscribe and see you for new articles!
Source
Design and principle of operation
The carburetors used on most scooter models are float type. They have a mixing chamber in which gasoline is mixed with air. The resulting fuel or combustible mixture enters the engine, where it burns. The correct ratio of air and fuel is ensured by: jets, metering needle, spool and throttle mechanism. Under certain conditions, they are helped by a starting mixture enricher and an accelerator pump. The operation of the device as a whole depends on the coordinated operation of these parts and mechanisms. If you begin to notice interruptions in engine operation, a decrease in its power, or a tendency to stall at idle, you must first check how the carburetor on your scooter is adjusted. The process of setting it up is practically no different from adjusting the carburetor of a motorcycle or Solex VAZ. Therefore, after practicing adjustment techniques on your two-wheeled friend, you will be able to cope with other vehicles without any problems.
Operation and causes of engine failure
Most often, two-stroke engines are found in motorcycles, boat engines, lawn mowers, chain saws and other devices that require the use of a lightweight and reliable engine. However, even such a simple engine can fail due to violation of operating rules.
To extend the service life and delay major repairs, you should properly break in a two-stroke boat or motorcycle engine. To do this, the proportion of oil mixed with gasoline should be slightly higher than that established for normal operation. With this mixture, let the engine run at partial power for several hours, which is equivalent to 500-1000 km for a scooter and motorcycle.
Nevertheless, due to exhaust toxicity, two-stroke engines are gradually being replaced by modern four-stroke engines. They continue to be used only where high power density with minimal weight and simplicity of design is required - motorcycles, chainsaws and trimmers, model airplanes and much more.
Source
Main menu
Engine tuning tipsAuthor of the article: Ron Paris. Author of the translation: Vladislav Yaropolov.
Paris Racing Products
Question number one is how do I install the needles on the carburetor? Unfortunately, there is no specific setting for any engine! Each application will require its own unique tuning, even two IDENTICAL engines will most likely have slightly different tunings.
Check out the following tips to help you avoid the most common engine tuning mistakes.
Carburetor design
There are a number of restrictors to control the flow of fuel at different fuel/air ratios, called needles.
There are five main carburetor parts you need to know about:
1. Plunger or cylinder (regulates the amount of air entering the engine). It simply blocks airflow into the engine in proportion to how open or closed it is. 2. Idle screw (sets the absolute minimum air flow that the plunger/cylinder can allow to maintain idle speed). This is simply an adjustment screw that engages the plunger/barrel in the nearly closed position of the carburetor. 3. High speed needle (regulates the flow of fuel into the engine at any throttle position). It is simply a pointed needle that screws into the hole through which the fuel flows (an adjustable restrictor). This maximum fuel flow is adjusted to provide the correct air/fuel ratio for FULL OPEN GAS ambient conditions. There are two other devices, the low speed needle and the mid speed needle, which further limit or control the fuel flow at lower throttle positions. 4. Low speed needle (regulates fuel flow at low engine speeds). The low speed needle simply restricts fuel flow at low engine speeds. If you look inside the carburetor you will see a long pointed needle (except for Picco torque carburetors). When the carburetor is closed, most or a fraction of the diameter of the long pointed needle is inserted into the spray nozzle, this is what is adjusted when you turn the low speed needle. This literally moves either the pointed needle or spray nozzle further in or out, changing the free cross-section of the nozzle regardless of the position of the plunger/cylinder. This leans (less free cross-section) or enriches (more free cross-section) the flow of fuel from the atomizing nozzle at low speeds. Note: Some carburetors have a moving spray nozzle and others have a moving needle assembly, both designs have the same effect. 5. Medium speed needle (regulates the flow of fuel into the engine after low and up to maximum speed).
Note that when you open and close the carburetor, the pointed needle (mentioned in step 4) fits into a small tube called the spray nozzle/jet. This spray nozzle is where ALL the fuel enters the air flow, and that flow is controlled by the high speed needle, the mid speed needle, the low speed needle and the idle screw! Typically somewhere between the 1/2 and 3/4 throttle position the needle is completely out of the atomizing nozzle and this is called the full fuel flow position (FFP), in this position 100% of the fuel mixture is controlled by the high speed needle. On many carburetors, the low speed needle and the mid speed needle are not independently adjustable, so mid speed is a factor of the needle taper and is determined by the factory design. Some plunger carburetors have completely independent adjustments for the spray nozzle and the mid speed needle. WARNING: Be very careful with these types of carburetors!!! You can easily identify them as they have four adjustment screws!
One of each: * High speed needle (usually something vertical). * Idle screw (usually a much smaller screw that enters the carburetor at an angle). * Low speed needle (located at the end of the plunger OR on the opposite side of the carburetor). * Medium speed needle (also located on the end of the plunger OR on the opposite side of the carburetor).
Note: If there are adjustments on the plunger and on the opposite side of the carburetor, then one is the mid speed needle and the other is the low speed needle!!! Check your engine manual before attempting to adjust this type of carburetor!!!
It is very important not to mistakenly use the mid speed needle to adjust the low speed mixture, thus making it very easy to throw the carburetor out of sync.
I generally recommend not attempting to adjust the mid speed needle even if the carburetor has one, as the effect of the changes is VERY small and mostly limited to the small mid speed range. Only a very experienced driver can detect these changes! The downside is that only an expert can re-tune a carburetor with an out-of-step mid-speed needle setting.
Hopefully if I can help drivers better understand how a carburetor works, then all the other instructions and guides will make more sense!
Optimal carburetor settings
There is no predetermined optimal carburetor setting for any size or make of engine. If such a thing existed, then all engines would be supplied without adjustments. There are many variables that need to be taken into account. Glow plug, fuel type and nitromethane content, exhaust pipe type and length, clutch setting, gear ratio, wheel size, air humidity, temperature and pressure, etc. There is no one who can tell you how to set the carburetor needles, they can only be adjusted to specific conditions.
BUT IT'S NOT SO HARD, IT JUST APPEARS HARD. 95% of all problems are due to incorrect adherence to instructions.
Carburetor Setting Balance
It has come to my attention that some racers make the mistake of setting the idle screw to the wide open position (high idle) and setting the low speed needle to too rich! This gives an erroneous normal idle speed even if the speed is set too high because it floods the engine with excess fuel causing the idle to be lower than set! The end result is an engine with a very rough idle that is rough and can stall when applying full throttle as the too rich low rpm mixture can mask the too lean high rpm mixture!!!
Let's look at this a little deeper!
Idle screw too wide open: You can set the idle screw too wide open and still not idle high! Even though the air regulator (carburetor rotor or slider) can be set to a position that is usually a very high idle, the idle will be low because the low speed needle mixture setting is so rich that the engine is flooded with excess fuel and the engine enters a condition that usually called 4-stroke idle. One sign of this is that after accelerating a fully warmed engine, it will hold a high idle speed for a few seconds and then reduce it to a lower speed.
Here we turn to the written form of sound effects.
Something like "yes..yes..yes..yes..yes..yes..yes..yes", then it drops to "yes...yes...yes...yes" (if it were musical notation, it would be like falling from 8 bars per second to 4 bars per second).
If you start leaning the low rpm mixture a little at a time (then repeat the throttle and idle test) and more time passes before the idle drops, you are moving in the right direction! As a result, as the mixture continues to lean at low speeds, the idle speed will begin to rise and this is the very moment when the time comes to lower the idle speed to the required value by adjusting the idle speed screw!
ATTENTION!!!!
Now that you have your idle set correctly, the high rpm mixture may be too lean!!! Keep in mind that the fuel does not enter directly into the combustion chamber as with four-stroke engines, it first enters the crankcase and is then carried or pumped into the combustion chamber by the movement of the piston. Let's just say that the engine crankcase can have a much larger volume than the combustion chamber, so it takes some time to burn the remaining fuel. In other words, if the low rpm mixture is too rich, the engine will be supplied with this residual fuel for a short time, and depending on the demand, you may actually experience a lean condition at high rpm, which can be within certain limits:
1. Works well, but the motor life is short. 2. Runs well, but the engine continues to get hotter the longer you run it, to the point of overheating! 3. It works fine at low speeds, but fails, fails, or drags as the speed increases. 4. Runs fine at low speeds, but when you give full throttle it stalls.
An excessively rich high rpm mixture can act the same as points 3 and 4, but is accompanied by excessive smoke and a distinct rumbling sound.
There is no reason for the engine to continually get hotter, unless the settings are incorrect (classic symptom #2), or there is a mechanical problem causing increased stress or friction in the engine.
Exceptional situations: if the weather or track changes SIGNIFICANTLY.
Examples: It starts to lightly rain and the off-road track goes from a dry, powdery state to a high-traction state, or during a competition there is a sudden weather change of ten degrees! It is important to fully warm up your engine, clutch and chassis before making any final adjustments. The chassis in most cases also acts as a cooling radiator for the engine, so it is very important to fully warm up the chassis!!! I prefer to warm up the engine for at least 3-4 minutes before qualifying to fully warm up the engine (operate the throttle if you have a frequency window). But it still takes at least 2-3 minutes of hard driving on the highway to fully warm up the chassis!
Should I seal the carburetor with silicone sealant?
Many drivers find this a must! Especially offroad.
Here are some tips: 1. Make sure you are using non-volatile silicone (this can be determined by the inscription - oxygen sensor safe). You can find this kind of silicone at any auto parts store. 2. Apply sparingly, only a thin strip on the carburetor neck, just below the main carburetor body (even if there is a silicone O-ring there. Do not apply silicone to the carburetor hole in the crankcase or coat the entire carburetor neck (this will seal the carburetor to the crankcase well). You only need to get a thin strip of silicone between the engine crankcase and the carburetor body when the carburetor is installed. 3. After positioning the carburetor, you need to tighten the tightening bolt tightly, which holds the carburetor securely. Then apply a little silicone to both ends of the tightening bolt. 4. Allow Allow the silicone to cure completely before starting the engine.
Ideal engine temperature
First, let me say that there is no IDEAL temperature for any engine.
There are many variables that affect this. External temperature, fuel type and nitromethane content, atmospheric pressure, exhaust pipe type and length, clutch setting, glow plug, gear ratio, grip on the highway, driving style, etc.
All of the following conditions MUST be satisfied before any engine temperature can be considered correct. The engine is assumed to be in good condition.
1} A clearly visible plume of smoke from the exhaust pipe during acceleration. 2} Stable idle. 3} The glow plug spiral should be shiny and its shape undistorted. 4}Good engine performance.
Picco engine, on road, in average conditions, from 20 to 40% nitromethane - from 95 to 110 degrees. Picco engine, off road, in average conditions, from 20 to 30% nitromethane - from 100 to 120 degrees. Nova engine, on road, in average conditions, from 20 to 40% nitromethane - from 105 to 125 degrees. Nova engine, off road, in average conditions, from 20 to 30% nitromethane - from 110 to 130 degrees.
How to “READ” a glow plug
OS and Turbo glow plug coils turn gray faster (easier) than McCoy plugs, this is not necessarily a bad sign. In fact, when the new plug's coil turns slightly gray after 5 or 10 minutes of running the engine, it means you are very close to the optimum setting, but be careful, the next step is TOO LEAN!
Rules: * The spiral and surrounding bottom of the candle are moist, with a shiny new spiral = rich side of optimal power 85%. *The coil and surrounding bottom of the candle begins to dry out and the coil begins to turn gray = very close to the optimal 95% power. * The spiral and surrounding bottom of the candle are dry, the spiral is completely gray, but not deformed = optimal power 100%. * The coil and surrounding bottom of the plug are dry, the coil is deformed = slightly lean mixture, DANGER! * The spiral and the surrounding bottom of the spark plug are dry, the spiral is torn and deformed or burnt out = extremely lean mixture, possible engine damage!
Note: You can only “Read” your candle if it is in almost new condition (the spiral looks like new and is shiny). A gray candle may still work well. Once it becomes completely gray, performance may begin to deteriorate. To check, simply screw in a new plug and if there is no change in performance, keep the gray plug or screw it back in.
Effects of replacing the exhaust pipe (manifold)
Rule of thumb: Longer exhaust pipe (manifold) = more low-rpm output (at the cost of losing some revs). Shorter exhaust pipe (manifold) = more output at high rpm (at the cost of losing some torque).
But you can go too far in either direction, causing erratic engine performance or engine overheating. You must stay in the "optimal" zone.
There is no specific length for every engine or exhaust, experiment with lengths to suit your driving style or track conditions.
How to turn off the engine
If the engine gets out of control and reaches high speeds, do not stop the flywheel with your hands! Some people turn the car over and brake the flywheel with the toe of their boot. It works, but 50% of the time the engine fails before you can stop it.
The method I use is: Try and hold the car firmly so that the wheels don't spin (this can wear out the clutch, but clutch cams are cheaper than the engine). Remove the housing, if you cannot reach the air filter, pull off the air filter and clamp the carburetor inlet. It's like taming a wild animal, but it's a good way.
Do not pinch the air filter with your hand; all dirt will be sucked into the engine! Pressing a rag against the exhaust port (if you have one handy) will also work. But, keep in mind, with the rag folded in several layers, it will take a few seconds to jam.
If the engine is idling normally, simply brake the flywheel with the handle of a screwdriver.
How to store fuel
I always agitate the fuel as there is some oil separation, especially with high nitromethane fuels. Water absorption is the #1 cause of bad fuel. And only partly this is due to nitromethane or oil/additives. Methanol is very hygroscopic.
My tips: 1. Never leave a fuel canister open longer than it takes to fill the refill bottle. 2. Never leave the refill bottle open longer than required to refuel the vehicle. 3. Always rinse the fuel bottle at the beginning of the day with a small amount of fresh fuel. 4. NEVER pour fuel back into the fill bottle or fuel canister. 5. Keep fuel away from direct sunlight and do not place it on the ground. 6. Store fuel at a constant temperature. 7. I prefer to squeeze the fuel canister, squeezing out excess air, before closing the canister. 8. It is a good idea to save a few 1/2 gallon and 1 liter bottles and transfer the remaining fuel from the can into them. Remember to rinse the containers with a small amount of fresh fuel.
If you follow these simple tips, you will never suffer from bad fuel.
Will running out of fuel damage the engine?
In my opinion, if your engine is tuned correctly, it will not be harmed by shutting down due to running out of fuel.
I've done this hundreds of times without any damage, even on advanced sports engines.
If the engine was previously tuned as follows: 1. Set to a slightly rich mixture, the engine accelerates for a short period of time before stalling, going through the "ideal" setting stage. 2. Tuned for "ideal" performance, the engine suffers from a lack of power before stalling, going through a stage where the mixture is too lean. 3. If tuned too lean, the engine will noticeably stall and may burn a glow plug before stalling as it goes through the too-lean stage.
If the glow plug coil breaks and falls into the engine, it can cause serious damage to the piston and liner. However, a short period of running lean will not harm the bearings, bushings, connecting rod, crankshaft, etc., if you use high quality fuel (especially high castor oil content).
Is it possible to switch to fuel with a different nitromethane content or to a different brand of fuel?
There are many opinions on this matter, but I don't see any problem with both transitions. The most important thing is to use quality fuel!
Personally, I run the engine on the same nitromethane content that will be used later, but have had good results using either option.
The only recommendations that can be made when switching to another type of fuel: 1. Let the engine idle for a few minutes before hitting the track. 2. Use 1/2 to 1 tank of fuel on a rich mixture. 3. Check the glow plug and if it is in good condition, use it and tune the engine.
Do I need to use after run oil?
It is always a good idea to use preservative oil after engine starts.
First, allow the fuel tank to completely empty by idling the engine until the fuel is used up (try restarting the engine several times).
Next, put a few drops of oil into the carburetor and a few drops into the glow plug hole. Place a rag on top of the engine (with the spark plug removed) and crank the engine for 5 seconds on the starting table.
Finally, place a few drops into the carburetor and screw in the glow plug. Crank the engine again for 5 seconds on the starting pad.
That's all!!!
Never use oils that contain silicones.
Engine cleaning
First, treat the engine with preservative oil as described above.
Remove the engine from the car, then you can wash it, being careful not to wash dirt into the front bearing (even if it has rubber protection).
I clean behind the flywheel with a brush, then wrap a strip of rag around the crankshaft between the bearing and the flywheel.
Next, I plug the carburetor and exhaust port (glow plug screwed in) and flush the engine with methanol or denatured alcohol (don't use isopropyl alcohol, it contains 30% water).
I do not recommend using brake or carburetor cleaners.
Then I blow it with compressed air. If you don't have compressed air, shake the engine vigorously and dry it with a hair dryer. Do not heat too much; the engine should be warm to the touch.
Finally, I remove the strip of rag, let the engine cool to ambient temperature (to prevent condensation from forming inside) and pack it in a ziplock bag or install it on the car.
Running in and tuning the engine for beginners and experienced drivers
Engine break-in for a novice driver
How to break in your new engine Patience is the secret to success!
Your success or failure with an internal combustion engine depends on how well it has been broken in. The more time you spend properly breaking in your engine, the better it will perform. A well-broken-in engine will produce more power and higher revs, and will run smoother than an engine rushed into racing conditions.
It's all about the carburetor
Everything that is needed to ensure a long engine life is contained in its carburetor. Most carburetors have three adjustments that you need to know. The first, and most important, is adjusting the high speed needle. This needle valve controls the mixture of fuel and air that enters the combustion chamber during high-speed operation. More fuel in this mixture causes a "rich" condition, and less fuel (more air) causes a "lean" condition. A richer high-speed needle setting will help keep the engine cooler because it lowers the RPM and because more fuel passes through the combustion chamber and some liquid cooling takes place. A lean setting will allow the engine to reach higher RPMs, but will also cause it to run at a higher temperature.
A properly installed high speed needle will provide a trade-off between temperature and high speed. Needless to say (but we'll remind you anyway), extremes in both directions are harmful, but no one has ever destroyed their engine by running it too rich.
Many sports engines also have a second needle valve, which is used to control the air-fuel mixture at idle. This needle is used to regulate the engine's transition from low speed to high speed. It also helps control the idle fuel mixture. A rich low speed needle setting will result in poor throttle response at low speeds, and can make the car feel sluggish when exiting tight corners. A lean setting will allow the engine to produce more power at low rpm.
Many modern entry-level engines have no low speed needle completely. While this doesn't allow for high-end settings for the experienced racer, the lack of another needle makes these engines more friendly for beginners who only need to adjust the high-RPM needle.
And the last thing is the idle speed screw. Essentially, this screw is used to prevent the carburetor choke from closing completely (which will stop the engine). A small gap in the carburetor allows enough air and fuel to mix and keeps the engine running. Setting the idle speed is usually done after the high speed needle and low speed needle have been correctly adjusted.
Where to begin? Read the instructions!
Before you place your vehicle in the starting box or pull the recoil starter, read the instructions that came with your engine or vehicle. Most manuals have a section that describes approximate initial carburetor needle settings. We've found that advanced (and more expensive) engines tend to follow the manual settings more closely, meaning that when the manual says to set the high-speed needle three turns from closed, that's almost the exact position at which it's best to start the engine for break-in.
For entry-level engines, the needle position that will allow the engine to start and run may be quite different from what is recommended in the manual. From our experience, if the engine does not want to start, leaning the mixture at high speed needle in small increments will allow it to do so. Once the engine has started and is running smoothly, we usually enrich the mixture back to the value specified in the instructions. Never run a new engine, or even an old one, with the mixture too lean.
Starting your new engine for the first time
We know you want to go out and do a few runs with a brand new engine - don't do it. The first few starts of your new engine are critical. Once your engine has started, place it on a stand so that its wheels are off the ground. Let the engine idle for a few minutes (two or three minutes), then stop the engine and let it cool.
During this procedure, it is very important that the piston is not at the top of the cylinder while the engine is cooling. Part of what happens during break-in is that the engine parts in contact go through thermal cycles—they expand when the engine is hot and contract when it is cold. Heat cycles stabilize the metal and allow the parts in contact to fit together more tightly. Positioning the piston away from the top of the cylinder (which is smaller in diameter than the bottom to create better combustion chamber closure) will allow the cylinder to contract properly as it cools without interference from the piston. To figure out where the piston is in relation to the cylinder, simply turn the flywheel - it is difficult to turn when the piston is at the top of the cylinder, where the interface between the piston and cylinder is tightest. Simply turn the flywheel to the middle position of the area that is easiest to turn.
Now you're ready to unleash some horsepower, right? Wrong. Repeat the above steps three or four more times.
Yes, now you can run it
Once you have broken in your engine, you can finally take it to the track. But don't get excited just yet—you should run it with a very rich high-rev needle setting. Some engine experts recommend setting the mixture so rich during break-in that the engine runs in four-stroke mode instead of two-stroke (your engine is a two-stroke, which means the air-fuel mixture ignites once every two strokes of the piston). Four-stroke means that the air-fuel mixture is ignited once every four strokes of the piston. Under this condition, all unburned fuel passes through the combustion chamber and carries heat (and any metal particles generated during the break-in process) directly into the exhaust pipe!
Is it really necessary to run the engine with such a rich mixture? Let's say the experts know their subject, but we have run several dozen engines without allowing them to go into four-stroke mode. Whether or not you use four-stroke mode during break-in is entirely up to you - just be absolutely sure that the high-speed needle is set to a very rich position: there should be a lot of blue smoke coming out of the exhaust and the engine should sound "dull."
During this procedure, avoid prolonged use of full throttle, which may overload the engine. While driving, you should press the gas briefly, avoiding staying at the same engine speed for a long time.
Run your engine using these settings for three or four tanks of fuel, allowing the engine to cool between starts.
Now is the good time!
Once you've run six to eight tanks of fuel through the engine (as described above), it's time to start leaning the high-rpm needle. Start leaning the mixture with the high speed needle (turning it clockwise) at 1 o'clock (if you think of the needle as a watch face, one full turn of the needle is 12 o'clock). Run the car for a minute or two, then bring it back up and lean the mixture by turning the needle for 1 hour.
Repeat this procedure until the engine reaches a good speed, but under no circumstances allow it to squeal. The engine should still be emitting a lot of blue smoke from the tailpipe.
Before you reach those top-of-the-line race rigs, we recommend that you run a few more tanks of fuel on these "almost race" rigs. Once you have the needle setting where your engine revs well, richen the mixture (turning the needle counterclockwise) by turning the needle about 1/8 to 1/4 turn - this is your final setting.
Last steps
Once you've found a good high speed needle setting that allows the engine to make good power while still emitting a lot of blue smoke from the exhaust (especially coming out of corners), it's time to adjust the idle needle and idle screw.
Most engine manufacturers recommend specific settings for the idle screw, and they are usually good within a certain range. For now, let's set the idle speed screw to medium speed without stalling.
Warm the engine to operating temperature by running it for a few minutes. Now stop the car and listen to the engine idle. If the engine idle is fast at first and then slows down within a few seconds, the low speed needle setting may be too rich. Lean the mixture with the low speed needle (turning it clockwise in 1 hour increments) until after a few runs, the idle becomes stable within 20-30 seconds of stopping the car. Once you have achieved this, use the idle screw to make the final idle adjustment.
For sports engines without a low speed needle, the idle speed screw is the only method of adjusting the idle speed. For these engines, simply turn the idle screw clockwise to increase idle, and counterclockwise to decrease idle.
Setting the idle speed is not a race to achieve the lowest rpm without stalling the engine speed! Your goal when setting idle is to allow the engine to run at a moderate RPM without any clutch drag. Your car should sit quietly in the parking lot when idling. If you have to hold the brake, the idle is too high. If you have to press the throttle briefly to prevent stalling, the idle speed is too low.
Enjoy your new engine!
RC vehicles can be a lot of fun, or they can be a lot of frustration. The difference between success and failure lies in the engine break-in process. If you follow these steps, be patient, and use your head, you are guaranteed success. Rushing through the break-in process, or worse yet, completely neglecting it, is a recipe for disaster.
Tuning your engine is the hardest part of combustion engine racing. But once you learn how a carburetor works and which screw does what, it will all become second nature. So when you start your car, you always know exactly what to adjust to get the highest level of performance.
FOUR RULES FOR ENGINE TUNING
1. A rich mixture is good. Blue smoke should always come out of the exhaust pipe. 2. Always adjust the high speed needle first. 3. Never try to tune a cold engine - wait until operating temperature is reached. 4. Always start engine tuning with a rich, high speed needle setting. Never start with poor settings.
Tuning carburetors and engines for an experienced driver
1. When starting a new engine, follow the installation instructions first! Start the engine and let it idle at moderate speed for 2 or 3 minutes. Then stop it and let it cool for a few minutes. Make sure the piston is in the down position. Repeat this procedure 3 or 4 times.
2. Now run the car on the track, making sure the mixture is rich. You should hear a four-beat sound. Release the gas once or twice while driving in a straight line so that the engine does not strain in this rich state. Repeat this procedure for 2 or 3 tanks of fuel, allowing the engine to cool for a few minutes between fill-ups. Check the spark plug frequently. It should look new (shiny spiral without bending).
3. Now you can start to slightly lean (turn clockwise) the high speed needle in 1 hour increments (1/12 turn), checking the spark plug frequently (I use a spark plug heater with a gauge). I recommend running a few more tanks of fuel on a slightly rich mixture before "Race Tuning". When setting for maximum output, adjust until a good RPM is achieved, then open the needle 1/8 to 1/4 turn (counterclockwise).
4. Adjust idle speed:
4.1. After fine-tuning the high revs, move the model closer to you and listen to the idle speed. If the idle is fast and then slows down within a few seconds, the low rpm mixture may be too rich. In this case, lean it out (turn the needle clockwise 1/4 turn), then make another run and bring the model back to you.
4.2. Repeat this procedure until the idle speed remains high for at least 10 to 20 seconds, at which point adjust the idle speed screw so that the idle speed is moderate. The wheels must not rotate and the clutch must be fully released. 5. You may need to repeat steps 3 and 4 several times to achieve the “perfect setting.”
Be patient. Tuning your engine is the hardest part of combustion engine racing, and it's the number one secret to winning race results. If you are a beginner, it is highly recommended that you contact a hobby shop or an experienced modeler for help.
Two final notes:
1. Make sure the engine is warm before tuning. 2. Always adjust from rich to lean. When in doubt, richen the high rpm mixture.
Return to list Discuss on the forum