Today, many people want to learn how to bore a cylinder (cylinder block) at home. Thousands of views of video reviews are clear evidence of this. But, unfortunately, this is the lot of only those craftsmen who are able not only to do something, but to do it well. We do not see the advisability of carrying out this operation in their garage for those car enthusiasts who consider self-repair only one of a few hobbies. On the contrary, if you can easily cope with the repair of many engine components, then boring the cylinder block will be too tough for you.
How to bore a motorcycle cylinder
The engine of any vehicle is its heart, which makes the wheels spin, thereby driving the vehicle, including a motorcycle. Thus, the greatest loads during engine operation fall on its cylinders and pistons. This is due to the harsh conditions of high temperature and pressure in which the motor operates.
Five random motorcycles:
Triumph Thunderbird SE 2010
KTM RC8R 1198 Track 2012
878000 rub.*
Harley Davidson FLSTSE Softail Convertible CVO 2012
BRP Can-am S pyder RT-S Roadster 2010
Aprilia AF1 Prototype 1985
Causes of cylinder failure
The pistons, falling and rising inside the cylinder, are in constant friction with the walls of the cylinder, thereby leading to its wear. It is worth noting that a motorcycle cylinder can wear out completely unevenly, and therefore the cylinder becomes deformed, losing its original shape. Unfortunately, this defect is not immediately noticeable to the naked eye. However, the fact that the shape of the cylinder has undergone changes can be determined using special measuring tools.
It should be remembered that the piston moves inside the cylinder along the correct trajectory only theoretically; in practice it happens a little differently. The angle of deviation from the trajectory affects the wear rate of parts. Thus, the larger the angle, the faster the motor cylinders wear out.
The movement of pistons in cylinders along an incorrect trajectory is caused by several factors, one of which is the nature of the design (lack of axiality or perpendicularity in the position of the parts that are mating).
In addition, very large dimensional tolerances also contribute to rapid wear of pistons and cylinders, due to which the piston moves not only parallel to the cylinder axis, but also with a certain deviation from the horizontal.
It is also worth considering the temperature regime at which all this occurs, as well as the products produced. All this has a destructive effect on the cylinder walls and piston surface. Thus, as a result we can have not a round cylinder, but an elliptical one.
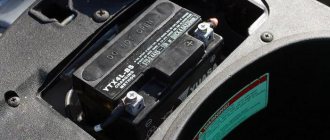
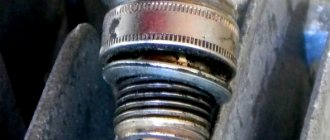
CPG Ural, After repair
So, not long ago I took the cylinders to be bored, bought new pistons with rings and pins, assembled everything carefully and carefully, the motorcycle started working the first time, the compression was excellent. I started it up gradually, let it cool down and then started it up again, the motorcycle ran for 10 minutes and cooled down for 30 minutes. Then I started driving slowly, without putting much stress on it, and drove about 250 km. Yesterday I was driving along a well-paved and level road for about 100 km/h, the motorcycle suddenly stalled while moving, I released the clutch, it started up again, I didn’t pick up a speed of more than 80 km/h, I immediately stopped and let it cool down, it cooled down for 15 minutes, then it started up like crap, about 5 times (compared to with the fact that always with 1), I got to the garage, already on almost one cylinder, the 2nd somehow worked every other time. I came and looked at the valves, changed the spark plug normally, started one cylinder anyway... I take it apart and look at the right piston, ideally there’s no sticking at all, in general an excellent run-in, the left piston has all the rings rolled up and worn out at its worst, there are aluminum scuffs on the cylinder, the piston is in trouble... Another new finger, as if it had passed at least 30,000 km... so I’m thinking what to do? Should I re-bore the boilers or clean the left cylinder with a zero and buy new pistons with rings and pins?
It is already useless to smooth the left piston with sandpaper and a file...
Replacing the piston and boring the cylinder
If such a situation occurs, then replacing the piston alone does not solve this problem.
It needs to be solved comprehensively, i.e. replacing a piston plus boring a motorcycle cylinder. Those. cylinders must be bored every time their wear has been detected. It is also worth considering that not all cylinders are subject to wear, even after quite a long period of operation in very difficult conditions. There are also cases where a vehicle lives out its life without ever boring the cylinders.
Parameters for determining cylinder wear:
- if at the top dead center of the cylinder its dimensions have changed by 0.05 mm from the original ones;
- if in the place where the piston skirt and the cylinder wall come into contact, the size has changed by 0.03 mm.
Thus, the two indicated parameters may well answer the question of whether or not it is worth boring the cylinder. If there is at least one of the changes listed above, then the answer is obvious - boring is necessary.
There are also worse situations when a so-called “stepped” defect appears in the upper part of the cylinder. The resulting step reduces the wear time of the cylinder, piston rings, and ring seats on the piston, resulting in very noticeable shocks during driving. However, this defect becomes noticeable without any measurements. When it changes, the nature of the engine's operation changes - it begins to vibrate strongly.
This is a direct indication for immediate repair, since the ellipsoidality accompanying this defect leads to the fact that the piston rings adhere worse to the cylinder walls. This, in turn, can lead to breakthrough of gases from the cylinder into the crankcase, disruption of compression in the engine, which also increases oil and fuel consumption.
As we see, in addition to the fact that untimely elimination of defects leads to the expenditure of money, they can also cause irreparable damage to the heart of the vehicle.
In this case, boring the cylinders will help restore the necessary parameters of this part of the engine. However, by boring we mean not only the restoration of the geometric parameters of the motorcycle cylinders, but the restoration of the normal position of the mating parts relative to each other. In other words, if you only correct the geometry of the cylinder, it will not be enough to restore normal alignment and the normal location of all the main surfaces.
The consequence of this is the appearance of excess friction, which affects other structural components of the piston group. In other words, all moving parts that participate in the operation of the engine and are part of the piston group will be subject to additional bending, compression, etc. loads. This, in turn, can cause further breakage of the cylinders as the engine operates.
Thus, if the question arises about boring the cylinder, then, of course, it is better to do it in a workshop - more expensive, but less problematic.
However, nowadays there are still masters who want to carry out this process on their own. Perhaps some people don't have enough money, while others just like to spend time in the garage, tinkering with their motorcycle. In any case, it is possible to bore a motorcycle cylinder yourself. It is worth noting right away that the boring method is also suitable for an automobile cylinder block. The only caveat is that turning to a turner is inevitable, since it is the turner who can make the appropriate mandrel that is suitable for this process.
The mandrel should have dimensions depending on the size of the cylinder being bored. For example, if the diameter of the cylinder is 76 mm, then the diameter of the mandrel should be 74 mm, and its length should exceed the length of the cylinder by approximately 150 mm, although a little more is possible. After the mandrel is ready, you need to make a hole in it into which the knob will be inserted, and use a hacksaw to cut a groove along the groove, the depth of which should be approximately 10 mm.
Five random articles about motorcycles:
What do Jawa 634 and CZ 472 have in common?
For those who ride Java and ChZ Many readers - owners of Czechoslovak motorcycles Java and ChZ face certain difficulties, especially when operating them in rural areas.
The reasons are their own inexperience, lack of specialized literature, and mainly that these motorcycles, intended mainly for paved roads, are often used in places where they have to travel quite a lot on unpaved roads. We selected the questions most often found in editorial mail and asked engineer E. KONOPA to answer them. What parts of the new and old JAVA are interchangeable? What do the YAVA-634 and ChZ-472 motorcycles have in common? It is impossible to completely list all the interchangeable parts and assemblies in the article. Let's focus on the main ones. In the new Java 634 motorcycle engine, the compression ratio is higher, achieved by reducing the height of the cylinder. The remaining main dimensions - landing and center-to-center - are the same, which makes it possible to install a new crank into an old engine... Read more >>
How Czechoslovakian mechanical engineers take into account the proposals of Java motorcycle owners from the USSR
There is only one goal - quality. At the end of 1984, YAVA-350 motorcycles of the model “638-5-00” began to arrive in our stores (see “Behind the wheel”, 1986, No. 3), which differed from its predecessor - “634.00” mainly in the engine and electrical equipment (12 instead of 6 V), as well as a front fork.
Owners of new cars positively assessed the improvements. At the same time, they expressed wishes regarding the manufacture of certain components, especially engine parts. Czechoslovak specialists - technologists, designers, having analyzed letters from consumers from the USSR, implemented a set of measures that take into account their suggestions. This work was completed last fall. And recently the scientific editor of the magazine, engineer B. SINELNY KOV, visited Czechoslovakia and got acquainted with the production of motorcycles at Czechoslovak factories. There is probably no need to talk about the great popularity of the JAVA and ChZ motorcycles, which have been attracting our motorcyclists for thirty years with their chassis... Read more >>
How to remove cylinders easier in Java. Protective pads for studs
Protective gaskets for studs After long-term use of a YAVA motorcycle, especially in rural areas, it can be difficult to remove the cylinders: dust and sand, mixing with oil, tightly clog the holes for the studs.
In addition, during disassembly, some of this dirt gets into the crankcase, no matter how hard you try to close it. Head gasket I got rid of this trouble in the following way. I cut out six gaskets from raw rubber about 2 mm thick (according to the picture) and put them on the studs before installing the head. When the engine heats up, they vulcanize and reliably close the holes from dust. I have been successfully using this method for several years now. V. KOROTCHIKOV Gomel region, Ozerany 1989N07P33 Read more >>
Electronics on Izhevsk cars. Basic faults, detection and elimination methods
Basic electronics faults, detection and elimination methods.
All Izhevsk motorcycles of recent years of production are equipped with electronic turn signal switches, and those with 12-volt equipment are also equipped with rectifier units. The characteristics and reliability of these devices are higher than mechanical ones, but problems also occur with them. As a rule, a failed device is replaced with a new one, which entails additional costs and consumption of spare parts. Meanwhile, if you know the circuit diagram of the device and the repair method, in most cases it can be restored. This is accessible to many motorcyclists familiar with electrical or radio equipment. We offer them recommendations prepared by design engineers from Izhevsk V. ARDASHEV and V. MEZRIN. The topic of this first article is a description of the design, testing and repair of the interrupter. On motorcycles IZH P3-02, IZH Yu3-02, IZH PS, IZH Yu4, a universal electronic turn signal interrupter IZH RP 2SM-10 has been installed since 1980. It is completely replaceable... Read more >>
IZH Jupiter 5-01 K (IZH-6.114-01)
The youngest Jupiter On average, every two to two and a half years, the Izhmash motorcycle production plant produces either a new model or one of the modifications of “planets” and “Jupiters”.
General view of the IZH Jupiter-5-01 motorcycle. The fairing, new tank, seat, tool boxes changed the appearance of the motorcycle and modernized its shape. When we visited Izhevsk in May and walked along the thread of the largest motorcycle conveyor in the country, from which up to 400 thousand cars a year already roll off, we immediately noted for ourselves: the main place in the plant’s production program is occupied by the new IZH Planeta-5 models. and "IZH Jupiter-5-01". True, between them one could see small inclusions of “Planet-4” with two mufflers and an old crew part. But, as it turned out, they were intended for sale in some countries of Asia and Latin America, where they had proven themselves well and where demand for them remained. For us... Read more >>
login registration forgot your password?
Motorcycle goods store About the store Terms and return procedure
Cylinder boring process
The process of boring a cylinder is relatively simple.
However, it will take a lot of time and monotonous work. In addition to the mandrel, you will also need good, moisture-resistant coarse sandpaper, as well as a couple of sheets of fine-grain sandpaper for filling the mirror. When all the tools are available, you can proceed directly to the process of boring the cylinder. To do this, you need to insert coarse sandpaper into the groove, and then wrap it around the mandrel. The sandpaper should also be well soaked in oil and can be inserted into the cylinder.
You should ensure that the mandrel with sandpaper fits correctly into the cylinder, otherwise there is a risk of boring it out of size. To do this you need to check. After the mandrel is wrapped with sandpaper, it should be placed in the cylinder; if it fits in too freely, then you need to put paper under the sandpaper and try again. It is necessary to ensure that the mandrel with sandpaper fits tightly into the cylinder by rotating it. Once everything is done, you can begin to rotate the boring tool inside the cylinder.
In this case, the sandpaper should be lubricated with oil each time - this will prevent it from clogging frequently. As soon as you feel that the sandpaper inside the cylinder rotates easily, you need to put paper under it again and continue the process. As you bore the cylinder, you should periodically try to insert a repair piston into it. When the piston fits tightly into the cylinder, you can change the sandpaper to finer sandpaper and begin filling the mirror.
You should ensure that when boring the motorcycle cylinder, the piston does not dangle, but its movement is not impeded.
After all, motorcycles are air-cooled and the cylinder heats up very much, so boring it tightly can lead to the piston jamming when heated, and running in the motorcycle will bring nothing but torment.
Before you start boring a motorcycle cylinder yourself, you should remember that this job is best done by a specialist using a special boring machine.
In this case, the cylinder will be bored perfectly. But perfect boring may not be achieved manually, as a result of which precious time will simply be lost on empty work, which will still have to be redone. Therefore, it is best to take the cylinder to a workshop for boring.
Traditional methods
So, closer to the topic. You can bore a cylinder block at home without special equipment using several traditional methods. They will require not only time, which goes without saying, but also patience.
On the other hand, most experts agree that you still need to use the machine. A boring machine will allow you to fit the cylinder perfectly accurately, although much will depend on the person’s skills. But compared to the manual boring method, the percentage of defects is minimized.
Although the method is “old-fashioned”, it also cannot do without a tool. A good electric drill set at low speed will work here. A worn piston with a gap in the liner (on the side) is also required. And you will also need a cylinder pin, as well as sandpaper with a different number of abrasive.
The piston in this case plays the role of the most significant element. It is the working fluid onto which the sandpaper is fixed. It is better to select an old piston that has expired, since after boring it will no longer be suitable for use.
In a car service, it is not paper that is used, but abrasive chips. Instead of a drill, as mentioned above, a special machine with a crank having the required diameter is used.
Repair process
- A hole is drilled in the middle of the piston for the cylinder pin.
- A nut is screwed onto the stud, and then the stud is inserted into the piston with its end up.
- The pin is tightened tightly.
- A cut is made on the piston with a metal hacksaw.
- The sandpaper is inserted into the resulting hole and then wrapped around the piston.
- This unique attachment is installed in the drill and tightened tightly.
- The cylinder is secured against turning.
- The drill turns on at low speed. Boring starts from top to bottom, and then from bottom to top.
Note. During this boring process, care must be taken to ensure that the skin does not come out of the piston. First, a large skin is used, then a finer one. At the final stage, grinding should be carried out with a zero.
Some experts also advise boring the cylinder block while using oil. Others do not agree with this opinion, because they believe that it bores well even dry. We are more impressed with the latter option, especially since you can feel the uniformity and smoothness with your hands if you have a certain skill.
A useful recommendation is: in order not to knock your hands off during grinding with an electric drill, it is recommended to firmly fix the cylinder, but try not to damage it in the process.
You may also find this video about honing helpful.
In this case, a wooden mandrel will be used as the main tool. But you will have to contact a milling machine who will turn this very mandrel. The mandrel manufacturing technology is based on the following formula: if the cylinder being bored is 76, the bar mandrel should have a diameter of 74 mm. As for the length, it should be 200 mm larger than the size of the cylinder.
Preparing the fixture
- A hole is drilled in the mandrel.
- Using a hacksaw, a cut is cut along the mandrel, into which abrasive paper is inserted, as in the case described above.
Note. The approximate depth of the groove should be 10 mm. The skin, as in the first case, should be both large and small.
Let's get started
- The abrasive paper is wrapped around the mandrel.
- The skin is generously moistened with oil.
- The cylinder is bored by a mandrel. It is necessary to rotate the mandrel inside the cylinder with a large piece of sandpaper, trying to achieve free movement along the surface. Then change the paper to fine paper and continue.
The best grinders in the world are the Japanese. Their secret is great patience. It's the same here. You have to be patient, otherwise nothing will really work out. There is no need to rush in the process of boring cylinders.
Simple tips
The ideal option for boring cylinders that contain a car engine block:
- The piston should sit tightly inside and not move downward due to its own weight.
The ideal option for boring cylinders that contain a motorcycle engine block:
- The piston inside the cylinder should move easily, but not hang out too much, since when heated it will jam due to physical expansion.
Having learned how to carry out boring with your own hands correctly, you will no longer be concerned about the problem that arises for most owners of used cars. It is hardly possible to avoid low compression of internal combustion engines on used cars, but theoretically anyone can bore and increase compression.
Of course, as at the beginning of the article, we warn the reader. Most likely, it will not be possible to carry out boring correctly without the appropriate knowledge, but desire can overcome all doubts. Be sure to watch a few video instructions, study our recommendations and go ahead!
How to bore a cylinder at home on a scooter
In this article I wanted to explain to many, based on many years of experience, that boring a scooter cylinder and honing it (or, as people more simply call it, grinding) are two different processes, and doing only one of them is in 100% cases money down the drain.
Unfortunately, a lot of workshops that repair scooters do not even delve into the essence of these processes; as a rule, they either have a makeshift grinding machine or an old USSR machine with grinding bars. Or do people simply hand over the cylinder for grinding without even asking what they will do? how will they do it? on what equipment, etc.
Often in practice, when replacing a piston or when changing piston rings, they work with so-called honing brushes or spring-loaded honing stones. However, this action has little in common with proper sprouting and honing. In this case, the more or less worn-out working surface of the scooter cylinder is only cleaned and made a little rough. This cannot improve the geometric characteristics of the cylinder. Due to the fact that the grinding tools are loaded with spring force, they precisely follow every deviation from roundness and every misalignment, but still without improving the geometry of the cylinder . Due to the lower contact pressure, it is unlikely that sufficient surface roughness can be achieved to improve lubrication. As a result, there is greater frictional resistance for the new piston rings, which wear into the cylinder wall a little faster. Thus, this wear on the cylinder surface cannot be prevented or reduced. If the piston rings are worn, then, based on experience, the cylinder wall is equally worn. The remarkable appearance of the internal bore after simple honing of the cylinder should not be misleading, since the ellipse of the cylinder remains the same.
In order to correctly restore the working surface of the cylinder on your scooter, you must first bore the cylinder with a regular turning tool, having previously aligned the cylinder along the axes with minimal runout, this will get rid of ellipse and other undesirable results of our ride, and only after the cylindrical surface has been restored , only then can you begin honing the working surface of the cylinder. Only in this order of carrying out cylinder repair activities can you count on a long service life of the repair CPG, otherwise all you will do is change the rings and waste money on repairs.
And the last piece of advice for today: If you remove the cylinder and see an absolutely mirror-like surface there, then know that there is nothing to be happy about, this is wear and tear, since there is no mesh on the working surface that forms an oil film (which is especially important for 2t engines) on the walls cylinder.
Less lubrication -> more friction -> more temperature -> more wear -> less service life!
And for starters, a short video of how a cylinder is honed after boring
Traditional methods
So, closer to the topic. You can bore a cylinder block at home without special equipment using several traditional methods. They will require not only time, which goes without saying, but also patience.
On the other hand, most experts agree that you still need to use the machine. A boring machine will allow you to fit the cylinder perfectly accurately, although much will depend on the person’s skills. But compared to the manual boring method, the percentage of defects is minimized.
Although the method is “old-fashioned”, it also cannot do without a tool. A good electric drill set at low speed will work here. A worn piston with a gap in the liner (on the side) is also required. And you will also need a cylinder pin, as well as sandpaper with a different number of abrasive.
The piston in this case plays the role of the most significant element. It is the working fluid onto which the sandpaper is fixed. It is better to select an old piston that has expired, since after boring it will no longer be suitable for use.
In a car service, it is not paper that is used, but abrasive chips. Instead of a drill, as mentioned above, a special machine with a crank having the required diameter is used.
Repair process
- A hole is drilled in the middle of the piston for the cylinder pin.
- A nut is screwed onto the stud, and then the stud is inserted into the piston with its end up.
- The pin is tightened tightly.
- A cut is made on the piston with a metal hacksaw.
- The sandpaper is inserted into the resulting hole and then wrapped around the piston.
- This unique attachment is installed in the drill and tightened tightly.
- The cylinder is secured against turning.
- The drill turns on at low speed. Boring starts from top to bottom, and then from bottom to top.
Note. During this boring process, care must be taken to ensure that the skin does not come out of the piston. First, a large skin is used, then a finer one. At the final stage, grinding should be carried out with a zero.
Some experts also advise boring the cylinder block while using oil. Others do not agree with this opinion, because they believe that it bores well even dry. We are more impressed with the latter option, especially since you can feel the uniformity and smoothness with your hands if you have a certain skill.
A useful recommendation is: in order not to knock your hands off during grinding with an electric drill, it is recommended to firmly fix the cylinder, but try not to damage it in the process.
You may also find this video about honing helpful.
In this case, a wooden mandrel will be used as the main tool. But you will have to contact a milling machine who will turn this very mandrel. The mandrel manufacturing technology is based on the following formula: if the cylinder being bored is 76, the bar mandrel should have a diameter of 74 mm. As for the length, it should be 200 mm larger than the size of the cylinder.
Preparing the fixture
- A hole is drilled in the mandrel.
- Using a hacksaw, a cut is cut along the mandrel, into which abrasive paper is inserted, as in the case described above.
Note. The approximate depth of the groove should be 10 mm. The skin, as in the first case, should be both large and small.
Making a “cutter”
In this operation we will need: a birch log, calipers, a marker, a chisel, a saw, a cylinder (the one we are going to sharpen), a piston (new and old), a rasp (you can use a file), a drill, a long bolt with a nut or a hairpin with two nuts , sandpaper sheets “10”, “6”, “5” and “0” (on a fabric basis - not suitable on paper). There are a few caveats - the stud or bolt must be at least 8mm in diameter. The best solution would be 12mm. Sandpaper is selected independently, depending on the type of boring. It is advisable to go through the “rough process” and bring it “to clean water”, and not to drive the rough one until you are blue in the face. Then fix the finishing one, and buy and select a new piston.
Let's start - measure the sleeve with a caliper:
Let's take an allowance of 10mm and measure it on the already trimmed log:
Let's outline approximately where we have “more meat”, and set some simple markings there and drill:
Immediately take a larger chisel and chop off the excess “meat”. Shape it into a cylinder.
But the shape of a cylinder will not work, it will turn out something like an oval:
The next step is to tighten the resulting cylinder onto the stud/bolt. Tighten until your teeth creak. When inserted into the drill, tighten until your teeth creak - it will unwind with a bang. If you tighten it harder, it won’t run away. Now secure the drill, make a stop for the chisel, and unwind the cylinder by pressing the gas on the drill. Take technology breaks more often. During breaks, tighten all nuts. If it comes loose, the results could be disastrous.
By substituting a chisel (smoothly substituting a chisel!) we ensure that we first get an oval:
Then the shape will remind us of a cylindrical object:
Later you will get a natural, perfect cylinder. I think there is no need to explain that the fine-tuning was no longer carried out with a chisel, but with a rasp, and later even with a file.
You should now have a long wooden piston for the cylinder.
. Only well weakened. Somewhere by 0.3-0.6 mm.
Something like that:
This is an example of relaxation.
Next, we will make a technological cut in a wooden blank:
And you need to make a “latch” for it, that is, a latch. So that the sandpaper does not run away from us somewhere far away. Here I honestly admit that I stepped in the wrong place.
I made it wooden:
And it looked like this:
But when I started refilling, I realized that it didn’t hold well. The answer did not take long to arrive - a 3mm welding electrode worked perfectly as a clamp.
Make a fastener for the drill - it tends to run away from you!
Now let's see how we will have a working area:
Well, we have made our workplace. We can start taking measurements.
Messages [1 to 20 of 46]
1↑ Topic by mexanik62 29-11-2011 23:53:22
- mexanik62
- Mechanic from the 30s.
- Inactive
- Name: Uncle Vitya
- From: Evpatoria
- Registered: 03-08-2011
- Messages: 10 832
- Reputation: 1 151
- Motorcycle: 12-volt K-750, ZAZ Sens Hatchback
Topic: Do-it-yourself cylinder boring
Added: 29-11-2011 19:42:54
Added: 29-11-2011 19:45:08
Added: 29-11-2011 19:48:36
Added: 29-11-2011 19:53:22
Of course, the Stone Age. So during the war, tractors and combines were bored in the field relatively recently. However, if there is no alternative. If anyone is interested, I’ll write in more detail.
2↑ Reply from PATRIOT 30-11-2011 16:10:02
- PATRIOT
- Patriot IMZ
- Inactive
- Name: Ilya
- From: Krasnodar region, Krasnodar
- Registered: 18-02-2011
- Messages: 3 148
- Reputation: 180
- Motorcycle: No. Next will be the K750!
Re: Do-it-yourself cylinder boring
well anyway!
How long does it take to sharpen like this?
3↑ Reply from t 34 30-11-2011 16:25:08
- T-34
- Pro
- Inactive
- Name: Ruslan
- From: Zab region Chita
- Registered: 20-02-2011
- Messages: 586
- Reputation: 39
- Motorcycle: self-propelled
Measurements
We buy a new piston, one repair size larger (usually 1 unit) and see how and where it fits (if it doesn’t fit, then there’s still more to come
).
We push in different directions to understand where and what is in the way. If the cylinder worked in risky modes, it means it has a huge output. Mine worked with too early ignition, a slightly lean mixture, which gave quite high revolutions.
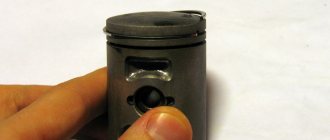
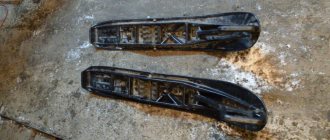
The cylinder mirror is excellent, but here's the breakdown:
What you see on the cylinder liner is dirt. That is, a lubricant that once was. After removing it, I preserved it for some reason. I don’t know why.
Having measured the piston (even if it goes inside, it jams right in the middle), I realized that it needs to sharpen just a little. If the piston doesn’t fit at all, then yes, let’s see how much grinding needs to be done. Usually in such situations they sharpen 0.1-0.15 mm. I sharpened 0.01-0.07. It is advisable to choose a piston in the store so that it barely enters. Then boring will turn out better because you can pick up the piston even larger and bore it again. In the pictures there is simply a worn-out cylinder that seems to have served its useful life during this repair.
Carving according to the "Ural"
June 26, 2015
Part III. Boring and preparation for assembly.
How long did you have before me? In millimeters, or better to the nearest hundredth. The size of the cylinder, bored out for the “second repair,” was not surprising: the motorcycle has a lot of mileage, but there is still “meat” on the walls. We'll cut it off!
The engine in the Tru Motor workshop decided to assemble a modern one, which means that modern spare parts are needed. The main stumbling block was the crankshaft from Ural for the 2015 model year, the installation of which entailed a number of changes. Tolerances, workmanship and safety margins are unprecedented for a Soviet motorcycle. One problem: you can’t just push it into the old, lower-valve crankcase: the modern crankshaft is not mounted on 207 bearings, as before, but on larger, more reliable 208 bearings.
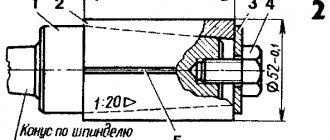
With the rear main bearing everything is more or less simple; it, along with the rear crankcase cover and oil seal, is supplied from the same new Ural, and the modern flywheel is also from it. But for the front bearing the shaft will have to be re-sharpened - the journal diameter will have to be reduced from 40 mm to 35 mm (Fig. 1). The work is complex and requires special equipment. You can’t clamp a shaft into a regular lathe or grinding machine; the non-removable connecting rods need to be fixed somehow, otherwise they will destroy the entire workshop, so we resorted to the help of a friendly workshop that remakes such crankshafts in small batches, and bought a ready-made shaft.
We were able to find spare parts for the new Urals from the official Plamen dealer, who provided us not only with a rear crankcase cover with a bearing and oil seal, but also a new oil pump, Avtotekhnologiya forged pistons with a diameter of 79 mm, a new flywheel and timing gears. And we managed to find spare parts for the “lower valve” in the oldest Moscow store MOTO99, where they dug up for us a new Soviet-made K-750 camshaft, a set of oil seals, Japanese bearings, as well as a complete set of gaskets, including even such scarce things as aluminum gaskets heads (although they can be made at home - there would be a sheet of aluminum, or even better, copper 0.5 mm thick).
In addition, we found a tray with advanced fins that provide better cooling. They didn’t skimp on lubricants either, deciding to pamper the engine with Motul 300V Competition 15W50 synthetic. Don't be surprised: car oil is much more appropriate in an engine with a dry clutch than motorcycle oil.
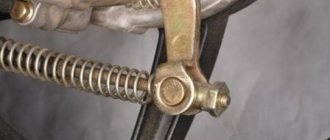
All that's left to do is to bore the worn out cylinders (photo 1) for new pistons and repair the valves. We went to solve this problem, which happily agreed to help us, and most importantly, show us the whole process from the inside.
To begin, the cylinder is clamped on the boring machine bed and centered relative to the cutter (photo 2). Having measured the internal diameter, adjust the spread of the cutters (photo 3) and begin boring (photo 4). The cutter removes a rather thin layer of metal, so after each pass it is removed and the expansion in the cutters is increased (photo 5), repeating the procedure until the diameter of the hole is equal to the diameter of the piston (in our case 79 mm). In fact, the piston diameter may differ from the stated 79 mm and range from 78.93 to 78.94 mm, so it is always better to bore according to the actual size of the pistons.
After this, the cylinder is sent for honing, where inclined marks are applied to its inner surface to retain oil. At the same time, its diameter also increases slightly. The gap we need between the cylinder and the piston is 0.12 mm. Would you say it's too much? Not at all! The coefficient of thermal expansion of forged pistons is slightly higher than usual, the “air” engine is much hotter than its “liquid” counterparts, therefore it is impossible to bore less, and we decided to provide a small margin. But you don’t have to worry about break-in and you can safely load the engine, for example, at races.
Honing takes place in three stages using three special bars of different hardness (photo 6), but before that it is necessary to accurately measure the diameter of the piston in its widest part - one and a half centimeters from the edge of the lower skirt, perpendicular to the hole for the piston pin (photo 7). First, a rough hone is applied, which removes 0.08 mm from the cylinder walls in just a few passes, after which the rough bars are replaced with medium ones, which remove much less, and the gap increases to 0.12 mm. After each pass, the master checks the diameter of the cylinder using a bore gauge (photo and, most importantly, checks that the cylinder is bored evenly, without turning into a cone.
If you look at a honed cylinder under a microscope, it turns out that seemingly shallow scratches actually look like huge ditches with burrs, metal sastrugi and shavings. They are smoothed at the third stage of honing (photo 9). Then the cylinders are sent to a special washing chamber, where they are washed from chips, oil and other contaminants with a special shampoo under high pressure and temperature (photo 10). Usually this is where the repair ends, but we need to sort out the valves.
Previously, motorcyclists had to pour kerosene or diesel fuel into the combustion chambers to check their tightness, but modern technology saves time and hydrocarbons by checking the tightness with a vacuum compressor (photo 11). Sucking air? Disorder! In our case, all the valves were leaking: on the right cylinder it was barely noticeable, on the left - with a whistle. The piston, which was trying to split into atoms and get free, seriously damaged the chamfers and stuck to the valve seats (photo 12). In addition, the ends of the valve stems were also tired, so everything had to be repaired. It’s good that you don’t change it: wear on the valve seats and stems is almost unnoticeable, and there is no indication for replacing them. But if the wear of the valve stem exceeds 0.15 mm and its diameter approaches 8.85 mm or becomes smaller, as well as if the wear of the seat exceeds 0.25 mm and reaches 9.25 mm, both the valves and the cylinder need to be changed. There are no guide bushings in the cylinders; the valve seat is made directly into the cast iron casting of the cylinder. Other indications for cylinder replacement are chipping and cracks on the seats.
First, the valve is clamped in a special end-cutting machine (photo 13), where the broken end of the stem is ground off and chamfered (photo 14). After this, chamfer the plate (photos 15 and 16). Using special cutters centered on the valve guide, the chamfer on the seat is restored (photo 17). It is important to get an even contact zone between the valve and the seat (its width - approximately 1-2 mm - is very important to ensure tightness, cooling and ultimately the longevity of the parts). After processing with a milling cutter, there is no need to grind the valves, the tightness is absolute! It’s good that the bushings weren’t broken either (the easiest way to assess the gap is to slightly extend the valve and rock it in different planes).
Of course, broken cooling fins worsen the heat transfer of an already hot cylinder, but the loss of up to 20% of the fins is acceptable and has virtually no effect on the operation of the motor. Cooling is worsened by flakes of rust and dirt that clog the entire space between the fins, so sandblasting the cylinders more than compensates for a couple of broken corners of the fins.
If the cylinder requires serious repairs, it is easier not to mess with it and look for another one. For a slightly worn cylinder from a lower valve they ask about five hundred rubles, cheaper than for any other motorcycle.
So, the geometry is restored. But it’s too early to install the cylinders on a motorcycle: dirt and rust on the cooling fins will interfere with normal cooling, so it is advisable to clean the fins with coarse sandpaper, or better yet, sandblast them. At Pesochka.ru, all the husks were blown off our “pots” in literally ten minutes, completely removing the layer of sewage that had stuck for decades. After this, all that remains is to paint the cylinders with heat-resistant paint - and you can begin assembling the engine, which we will talk about in the next issue.
To be continued…
Boring process
We insert sandpaper into the technological groove and give the drill a short “gas”. After this, the sandpaper tightly envelops our shape. We select the effective length of the sandpaper as follows: measure out a large piece of cloth and screw it completely onto the mold. We put our cylinder on the muffled drill. Doesn't fit? So we unwind it a little, and ruthlessly tear off the extra flap from the sandpaper. An effective thickness is for the cylinder to fit in with a little force, but not too tight. You need to start with “10” grains.
We drove around a little, and we see that our sleeve is gradually increasing in size. The piston slowly begins to climb. A couple of tips:
- DO NOT drive. There is no need to quickly bore. Drive the cylinder slowly, as if imposingly. A little forward, a little back.
- Use the entire workpiece during boring. Don’t stand still, and if it doesn’t go further, then you need to find a defect/jamb while preparing the mold.
- Do not rush to replace the sandpaper with a new one. Sharpen it better than the old one. Even if it is already clogged with chips, clean it and continue working
- Do not set high speed on the drill. The higher the speed, the greater the chance of throwing the cylinder into a landfill.
- Effectively no more than 550 rpm.
- Do not pinch the workpiece while boring. Do not make a sudden forward movement just because the cylinder does not go further (stays in one place). May wrap his hands.
If you follow all the rules, slowly, you can get this result:
Then be sure to rinse the cylinder in gasoline. And then lubricate it with oil (if you are installing it on a vehicle), or lubricate it with grease/lithol (if you are preserving it until the next breakdown).
Now my favorite phrase:
The first time, a young specialist may not get the desired result. This is due to his inattention and deaf ears to my advice. If you follow this article clearly, you can also bore the block on your car. But I don’t know who will need it.
Ural motorcycle engine tuning: detailed information
What owner of a domestic motorcycle has not thought about tuning the engine of a Ural motorcycle? This burning question worries many fans of domestic Ural motorcycles! The fact is that the standard Ural engine has many manufacturing inaccuracies and is technically imperfect. Depending on the model and year of manufacture, the power of the Ural motorcycle varies from 32 to 36 horsepower, which in our time is considered low for an engine capacity of 650 cubic centimeters. In this article we will look at how to increase the power of a stock outdated engine. I would like to note right away that a lot of turning work will be required; find a workshop in advance that will agree to help you in this matter.
The Ural boxer engine has great potential for tuning, thanks to a piston diameter of 78mm and a stroke of 68mm. With this configuration, the engine could be revving, unfortunately the quality of the parts and the purpose of the motorcycle do not allow this to happen. In the article we will look at the solution to this problem, due to which you can achieve impressive results from the operation of such an engine, namely:
- Engine head tuning
- Camshaft tuning
- Cylinders and pistons
- Carburetors and ignition
- Additional engine modifications
Through the channels of the engine heads, the cylinders are filled with a fuel mixture, and exhaust gases are released. The more efficiently the cylinders are filled and the exhaust gases escape more easily, the greater the engine power. To tune the Ural engine heads, you will need to remove the valves. The diameter of the original Ural valves is only 38mm inlet and 35mm exhaust, which affects the suffocation of the engine. Along with the valves, you need to press out the old valve seats and guides. The seats for the saddles should be bored to the size of the Dnieper saddles. New enlarged seats will allow the installation of larger diameter valves 40mm inlet and 38mm exhaust from the Dnieper. The best alternative to Dnepr valves would be valves from Audi. The quality of automobile spare parts is much higher, and thanks to the fixation with new type of crackers, the service life of the heads can be significantly increased. We recommend using bronze valve guides from VAZ 2101-2107.
Internal grooves improve lubrication of the valve stem. The movement of valves in them is the most efficient with minimal friction losses, and the service life is much longer. Bronze perfectly removes heat from the valve, which will have a positive effect on the stability of valve clearances.
It is important to know: when choosing valves, do not run into a fake. Exhaust valves made of heat-resistant steel should not be magnetized. Bronze guides are also not magnetic.
Please note that the gap between the guide and the valve stem is required from 0.04 to 0.06 mm. The valve should move freely in the bushing without dangling in it. By the way, we would like to note that the car guides have a seat for the oil seal. We strongly do not recommend installing it, since lubrication occurs by splashing oil, and not under pressure as in cars. After installing new valve guides, pay attention to the trimming of the valve seats. It is necessary to trim the seat along three chamfers: 60, 30 and 45 degrees, of which 45 degrees is the working one, which comes into contact with the valve plate, ensuring a tight fit. You will also have to replace the standard valve springs with automotive ones from the VAZ 2108. They are somewhat stiffer than the original ones, and are able to ensure smooth operation of the valves at high speeds. But keep in mind that with such springs, the camshaft is subject to accelerated wear - tuning a motorcycle engine requires sacrifice. The final procedure for tuning the heads is to bore the intake and exhaust channels with a cutter a couple of millimeters larger in diameter. At the same time, it will be possible to get rid of casting sagging and ensure better engine breathing. The exhaust channel should be polished to a mirror, and the intake channel should be left matte, slightly rough, to prevent fuel condensation on the walls. After tuning the heads, do not forget to blow out all the channels and hard-to-reach places with compressed air, and grind in the new valves. Grinding must be done manually using a two-component lapping paste. Never use a drill. A hose is put into tension on the opposite end of the valve stem, thus rotating the valve with your palms until you get a matte ring on the seat and valve plate with a thickness of 1.2-1.6 mm. Check the tightness of the valve by pouring keratin into the channels for 1-2 minutes.
Camshaft tuning
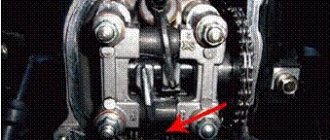
This modification requires a very thoughtful approach; as a rule, a new cam shape is created experimentally and may not meet your expectations. A wide-phase camshaft will help to fully realize the capabilities of tuned cylinder heads. For moderate tuning, you can simply install it from the Ural model M 67-36. The photo below shows a wide-phase shaft on the left, and a regular one on the right.
If you want to achieve the maximum from the engine, then it is possible to increase the profile of the cams of the standard shaft. This can be done by welding the metal using argon welding. By increasing the width and height of the cams by a couple of millimeters, it is possible to achieve a shift in torque to the high speed region and increase power also by increasing the speed of the valve timing. Take into account the fact that such an engine will lose traction at low speeds and may even stall at idle. For this modification, we recommend finding a workshop or factory that can properly process the cam profile followed by carburizing. Then, it is important to make sure that the geometry of the shaft is even; there is a high probability that the shaft could be driven by a sharp temperature change; the curvature is checked with a dial indicator by an experienced turner.
Cylinders and pistons
One of the most important parts in an engine is the pistons. They take on a huge load from expanding gases and temperature. Low-quality standard pistons do not withstand loads well, often have different weights, and the piston rings cannot provide high compression due to their outdated design, this significantly affects the power, and the massiveness and number of rings make the piston very heavy, which prevents the engine from spinning. It is recommended to install forged pistons with imported rings. A good solution would be to install forged pistons from the Ural Wolf motorcycle; they have a convex surface, which will increase the compression ratio and significantly increase engine power.
As for the cylinders, it is preferable to replace them with aluminum ones with a cast iron liner. The thermal conductivity of aluminum is much higher, and effective heat dissipation is ensured. A significant improvement in cylinders is relining. The standard internal diameter of the cylinder liner is 78 mm, and if the volume of the standard engine of 650 cubic meters does not suit you, by replacing the original cylinder liners with liners from Moskvich 412 with an internal diameter of 82 mm, you can significantly increase the volume and, accordingly, power. Select the pistons accordingly for the new diameter.
To combat overheating, a cooling system in the form of installing an oil cooler and by forcefully spraying oil onto the bottoms of the pistons will be useful. To connect the oil cooler, an additional oil pump is needed, since the standard one is very weak. To pump oil through the radiator, it is advisable to install an oil pump from a Dnepr motorcycle. Drive the second pump through an adapter from the standard Ural pump. In order for the additional pump to fit in the crankcase, an enlarged sump is required, which will also have a positive effect on cooling. By slightly increasing the amount of oil in the system, it will be possible to distribute the thermal load, and the new aluminum pan will remove heat even better.
By connecting to the new oil pump an oil line made of a copper or steel capillary tube, which must first pass into the radiator, then cooled oil from it must flow to the inside of the pistons. To do this, the line from the radiator enters back into the crankcase and bifurcates so that the oil supply is directed to the bottom of the piston from the inside. An oil cooler can be purchased at a Japanese motorcycle dismantling shop, and an automatic transmission radiator of the size you need from any car is also perfect.
Carburetors and ignition
Tuning a Ural motorcycle engine affects all engine systems, including ignition and carburetors. It is recommended to read the information: how to properly configure Ural carburetors. The standard ignition is so outdated that it is not even suitable for everyday driving, let alone anything else. It is desirable to install a microprocessor ignition with the possibility of an automatic advance angle. This article will help you set up the electronic ignition system. Ideally, such an ignition would be installed with a programmable controller with the ability to adjust the firmware. Such ignition systems have another useful feature - speed cut-off. This will prevent over-torque of a heavily boosted engine. Well, for maximum spark strength, in combination with a new ignition, you can use a coil from the Oka or Gazelle. Branded high-voltage wires with silicone insulation and internal resistance are required, for example from Tesla from VAZ 2108. They will ensure an uninterrupted spark in any weather and eliminate the possibility of spark breakdown to ground. As for carburetors, you will need to install Japanese vacuum carburetors with a diffuser diameter of 32 to 36 mm, followed by selection of jets, synchronization and adjustment with a gas analyzer. Tuning on a dynamometer is highly advisable, where you can test different settings and ignition timing and get the most out of your motorcycle tuning!
Additional engine modifications
In addition to the above methods of tuning a Ural motorcycle, there are several more secrets. It is possible to install a crankshaft from the K 750 on the Ural engine, which will increase the cylinder stroke to 78mm.
Thus, it is possible to significantly increase the working volume of the Ural engine. It's quite difficult to find, but it's worth it. Another problem with the motorcycle is the tight response to the throttle and slow acceleration. The reason for this is that the flywheel is too heavy, the weight of which is designed for riding with a stroller and for transporting heavy objects.
According to the drawing, it is possible to reduce its weight by a couple of kilograms. Due to the weight reduction, the inertia of the crankshaft will decrease, and the acceleration dynamics will significantly increase. To fully realize the power on the road, the gears of the gearbox must be replaced with 9 or 10 pairs. In conclusion, we would like to note that tuning the Ural motorcycle engine is justified only for racing purposes; for everyday use, such an engine will have a short resource and significant fuel consumption.
Rate this article
Moscow Scooter Club
Time zone: UTC + 4 hours [Summer Time]
Forum Rules
BE SURE to indicate the model, unit and symptoms of the malfunction in the title of the topic.
Heading form: [SCOOTER MODEL] - unit malfunction Example: [Dio] electric starter does not work.
If the topic concerns general repair issues, the model may not be specified.
The main rule is that the title of the topic should be brief, but as fully as possible reflect its content. Topics whose title does not indicate at least the approximate essence of the question, such as “AAA. Save!”, “I have a problem, tell me,” will be DELETED .