wide opposed wheel
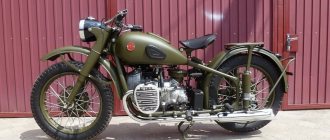
Hi all. Now the time has come when I can boldly write an article about my steel horse. I finally took it too. in a word, I bought myself a Dnepr 16. It was disassembled... . Well, in short, like everyone else, they had their own nuances. Well, that's not the main thing. I decided to make a chopper out of it. and then a problem arose, WIDE WHEEL... how? where? for how much? there is nothing like this anywhere... 
I decided to rummage around the net, and noticed that many people have a question about how to install a wider wheel on a Soviet boxer :). A lot of ideas have been proposed in this regard. Cavoto was able to make a couple there, but Cavoto was not. but what can I say? I decided not to look for something, but to invent something of my own, this... . and that's what I got 16 disk. . tire 160/65 R16, in short, at first I thought it would be a car wheel, but when everything was done and installed, I realized that I personally would be ashamed to ride with such a wheel, I would have a spoked wheel in front, and what about the back, a piece of iron???? Many people may be satisfied with this option. but I want to assemble really decent equipment, and not some kind of collective farm... ... and I decided to remake it. and this is what I got... .... First of all, I cut off the core so that it wouldn’t hurt my eyes. after which a new problem arose!!! what should I do next? and then it was necessary to make the hub... . but how? from Kavo? how much? where can I get it? I rummaged around the net again and realized that I wouldn’t find anything interesting. Stopper again. the only thing I knew for sure was that I wanted a disc brake, and the option to install a brake drum from MT... .... . !!!!! never in my life. It’s big, and after looking at its entire system I realized that cone bearings are not for me either. in a word, everything was going to the point that I had to make a homemade hub... ... 
and this is what I got
I made a hub with 40 spokes for simple bearings, with an adapter for a disc brake. but before that I already bought myself a brake system from Kawasaki. She didn't suffer badly. It can be completely disassembled, which makes it easier to replace any part if something happens... . she suffered from a small neat detail... . . in a word, it was great... but after all the joys, the problem comes again. Now we need to drill out the holes for the spokes. drilling is not a problem, but marking the wheel... ... guys... . It was easier for me to draw the hub than to mark it... but oh well, I marked it, and I even punched this poor disk. but he did.
the next step was the knitting needles. . I found knitting needles from Chezet. I made a hub for them... but I only had 13 of them... . I looked for knitting needles around the city, found them, but when they told me the price... . I lost the desire to do more. for one knitting needle that looks like a nail, give 1.5 dollars... . . NO THANK YOU... and what should I do????? hmmmmm... . . I said nail????but really why not. Without hesitating for a long time, after a couple of moments I already had 1 kg of nails in my hands, which cost me 4 dollars. after which carvings were made on them... . it took a long time, but I'm a persistent person. and that's what happened
they were of course not very beautiful, but a couple of treatments and what happened finally all the work was finished, now all that was left was to paint and assemble everything... . . look further, this is an already primed hub and this is a disk in the ground... . and now the guys are painting, this is already a painted hub with nails AND HERE IT IS, GUYS ASSEMBLED... ... ... ... ... everything came together very beautifully and clearly. according to all my requirements. Well, then I’ll show you how it looks, purely in preparation, please don’t judge strictly... I’m still green at this. I don’t understand everything. I’ll finish the frame soon, and I’ll also post it for everyone to see. Thank you all in advance... ...
iursedos
opposit.ru
Evgeniy Osokin | Thread Posted by: Men
people, like in the Urals, you can put the rear wheel of a car xxxeellp
╰☆╮ (Honorius) you weld a car part into a Ural daisy. minimum rework
Vladislav (Erasmus) You explained it straight away. He will understand everything right away)))
Alexey (Liang) You also explain to him that you need to move the motor so that the cardan goes through. He believes that the rear and front wheels of the car are different. It is not necessary to explain it this way, but the way I will explain it below.
Alexey (Liang) 1. You buy a rear wheel from a car of the xxxeeell brand (don’t confuse it with the front one, they are very similar)! 2. You place the Ural on the central stand, and ask mom and dad to hold it from left to right so that it doesn’t fall.3. You put a wheel on top of the Urals, bracing it with ropes so that it doesn’t fall. All the women will be yours!
K (Booty Pie) So he definitely understood
Roma (Chaderick) it’s interesting, when people write all sorts of crap, do they read it, or believe it themselves. Well, okay, when some question leads to a dead end, but sometimes they ask such crap.
╰☆╮ (Honorius) it’s one thing to roll it out... it looks beautiful and you can install it without expanding the pendulum. My motocross bike is 120 mm wide, but with a wide one it’s just a lot of trouble, and the consumption will increase and the handling will be worse
╰☆╮ (Honorius) why move this motor, you mount it on the hub under a sprocket, there will be a chain drive... and the gearbox is mounted immediately in front of the rear wheel, you can just install a disc brake on the way. I think it can handle it
RUSTAM (Ashraf) I fucked your mouth motherfuckers
RUSTAM (Ashraf) bitch don't bother mommy and daddy
RUSTAM (Ashraf) I put you in the place of the wheel freak
Wheel-VShK-Homemade (2).mp4 – YouTube
(Ural, Dnepr) K-750 Conversion for a cruiser, not a single spare part from an imported motorcycle. – Duration: 10:53. Igor Zaikin 392,393 views.
Part 1. Wide wheel for motorcycle Dnepr-12 (K-750, M-72, Ural.
Part 1. Wide wheel for motorcycle Dnepr-12 (K-750, M-72, Ural). MOTO SAN. SubscribeSubscribedUnsubscribe 13.75713K. Loading.
To post a response you must login or register
Making a motorcycle wheel from scratch.
beautiful back!!!
How to make a wheel for a chopper motorcycle no worse than at the factory.
It can be assumed that any project to improve the appearance of a motorcycle begins with altering the frame. In principle, this assumption is true, but only partly, since it is impossible to qualitatively “digest” the rear part of the frame without having a ready-made rear wheel. Therefore, you need to start a comprehensive modification of a motorcycle by making a beautiful “sexy” rear wheel. After all, a beautiful rear end of a motorcycle has the same meaning as a beautiful rear end of a pretty girl.
Wheels from renowned manufacturers have a full range of sizes in diameter and width, and it is these parameters that determine the width and height of the rear part of the frame and swingarm. The quality of these companies is excellent, but when some see the price corresponding to this quality, they are shocked and immediately close the catalog. For example, a tire roller 360 mm wide, cut by an expensive and computerized machine from a solid aluminum block, can cost about 15 thousand dollars. In general, there is no price ceiling. (Now tires with a width of 400 mm have appeared.)
In this article I will try to “sort out” the most budget-friendly, but despite this, quite good in appearance, option for manufacturing the rear wheel of a motorcycle. Moreover, the width of this wheel depends entirely on what kind of car rim you find, since we will make the product from a car wheel. Therefore, decide in advance on the width of the rim so that you know what to look for at a car disassembly, but select the diameter of this wheel to 16 inches and I will explain why.
- Well, firstly, this diameter is very common among both cars and motorcycles.
- Secondly, it looks good with almost any frame (especially for custom ones in the now popular old-school style).
- Well, thirdly, the hub drawing I developed is suitable for this diameter, and also fits the length of common Dnepr spokes (from the Dnepr motorcycle). This will save you from searching for knitting needles of a different length or shortening Ural knitting needles.
However, if someone still wants to use a rim of a different diameter, then they should wait a little, since I will write about the correct change in the length of the spokes while maintaining the “native” thread (knurled, not cut) in another article (find the article here) . Another important condition: the rim must certainly be iron, and not light alloy. Well, firstly, it is cheaper than aluminum or titanium, but this is not the main thing. The fact is that an alloy wheel from a car on a motorcycle is easily recognized by people and, to put it mildly, it ruins the entire project.
I don’t argue, there are, of course, beautiful alloy wheels, but they are not cheap, and no one will want to sell you individually, since the set includes 4 pieces. Well, if you order the production of a wheel from a forged light-alloy blank, on a modern CNC milling center, then such a wheel will cost you an exciting amount, and its price may well exceed the cost of your motorcycle (how many zeros there will be in the price tag depends on the exclusivity of the design, material , the credibility of the manufacturer and other exciting factors).
In addition, having installed a light alloy wheel from a car, you will certainly need to look for a narrow front wheel made of the same alloy and with the same pattern, and this is practically impossible (again, you will need to order the production of a narrow wheel with the same pattern from scratch, and this is not cheap ).
Having made an iron wheel on spokes of at least 360 mm, no one would even think (even during a technical inspection) that this wheel was once a car wheel. After all, the technology that I will describe is almost the same as in any motorcycle factory. However, it is quite affordable.
As I already said, at the disassembly site we find a car wheel with a diameter of 16 inches and the width you like or depending on what kind of motorcycle tire you can find. Next, we take it to any tire service center and roll this rim on a special machine, since if the rim is used, then it will certainly be crooked (not expensive, about 5 dollars). Next, we cut out the inside of the rim with a grinder or, if possible, on a large lathe and sand where the welds were.
The photographs that I will post below will show an example of working with a wheel from Moskvich of the very first model. The funny thing is that on this rim it is very easy to separate the inner part, since it is attached with rivets. They are cut or drilled and the inside is knocked out with a hammer. Just before this, it is important not to forget to roll the rim.
In most services, the disk from Moskvich will not fit its holes with the pins of the machine, since the standard is different, but believe me, the bullet does not take this standard, in the literal sense of the word, since before everything was done for centuries - proven. When I arrived at the car service center, and the Moskvich wheel was secured in the machine and began rolling, this machine creaked and whined during rolling, proving that the rims of modern cars, in comparison with the Moskvich rim, are made of “foil.” The car service mechanics had their eyes wide open!
So, if the rim from the 401 Moskvich does not fit into a modern rolling machine, then it is very easy to make an adapter from an old Zhiguli brake disc. or simply cut it out of 10 - 12 mm steel on a lathe, which is what they did for me (see photo on the left). The only drawback of this rim is that the maximum tire size that will fit on this rim is 160 mm. If you want something wider, we are looking for Pobeda, 21st Volga, Niva, Gazelle, or foreign cars.
Next, we weld and sand the rivet holes. The next step will be marking. Here you need to immediately decide how many knitting needles you want, 60 or 80. In the photographs I will show both options, and when you see a photo of a rim with 80 spokes, you will understand that it is almost impossible to squeeze in a larger number of spokes on a diameter of 16 inches. The distance between the cones is so small that the number of knitting needles can only be increased if thinner ones are used, for example, from Minsk or Java.
You will also need to make changes to the hub by drilling holes for the spokes in several rows (at different levels) and, naturally, of a smaller diameter. Anyone who can handle this, go for it, because tuning has no limits. But at this stage, (in this article), I am trying to explain the basics of working with wheels and for beginners.
Naturally, the coolest “masters” will find in this article something that I’m doing wrong; that’s why there are the coolest “masters” who only know how to teach someone best. But in this article I am not trying to teach anyone, I am telling you how I do it, and the work is visible in the photographs below. But this does not mean that everyone is obliged to do this. If anyone wants to, please, I’m always happy to be helpful.
So, we decided on a number, for example, 60. For beginner customizers, that’s it. There are several marking methods, but the simplest is using a device with the strange name curvimeter.
At the bottom of this device there is a wheel, and when you roll the device using this wheel on any surface, it shows the exact distance in millimeters on one side of the scale, and on the other side the exact distance in inches (see photo).
This device is a very convenient and accurate tool, but if you don’t have it, you can use a regular tape measure. We wrap it around the rim and pull it tightly; it is better to do this with the help of an assistant. Divide the result by 60.
Next, we mark with a very thin scriber, or better yet, with an awl, since moving even a millimeter to the right or left will result in a shift of a centimeter at the end of the circle (tested). But I hope, after trying a few times, you will succeed. The most important thing is that you need to mark the holes not just in a row, but in a snake pattern (see photo below), stepping back from the edge of the central (wide) groove by 8 mm. Then we carefully drill these holes and the more visible they are, the better, since when heated everything becomes barely noticeable.
Well, now we come to the most interesting part of the work, the one that will turn the car rim into a motorcycle rim. To do this you will need to make a press. There are several options, but I will describe the simplest and most practical, in my opinion, threaded press, and you can make it literally in a day. See how to make it here.
You need to screw a ram onto the end of the threaded rod of the press, and a matrix is screwed into the transverse bar of the press (where the wheel fits).
The press bar is rotated - the sphere of the matrix is visible.
That is, it turns out that the wheel rim is placed between the plunger and the die, and under the pressure of the press (its rod), the plunger presses the rim metal into the matrix sphere (the die sphere is clearly visible in the photo, and the punch is screwed onto the press rod), and the shape of the convexity of the rim metal is when extruded, it exactly repeats the shape of the matrix.
Punch for squeezing out cones under the wheel spokes. For a drawing of the ram and die, see the photo on the left and below. All dimensions of the punch sphere and matrix are designed for the head of a Dnepr spoke (from a Dnepr motorcycle).
Drawing of the plunger and matrix in the photo on the left and below. They need to be made from high-quality steel, not lower than forty-five (ST45), and after turning, both the ram and the matrix should be hardened to a hardness of 58 - 65 HRC.
Drawing of a matrix for squeezing out cones under the spokes of a wheel.
It is possible to make a press based on a hydraulic jack, and the principle of its manufacture can be seen in this article. Only you will have to make the bracket a little wider (depending on the width of your rim), attach the ram to the end of the bracket, and attach the matrix to the jack rod. In general, the principle will be clear as soon as you follow the link and see the drawing.
Another version of a homemade press from a jack can be seen here, but of course you can make your own better version.
Many so-called smart “Mega Masters” can say that why such difficulties with the so-called abstruse word “puklyovka” (the main word to learn) and the use of a press, if you can take a hammer and lay the rim on some kind of matrix, just knock out the cones with some kind of matrix then with a pin, in the form of a pound. This is what those who tried to knock out bumps say only on a wheel from a foreign car, and not on a rim from an old Soviet car, which, as I already said, is not taken by a bullet.
After all, you can, for example, saw off some kind of heavy blank with a hacksaw for metal (Shura saw), or you can use a machine or just a grinder, and the difference will be noticeable. So in this matter - why swing a hammer when you can do everything without straining. You can, of course, if you are making a wheel for yourself for the first and only time in your life, and do not put them on stream.
And it is unlikely that such impact “technology” will allow achieving normal quality and uniformity of convexities. And why use a hammer, risking damage to your hands, if you can make a simple press, which will be useful for other purposes, and in general will be very useful in the workshop.
Having placed the wheel under the press (between the ram and the die), we begin to squeeze out the cones. I’ll make a reservation right away that metal up to 1.5 mm thick can be squeezed out “cold”, but in our case the rim has a thickness of about 2.5 mm. and as I previously noted, high-quality Soviet “flying bullet” standard. And therefore, if it is not heated at the place of extrusion, then no thread on the press will withstand it.
Some may say that you can use a hydraulic press, but that is not the point. If the metal is not heated, it will still break at the end of the formation of the convexity, and even if not, this has happened to me, then you still will not achieve normal quality of the convexity.
In addition, no matter how hard and high-quality steel you use for the punch and die, they will wear out greatly without heating, especially the working area of the punch. Therefore, it is necessary to heat it, and if you do not have a gas cutter or burner, then try to ask someone to heat it (for example, at a housing office, or a car service center, since the press is small and you can carry it with you).
It is better to heat according to the “crosswise” principle, that is, heat one side, squeeze it out, rotate the rim 180°, squeeze it out, scroll it 90°, press it, then again 180°. This will guarantee that the rim will not “lead” (while we are heating one side, the other is cooling). We work with gloves and, preferably, two people - one warms, the other presses.
The bumps have been squeezed out on the rims (not all of them are on the top one), all that remains is to work with a drill.
Do not try, especially at first, to squeeze it out in one go. It’s better to first aim well and sort of mark it, slightly squeezing out the hole with a ram, and then check and if it’s smooth, then heat it again and squeeze it out completely. In this matter, it is better to do everything slowly.
Do not spare the gas and you will certainly succeed. After this work, the rim will finally be overgrown with squeezed out bumps and take on a “motorcycle look,” but it’s too early to relax, since work with a drill awaits you. You need to drill 60 holes and at a certain angle.
There is no point in telling me what angle this is in degrees, since it will not help you. It’s better to do the following: if the hub is not ready yet (and you will need to order it from a turner), then take a piece of pipe or a log and saw off a piece as long as the width of the hub in the drawing. This is your template. By inserting it (or somehow securing it) into the middle of the rim, you will periodically check the angle of the drill.
Believe me, a couple of degrees to the right and left will not play any role, since the holes should still be slightly larger in diameter than the head of the spoke. This allows the spoke to move around a little and adjust the angle of the hole, even if you make a slight mistake when drilling. But still, there is no need to rush here either.
Rim from 401 Moskvich with welded rivet holes.
80 spoke primed rim
Do everything carefully and slowly, and you will succeed. After all, this is precisely why I explain everything in detail. Drill first with an 8 mm drill, and then a little larger. As I already said, make sure that the head of the spoke is inserted with a gap, but small (about 0.2 mm).
60 spoke primed rim
After that, all that remains is to apply primer and paint, or start polishing the rim to apply chrome - whichever you prefer.
Photos of the finished 60 and 80 spoke primed rims are shown to the left and below.
Rim with embossed grooves for spokes and drilled holes.
Let's start drilling.
For the hub blank, excellent steel 40X13 was mined, and a heavy blank of this steel (weighing about 15 kilograms) was processed on a lathe, and a couple of buckets of chips were removed until the blank shown in the photo was obtained.
The hub is designed for four bearings (I love the power reserve in everything), closed type, and suitable for the diameter of a standard axle from heavy motorcycles. The fourth bearing is located in the splined sleeve.
The outer diameter of the bearings is also the same as in the standard, only they are not conical, but regular. I recommend reading about how to decipher bearing markings and how to choose the right bearing in a store here.
It is advisable to sharpen the hub from steel 40X13 or 45, it is possible from stainless steel, titanium, but if you can’t find it, then from ordinary steel (whatever you find).
At least the hubs of foreign-made motorcycles (for example, the Yamaha Drag Star) have hubs made of duralumin like our D16.
On one side there is a seat with holes (6 pieces are shown in the photo, where it says the hub is ready for chrome application) for a brake disc from Izh or Aprilia, Ducati - don’t be surprised, they have the same size of disc mounting holes as the Izhevsk disc, and on the other side there is a seat for a splined bushing from the Urals. It needs to be separated from the Ural “daisy” (brake drum) by cutting off the rivets.
If someone wants to use this wheel on a motorcycle not with a cardan, but with a chain, then instead of a splined bushing, you just need to attach a bushing with holes for fastening the sprocket. Naturally, the width of this bushing is selected individually for each swingarm or frame (if it’s a hardtail, that is, rigid).
You will also need to machine the spacers (you can use a suitable tube) that are installed between the bearings. The drawings are in the photo below.
I hope that you will not have any problems with marking and drilling holes in the hub. You will need a 5 mm centering drill, which will do it in one pass and countersunk. Drilling, of course, is better on a machine. For those who are not confident in their abilities or who do not have a drilling machine, it is better to entrust this operation to a familiar milling machine operator.
By the way, whoever has a lathe in the workshop, even a simple school student like TV - 3, 4, 6, 7 (or TV16), then there will be no problems with marking the holes in the hub if you make a simple dividing device, and how can I make it? I showed it in a video on my suvorov-custom channel, and I also published this video just below. I am not publishing a drawing of the wheel axle, since it is prepared based on the dimensions of the front fork, pendulum or frame. We will talk about this in one of the following articles. That, it seems, is all.
If you have any questions, write in the comments, I will be happy to answer, especially for beginners. Good luck to everyone and creative success, I hope this article will help you make your own wheel for your handsome chopper!
THE HUB IS READY FOR APPLICATION OF CHROME.
suvorov-custom.ru
Messages [1 to 20 of 23]
1↑ Topic by Elere 06/11/2016 16:41:05
- Elere
- Newbie
- Inactive
- Name: Alexander
- From: Khabarovsk region, Solnechny village
- Registered: 11-06-2016
- Messages: 15
- Motorcycle: URAL imz 8.103-10
Topic: Rear wheel from car, how?
Good day. All my life I dreamed of building a custom bike. And then two scraps fell into my hands (62 and 8.103 10). There are a lot of ideas, but first I want to install a wide wheel. But I have no idea where to start. Can you help? PS Budget is limited.