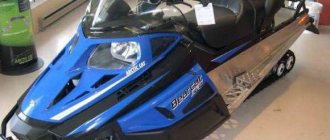
Popular brands
A set of mechanisms and equipment for motorized towing vehicles and snowmobiles is sold under different brands.
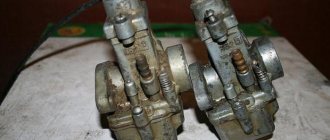
The Safari variator is popular; it changes the gear ratio and subsequently smoothly regulates the speed of movement of the equipment. This mechanism is also used for installation on a utilitarian snowmobile, for example, “Buran” or “Taiga”. This type of variator has a reinforced crosspiece, as well as a high-quality pressing mechanism. These two components contribute to the reliability of the product as a whole. Safari is lightweight, has a simple design, and is characterized by good reliability. With a mass of 3800 grams, the diameter of the mechanism is 21 centimeters and the length is 16.7 centimeters. The variator for the Forward snowmobile and motorized towing vehicle is also in demand among consumers. This mechanism is characterized by high quality construction, durability and reliability.
Reviews from experts
Reviews of the Safari variator are provided by professionals and ordinary users in various sources. Experts say that this is high-quality equipment. In order for the variator to serve for a long time, you need to pay attention to some issues when choosing.
The mechanism crosspiece and spring must be reinforced. The cost of such equipment is about 3600-3700 rubles. The quality of the material should be assessed visually. The casting must be free of defects and inclusions of foreign particles. The surface must be smooth.
To prevent the pulley from turning away from the shaft during the adjustment process, the motor cannot be started with the casing and belt removed. By following the recommendations in the instructions, you can expect a long service life from the equipment.
Regulator design and operation
The centrifugal action regulator includes a fixed cone 1 mounted on a shaft 12, a movable cone 3 with weights 2 that rotate on axes, a stop 4 with rollers 9 designed to move the weights, a spring 6, which is installed between the stop and the cover 5. Cone the fixed one and the stop are mounted on the shaft using a metric thread. Installation of these elements is carried out using a wrench with a tightening torque of 8-10 kgm. The spring moves the cones of the drive pulley apart when the engine speed decreases, thereby ensuring idle speed. At idle speed, the gap between the V-belt and the surface of the moving cone is 1-3 mm.
The regulator operates as follows: when the shaft rotates, centrifugal forces, acting on the weights, tend to rotate them and move the movable cone away from the stop, thereby clamping the belt in the pulley groove. The return spring counteracts centrifugal forces at speeds not exceeding 1600 rpm. As the engine speed increases, the cones grip the belt, increasing its tension and compression from zero to the nominal values required to transmit torque and overcome the forces of resistance to vehicle movement.
Continuing the adjustment process
Installing the Safari variator on a Buran or another type of snowmobile, as well as adjusting it, requires strict execution of the established sequence of actions. Adjustments must be made in the area between the ends of the cones of fixed-type pulleys. The distance between them should be 55 mm (±0.5 mm). If this indicator does not correspond to the value set by the manufacturer, you will need to adjust it in the grooves of the base under the motor. To do this, the motor in this area must be moved.
After installing the belt, you will need to turn it into neutral. The driven pulley rotates several times. The belt should extend to its outer diameter. The tension is checked. To do this, apply a little pressure to the center of the belt line. The deflection should not be too great. With a force of 11 kgf, the deflection should be 32 mm (±5 mm).
When servicing the Buran snowmobile, the Safari variator requires a few more manipulations during the setup process. The belt is adjusted using three screws. They are included in the spare parts kit. They will need to be screwed into the appropriate places on the driven fixed disk. At idle, check the belt movement. It shouldn't jam. The belt rests on the pulley shaft. There should be a gap between it and the cones. If you need to adjust this distance, you can install special rings between the shaft and the stop.
How to lubricate the Safari variator
To lubricate the driving and driven structural elements, the manufacturer provides several compounds:
- CIATIM is a lubricating viscous substance that does not allow moisture to pass through and allows you to keep pulleys intact under the influence of an aggressive environment, sold in standard containers with a sprayer;
- Litol is a similar substance, which also prevents the spread of corrosion and completely envelops the workpiece.
The owner can also use silicone lubricants from other manufacturers, but their effectiveness should not be inferior to the above drugs, otherwise there is a high risk of breakdown.
How to install the Safari variator
For proper and correct installation of the variator both in snowmobiles and towing vehicles, it is necessary to use the manufacturer’s instructions and follow safety regulations. The devices must be de-energized, all their systems must be in working order, otherwise there is a high probability of incorrect operation of the variator.
If a malfunction is found during installation, it must be corrected before complete installation. Also, installing a safari variator transmission does not require special repair skills; only the keys for adjusting the gaps must have different heads.
Installing the Safari variator on a motorized towing vehicle
The manufacturer does not expect any special differences when it comes to installing the device on a motorized towing vehicle. Most towing vehicles have a standard place for mounting a variator, which in its dimensions is suitable for these mounts. The installation sequence is similar for snowmobiles, however, there are some nuances when adjusting idle speed and torque gain. The towing vehicle does not need to set high speed - the emphasis is on traction characteristics. Therefore, when setting up, it is necessary to set the gaps and clamping force of the pulleys, taking into account the characteristics of the increased traction of the device.
Installation of safari variator on “Buran” and “Taiga”
To install this device in a snowmobile body, it is necessary to comply with certain rules specified by the manufacturer:
- before installation, it is necessary to dismantle the old device and check the functionality of the remaining systems of the towing vehicle or snowmobile, and also clear the grooves for installation;
- the cone of the device must be connected to the crankshaft of the snowmobile engine in one part, and the other is connected to the stop using a thread;
- the pulleys are installed using fasteners in standard seats, a belt must be secured between them (the idle speed must be adjusted and installed);
- After installing the housing, it is necessary to adjust the operation of the system with this engine; in addition to idle speed, it is necessary to adjust the gaps between the pulleys and the clamping force of the spring.
Important! When installing this device in its original location, the owner must adhere to the manufacturer’s strict recommendations. If individual elements are installed incorrectly, incorrect operation of the variator is guaranteed.
Pulley installation
Installation of the Safari variator is carried out in accordance with the manufacturer's instructions. To do this, you need to screw the pulley onto the crankshaft of the snowmobile engine. You will need to move the movable cone. This will create a hole for the knob. Next, you should tighten the mechanism. A wrench is used for this.
The system housing and belt must be installed correctly. In this case, it is necessary to apply the data presented in the vehicle’s operating manual.
The pulley can be removed if necessary. To do this, it is removed from the crankshaft shank. The casing is removed from the variator. Next, the belt is dismantled. The movable cone moves. This will make the hole for the knob accessible. Use a spacer to secure the cone. Next, you will need to fix the crankshaft on the engine. To do this, use a metal object that is installed under the tooth of the electric starting gear. The shaft is dismantled using a crank.
Safari variator malfunctions
The most common malfunctions that sometimes occur due to improper operation include:
- Incorrect installation of the device, which can lead to mechanical damage, operation with an incorrect gear ratio of the Safari variator, as well as failure of the engine itself due to overloads.
- Pulley jamming due to heavy overloads or lack of constant preventive lubrication. Such a malfunction leads to a complete replacement of the entire device.
- Abrasion of liners due to lack of lubrication, or due to loss of their properties due to overload or old age.
Such problems are the most common and require timely prevention of the condition of the liners and their replacement.
Customer Reviews
Reviews about the Safari variator left by buyers indicate the high quality of the presented mechanism. With timely maintenance, the system operates stably. This is reliable equipment, the cost of which remains consistently acceptable. Among all types of CVTs for motorized towing vehicles, Safari is recognized as one of the highest quality devices.
Having considered the features of Safari CVTs, the rules for their configuration, installation and operation, you can use the presented equipment for a long time.
Service
Like any other component in the design of a motorized towing vehicle, the variator requires maintenance. It should be carried out every 3,000 kilometers of vehicle mileage. The car owner should not forget about lubrication of the variator. It is worth lubricating the parts with a special universal product. After the equipment has covered 6,000 kilometers, it will be necessary to check the condition of the liners on the weight axles. It is necessary to warm up the engine in a neutral position, this helps prevent rubber from winding on the shaft. Rubber deposits on the shaft can be removed with a piece of cloth soaked in gasoline.
CVT "Safari" for motorized towing vehicles: maintenance and operation rules
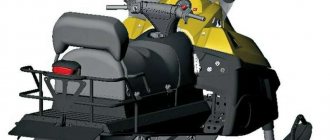
The transmission on motorized towing vehicles can be implemented in two options:
- a simplified and cheap way is to install a reduction gearbox and an automatic centrifugal clutch on a motorized dog;
- a more expensive and optimal method from a design point of view is the use of a V-belt variator. The variator allows you to smoothly change the torque, which helps to increase traction when overcoming difficult sections of the route. From the variator, the torque is transmitted via a chain transmission to the track drive sprocket. Safari CVTs have gained particular popularity among modern designs of motorized towing vehicles.
Flaws
According to experts, this device has virtually no disadvantages. However, Safari CVTs also have weaknesses:
- adjustment that is difficult for a non-professional to make;
- weak V-belt that cannot withstand moisture;
- rapid wear of the trapezoidal drive belt.
When water gets on the V-belt, the quality of adhesion to the pulleys decreases and the traction force deteriorates, and the surface on the drive belt quickly wears out when the torque of the power unit is exceeded.
What is a Safari CVT?
The Safari variator for the Taiga snowmobile is a continuously variable V-belt type gearbox. This device acts as a standard transmission for Buran and Taiga snowmobiles, and can also be installed as a replacement for standard motorized towing vehicles.
The continuously variable transmission appeared more than 50 years ago on the automotive market. Over time, having entered the everyday life of motorists, such a unit began to be installed on more compact equipment.
The principle of operation of the system remains the same, as in automotive versions, but the dimensions have changed downwards. Snowmobile engines have a smaller volume, torque and dimensions, and therefore do not require large transmissions to transmit torque and power to their tracks. The situation is similar with motorized towing vehicles, where it is the “locomotive” traction, without reference to acceleration speed and power indicators, that plays a decisive role. Therefore, the Safari variator assembly for a snowmobile must have specific characteristics:
- Ease of maintenance is one of the determining factors when choosing equipment. Considering the small dimensions of the product and the simplicity of the design of this variator, the consumer can carry out preventive maintenance, minor repairs and replacement of individual failed parts independently with minimal technical knowledge and tools.
- Cheapness of the unit and spare parts. This system is intended for snowmobiles and its final cost in a complete set rarely exceeds 6,000 rubles. Compared to competitors, this figure is on average 15-20% less.
- Ease of installation is also an important parameter during operation. Replacement is carried out using a special tool and subsequent adjustment. Also, in comparison with its competitors, this type does not require special repair skills (with the exception of the adjustment process, which is quite labor-intensive).
- The traction properties of this variator are high by snowmobile standards. Among similar devices, this device is a leader, providing the ability to tow several adult passengers or cargo weighing up to 150 kg when used on a towing vehicle.
High reliability has been repeatedly confirmed in practice by snowmobile owners. The system is designed to operate in low temperatures and is ideal for this type of terrain. Even when the maximum thrust mass was exceeded, more than once the unit coped with the load and did not show any design flaws.
The assembled device is shown in the photo.
JSC "Rybinsk Motors"
half-pulleys of the impeller, to the outer side of the inner half-pulley as follows:
· remove the air intake and the recoil starter assembly;
· Unscrew the nut securing the impeller pulley, holding the impeller from turning with the stopper included in the snowmobile tool kit;
· remove the outer pulley half, belt, adjusting washers and inner pulley half;
| Rice. 29 — Adjusting the fan belt tension |
· place the required number of washers, the inner half-pulley, the remaining adjusting washers, the front half-pulley on the impeller shaft and tighten the nut;
· insert the belt into the groove of the impeller pulley and, turning the engine crankshaft (the spark plugs are turned out), put it on the drive pulley;
· check the belt tension, reinstall the fan air intake and recoil starter.
Power system maintenance.
Changes in the technical condition of the power system during operation are due to the fact that fuel and air filters gradually become clogged, and fuel purification deteriorates. Due to clogging and violations of adjustments in the carburetor, the composition of the combustible mixture changes at different engine operating modes. In addition, during long-term storage of gasoline, the content of actual resins in it increases. The use of such gasoline causes rapid tarring of fuel lines and fuel filters, and the composition of the mixture is disrupted due to a decrease in the cross-section of the carburetor jets. To prevent many malfunctions of the power system, it is necessary to use only recommended gasoline and oils to prepare the fuel mixture, accurately maintaining the specified proportions and observing the requirements for refueling.
Maintenance of the power system consists of systematically checking the quality of fastening and tightness of all connections, washing the fuel tank, fuel lines and filter elements, cleaning and rinsing carburetor parts and channels and periodically making adjustments. The carburetor should be adjusted only after checking the technical condition of the engine and power system, the serviceability and correctness of the ignition system adjustments.
Due to leaks in the connections of the fuel system, air may be sucked into it, as a result of which the fuel pump becomes partially or completely inoperative. When air leaks through the seals of the carburetor and intake manifold, a sharp depletion of the combustible mixture occurs - the engine starts with difficulty and does not idle. Leaky connections can be eliminated by tightening fasteners and replacing damaged gaskets. Insufficient fuel supply is also possible if the vent hole in the fuel tank cap is clogged.
Maintenance of the settling filter comes down to its periodic cleaning. To do this, unscrew the wing nut, remove the glass and filter element and wash them in clean gasoline.
To wash the fuel tank filter, pull out the fitting from the rubber bushing of the tank and carefully remove the bushing from the hole using a screwdriver. Clean the filter without disassembling it.
Maintenance of the fuel pump consists of periodically removing mechanical impurities from the sump and washing the filter mesh. Disassemble the pump only if it is faulty, as disassembly may damage the diaphragm.
Perform complete disassembly of the carburetor only if it malfunctions, if during operation there is increased fuel consumption, a sharp decrease in power in transient modes and unstable operation at idle speed of the engine. After operating on leaded gasoline, before disassembling it is recommended to immerse the carburetor in kerosene for 10...20 minutes. Disassemble carefully, avoiding damage to the gaskets.
After disassembling, rinse all parts thoroughly and clean them of resinous deposits. Flushing should be done in unleaded gasoline. After washing, blow out the jets and channels with compressed air. If the jets are heavily tarred, they can be cleaned with a pointed stick made of soft wood, generously moistened with acetone. You cannot clean the jets with wire or other metal objects, as this leads to an increase in the throughput of the jets and additional fuel consumption. When assembling, install each jet in its place. To avoid warping of the flanges, tighten the carburetor mounting nuts evenly.
Adjusting the K65Zh carburetor
Adjust the carburetor at idle speed in the following order:
· before starting the engine, by rotating screw 5 (Fig. 30), set the throttle in such a position that a gap of 2...2.5 mm is formed between its base and the lower generatrix of the carburetor body;
· screw it in completely, and then turn out adjusting screw 4 by 0.5...1 turn;
· start and warm up the engine at average crankshaft speed for 2...3 minutes;
· by tightening screw 5, set the minimum stable speed of the crankshaft;
| Rice. 30 — Adjusting the K65Zh carburetor: 1 - float chamber; 2 — float sink; 3 — fuel inlet fitting; 4 — screw for adjusting the quality of the idle mixture; 5 — idle speed adjustment screw; 6 — screw for adjusting the tension of the throttle lift cable; 7 — housing cover; 8 — screw for adjusting the tension of the corrector control cable; 9 — body |
· by gradually unscrewing screw 4 until interruptions in engine operation appear, and then by slowly tightening it, find the optimal position of screw 4, at which the engine will operate stably;
· check the stability of the engine when suddenly opening and closing the throttle. If the engine stops working when the throttle is sharply opened, turn screw 4 a quarter to half a turn (the mixture will become richer), if the engine stops when the throttle is suddenly closed, turn it out the same amount (the mixture will become leaner). For an adjusted carburetor, screw 4 should be unscrewed no more than two turns from the fully screwed position. Turning it back to a large amount will lead to a lean fuel mixture at operating conditions and, as a result, to overheating of the engine.
The position of the float mechanism is adjusted with the carburetor removed from the engine and the float chamber removed by bending the float adjusting element. The optimal fuel level is ensured when the float is positioned in such a way that on an inverted carburetor the float is under the force of its own weight, and at the same time the casting parting line on the side surface of the float is parallel to the plane of the parting with the float chamber of the carburetor body.
Adjusting the quality of the mixture for engine operating conditions depending on climatic and other factors is done by rearranging the throttle metering needle in the needle lock. When the needle is raised, the mixture becomes richer; when lowered, it becomes leaner.
The optimal operating fuel consumption corresponds to the position of the throttle metering needle, in which the snowmobile under load is one driver, moving at a speed of 30 km/h on snow cover with a density of 0.3...0.35 g/cm3 and an ambient temperature not exceeding minus 4 °C , consumes no more than 22 liters of fuel over 100 km.
Adjusting the Mikuni carburetor
To adjust the quality of the idle mixture, fully tighten screw 2 (Fig. 31), then unscrew it 1 turn. When you turn the screw clockwise, the mixture becomes richer; when you turn it counterclockwise, it becomes leaner.
Speed adjustment
Rice. 31 — Adjusting the Mikuni carburetor:
idling is carried out
1 — idle speed adjustment screw; first pre-on
2-screw for adjusting the quality of the idle mixture with the engine turned off, thus finally approaching. For preliminary adjustment, turn out screw 1 (Fig. 31) until it does not contact the throttle. Screw in screw 1 until it touches the throttle body, then, while continuing to screw in the screw, ensure a 1.5 mm gap between the end of the throttle body and the surface of the carburetor outlet (engine side), using a piece of drill bit, etc. as a gauge. (Fig. 32). To make final idle speed adjustments, start the engine and let it warm up. Then adjust the idle speed to minimum steady speed by turning the screw clockwise to increase the speed or counterclockwise to decrease the speed.
Attention!
Do not adjust the idle speed using screw 2.
Adjusting the quality of the mixture for engine operating conditions depending on climatic and other factors is done by rearranging the throttle metering needle in the needle lock. When the needle is raised, the mixture becomes richer; when lowered, it becomes leaner.
The fuel corrector has two positions: “closed” and “fully open”. Open position
tion
Rice. 32 - Using a piece of drill as a gauge is used when starting the engine.
5.6 Transmission maintenance
Maintenance of snowmobile transmission components and mechanisms consists of adjusting them, tightening threaded connections, cleaning external surfaces of dirt and carrying out lubrication work.
Maintenance of variator with centrifugal regulator 110602800.
For reliable operation of the variator and increasing the durability of the variator belt, the relative position of the driving and driven cones is important.
Check the size indicated in Figure 8 (53±0.5 mm) from the end of the driving cone to the end of the stationary driven cone using two rulers. If necessary, make adjustments as follows:
· loosen the bolts securing the engine to the sub-frame;
· by moving the motor, set the required size, parallelism of the motor shaft and the drive shaft of the reverse box;
· Tighten the engine mounting bolts.
To ensure uniform wear on both working faces, the belt must be turned over with respect to the working surfaces of the variator every 150 - 200 km. To remove the variable speed belt:
· set the reverse gear shift lever to the neutral position;
· remove the variator casing;
· spread the driven cone and remove the belt through the edge of the fixed driven cone;
· Remove the belt from the drive cones.
Install the new belt in reverse order.
Notes:
1 Install belts only after keeping them for 24 hours at a temperature of plus 15...25 °C or for at least 30 minutes at a temperature of plus 50 °C.
2 Installation of belts in field conditions is allowed only after they have been kept in the engine compartment for at least 15 minutes after the engine has warmed up.
To lubricate the variator drive shaft and the reverse gearbox drive shaft:
· remove the variator casing;
· unscrew the bolt, remove the washer, cover and movable disk;
· disassemble the weights by unscrewing the nuts securing the axles and weights, and wash the axles and rollers;
· unscrew the bolt from the reverse box drive shaft and remove two washers;
· use a puller to remove the fixed cone;
· remove the variator belt;
· remove the retaining ring, half-ring and movable cone of the driven pulley;
· Lubricate according to the lubrication table and install the removed parts in reverse order.
Contact of lubricant on the working surfaces of the variator cones is not allowed!
Maintenance of centrifugal regulator 110602900
(Fig. 9) consists of carrying out lubrication and adjustments.
To ensure optimal operating conditions for the variator, the following requirements must be met:
· the axes of the pulleys must be parallel, the distance between them must be 278...283 mm;
· the width of the groove for the belt on the driven pulley of the variator should be 29+1.0 mm at a distance of 3.5 mm from its outer diameter. The size is ensured by placing adjusting rings 24 between cone discs 16 and 26. The size adjustment is made by the manufacturer when assembling the snowmobile;
· the distance between the planes of the ends of the fixed cones of the drive pulley 1 and the driven pulley 16 should be 53±0.5 mm.
Adjustment of the relative position of the pulleys is carried out by moving the engine in the grooves of its sub-motor base.
To lubricate the centrifugal governor:
· remove the snowmobile hood;
· remove the variator casing;
· remove the variable speed belt;
· unscrew the bolts and move the steering column to the side;
· stop the engine crankshaft from turning using a metal object installed under the tooth of the electric start gear on the sub-engine base;
· unscrew bolt 11;
· remove the housing 9 and the movable cone 3 from the shaft of the stationary cone 1;
· place cone 3 on the end and remove body 9;
· from the radial grooves of the cone 3, remove the clips 6 with rollers 4;
· Remove the rollers from the holders.
Carefully remove the old grease and lubricate the rubbing surfaces: cone shaft 1, cone bushing 3, internal cavity of the stop 7, rollers 4 and plates 5. Fill the cavity of the fixed cone shaft 1 with grease.
Reassemble in reverse order. When assembling, be sure to align the balancing marks, made in the form of small recesses on cones 1, 3 and body 9.
To remove the centrifugal regulator, unscrew the fixed cone 1 using a wrench.
Install the centrifugal regulator in the reverse order.
Attention! It is not allowed to dismantle the bolts 13 without first compressing the spring 10. Compress the spring by recessing the stop 7 in the housing 9.
Reverse box maintenance
includes checking and adjusting the chain tension, checking the level and changing the oil in the crankcase, eliminating oil leakage at the crankcase connector.
To adjust chain tension:
· unscrew the fixing bolt of the tension device and remove the rubber cover of the inspection window;
· put the reverse box control lever in the “Forward” position;
· by turning the drive cone disk counterclockwise, tighten the chain until it stops; by turning the disk clockwise, loosen it. The difference between the indicated chain positions should be 1...5 mm (see Fig. 33);
· Rotate the eccentric axis of the tension sprocket to set the required chain deflection. Fix the found position of the axis with a bolt.
The chain tension can be easily checked by the play of the stationary cone of the variator. The backlash measured along the outer diameter of the cone should be within 10...20 mm.
To wash the reverse box, do the following:
· Unscrew the crankcase drain plug and drain the oil;
— put the plug in place;
· pour 1 liter of flushing mixture into the crankcase through the hole in the cover, consisting of 75% gasoline and 25% MK-8 oil;
· start the engine and, with reverse switching, run in the snowmobile for 10...15 minutes; - after running in, drain the flushing mixture through the hole in the reverse box
Rice. 33 — Adjusting chain tension
in the lid, fill the reverse box with fresh oil in a volume of 350 cm3.
Check the oil level in the reverse box with a special dipstick through the inspection window from its lower edge. In this case, the oil level should be between the dipstick control marks.
5.7 Chassis maintenance
Maintenance of the snowmobile chassis consists of periodic inspection, adjusting the tension and centering of the tracks, timely lubrication and tightening of threaded connections.
The need to adjust the tension and centering of the tracks during operation arises due to wear of the undercarriage parts, especially the teeth of the drive and driven sprockets, and the stretching of the track surface.
Weak track tension when the snowmobile is moving can lead to the roller balancers turning over, the tracks falling off the sprockets, and poor alignment causes excessive wear on the track edges, balancer cheeks and sprocket teeth.
To check and adjust track tension and alignment:
· lift and secure the snowmobile so that the tracks can rotate freely;
· check the track tension. The distance between the inner surface of the upper branch of the caterpillar and the lower surface of the frame square at the middle bracket for fastening the balancer rollers in front of the snowmobile should be 55...65 mm (Fig. 34);
· if the tracks are not tensioned enough, loosen the nuts of the balancer axles of the guide sprocket shafts and turn the adjusting bolts clockwise with a wrench until the tracks are at normal tension (to loosen the tension, rotate the bolts in the opposite direction). After adjustment, tighten the self-locking axle nuts.
| Rice. 34 — Adjusting track tension |
When adjusting the tension, long
the ends of the balancer springs must be inserted into the middle slots of the combs welded to the snowmobile frame. These three-position combs only serve to change track tension depending on snow conditions.
When driving on deep, loose snow, the tension is reduced by moving the ends of the springs to the rear slots of the combs, and when driving on densely compacted snow, the ends of the springs are transferred to the front slots, thereby increasing the tension of the tracks.
After adjusting the track tension, center them in the following sequence:
· start the engine at a speed at which the tracks begin to slowly rewind;
· check that the sprocket teeth engage with the tracks. The gap between the engaging tooth and the corresponding track window must be at least 0.5 mm. The gaps between the edges of the tracks and the cheeks of the balancers should be the same on both sides of the track;
· on the side where the track comes closer to the balancer cheek, loosen the axle nut, rotate the tension adjusting bolt until the gap on both sides of the track is the same, and tighten the nut again.
After performing the tensioning and alignment operations of the tracks, tighten the nuts 5 (Fig. 12) until they stop, and then tighten the bolts 1 by turning them half a turn clockwise.
The operations of tensioning and centering the tracks are interconnected, and one of these operations cannot be performed separately from the other.
To carry out lubrication work:
· lift and secure the rear of the snowmobile;
· loosen the track tension mechanism;
· unscrew the bolts securing the roller balancer axles to the frame brackets and remove the roller balancers;
· take a syringe filled with grease with a grease nipple installed on the output end;
· sequentially removing the plugs from the outer cheeks of the rollers, insert the threaded end of the oiler into the hole and lubricate it;
· lubricate the axles with a thin layer of grease and install the roller balancers in the reverse order;
· unscrew the nuts of the balancer axles of the track guide shafts, remove the long ends of the balancer springs from the frame combs and remove the springs;
· unscrew the tension bolts, remove the balancer axes and remove the guide sprocket shafts from the frame;
· remove the plugs from the outer cheeks of the rear balancers and spray in grease;
· lubricate the spacer bushings of the balancer axles;
· unscrew the bolts securing the bearing housings of the track drive shaft;
· remove the bearing housings;
· wash the bearings and bearing housings in clean gasoline;
· fill the bearings and bearing housings with grease.
Reassemble in reverse order. Perform track adjustments.
To lubricate the hinge joints of the ski, spring support liner and spring leaves:
· lift and secure the front of the snowmobile;
· unscrew the nut, remove the axis of fastening the ski to the kingpin and remove the ski;
· unpin and remove the axles that attach the ski to the spring;
· unscrew the nuts and remove the spring coupling bolts;
· carry out lubrication according to the “Lubrication Table”.
Lubrication of the telescopic ski suspension is not required during operation.
5.8 Maintenance of control mechanisms
Maintenance of control mechanisms consists of their timely lubrication, tightening of threaded connections, adjustment of brakes and control drives.
During operation, the friction pads of the brakes wear out, the gap between them and the brake disc increases, and the stroke of the brake levers increases. Weak brake performance can also be caused by a decrease in the coefficient of friction between the brake friction pads and the disc due to oiling of the pads.
To restore normal operation of the brakes (Fig. 16), adjust them.
To adjust the left brake:
· loosen the bracket mounting bolts 18;
· by pressing the left control lever 1, bring the pads 7 and 8 together, and by moving the bracket 18 in the grooves of the steering column bracket 9, achieve simultaneous contact of the entire supporting surface of the pads with the disk 5. Tighten the bracket fastening bolts;
· by rotating the adjusting clutch 4, move the end of the brake lever from 10 to 25 mm until both pads come into contact with the brake disc;
· use adjusting bolt 14 to install the brake pads so that disc 5 rotates easily. It is allowed to lightly touch the pads in the places of greatest runout of the disc;
· secure the position of bolt 14 with nut 13. Adjust the right brake in the same way. Lubrication of control mechanisms requires partial disassembly of the components. To lubricate the steering column bearing bushings:
· remove the steering column mounting strips;
· remove the rubber bushings;
· lubricate the inner surface of the bushings with Litol-24 grease;
· Reassemble in reverse order. Lubricate the ski pin as follows:
· lift and secure the front of the snowmobile;
· unscrew the bolt securing the kingpin to the rocker and remove the ski together with the kingpin;
· Lubricate the pin with Litol-24 grease and put the ski in place. To lubricate the speedometer drive gear:
· unscrew the three nuts securing the drive housing to the reverse box;
· remove the housing and take out the driven gear;
· Fill the housing with Litol-24 lubricant;
· Reassemble the drive in reverse order.
After lubricating the brake, throttle and carburetor control cables, adjust them.
When the control lever is released, the throttle should be closed, and when the throttle is fully open, the control lever should not come all the way to the handlebar. In the initial position of the fuel corrector control lever, the corrector fuel channel must be closed.
5.9 Electrical maintenance
Maintenance of the electronic ignition system.
The electronic ignition system does not require special maintenance or adjustments. Maintenance of the ignition system comes down to checking the reliability of the contact connections on the stator, commutator and transformers, the connection points of the commutator and transformer with the ground of the snowmobile, and the mounting points of the ignition system components on the engine and snowmobile.
Attention! The functionality of the electronic ignition system and the engine is ensured by strict coincidence of the polarity of the magnets (Fig. 22) of the flywheel: the north (N) pole of the magnet must be opposite the keyway. Checking the polarity of the magnet can be done using a compass or other magnet with a previously known polarity. Like poles (N:N or 'font-size:14.0pt;letter-spacing:-.85pt; '>S:S) of magnets repel, unlike poles ('font-size:14.0pt;letter-spacing:-.75pt; '>N:S or S:'font-size:14.0pt;letter-spacing:-.75pt; '>N) - attract. When replacing the flywheel with a new one, it is necessary to check the polarity of the magnets.
| Rice. 35 — Setting the ignition timing: 1 - stator; 2 – engine crankcase |
Spark plug maintenance.
Check the technical condition of the spark plugs every 25 hours of engine operation or 500 km of the snowmobile. 24...280 at a rotation speed of 5500 min-1.
Possible faults
Any equipment and its elements fail, the variator is no exception. When using this device, the following problems may be noticed.
- Uneven movement of the motorized towing vehicle, presence of extraneous sounds during operation. The reason for this situation may be a worn variator transmission belt or wear of its plastic inserts. To eliminate the problem, you will need to replace the belt or inserts.
- The propagation of a metallic hum may indicate damage to the bearings. To fix the problem, you will need to replace the bearings.
- As the engine speed increases, no movement of the motorized towing vehicle is observed. In this case, it is worth checking whether the belt is torn or whether the track roller has turned over due to mechanical damage. Troubleshooting involves replacing the belt and returning the roller to its original position.
- The variator jams when it overheats. This problem can be caused by bushing wear or belt slippage. To ensure that the variator does not jam the bushing, you need to check the belt and clean the discs.
In order for it to function without problems, you will need to follow the maintenance recommendations.
For information on how to set up a variator on a motorized towing vehicle, see below.
Maintenance
The Safari variator requires periodic maintenance. This procedure is performed every 3 thousand kilometers. The shaft will need to be lubricated. It is located under the split sleeve. The lubricant should be universal type lithol. This will prevent premature destruction of metal parts.
The weights on the axles, as well as the condition of the material of the liners, must be checked every 6 thousand kilometers. The degree of wear can be determined by measuring the play distance. It should not reach more than 1 mm. The gap size of the guides and movable type cone liners is also determined. Here a gap of no more than 1.5 mm should be determined.
To prevent rubber from enveloping the shaft, the engine must warm up exclusively in the neutral position. If a rubber coating appears on this structural element, it must be removed with a rag. The material is wetted in gasoline before cleaning.
Belt adjustment
Adjustment of the Safari variator is also carried out according to the method established by the manufacturer. This process is necessary if the belt was purchased from brands such as Pubena, Optibelt, etc. In this case, its overall dimensions will differ slightly from the standard ones. These are belts 14x33x1120. Its standard dimensions, which do not require adjustment, are 14x34.5x1120.
The process is carried out after installing the pulley on the snowmobile. First, the distance between the edges of the cones and the pulley (driven) is checked. If the belt has overall dimensions of 14x33x1118, it should be 33 mm (±0.5 mm). If you insert it into the pulley groove, the sides should not protrude more than 2 mm. In this case, the adjustment is considered correct.
If the belt protrudes from the pulley guides more than permissible, you must remove the bolt using a puller. Next, the driven cone of the fixed type is dismantled. The key needs to be removed from the shaft, and 1-2 rings are installed on the shaft. Assembly is carried out in reverse order.
Design and principle of operation
After purchasing a variator for a motorized towing vehicle, it is recommended that you carefully read the instructions. By studying the correct operation, you can extend the life of your motorcycle. The mechanism contains a centrifugal-type regulator, which contains cones with movable and fixed weights. To allow weights to move, stops with rollers are used in their production. The design of the mechanism also includes a cover and a spring.
A fixed cone, which has a stop, is attached to the shaft thanks to a thread. The crankshaft is mounted to a fixed cone. A spring is needed to create idle speed. When installed correctly, the location of the variator belt should be fixed 1-3 millimeters from the surface of the cone. This option helps regulate the idle speed. To change the gap, rings are used that are located on the border of the shaft stop and the protrusion. A certain algorithm can be traced in the operation of the variator:
- the regulator rotates;
- centrifugal forces arise;
- centrifugal forces influence the weights.
The above actions contribute to belt compression of the pulley groove in the variator. The return spring counteracts the centrifugal force. For this reason, weights can easily overcome opposition. The number of revolutions per minute must be at least 2200. When this threshold is exceeded, the force acting on the belt increases to the operating reading. With these factors, a torque arises and the resistance is overpowered.
Technical specifications
Compared to mechanical analogues, the Safari variator has a relatively small mass. It is distinguished by a simpler design and uncomplicated operation. When fully assembled, the device has the following dimensions:
- 210 mm in diameter;
- total weight - 3.8 kg;
- length 167 mm.
If we compare the Safari with similar CVT gearboxes, they are also inferior to this mechanism. Many of them have greater weight and diameter. Other technical characteristics include - load grip at 2200 rpm, load weight 150 g.
Disassembling the mechanism
The Safari CVT may require disassembly. In this case, the regulator will need to be removed from the vehicle. In this case, the fixed cone will need to be fixed in a lathe (another convenient method can be used).
You will need to insert an aluminum rod between the parts of the movable cone. In this case, wooden blocks can be used. The cone must be unscrewed together with the lid and stop. If you knock a little in the area of the cone ribs, the dismantling process will be much easier.
Next, unscrew the 6 bolts holding the cover to the movable cone. When only 2 bolts remain, it must be held. Otherwise, the spring may shoot out strongly. When the turn comes to the stop, you only need to remove the liners. The axles and rollers must be washed thoroughly. For this, kerosene or gasoline is used. After inserting new inserts, you can assemble the stop in the reverse order. Lubricant should not get on the surfaces of the disc cones.
Some tips
When installing the Safari variator on a motorized towing vehicle with your own hands, you need to take into account a few tips from professional mechanics. They will help you understand some of the intricacies of the process of adjusting and operating the system.
Kevlar belts almost never slip. Therefore, during the adjustment process, you can slightly reduce the preload of this structural element. In this case, the drive belt will move onto a pulley of a smaller diameter more easily. When the engine speed is low, the vehicle speed will be quite high. This allows you to significantly save fuel.
If the drive belt falls below the discs, the towing vehicle will have a harder time starting. In this case, repairs must be made. The old belt is worn out. It will need to be replaced with a new structural element.
Which CVT is better - Alpina or Safari
In the segment of motorized towing vehicles and snowmobiles, in terms of gearboxes, there is constant competition between two proven units - Safari and Alpina. Both products are standardly installed on Taiga and Buran snowmobiles. Also, both have similar characteristics - the differences are only in the details - maximum speed and total weight. However, with a detailed comparison, it is quite possible to identify nuances that allow you to give preference to Safari, namely:
- the maximum towing weight of the Safari, although not much, is still higher - 150 kg (as opposed to 140 kg);
- the maximum number of revolutions is also higher in the Safari, which allows you to develop greater speed;
- in terms of maintainability, both products have deservedly acquired a good reputation among owners as reliable devices and quite affordable for self-repair;
- In terms of cost, both competitors are also approximately equal - the Safari variator assembly or Alpina can be purchased within 4-6 thousand rubles.
With a slight advantage, Safari outperforms its competitor Alpina in terms of consumer characteristics and properties. The remaining models of domestic and Chinese production in terms of their characteristics in total are already significantly inferior to these models.
More information about the purpose of the variator
The Safari variator, used on modern motorcycles and vehicles (snowmobiles, towing vehicles, ATVs), is a continuously variable V-belt transmission. The design of the variator transmission, shown in the photo below, consists of two pulleys.
The variator automatically adjusts the gear ratio according to the following parameters:
- resistance to movement of the “dog”;
- crankshaft rotation speed of the motorized towing vehicle engine.
Depending on the combination of the above parameters at a particular moment of movement, a certain gear ratio of the variator is automatically adjusted. In addition, the drive pulley of the V-belt drive performs clutch functions and when the engine speed decreases below 1500 rpm, the engine shaft is automatically disconnected from the intermediate transmission shaft.
general characteristics
The “Safari” variator is being installed on a motorized towing vehicle and a domestically produced snowmobile “Taiga” and “Buran”. It is also suitable for small mechanized vehicles. The presented variator belongs to the category of V-belt drive devices. It has continuously variable automatic transmission.
There are no particular differences between the designs for different brands of snowmobiles. There is a slight difference in the weight of the weights and the shape of the variable speed profile.
The technical characteristics of the Safari variator allow you to adjust two parameters. These include engine speed and vehicle movement resistance. The design includes a driven and driving pulley. The first of the presented structural elements is not supplied complete with the main mechanism. If the engine speed reaches 2200 rpm, the pulley will take over the role of the clutch. It will disconnect the reverse and engine shafts.