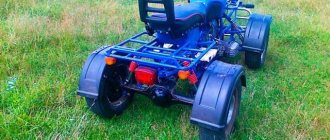
Description of the vehicle
A modern ATV is equipped with four or six small wheels, but with increased maneuverability. The main technical characteristics include: light weight, all-wheel drive and low gear. Due to the unique configuration, the vehicle can easily travel on country roads. It can be used in summer and winter.
Read also: How to make a home disco
To make a homemade ATV, it is recommended to decide on its type:
- Utilitarian. The model has a lot of weight and good maneuverability. The vehicle easily carries several people and accelerates to 90 km/h.
- Stunt. Equipped with a narrow platform and radiator. The car weighs little and can accelerate to 137 km/h.
Vehicle assembly is carried out taking into account technical characteristics, equipment, and operating conditions. To perform independent work, you will need to have skills in working with a welding machine and a lathe. To build a car, you will need a spacious garage. Taking into account suitable parameters, a do-it-yourself drawing of an ATV is prepared.
Selection of main parts
The next step will be to select the necessary parts first, namely:
- engine
- wheels
- shock absorbers
- frames
- rear axle
If you want to build a simple lightweight quad with drive only to the rear axle, then it is preferable to choose an engine from a medium-sized motorcycle, from 250 cc and above. Depending on the construction budget, it can be almost any engine from a Soviet motorcycle, preferably with a chain drive, which makes it quite easy to drive the rear axle. The axle can be made from a pipe made of structural steel. In the center, weld flanges for attaching the driven star and disc brake, and install wheel bearings from the car on the sides, having previously pressed them into pre-made housings.
Homemade tricycle from IZH Jupiter
A tricycle built on the basis of the Izh Jupiter motorcycle: photo and description of the homemade product, as well as a video review of the trike’s design.
The craftsman assembled a homemade tricycle with his own hands, using Izh Jupiter as a donor. Below are photos and drawings of the trike.
The design of the tricycle is quite simple: a rear axle is installed, torque is transmitted via a chain drive to the driven axle sprocket.
Rear wheels from VAZ.
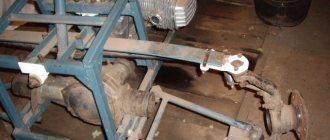
The figure shows the dimensions of the rear axle of the tricycle.
The rear axle is made of a thick-walled pipe with an outer diameter of 42 mm, machined axle shafts from a VAZ are installed.
A sprocket from an Izh motorcycle is installed on the axle.
We recommend watching the author’s video, where he talks in detail about the construction of his homemade tricycle.
Video: winter drift on a tricycle.
Body and wiring
Attachments, a gas tank and other structural elements are attached to the assembled frame. Each node must be firmly fixed on the prepared platform. It is important that the vehicle remains stable after assembly.
For many motorcycle owners, it is important that the appearance of the ATV is spectacular. Therefore, the design must be thought out in advance, before assembly begins. You will need to install a driver's seat and lighting fixtures. Turn signals and headlights are also removed from the donor motorcycle.
Homemade swamp tricycle on IZh Planet
The design of this homemade swamp vehicle is so simple that almost any car enthusiast can repeat it in his own garage. The basis of the swamp vehicle is the IZH Planet 3 motorcycle. IZH Planet motorcycles often become donors in all-terrain homemade vehicles, this is primarily due to the endurance and unpretentiousness of their engines. The bridge was taken from a Muscovite and modernized. We cut out the bearing mounts from the doll with a grinder, then welded the yoke to the bridge stocking (if it is not welded, the stocking will warp when you cut it in half), then cut the stocking itself in order to secure the sprocket. The chain tensioner was also borrowed from the combine.
Read also: Construction of a log sauna in black
The KF-97 cameras are used from the agricultural trailer of the T-150 tractor. The tire for such a tube wheel is the same tube, only cut to a smaller diameter. First, the “tire” is put on, then it is tightened with belts. The transverse harnesses turned out to be 1.02 m long, and the longitudinal strip was 3.5 m long. The width of the longitudinal strip is 30 centimeters. The transverse belts with the longitudinal strip are connected using bolts.
The basis was taken from cornfield disks, cut in half using a small grinder and extended by 30 centimeters with steel plates welded between the disk halves (6 plates in total). The disc is covered with a chamber from a VAZ car, cut to a larger diameter. Since the disks were used from a Niva, and the axle from a Muscovite, the rear disks at the mounting points had to be trimmed.
Frame, brakes and transmission
The motorcycle frame has been lengthened and strengthened. To prevent the pendulum fork from “walking”, it was welded. The chain and sprockets are borrowed from the combine. Their ratio is 2 to 1. A small star with 25 teeth, it is attached to the drum using eight hardened 10-point bolts. A large star with 50 teeth. The braking system of a swamp vehicle is no different from any other, so the brakes are left unchanged. But the drum was modernized to accommodate sprocket mounts.
Read also: Friendship relationships. Buddies
The length of the fork stays of this swamp vehicle is 800mm, while its width is approximately 700mm. The front wheel axle was used from a donor - an IZh motorcycle. On one side, an extension pipe 500 mm long is welded to the axle. This pipe is inserted into a modernized Izhevsk drum screwed to the wheel. On the other hand, the axle is screwed into the same mount as on the fork leg. The mount was cut off from the shock absorber and welded to the stay (it is not visible in the photo since it is inserted into the pipe and welded).
The fork is attached to the steering wheel of the swamp vehicle quite simply. 2 pipes are inserted into the shock absorber mount.
Engine for all-terrain vehicle
The engine is from the IZH-Planet 3 motorcycle with forced air cooling from the SZD motorized stroller (popularly “Invalidka”). The crankshaft is the original crankshaft - the planetovsky one, not the SZDshny one, since the seat for the generator in the SZDshny one does not fit (it is larger), and the swamp vehicle has an Izh 6v ignition coil.
Homemade swamp tricycle on IZH Planet 3
The design of this homemade swamp vehicle is so simple that almost any car enthusiast can repeat it in his own garage. The basis of the swamp vehicle is the IZH Planet 3 motorcycle. IZH Planet motorcycles often become donors in all-terrain homemade vehicles, this is primarily due to the endurance and unpretentiousness of their engines.
The bridge was taken from a Muscovite and modernized. We cut out the bearing mounts from the doll with a grinder, then welded the yoke to the bridge stocking (if it is not welded, the stocking will warp when you cut it in half), then cut the stocking itself in order to secure the sprocket. The chain tensioner was also borrowed from the combine.
The KF-97 cameras are used from the agricultural trailer of the T-150 tractor. The tire for such a tube wheel is the same tube, only cut to a smaller diameter. First, the “tire” is put on, then it is tightened with belts. The transverse harnesses turned out to be 1.02 m long, and the longitudinal strip was 3.5 m long. The width of the longitudinal strip is 30 centimeters. The transverse belts with the longitudinal strip are connected using bolts.
The basis was taken from cornfield disks, cut in half using a small grinder and extended by 30 centimeters with steel plates welded between the disk halves (6 plates in total). The disc is covered with a chamber from a VAZ car, cut to a larger diameter. Since the disks were used from a Niva, and the axle from a Muscovite, the rear disks at the mounting points had to be trimmed.
Frame, brakes and transmission
The motorcycle frame has been lengthened and strengthened. To prevent the pendulum fork from “walking”, it was welded. The chain and sprockets are borrowed from the combine. Their ratio is 2 to 1. A small star with 25 teeth, it is attached to the drum using eight hardened 10-point bolts. A large star with 50 teeth. The braking system of a swamp vehicle is no different from any other, so the brakes are left unchanged. But the drum was modernized to accommodate sprocket mounts.
Preparation
In the process of constructing something, it is important to clearly understand before starting work what will happen and how. A reasonable approach to organizing a business will allow you to achieve an adequate result the first time, otherwise you risk facing the need for rework , additional costs of time, effort, and even money. All this is completely unnecessary, so let’s look in detail at how to prepare for creating an ATV from the Oka.
Front and rear suspension
Homemade ATVs are equipped with front or rear suspension. It is easier to mount a ready-made front suspension from an old motorcycle. You can use other options:
- Rear axle from the car. It must be shortened to fit the parameters of the quadric. The advantage of this method is the presence of a differential. The disadvantage of the bridge is its large mass.
- Cardan + gearbox on the rear axle. An independent suspension with high ground clearance is suitable for an all-terrain vehicle. In this case, the suspension arms are fixed to the frame using bolts.
You may also be interested in: Inexpensive Irbis motorcycles: only for beginners?
To prevent the ATV from turning over while driving, it is recommended to tilt the front suspension strut. The shock absorbers are from Izha. If you have the financial opportunity, it is better to install gas-oil shock absorbers with pumping. They provide suspension adjustment based on the road surface.
The steering system of an ATV is similar to that of a car. A steering wheel or motorcycle handlebar is installed . Some experts advise combining 2 types:
- motorcycle handlebars, shaft and lever at the top;
- parts of the steering system from the car are below.
You can make the steering shaft with your own hands. For this, a pipe with a diameter of 20 mm and a wall thickness of 3 mm is used. You will need to install a travel stop at the bottom of the part.
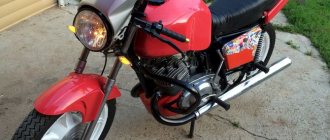
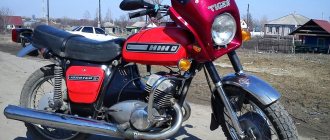
IZH 6.920 GR – cargo motorcycle
A modification of the cargo-passenger tricycle IZH 6.920 GR, depending on the version, is intended for the delivery of goods, transportation of people or professional activities. A two-seater motorcycle with a cargo module, in addition to the driver, will be able to transport one more passenger and cargo weighing 250 kg. The Russian tricycle was created on the basis of the IZH Jupiter-5 motorcycle, which is quite well known in our country.
IZH 6.920 GR is produced with a two-cylinder, two-stroke liquid-cooled engine with a power of 24.5 hp. (350 cm³). The two-speed transfer case has a reverse gear and a locking differential, and the liquid cooling system of the gasoline power unit ensures its stable operation in different temperature conditions.
The single-seat modification IZH 6.92003 GR is equipped with an extended body, thanks to which the load capacity of the cargo part is increased by approximately 80 kg. A motorcycle for fire extinguishing is also produced - IZH 6.92001. The front wheel disc of all versions is equipped with a two-cam drum brake with a mechanical drive or a disc brake with a hydraulic drive.
The passenger version of the trike, in the Eastern style, which has the unofficial name “motor rickshaw,” allows the transportation of 5 people, including the driver. This modification is used for the rapid delivery of people over short distances. For example, this is economically beneficial in industrial zones and production associations covering a vast territory.
The cargo module is made in the form of a two-wheeled trailer, rigidly attached to the rear of the motorcycle, and thus forming a three-wheeled motorized vehicle with a body. The rear suspension of the cargo compartment, as well as the wheels and brake mechanisms, are maximally unified with similar components of the standard version of the motorcycle.
The front suspension consists of a wheel mounted on a telescopic fork with two spring-hydraulic shock absorbers or shock absorbers with pneumatic adjustment. The rear suspension is independent, long-link. Adjusting the spring tension of shock absorbers controls the compression force of the springs, which guarantees acceptable comfort while driving.
Vehicles such as the three-wheeled passenger, cargo, cargo-passenger or firefighting motorcycle IZH are widely in demand in the regions. Due to their efficiency, high maintainability and ease of maintenance, tricycles are actively used by residents of rural areas and small farmers, as well as by public utility services in villages and small towns.
ATVs designed on the basis of the Ant scooter
For 36 years, the Soviets organized the production of Ant motor scooters. In total, over the years, 8 models have been produced, differing in gas tank volume and engine power. Today, the Ant scooter is an ideal base for creating an ATV with your own hands. In order to convert the “Ant” into an ATV, you should perform some fairly simple steps: slightly redesign the frame, work on reinstalling the seatposts, and so on. Installing the steering wheel and brakes of the future ATV will require special attention, continuous effort and time. When constructing homemade ATVs, it is strictly not recommended to use a brake system that has previously been used. It would be much safer to buy a new one. At the same time, the steering system can be used from an old Ant scooter or an Oka car. The final stage of creating an ATV from an Ant scooter is installing turn signals, headlights and stops.
Change your appearance
Despite the fact that the design of the fifth Planet model was probably the most interesting among all domestic motorcycles, tuning the IZH Planet - 5 motorcycle most often began with the appearance. The main reason for this was that work to change the external image can be classified as the simplest, not requiring deep technical knowledge and skills.
For this purpose, the following main work was carried out:
- double-sided arches and knee guards were installed;
- the windshield was replaced;
- higher wings were mounted;
- direction indicators were replaced;
- the muffler pipe was replaced;
- enlarged side mirrors were installed.
Complete or partial tuning operations to change the appearance immediately made the motorcycle recognizable and different from its serial counterpart.
All wheel drive and car engine
How to create an ATV with 4-wheel drive yourself, you ask? Above we looked at the simplest option. But the option is possible not only with a motorcycle engine, but also with a car engine! And then we will tell you how to make an ATV with an Oka engine. In the case of an all-wheel drive ATV with a car engine, things are much more serious. Here you can no longer use a motorcycle frame as a basis; it will have to be welded completely from scratch for a car engine. By the way, it can be not only from Oka, but also any other, depending on your desires and capabilities. Don't forget about the liquid cooling system right away. Design the frame in such a way as to place the radiator and fan in a protected place from forest branches. The engine and gearbox should be mounted along the frame so that the drive shaft from the gearbox is directly directed to the rear axle. To distribute wheel rotation, each wheel will need 2 identical axles, for example from a Zhiguli. But for installation you will have to shorten them. To increase cross-country ability, if desired, you can make a reduction chain gearbox, combining it with a standard gearbox. In this case, the drive gear should be slightly smaller than the driven one. By simple calculations of the ratio of the diameters of these gears, you can find out how much the maximum speed will decrease and the thrust will increase. If the ATV is not planned to be used for driving on public roads, then this will be a very significant technical solution.
Building a trike with your own hands (48 photos)
It all started in September 2003. In Crimea, while walking along the evening embankment, I came across a bearded guy who offered to take a photo on a miraculous yellow self-propelled vehicle for 10 hryvnia. For about ten minutes I couldn’t take my eyes off it (the trike). Since then, this device has sunk into my soul. When I returned home, I looked on the Internet, figured out how much such equipment could cost and realized that I couldn’t bear such expenses. And in the spring of 2004 I bought myself a motorcycle. I drove it for a season. And in September, while searching for spare parts for my motorcycle, I came across Palych’s article on the Internet about building a trike.
A week later I was already disassembling the purchased Cossack for parts. I removed the engine and gearbox, rear suspension, wiring, seats and everything related to the brakes and clutch. The rest I threw away. I brought it all into the garage and walked around this pile of old iron for a long time and thought about where to start. I didn’t think long, about two weeks. Then I got hold of a bunch of different pipes and channels and work began to boil. Rear wheel mounting adapters were manufactured at RMZ. The rear part of the frame is welded from pieces of channel material. The rear arms were screwed to it and the engine was hung. Then the rear wheels were bolted to all this. The back is ready. Further more.
According to my sketches, RMZ manufactured elements of the front fork - crossbars, and steering wheel mounts. Everything was carefully polished and chromed. I bought the headlights, steering wheel handles, front brake, air horn and instruments in China. The steering wheel was bent from a stainless steel pipe. All that remained was to connect the rear of the trike to the front fork. This is where I had to think twice. We tried many options. Sometimes it turned out weak, sometimes it turned out great. Finally, after much torment and experimentation, I managed to draw something similar to a frame. Now our trike was rolling around the garage on three wheels. All that remained was to restore the beauty, do the wiring, brakes and clutch. We started with the seats. Frames were bent from water pipes. The foam rubber was taken from Zaporozhye seats. Then they took it all to China and covered it with leather. Natural. I probably had to tinker the most with the tank. He did not fit entirely into the galvanic bath. I had to saw off the halves, chrome plate them individually and then weld them back. We finished decorating the tank with a homemade instrument panel a la Harley, into which we inserted a fuel and engine temperature indicator from a VAZ four and a couple more light bulbs. The tank turned out to be fake. The real tank is under the passenger seat. It is from a VAZ-2108 with a chrome-plated neck welded to it from Zaporozhka. The rear fenders are also homemade, welded from stainless steel and polished. Then the engine was overhauled. And on the evening of March 30, 2005, the trike left the garage gate under its own power for the first time. The feeling was indescribable. Everything worked, everything turned on and switched. My joy knew no bounds. The entire construction took 7 months.
How to make an ATV from a Ural motorcycle?
At the first stage of creating an all-terrain vehicle, you need to make a suspension. First, the old vehicle will need to be disassembled. The frame of the device must be freed from all elements; the technician needs to remove the shock absorbers and steering wheel. It is advisable to determine in advance what type of suspension will be installed for an all-terrain vehicle from the Urals, for example:
- Suspension on springs.
- Rigid design without shock absorber.
- Suspension with shock absorbers on springs.
Of course, it is best to go with a suspension with spring shock absorbers. They can be taken from an old motorcycle. Since the device will have 4 wheels, the missing mechanisms will have to be purchased. The pendant in this case will have the shape of the letter “A”. You need to correctly calculate the weight of the future ATV. In this case, shock absorbers will ensure a smooth ride when driving on hard off-road.
Tricycle from the Urals and VAZ-2101
When creating a cargo tricycle with your own hands from the Urals and parts of a VAZ-2101 car, the easiest thing will be to install a regular bridge and make a car suspension with shock absorbers from the Urals.
The bridge from the VAZ-2101 is turned over, after welding the differential. This is reflected in the handling - the steering wheel is quite difficult to turn, however, the trike's cross-country ability increases.
The driveshaft is shortened and welded to the fork on the final drive and connected to the axle through a rubber coupling. It is better to take the original Uralov clutch, in this case the transmission will be softer.
To avoid bending the cardan drive, you can move the engine to the left by 7-9 cm, or move the axle to the right or increase the wheelbase.
It is better to leave the engine as a whole unchanged, but instead of two carburetors, make one Chinese one. And for forced cooling, use an air filter from Izh.
Additionally, to cool the engine when operating in difficult conditions, you can install two fans and run them separately if necessary.
Pros and cons of the design
+ Simple and cheap transport;
+ The engine does not overheat.
- Can only go forward;
— Too much load on the axle with the front wheel;
— Goes too fast in first gear.
Frame
You can assemble the frame from new pipes or use an old structure. If you plan to make the base from scratch, you should purchase pipes whose wall thickness should not be more than 3 mm. For the spars, blanks with a thickness of 25 mm are needed, and for crossbars and struts - 2 mm.
To assemble an ATV from the Ant scooter, you will need to assemble the pipes into a single structure using spot welding. If all elements are assembled correctly, the welding is complete. You will immediately need to attach the shock absorber lugs to the frame, as well as the levers. The brackets can be welded later, when components and mechanisms are installed on the frame.
To reconstruct a finished scooter frame, you need to remove all components from it. Pipes are built onto the bare frame from which the rear part is removed. After this, you can weld brackets and other small parts to install the corresponding components and assemblies. You will need to move the racks under the saddle 40-45 cm.
The structures of the rear and front trunk are created from a sheet of metal, which also need to be welded to the frame. The metal parts of the structure must be primed and painted.
ATV from "Ural": assembly and features
It may seem that making an ATV from the Ural is quite difficult, but it is not so. You will need to prepare the necessary parts and tools, and also review the assembly instructions. From one old but working motorcycle you can make a universal four-wheeler, which will be used both for off-road driving and on the farm.
It is worth noting that it is quite difficult to assemble a 4x4 Ural ATV with your own hands. For its high-quality development, you will need to seek help from a team of professionals; you will need a turner, an electrician and a welder. Making the front suspension independent is more expedient than assembling a homemade 4x4 ATV from a Ural. Otherwise, control may be difficult. The fact is that to provide all-wheel drive, it will be necessary to supplement the system with a gearbox, which will lead to an increase in the weight of the ATV. To assemble a rear-wheel drive structure, you need to prepare the following:
- Work motorcycle "Ural".
- Steering rod of transverse type.
- One pair of front hubs from a rear wheel drive vehicle.
- Front suspension arms.
- Axle shaft or driveshaft.
- Thick-walled light alloy pipe.
- Rear axle.
It is worth noting that the rear axle and front hubs must be taken from the same car. This will avoid the procedure of adjusting the disks to the fixing holes. It is recommended to take these parts from Moskvich or VAZ. The work will require a set of hand tools, as well as an angle grinder and a welding machine.
Homemade tricycle assembled from Soviet motorcycles
Dear visitors to the “ Samodelkin Friend ” website, from the material presented by the author you will learn how to independently assemble a tricycle from spare parts from old Soviet motorcycles with your own hands. This trike was assembled by Viktor Bryukhanov and was based on the Voskhod motorcycle frame, front fork with wheel, tank and seat, single-cylinder internal combustion engine borrowed from the Minsk motorcycle. The rear part (gearbox, axle shafts, wheels) is from the Ant cargo scooter. IZh “Planet” shock absorbers; by the way, the tricycle has a reverse speed and an additional towbar for a trailer. Rear brakes, no front brakes)
Thanks to its wheel arrangement, the tricycle is more stable on a dirty dirt road, perfect for fishermen and hunters for traveling long distances off-road (within reasonable limits))
So let's take a closer look at the design features of the tricycle.
Materials
- motorcycle frame "Voskhod"
- ICE "Minsk"
- gearbox, axle shafts and rear wheels “Ant”
- Shock absorbers IZH "Planet"
Tools
- welding inverter
- set of wrenches
- Angle grinder (grinder)
- skillful hands and a bright head)
Step-by-step photo of assembling a homemade tricycle from Soviet motorcycles with your own hands. The rear part is from an ant, shock absorbers IZh "Planet" Engine motorcycle "Minsk" Torque is transmitted using a chain drive. Shock absorber "Planet" There is also a reverse speed. Rear wheels “Ant” This is a cool trike assembled by Viktor Bryukhanov from old Soviet motorcycles, budget-friendly, rational and much better than expensive Chinese analogues.
ATV from a motorcycle
Another ATV by Sergei Pletnev, this time based on the heavy Ural-2 motorcycle with a range of 12,000 km. The main components were taken from the motorcycle - engine, gearbox, clutch, as well as a modified frame.
Main components
- Front wheels from Zhiguli;
- shortened rear drive axle and wheels from a VAZ-2101;
- steering wheel with steering shaft from the Urals;
- fuel tank and muffler from the Urals;
- driveshaft - axle shaft from Oka;
- CV joint from Oka;
- saddle from the Urals;
- The front shock absorbers are from Zhiguli, reinforced with a Ural shock absorber, the rear shock absorbers are completely from the Urals.
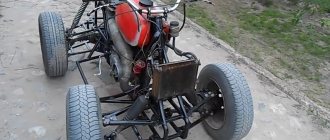
The front suspension of the ATV is built on homemade double transverse A-arms made of a square profile. The brakes were also borrowed from the Zhiguli - they came without a booster and a parking brake. The brake cylinder drive is connected to the motorcycle pedal. The engine is cooled by a fan from a VAZ stove. The rear wheels have well-treaded tires, and the front wheels have regular road tires.
The steering turned out to be hybrid. The lever steering wheel itself is borrowed from a motorcycle, and the rest of the spare parts from the car are a bipod, a column, fists and rods for them. The pendulum-type rear dependent suspension was not very successful - it has a hard ride and large torsional loads on the unit. The ATV has a front and rear rack. After testing, duralumin sheet fenders and rubber mud flaps were added.
In terms of parameters, the ATV turned out to be similar to the Ural motorcycle. Its maximum speed decreased slightly, but its torque increased. Car shock absorbers are better than motorcycle ones, so riding an ATV is more comfortable than riding a bike. To control such an ATV, you need sharpness and strength.
Do-it-yourself tricycle assembly from the Urals
Before starting work, it is necessary to think through the design of the future tricycle and the location of all elements. Ideally, make a drawing of the future vehicle.
Important design points:
- All joints must be reinforced.
- Car cups are welded to the top beam. It also serves as a support for shock absorbers.
- Frames are welded to the central beam, which serve as footrests for passengers and also support the suspension bump stops.
- The base for the pedal weights is the lower transverse tube, which is attached to the frame.
- A support for the gearbox is also made on the transverse frame.
The main difference between a tricycle and a motorcycle is that the engine is located at the rear and therefore the center of gravity of the vehicle is shifted back. When accelerating, such a tricycle rears up a little. Below you can see a diagram of how to convert a Ural motorcycle into a tricycle.
Location of tricycle parts
As we have already said, the engine of a Ural tricycle is not located on the main axis, like in motorcycles. It is placed between the rear wheels, because of this, when accelerating quickly, the tricycle easily rears up. But this is a much safer event than on a motorcycle and adds adrenaline and entertainment to the trip.
As a motor, you can use a native motor from the Urals or take a car engine. The main parameter of choice is its capacity between the rear wheels. Be sure to securely fasten it in at least three places. Most often, if the power unit is in good condition, then you don’t even need to do anything to it. And if the engine is old, then you can replace the radiator or some other elements.
Depending on the engine you choose, you will also have to change the exhaust system by installing one muffler for each cylinder.
When converting a motorcycle from the Urals into a tricycle with your own hands, the gearbox is usually installed on the left side, because you usually need to hold the steering wheel firmly with your right hand. You'll have to think a little about how to connect it to the engine, because now the gearbox will be located at a much greater distance from it.
The standard motorcycle suspension will have to be redone due to the fact that the load on the wheels in the Ural moto tricycle is distributed differently.
This is done using two consoles and two large springs (aircraft springs are ideal, but car springs will also work). The consoles are connected by levers through which the front axle passes.
Powerful springs are needed because when moving, a huge load is placed on the front wheel and suspension. The remaining springs can be left as standard motorcycle springs.
Battery
A separate frame is usually welded under the battery, which is attached between the engine and the driver’s seat. All the main details are thus arranged in one place. And if you attach panniers to the tricycle, they will completely hide all the important elements.
Increased functionality
Now that the frame and chassis of the ATV are assembled and the engine is installed, you need to think about secondary structures that will make it practical to use the equipment. The fuel tank is well suited for a Ural motorcycle. Its impressive capacity will be enough even for a car engine
An important modification would be the installation of a snorkel. Since the engine is located quite low in the frame, the air filter accordingly takes air from below
To prevent water from getting into it when fording, it is highly recommended to do this. The exhaust system also needs to be completely redone, with exhaust gases being removed at a fairly high level so that water does not get inside. Also, for an ATV you need a large, wide seat; by moving your body weight, you will be able to achieve better control when moving. An underbody skid plate can be made from aluminum sheet metal to protect the front suspension arms and engine. A winch installed in the front part would be useful in the forest. You can use car fog lights to illuminate the road.