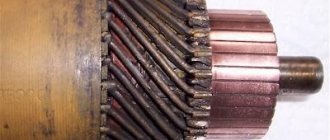
The scooter is a fairly common vehicle today; it does not require a lot of fuel, but at the same time it does not provide the incredible speeds that its two-wheeled motorcycle brothers can boast. This is a rather specific type of transport that not everyone will choose for themselves. But all the people who like scooters are always excited about riding them, they have a lot of fun and also find them extremely practical. But at the same time, not a single vehicle is insured against breakdowns, including a scooter.
Malfunctions can be very diverse, but in this article we will talk about electronics, and more precisely, about how to check the switch on a scooter. Naturally, if you have no idea what we are talking about, then you should not immediately take up the tools. It is better for you to calmly and carefully study exactly how the electronics in a scooter work, how checking the switch on a car and on a moped differs, and also what exactly you can do to check the electronics for damage and repair your vehicle. In general, before considering the question of how to check the switch on a scooter, you should understand what it actually is.
Switch and circuit device
How to check the switch on a scooter if you don’t even know what it is and where to look for it? This is why you need to start small. The first thing you need to do is find out what a switch is. In fact, everything is quite simple, since a commutator is an element of the electrical ignition circuit in a vehicle that produces a low voltage pulse that is transmitted to the ignition coil. In isolation from the overall picture, the definition does not look very clear, so it is worth considering the structure of the entire circuit.
So, the main element here is the generator, which generates the operating voltage in order for the switch discussed in this article to work. As mentioned above, using the energy of the generator, the switch generates a pulse for the ignition coil, but not just a pulse - namely a low voltage one. The ignition coil, in turn, generates a high voltage pulse at a specific moment in time, which is transmitted to the spark plug. The spark plug is screwed into the cylinder head and, upon receiving a high-voltage pulse, ignites the combustible mixture, which powers the engine. Well, now you know how the electrical circuit works in a vehicle, which will allow you to better understand how to test the switch on a scooter.
Tuning
For many, Alfa moped repair begins almost immediately after purchase. Thanks to the presence of spare parts and the simplicity of the Alpha moped engine, tuning is common. This could be replacing the not very comfortable original seat, or increasing the engine capacity to 110 cc. Replacing the sprocket from 14 to 15 or even 16 will increase the speed to 10 km/h.
Increase in cylinder volume - replacement from 50 cc. at 70 cc., will add power, which is sometimes lacking. To do this, in addition to the cylinder head, you will have to change the pistons and carburetor. You can carry out such maintenance of the Alpha moped yourself. If you bought an Alpha moped, repairing the gearbox and engine yourself will be a good opportunity for you to study your equipment.
And finally, some useful tips that will make repairing an Alpha moped a more enjoyable experience for you.
Have you disassembled the timing belt and CPG? Place parts in separate boxes. Sketch the position of the gears and forks on paper before removal. If you decide to increase the speed of the Alpha moped using an asterisk, do not forget that the front and rear change at the same time.
Malfunction
What prompted you to study the article on how to test the switch on a 4T scooter or any other common model? Most likely, your vehicle has stopped starting, but you don't know what exactly the problem might be. Perhaps the ignition is acting up, perhaps the engine is stalling. All this may or may not have a cause in the switch - this is the main problem of repair. You need to determine where exactly the problem is in order to fix it.
If your switch does not work or does not function well, then the low voltage pulse will not be transmitted to the ignition coil - accordingly, ignition will not occur. But the problem could be in the generator, the coil, or even the spark plug, so you need to know exactly how to check these elements. This material focuses specifically on the switch, so attention will be paid mainly to how to check the switch on a 4T scooter and other popular models.
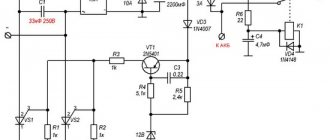
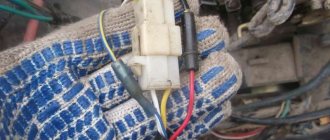
Checking power on the switch
We connect the battery. Turn the ignition key. We measure the incoming voltage at the switch connector. 12 V should be supplied to the red wire from the battery through the fuses and the ignition switch. We set the device to V-20 V. We connect one probe to the green wire, the second to the c/h wire.
If there is 12 V, then on dio 34 we immediately check the voltage on the pink wire - it should be 9 V. This means that the electrical circuit from the battery to the switch is working.
Some older Japanese Suzuki and Yamaha models do not have a switch. The ignition coil operates directly from the pulse generator. Therefore, there is no need to check the voltage from the battery, but you only need to check the operation of the generator and rectifier (according to the diagram).
Switch on car and scooter
Many car enthusiasts may be surprised, since they know that checking the switch on a car is a matter of minutes. To do this, you just need to use a voltmeter, which sometimes even comes directly with the car. You just need to know where to connect what, and no problems arise at all. However, in the case of a scooter, things are a little different.
If you want to know how to check the performance of the switch on your scooter yourself, then you should remember that you will not be able to achieve accurate measurements if your switch remains in the same place where it always is. All this will be discussed more specifically a little later, but for now you just need to understand that checking the switch on a car and on a scooter are slightly different things, so you shouldn’t think that the process will be identical. Read on and you will learn how to test the switch on a scooter with a multimeter, just like on a car, and what are the disadvantages of this method.
Testing the switch with a tester
If you have a special testing device, that is, a tester, then you can use it on the switch, since in any case it can give certain results. You can use a simple voltmeter, or you can use a more universal multimeter, but in any case you need to remember that this part of the scooter has five terminals - to ground, to the sensor, to power, to the ignition coil and to shutdown. If you only have one switch and tester, then you can only check for zero voltage. When the tester needle does not move at one of the outputs, this means that there is no voltage in it.
However, the result of damage is not always a complete loss of voltage - sometimes it may happen that at one of the outputs it will be unstable, low, and so on. And you won’t be able to find out about this unless you have the same switch that has already been measured for comparison. As you understand, this is only a partial test, that is, you can use this method to figure out how to check the switch on a Yamaha scooter or on any other specific model. But if you want to conduct a full check, you will have to use more effective methods. How to check the faulty switch on a scooter with maximum accuracy? For this you will need another work scooter.
Testing on another scooter
If you are wondering how to check the switch on a Honda-Dio scooter, then in this case you do not need another Honda-Dio to complete the procedure. We will talk about the interchangeability of switches on scooters a little later, but now you need to understand that you can get accurate readings if you have another scooter nearby. This method is the simplest and most common.
You need to disconnect the switches on both scooters, and then connect the element under test to the other scooter. If everything works perfectly, this will mean that there is nothing wrong with the switch, meaning the problem should be looked for in some other area. Naturally, this is additional work, but the fact remains that you learned how to check the serviceability of the switch on a scooter, you performed the test and got the result. If the problems remain, then you have found it - you will need to repair or replace the switch, but this will also be written about later.
At this point, it's time to move on to another very interesting method - imitation.
Dismantling and assembling a moped gearbox
Disassembly and reassembly of the gearbox is carried out to replace worn parts.
Before disassembly, it is necessary to dismantle the cylinder head, generator rotor, cylinder and clutch housing. Using a screwdriver with a thin blade, remove the retaining spring ring from the secondary shaft and then the driven gear of the motor transmission. To remove the gear shift mechanism, unscrew the gear lock bolt on the right side of the engine and remove the lock together with the spring located under it.
We remove the gear shift shaft assembly with the auxiliary gear shift fork.
We separate the halves of the engine crankcase and dismantle the crankshaft, after which access to the gearbox parts opens. The gearbox shafts along with the gears remain in the left half of the crankcase.
Unscrew the screw securing the speed indicator sensor and remove the sensor. Using a hex wrench, unscrew the gear shift drum screw. Under the screw there is a contact element and a washer for the speed indicator sensor. We remove the drum along with the shift forks, shafts and gears of the gearbox. When separating gears, shafts and forks, it is important not to mix them up.
If defects are found, the parts must be replaced. Reassemble the box in reverse order.
Disassembly and assembly of a moped gearbox updated: July 31, 2017 by: admin 2017-05-29
Simulation stand
If you do not have a second scooter, and also do not have access to it, then you should think about purchasing or making a special stand for yourself that would simulate the operation of your scooter. It is ideal for testing the switch on a Honda scooter, as well as on any other model, and if you regularly use such a vehicle, then the likelihood is that you will have to use the stand more than once or twice, so it is definitely worth the investment into it.
Now it is much more convenient to purchase it and install it in your garage, so that, if necessary, you can always check any part without using another scooter. But you can also do it yourself - only in this case you need to have very high skills and abilities in engineering, and it is also advisable to have impressive experience with such equipment. You should also know that such a stand has other advantages over a second scooter for control.
Alpha moped engine repair
Before disassembling the engine of the Alpha moped, we fix the scooter with the central stand and free it from the plastic. We disconnect all engine power systems and do not forget to drain the oil!!!
We remove the engine along with the transmission, and on a flat surface we continue the home repair of the Alpha moped.
It will help to properly dismantle the Alpha moped engine by disassembling it according to the following scheme:
- remove the muffler and exhaust pipe;
- remove the camshaft gear cover;
- unscrew all 4 bolts from the cylinder cover;
- remove the top cover and cylinder head;
- We look at valve wear, internal contamination and the condition of other system parts.
If this is your first time doing a DIY repair on an alpha moped and you need to disassemble it, don’t forget to sketch a diagram of how everything was in place! If the valves need to be replaced, or if there are gaps in the fit, then they need to be removed:
- Place the head on a level place. To prevent the valve from being damaged during dismantling, it is better to place a layer of thick rubber or a rag under it;
- we select the socket head, place it on the valve plate and hit it hard with a hammer;
- release the crackers, remove the top plate and valve washer;
- remove the valve and guide bushing.
To complete the repair of the Alfa moped engine, after replacing the parts, we begin assembling the engine in the reverse order, putting everything in its place, observing the marks. Don't forget to add fresh oil.
Difference between stand and second scooter
Let's say you wondered how to check the switch on a 2T scooter. You have read this article and realized that simply using a tester will not give you the results you need. Therefore, you are faced with the question of whether to get a stand, or try to find another scooter to check. Many people are inclined to the second option, as it looks much simpler and more convenient. However, you should still consider the former, as it has several significant advantages. One of the biggest is the depth of testing: if with a second scooter you can simply test the functionality of the switch and some details of its operation, then on the bench you will have the full range of possibilities. Everything will be before your eyes, you will be able to use the tester on any element, set the number of revolutions you need in order to test at various load levels, and so on. You can even check the compatibility of switches with ignition coils, as well as come up with any checks and tests that your imagination allows you to do.
In general, you will have a complete flight of fancy. You will get the answer to not only how to check if the switch is working on a scooter. You will be able to get an answer to any question that concerns your vehicle. However, it’s worth saying right away that if you just decide to buy a scooter for a couple of years and then switch to a motorcycle or car, then you shouldn’t waste time and money. The stand is more suitable for those people who are confident that they will ride a scooter for many years.
Photo report: Assembly of the gearbox (box) of the “Ant” scooter
After completely disassembling the engine of the Ant scooter, many, especially beginners, have difficulty reassembling the gearbox, and this is not surprising. There is very little reference information, there are too many “ant” experts, the matter is further complicated by the fact that there are no marks on the gearbox parts that greatly simplify the work on the correct orientation of the gearbox parts relative to each other.
In fact, everything is not as complicated as it might seem at first glance...
The gearbox, after disassembling the engine and troubleshooting the parts, turned out to be in very good condition; only one gear of the first gear had to be replaced (extreme wear of the bushing and, as a consequence, increased backlash of the gear on the shaft) and all the bearings (due to severe wear). All other gearbox parts were checked for wear and so on without any problems. Complete disassembly of the “ant” engine is described in detail in the article: Photo report: Disassembling the engine of the “Ant” scooter
Before assembling the gearbox, we carefully wash all the parts from dirt, pay special attention to the engine crankcase and the condition of the threaded connections, buy a new set of oil seals and gaskets (preferably made of paronite). The general principles of engine crankcase repair are described in detail in the article: Photo report: Repairing a scooter engine crankcase
And so, the right half of the crankcase is completely washed, laid on wooden blocks and is completely ready for the introduction of our gearbox into it.
We insert the retaining ring into the mounting hole of the secondary shaft bearing.
Using a mandrel, install the bearings into their mounting holes. Don't forget to place a special washer under the input shaft bearing.
We check the performance of the copier, for this: we press on it with a screwdriver or a finger and release it - several times, there should be no jamming or excessive play in its operation, the working surface should be strictly in the form of a cone (not “slicked”).
We carefully inspect the teeth of the “pawl” of the gear shift mechanism; there should be no cracks, chips, or wear. The teeth should be sharp (not “slick”).
In the same way, we inspect the teeth of the crescent of the gear shift mechanism.
We assemble the gearshift shaft and install the return spring.
We install the gearshift shaft into the engine crankcase.
We install the secondary shaft in its place.
We put the fourth gear gear in its place.
Apply any grease to the thrust washer of the tracing shaft (marked with an arrow) and place it on the mounting hole of the tracing shaft.
We unfold the crescent of the gear shift mechanism so that its last tooth (marked by an arrow) engages with the gear of the copier shaft.
We take the copy shaft and carefully inspect the forks of the gear shift mechanism, they should not show signs of excessive wear and signs of overheating (blue), wear on the working surface of the forks should not be more than 0.5 mm. You should also check the ease of movement of the forks on the shaft and the play, which should not be excessive.
These small abrasions on the forks are considered quite normal for this engine.
We take the copy shaft in our hand (with the daisy pointing towards us) and turn the forks of the gear shift mechanism all the way to the right (clockwise), the forks should take the position as in the photo.
We put the gearbox gears on the forks; the first and third gear gears (large) are placed on the long fork; the second and fourth gear gears (small) are placed on the short fork.
We install the copy shaft assembly with gears in place, while carefully ensuring that it is the last tooth of the crescent of the gear shift mechanism that engages with the gear of the copy shaft (as in the photo). If the crescent meshes with the gear with another tooth, then the gearbox will not work correctly in this case.
Reinstall the input shaft.
We put the first gear gear on the secondary shaft and swing it; if large play is detected, we replace the gear with a new one.
We install the copy shaft clamp along with the spring on the gear shift mechanism shaft.
After assembling the gearbox, we must check its functionality and prepare the engine for final assembly. The final assembly of the engine is described in detail in the article: Repairing the Ant scooter engine
Switch repair
So now you have all the information you need on how to troubleshoot your scooter's switch. Now you can spend some time discussing how to fix this problem. The first option is repair. You may be surprised, but this is far from the most common option, and now you will find out why. The thing is that the scooter switch circuit is most often filled with very durable plastic, and if you try to clean it off to make repairs, there is a very high probability that you will cause irreparable damage. Therefore, if you still want your switch to be repaired, then you should entrust this matter to a specialist who has owned a soldering iron for several years and has been involved in similar things. However, as mentioned earlier, this method is not particularly popular, as it is very troublesome. Most scooter owners prefer to save time and hassle and immediately buy a new switch when they find out that their current one has failed.
Alfa moped box repair
The gearbox of the Alpha moped sometimes fails and requires constant attention. Repairing a gearbox at home is not particularly difficult for a beginner.
How to rebuild a gearbox with your own hands?
We carefully read the instructions for the alpha moped, do-it-yourself gearbox repair.
Let's take it slowly, in order:
- We first dismantle the cylinder, then the rotor and clutch block;
- carefully remove the retaining ring (you need a screwdriver and a thin knife or blade) and the drive gear;
- To remove the speed unit, unscrew the fastener - the bolt on the back side.
- remove the gear shift fork;
- remove the crankshaft and drum.
When the repair of the Alpha moped box is completed, assemble the gearbox using the reverse algorithm.
Buying a switch
Purchasing a switch is the easiest and fastest way out, since you do not waste time, effort, and the cost of this mechanism is not so high as to save much on it. This is really the most reasonable solution that you can come up with in a situation where your switch has burned out. However, again, it is very important that you check everything correctly, do not use only a tester, but carry out a full procedure for checking the switch so that you can say with certainty that this is the reason. Otherwise, you will just spend money on a new part, but your scooter will still not function.
Interchangeability of switches
Separately, it is worth talking about the interchangeability of switches for scooters, since this issue worries many people who use these vehicles. Fortunately, this question brings only positive emotions, since in most cases the switches on different scooter models are interchangeable. This means that if one switch is damaged, you won't have to look everywhere for the exact same one, because you can use any other one that you can find.
Naturally, we cannot say that absolutely all switches are interchangeable; there are some points that you should pay attention to. First of all, this is the presence or absence of a Hall sensor in the circuit - in some scooter models it replaces the ignition coil, and, accordingly, the switch that interacts with the Hall sensor will not be suitable as a replacement for the switch that interacted with the ignition coil. There are other restrictions - for example, you will not be able to use a commutator that is used for an engine with a different number of cylinders. Luckily, scooters almost always use single cylinder engines, but this is still something to keep an eye on.