ATV built on the basis of the Dnepr MT-10 motorcycle: photo and description.
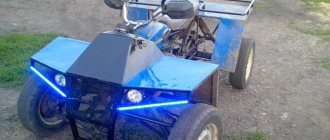
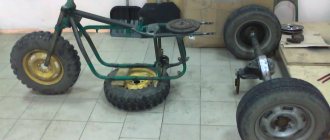
This homemade ATV was made at home; a Dnepr MT-10 heavy-duty motorcycle was used as a donor. The process of converting a motorcycle into an ATV is shown in these photos.
The frame from MT was modified, additional mounts were welded for the front and rear suspensions, homemade suspension arms, shock absorbers from a motorcycle, and a rear axle from a VAZ-2101 (shortened).
VAZ wheels.
Rear suspension.
- Front suspension.
- Steering.
- Front and rear trunk.
- The front bumper is made from motorcycle bars.
- This is what the ATV looks like after painting.
Source: https://avto-samodelki.ru/samodelnyj-kvadrocikl.html
How to make an ATV from an Izh motorcycle with your own hands
Today the cost of an IZh motorcycle is quite low.
Garage kulibins are constantly posting new diagrams and videos on how to convert it into an ATV. But when getting ready to assemble an all-terrain vehicle, you need to decide on the donor model, since several modifications have been released. The production of the IZH motorcycle began in the late 20s of the 20th century. Then, in one year, the plant produced five models at once with serial numbers from 1 to 5. Moreover, they differed significantly from each other. The most popular models at that time were the IZH-1 and IZH-2 models, which were equipped with a 24 hp V-engine. With. and a volume of 1.2 liters. These were the first motorcycles with a crankshaft located along the body and a three-speed gearbox that spun the rear wheel. There was a muffler at the bottom of the frame. IZH-2 was equipped with an air fan and a drive to the sidecar wheel.
The next few years there was no such mass production of motorcycles, but work was constantly being done to improve the internals and external design. Until 1946, the plant had accumulated a large number of drawings from Germany, as a result of which there was a significant jump in production. A couple of years after this, a new model IZH-350S appeared. It had a telescopic front suspension, the rear part received oil shock absorbers with springs. The engine had 14 horsepower.
In the mid-80s, they began to produce IZH-Jupiter-5. They were widely known and very popular at that time. This model was reliable and comfortable, although the engine power was slightly reduced. In addition, this motorcycle had an emergency start button.
Assembling an all-terrain vehicle from IZH
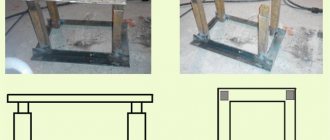
There are no fundamental differences in the assembly of an IZh-based ATV from other models. Initially, you need to draw up a drawing or find it on the Internet. This will allow you to clearly understand the plan for future work. After all, to assemble an ATV you need to have the skills of a welder, turner and designer.
ATV frame
To make an ATV, the Izhov frame needs to be slightly altered. To do this, you need to move the drains under the saddle by 4 cm, and remove the rear ones altogether. Then bevels should be made from them. You also need to get rid of the rear fork. The most important point in assembling an ATV is installing the engine on the frame. After connecting the internal combustion engine, you should combine its shaft and the rear axle gear using a chain drive. Then you need to bring the power unit control unit to the steering wheel. Then proceed to install the pedals and levers on the frame.
ATV suspension
After this, you can begin to install the pendants. For it they use parts from VAZ or Oka. It is recommended to use used parts, as they will not be very rigid. The body kit can be taken from old cars or Izha. Many people like steering wheel controls from a car rather than a motorcycle. In this case, you need to purchase a mechanism for this.
Steering
If the ATV will be controlled by the steering wheel of a motorcycle, then for these purposes you can use parts from that Izh. The main point in any vehicle is the braking system. You can take it from your car - it will be more reliable. Wheels of different sizes will help improve the aesthetic appearance. To make the wings and skin of the ATV, you can use rolled sheets, which can later be painted.
Characteristics
Gasoline consumption and overall dimensions of the ATV depend on the selected donor model. Approximately the all-terrain vehicle converted from Izh will be 168 cm long, 1.03 cm high and 1.1 cm wide. The curb weight is approximately 190 kilograms, and fuel consumption ranges from 4 to 7 liters per 100 kilometers.
Source: www.vsedelkin.ru
How to make an ATV from an IZH motorcycle?
ATVs are a very popular and relevant type of equipment in domestic conditions. However, not everyone can afford to buy such a device. Therefore, it will be useful to learn how to make an ATV from an IZH motorcycle at home.
Preparation
In the process of constructing something, it is important to clearly understand before starting work what will happen and how. A reasonable approach to organizing a business will allow you to achieve an adequate result the first time, otherwise you risk facing the need for rework , additional costs of time, effort, and even money. All this is completely unnecessary, so let’s look in detail at how to prepare for creating an ATV from the Oka.
Tools and materials
To work you will need:
- contactless ignition system;
- electric starter;
- temperature sensors;
- relay to turn off the fan;
- air cooling complex;
- front and rear independent suspension;
- gearbox with rear welded differential;
- chain transmission.
The list of components used and their characteristics are determined in accordance with the purpose of use of the ATV.
So, the more often you plan to go hunting and fishing, the higher the autonomy should be (driving at one gas station). The suspension, luggage compartment and other parts are selected in the same way.
Tools you need to prepare:
- angle grinder;
- welding equipment;
- electric drill;
- a set of locksmith's keys;
- screwdrivers;
- calipers;
- knife;
- hammers;
- pipe bending device.
Gearbox and brakes
If the quad is assembled on the basis of a car, the chain drive is replaced. This greatly simplifies vehicle maintenance. A manual transmission is installed, as it improves maneuverability. The input shafts are directed to the front and rear axles. Wheels can be removed from small cars: Oka, Niva.
The brake system is selected taking into account the mounted wheels. The steering knuckles are removed from the Niva or Oka. To assemble an all-wheel drive model, you will need: car steering, transmission drive and differentials. In this case, the frame is not used. It is better to weld the structure to suit the engine size.
The suspension is also removed from the car. A gearbox is installed on the front-wheel drive model. The next stage is the manufacture of the body. For this you will need fiberglass, fiberglass. Experts advise using the first material, as it is easier to work with.
A drawing is pre-prepared and body elements are cut out from polystyrene foam. To fix them together, glue or foam is used. Fiberglass is glued to the foam. The resulting structure is attached to the frame. The body is well dried, primed, sanded and painted.
Tires of the required size are selected. If the vehicle will be used off-road, it is necessary to create the appropriate ground clearance (distance from the bottom to the surface of the earth). For this, R17 wheels are installed.
The resulting ATV is equipped with turn signals, headlights, a dashboard, and a battery. Electrical equipment is connected according to a pre-designed diagram. For this, wiring and a multimeter are used to check the voltage in the network. The next step is to install the seats. The vehicle is checked for serviceability, and the data displayed on the drawings is compared. A quadric, correctly assembled, is not inferior in technical and operational characteristics to finished vehicles.
Manufacturing
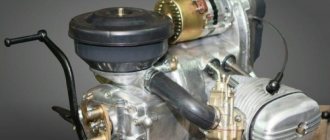
If you decide to make an ATV with your own hands from the IZH Jupiter-5 , then they take both the motor and temperature and fan sensors from this device. For independent front suspension, hubs from the VAZ 2108 and shock absorbers found on Minsk motorcycles are used. The gearbox must have 4 forward and 4 reverse gears. In used gearboxes, oil seals and sometimes bearings often have to be replaced.
The frame can be made from scratch or purchased ready-made at your discretion. But the motor must be securely bolted along it. Engine installation is possible both in the front and in the rear.
The transmission and drive need to be fixed more firmly. For homemade frames, thin-walled pipes are usually used. Tubes up to 0.25 m long are used for the spars, and up to 0.2 m long for the struts and cross members.
Most often, pipe joining is done by spot welding. After this, be sure to resort to full welding to guarantee maximum reliability. The ears for the shock absorbers and levers are welded on immediately. The brackets are mounted when it is time to install the corresponding units and components.
Frame
You can assemble the frame from new pipes or use an old structure. If you plan to make the base from scratch, you should purchase pipes whose wall thickness should not be more than 3 mm. For the spars, blanks with a thickness of 25 mm are needed, and for crossbars and struts - 2 mm.
To assemble an ATV from the Ant scooter, you will need to assemble the pipes into a single structure using spot welding. If all elements are assembled correctly, the welding is complete. You will immediately need to attach the shock absorber lugs to the frame, as well as the levers. The brackets can be welded later, when components and mechanisms are installed on the frame.
To reconstruct a finished scooter frame, you need to remove all components from it. Pipes are built onto the bare frame from which the rear part is removed. After this, you can weld brackets and other small parts to install the corresponding components and assemblies. You will need to move the racks under the saddle 40-45 cm.
The structures of the rear and front trunk are created from a sheet of metal, which also need to be welded to the frame. The metal parts of the structure must be primed and painted.
Recommendations
It is easy to eliminate disc runout - it helps to cut out the central block of Oka discs, to which some of the discs from various Zhiguli cars are welded. This assembly must be supplemented with several more pieces of metal, which are also welded. If there is any beating, it will be minimal. It is advisable to use the same rubber that is usually used for ATVs. Important: the clearance of an ATV is normally at least 0.3 m.
The gearbox can be taken from Oka cars. But the main pair of gears should be replaced with a chain drive. If you choose supporting pipes for work, then VGP 25x3.2 can be considered the best option. It is also advisable to prepare silent blocks. The carburetor circuit is better than using an injector.
How to make an ATV from an IZH motorcycle, see below.
Source: stroy-podskazka.ru
ATV from "Ural": assembly and features
It may seem that making an ATV from the Ural is quite difficult, but it is not so. You will need to prepare the necessary parts and tools, and also review the assembly instructions. From one old but working motorcycle you can make a universal four-wheeler, which will be used both for off-road driving and on the farm.
It is worth noting that it is quite difficult to assemble a 4x4 Ural ATV with your own hands. For its high-quality development, you will need to seek help from a team of professionals; you will need a turner, an electrician and a welder. Making the front suspension independent is more expedient than assembling a homemade 4x4 ATV from a Ural. Otherwise, control may be difficult. The fact is that to provide all-wheel drive, it will be necessary to supplement the system with a gearbox, which will lead to an increase in the weight of the ATV. To assemble a rear-wheel drive structure, you need to prepare the following:
- Work motorcycle "Ural".
- Steering rod of transverse type.
- One pair of front hubs from a rear wheel drive vehicle.
- Front suspension arms.
- Axle shaft or driveshaft.
- Thick-walled light alloy pipe.
- Rear axle.
It is worth noting that the rear axle and front hubs must be taken from the same car. This will avoid the procedure of adjusting the disks to the fixing holes. It is recommended to take these parts from Moskvich or VAZ. The work will require a set of hand tools, as well as an angle grinder and a welding machine.
DIY ATV from IZH Planet 5
Post by Vovochka » June 12, 2014, 07:32 pm
Initially I didn’t want to make it public before the first trip, but for selfish purposes - in case they save me from some hidden rake - I’ll start a topic. Although the device is not specialized for the forum, we theoretically assume that it will be possible to put cameras on it and take one for a ride through the swamp.
I'm not lazy, I'm energy-saving.
Post by lunatik-1 » June 12, 2014, 11:10 pm
. uh, what should keep the axles from breaking!?
Post by Vovochka » June 13, 2014, 07:04
lunatik “strength” of the axle shaft. on the buggy plane there are similar solutions, where the ends of the axle shafts are mated to the splined parts of the Oka CV joints, and here the flanges are pressed on. The studs should also not be torn off, because... they only tighten the mating parts, which also stay in place.
In general, the rear axle with such solutions is due to the fact that it was not possible to find a suitable material for a solid axle. from a “raw” 50mm round timber it is very heavy, and from a GPL (BMP) torsion bar the turner does not want to sharpen
The device was purely experimental - the Planet and other components were available. this is a kind of transition from a tractor theme to an all-terrain vehicle
I'm not lazy, I'm energy-saving.
Post by Vovochka » June 13, 2014, 10:15
Question: what is the best way to weld the ball joint plate to the lever? cut the pipe and weld it, or just overlap it?
I'm not lazy, I'm energy-saving.
Post by lunatik-1 » Jun 13, 2014, 11:14 am
Vovochka wrote: lunatik “strength” of the axle shaft. on the buggy plane there are similar solutions, where the ends of the axle shafts are mated to the splined parts of the Oka CV joints, and here the flanges are pressed on. The studs should also not be torn off, because... they only tighten the mating parts, which also stay in place.
In general, the rear axle with such solutions is due to the fact that it was not possible to find a suitable material for a solid axle. from a “raw” 50mm round timber it is very heavy, and from a GPL (BMP) torsion bar the turner does not want to sharpen
The device was purely experimental - the Planet and other components were available. this is a kind of transition from a tractor theme to an all-terrain vehicle
Post by lunatik-1 » June 13, 2014, 11:20 am
You do it beautifully Parts that work to break in motorcycles are often made using pipe cutting technology.
Good welding according to the second option IMHO prettier But (!) winter + water in the lever + hellish frost = burst lever Do you understand what I mean?
Post by lunatik-1 » June 13, 2014, 11:22 am
Vovochka wrote: question: how to properly weld an ear
Post by didulya » June 13, 2014, 12:27 pm
Post by Vovochka » June 13, 2014, 2:09 pm
How to make an ATV from an Izh motorcycle with your own hands
Today the cost of an IZh motorcycle is quite low. Garage kulibins are constantly posting new diagrams and videos on how to convert it into an ATV. But when getting ready to assemble an all-terrain vehicle, you need to decide on the donor model, since several modifications have been released.
The production of the IZH motorcycle began in the late 20s of the 20th century. Then, in one year, the plant produced five models at once with serial numbers from 1 to 5. Moreover, they differed significantly from each other. The most popular models at that time were the IZH-1 and IZH-2 models, which were equipped with a 24 hp V-engine. With. and a volume of 1.2 liters. These were the first motorcycles with a crankshaft located along the body and a three-speed gearbox that spun the rear wheel. There was a muffler at the bottom of the frame. IZH-2 was equipped with an air fan and a drive to the sidecar wheel.
The next few years there was no such mass production of motorcycles, but work was constantly being done to improve the internals and external design. Until 1946, the plant had accumulated a large number of drawings from Germany, as a result of which there was a significant jump in production. A couple of years after this, a new model IZH-350S appeared. It had a telescopic front suspension, the rear part received oil shock absorbers with springs. The engine had 14 horsepower.
In the mid-80s, they began to produce IZH-Jupiter-5. They were widely known and very popular at that time. This model was reliable and comfortable, although the engine power was slightly reduced. In addition, this motorcycle had an emergency start button.
Assembling an all-terrain vehicle from IZH
There are no fundamental differences in the assembly of an IZh-based ATV from other models. Initially, you need to draw up a drawing or find it on the Internet. This will allow you to clearly understand the plan for future work. After all, to assemble an ATV you need to have the skills of a welder, turner and designer.
ATV frame
To make an ATV, the Izhov frame needs to be slightly altered. To do this, you need to move the drains under the saddle by 4 cm, and remove the rear ones altogether. Then bevels should be made from them. You also need to get rid of the rear fork. The most important point in assembling an ATV is installing the engine on the frame. After connecting the internal combustion engine, you should combine its shaft and the rear axle gear using a chain drive. Then you need to bring the power unit control unit to the steering wheel. Then proceed to install the pedals and levers on the frame.
ATV suspension
After this, you can begin to install the pendants. For it they use parts from VAZ or Oka. It is recommended to use used parts, as they will not be very rigid. The body kit can be taken from old cars or Izha. Many people like steering wheel controls from a car rather than a motorcycle. In this case, you need to purchase a mechanism for this.
Steering
If the ATV will be controlled by the steering wheel of a motorcycle, then for these purposes you can use parts from that Izh. The main point in any vehicle is the braking system. You can take it from your car - it will be more reliable. Wheels of different sizes will help improve the aesthetic appearance. To make the wings and skin of the ATV, you can use rolled sheets, which can later be painted.
Characteristics
Gasoline consumption and overall dimensions of the ATV depend on the selected donor model. Approximately the all-terrain vehicle converted from Izh will be 168 cm long, 1.03 cm high and 1.1 cm wide. The curb weight is approximately 190 kilograms, and fuel consumption ranges from 4 to 7 liters per 100 kilometers.
Source: www.vsedelkin.ru
DIY ATV: 6 assembly options, detailed instructions + video
How to make an ATV with your own hands is a difficult and responsible task, but feasible for a master who has mastered welding and turning. The effort and time spent are paid off not only by large savings, but also by the result obtained - an exclusive, original model of a quadric that no one else has.
Features of assembling a homemade vehicle highly depend on the chosen base - the engine and other elements that are used by the craftsman.
6 best options for a base (“donor”) for those who have set the goal of how to make an ATV.
- Motorcycle "Ural".
- Motorcycle "Izh".
- Motor scooter "Ant".
- Another motor scooter (scooter).
- Car "Niva".
- Oka car.
Most often, some structural elements are taken from a motorcycle, others from a car.
In addition to the parts (components) for the quadric, its creator will need:
- assembly “shop” - a fairly spacious garage equipped with good heating and lighting will be useful in this capacity;
- a set of equipment and tools;
- blueprints.
Preparation for work, tools and equipment
First of all, you need to carefully consider when, where and for what purposes the future ATV will be used - hunting and fishing, motorcycling in nature, transporting goods, etc. It is on this basis that you need to make a choice of a “donor” vehicle, deciding how powerful the engine is needed, what kind of suspension is suitable, what kind of trunk, etc.
- You can take ready-made drawings from the Internet, create them from scratch yourself, or combine both options and ready to remake them at your own discretion.
- List of required tools:
- welding machine;
- Bulgarian;
- drill;
- a set of keys;
- various small tools - calipers, hammer, knife, screwdrivers, pliers, etc.
To make your own frame, you will also need equipment for bending pipes. If you don’t have one, you can rent it or outsource the necessary work to another craftsman. Only with remarkable skill can you bend the pipes manually by heating the bend with a gas cutter or torch.
Quad components:
- engine;
- frame;
- rear and front suspension;
- steering;
- brake system;
- cooling system;
- muffler;
- electrical equipment - battery, headlights;
- body, body kit
It is strongly recommended to purchase a brake system either completely new or from a vehicle with the shortest mileage. Using old brakes is too dangerous.
It is quite possible to make a muffler yourself. Everything else is to purchase used parts on the shadow market.
Parts selection
ATV frame
Depending on the “donor” and the design of the quad, you either have to make the frame yourself, or you can reconstruct a finished, used one.
The most important thing is that the engine is securely bolted to the bottom along the frame, which can be located either front or rear. The transmission and drive should also be firmly attached to the frame to avoid play.
Homemade frame
The material used is ordinary water and gas pipes with a wall thickness of no more than 3 mm:
- for spars - 25 mm;
- for crossbars and struts - 20 mm.
The pipes are connected using spot welding, followed by solid welding. Ears for attaching shock absorbers and levers are welded to the frame immediately. Brackets - during installation of units and components.
Reconstruction of an existing frame
To reconstruct a finished frame, you should remove everything, leaving the frame, dismantle the back part and build up the front. Then weld elements for fastening a complete set of components and assemblies of the ATV. When reconstructing a motorcycle frame, the seatposts should be moved back by 40 - 45 cm.
The front and rear luggage racks are cut out of a metal sheet and welded to the frame. Finally, the finished frame is painted; there is no need to varnish it.
Engine
The engine is suitable for a car, motorcycle or scooter. Some “Lefties” even construct an ATV from a walk-behind tractor with their own hands, since newer models are equipped with four-stroke engines, the power of which in heavy devices reaches 15 “horses” - versus 11 hp. "Ant."
The engine of a scooter has the advantage of low fuel consumption; in addition, the scooter-based quad is the lightest, which makes it easy to pull it out when stuck in mud and sand. But a quad to transport cargo and/or drive off-road requires a more powerful engine.
The engine power of the Izh-1, Izh-2 and Izh Jupiter is 24 hp, the old Ural is 32 or 36 hp, the two-cylinder engine of the old Oka is 35 hp. , a three-cylinder car of a later release - 53.
To travel in hot weather, the ATV needs a cooled engine. Cooling was not installed on older motorcycles, so you will have to pick it up (for example, from a VAZ 2108 will do) and install it.
The suspension can be used both rear and front. The easiest way is to take the front one from a motorcycle.
2 rear suspension options:
- The rear axle of the car, shortened to fit the dimensions of a quad. The advantage is the presence of a differential. Disadvantage - the design will be heavier.
- Cardan-gear design - with a gearbox mounted on the rear axle.
- Please note: the quad all-terrain vehicle requires an independent suspension with high ground clearance.
- The suspension arms are bolted to the frame through rubber-metal hinges - silent blocks.
- The front suspension strut must be tilted, otherwise the ATV may roll over.
- The shock absorbers are suitable from Izha, but if the budget allows you to purchase gas-oil shock absorbers with pumping, the driver will be able to adjust the suspension according to road conditions.
Steering and chassis
The steering system of an ATV can be based on a car - with a steering wheel, or with a motorcycle steering wheel. Some craftsmen combine both types: motorcycle handlebars, levers and shafts at the top, car tie rods at the bottom. It is advisable to take the fuel tank along with the motorcycle handlebars.
Do-it-yourself ATV - we sort out all the difficulties when creating an all-terrain vehicle
Unfortunately, not every person has the opportunity to purchase an ATV in a store. All more or less interesting models are now quite expensive, and buying a used ATV is always a certain risk. In this regard, many motorcyclists advise making a four-wheeled all-terrain vehicle with their own hands, using an engine and spare parts from some old Soviet motorcycle. Earlier, we already told you about how to make an ATV from a Ural motorcycle. In today's article, we will talk about other donors that can be used if you decide to assemble an ATV with your own hands.
ATVs designed on the basis of the Ant scooter
For 36 years, the Soviets organized the production of Ant motor scooters. In total, over the years, 8 models have been produced, differing in gas tank volume and engine power. Today, the Ant scooter is an ideal base for creating an ATV with your own hands. In order to convert the “Ant” into an ATV, you should perform some fairly simple steps: slightly redesign the frame, work on reinstalling the seatposts, and so on. Installing the steering wheel and brakes of the future ATV will require special attention, continuous effort and time. When constructing homemade ATVs, it is strictly not recommended to use a brake system that has previously been used. It would be much safer to buy a new one. At the same time, the steering system can be used from an old Ant scooter or an Oka car. The final stage of creating an ATV from an Ant scooter is installing turn signals, headlights and stops.
Why is it worth assembling an ATV with your own hands?
Assembling a four-wheeled all-terrain vehicle by yourself definitely helps solve several problems. The first reason why people decide to make a homemade ATV is, of course, a small budget. If you analyze the market prices for ATVs, you can understand that such vehicles can be considered almost a luxury. Prices for the simplest and lowest-power models start from 150 thousand rubles, for example, Yamaha Blaster YFS200. In principle, such a single-seat “quad” will be enough, but the power will always be in short supply.
But ATV models with engines with a volume of 500-800 cm 3 will cost much more, approximately 500 thousand rubles. You can also consider Chinese models, such as the Russian manufacturer Stels, but you will have to carefully monitor them. New all-terrain vehicles of this brand will cost approximately 300-400 thousand rubles, but the engines are much more interesting - 45-70 hp.
Nuances when operating a homemade “quad”
If you definitely decide to make an ATV with your own hands, then you should know about the intricacies of its operation. In principle, if you need an all-terrain vehicle for driving in impassable places where patrol cars have never been, then there’s probably nothing to worry about. You will have to face problems if you plan to drive even through small settlements, which are sometimes visited by patrol cars. If they catch you without documents for this vehicle, then with a 99% probability they will take it away from you. The whole difficulty lies in registering a homemade ATV, because the traffic police will most likely refuse you. In a good way, it is possible to register a homemade product, but it is extremely difficult to do. Therefore, assembling a homemade ATV only makes sense if you operate it in some wilderness.
Description of the vehicle
A modern ATV is equipped with four or six small wheels, but with increased maneuverability. The main technical characteristics include: light weight, all-wheel drive and low gear. Due to the unique configuration, the vehicle can easily travel on country roads. It can be used in summer and winter.
Read also: Ten most beautiful states in the USA
To make a homemade ATV, it is recommended to decide on its type:
- Utilitarian. The model has a lot of weight and good maneuverability. The vehicle easily carries several people and accelerates to 90 km/h.
- Stunt. Equipped with a narrow platform and radiator. The car weighs little and can accelerate to 137 km/h.
Vehicle assembly is carried out taking into account technical characteristics, equipment, and operating conditions. To perform independent work, you will need to have skills in working with a welding machine and a lathe. To build a car, you will need a spacious garage. Taking into account suitable parameters, a do-it-yourself drawing of an ATV is prepared.
Making a choice
So, how to make an ATV with your own hands? When creating a homemade ATV, we need to decide on the donor, that is, the motorcycle that will form the basis of our project. Old Soviet motorcycles are perfect for a four-wheeled all-terrain vehicle. From them we can borrow an engine with a gearbox, a frame, a steering wheel and, if desired, such parts as a tank, a seat and other elements. Since we already had an article about a homemade ATV from a Ural motorcycle, in this review we will talk about how to make an ATV based on an IZH motorcycle.
For our purpose, almost all models of motorcycles from the Izhevsk plant are suitable for us. The only thing that is important to understand is the engine power. Still, the end result will be a rather heavy structure, so the best solution would be to use the latest models - IZH Jupiter 5 or IZH Planet 5. There is no point in considering more interesting models, like IZH Planet Sport, because it is quite difficult to find them, and even if it is possible , then it’s better to restore them, because the motorcycle is quite rare and interesting. Let's move on to the main thing, how to make an ATV and what you need for this.
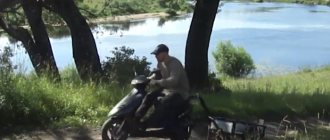
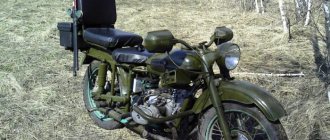
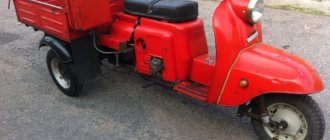
Homemade swamp tricycle on IZh Planet
The design of this homemade swamp vehicle is so simple that almost any car enthusiast can repeat it in his own garage. The basis of the swamp vehicle is the IZH Planet 3 motorcycle. IZH Planet motorcycles often become donors in all-terrain homemade vehicles, this is primarily due to the endurance and unpretentiousness of their engines. The bridge was taken from a Muscovite and modernized. We cut out the bearing mounts from the doll with a grinder, then welded the yoke to the bridge stocking (if it is not welded, the stocking will warp when you cut it in half), then cut the stocking itself in order to secure the sprocket. The chain tensioner was also borrowed from the combine.
Read also: The highest mountain in South America
The KF-97 cameras are used from the agricultural trailer of the T-150 tractor. The tire for such a tube wheel is the same tube, only cut to a smaller diameter. First, the “tire” is put on, then it is tightened with belts. The transverse harnesses turned out to be 1.02 m long, and the longitudinal strip was 3.5 m long. The width of the longitudinal strip is 30 centimeters. The transverse belts with the longitudinal strip are connected using bolts.
The basis was taken from cornfield disks, cut in half using a small grinder and extended by 30 centimeters with steel plates welded between the disk halves (6 plates in total). The disc is covered with a chamber from a VAZ car, cut to a larger diameter. Since the disks were used from a Niva, and the axle from a Muscovite, the rear disks at the mounting points had to be trimmed.
Frame, brakes and transmission
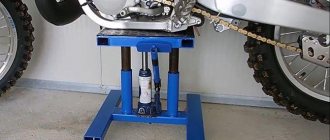
The motorcycle frame has been lengthened and strengthened. To prevent the pendulum fork from “walking”, it was welded. The chain and sprockets are borrowed from the combine. Their ratio is 2 to 1. A small star with 25 teeth, it is attached to the drum using eight hardened 10-point bolts. A large star with 50 teeth. The braking system of a swamp vehicle is no different from any other, so the brakes are left unchanged. But the drum was modernized to accommodate sprocket mounts.
Rear suspension
Once you have decided on the donor, in our case it is IZH Jupiter 5, you need to completely disassemble the motorcycle. After disassembly, we will need a frame on which everything was supported, including the engine. It is logical that to increase the reliability of the structure, the frame needs to be strengthened in several places.
Now it is necessary to weld the rear axle so that instead of a wheel, a block of bearings with a chain drive can be installed on the axle. You can see an example in the photo. As a suspension, you can use ordinary shock absorbers from a motorcycle, and for the rear axle, parts from an old Lada car are suitable. You can take a more complicated route and install a monoshock absorber, but then again you will have to look for spare parts from a car, for example, from the same Zhiguli or Oka.
Front suspension
Once the rear suspension is finished and installed, you can move on to the front part of the bike, where things get a little more complicated. In the case where we were dealing with the rear suspension, we had the opportunity to choose how much shock absorber was installed. When creating the front suspension, we have only one option - to use two shock absorbers.
Oka's car is perfect as a donor for the front part of the ATV. From it we will need shock absorbers, swivel units and a steering linkage. However, be prepared for the fact that spare parts will still have to be changed - something must be welded, sawed off, or filed. Also a good and simpler option would be to install a monoblock with fixed wheel planes. Then you won’t have to look for a steering linkage, couplings, hinges and other spare parts.
A monoblock is a really simple option, because installation will take literally an hour of time. The only disadvantage of this front suspension design is the heavier mechanism. Turning the steering wheel will be somewhat more difficult than with a suspension with shock absorbers.
Engine
Many people wondering how to make an ATV with their own hands understand that they should start with the engine. Indeed, the main part in the future ATV is the engine. The final result, and indeed the entire design in general, depends on how powerful it is. Of course, you can keep the engine from the donor’s motorcycle, but in the end the “quad” will not be as powerful. If we take the creation of an all-terrain vehicle a little more seriously, then installing a more powerful engine would be an excellent solution. We hope that we have answered your question about how to make an ATV yourself.
Source: avtomoto-best.ru
Selection of main parts
The next step will be to select the necessary parts first, namely:
- engine
- wheels
- shock absorbers
- frames
- rear axle
If you want to build a simple lightweight quad with drive only to the rear axle, then it is preferable to choose an engine from a medium-sized motorcycle, from 250 cc and above. Depending on the construction budget, it can be almost any engine from a Soviet motorcycle, preferably with a chain drive, which makes it quite easy to drive the rear axle. The axle can be made from a pipe made of structural steel. In the center, weld flanges for attaching the driven star and disc brake, and install wheel bearings from the car on the sides, having previously pressed them into pre-made housings.