These designs are similar to both cool motorcycles and their “big brothers”, but longer. You can buy them in a store or make a bicycle with your own hands.
{ ArticleToC: enabled=yes }
From motorcycles they took a long frame and fork, and a large steering wheel. Thanks to the unique design, the center of gravity was shifted, making the vehicle more rolling. Thanks to this, the chopper can easily ride even on bumpy asphalt.
Advantages
In Russia they have been gaining popularity in recent years.
Additional advantages include the following:
- exquisite appearance;
- unique style;
- high comfort;
- wide tires, allowing you not to feel the unevenness of the surface;
- the possibility of electrification and turning it into a bicycle moto;
- available tuning;
- an unforgettable driving experience.
On the website https://megavel.ru/category/velosipedy-choppery/ you can get acquainted with the models and the price, which cannot be called low. How to be? You can do it yourself, and for reasonable money.
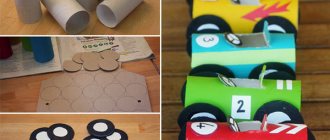
If you strictly follow the instructions below, which use parts from old bicycles and scrap materials, it is quite possible to make a vehicle with your own hands. It will turn out no worse than what the retail chain offers.
An old women's bike from the Wisp Raleigh brand is suitable for making a chopper, which will turn into a wonderful cruiser.
What will you need to build a chopper from the Urals?
Many bikers who have ever thought about building a custom motorcycle have never even tried to get started. The thought that this requires a good understanding of technology, and the whole process is very complicated, completely discourages the desire to create the motorcycle of your dreams. This is completely the wrong approach. In fact, as soon as you start making your first chopper from the Urals, you will realize that everything is actually very simple and you were worrying in vain.
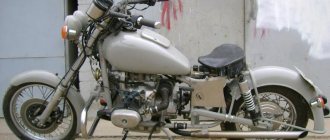
So, in order to make a real chopper out of a Ural motorcycle, we don’t need much. First of all, of course, you need a donor if you don’t already have one. If you are just planning to purchase a Ural motorcycle, then it is better to immediately look for a working bike so as not to waste time. Here it’s worth saying right away why we choose the Ural and not another motorcycle.
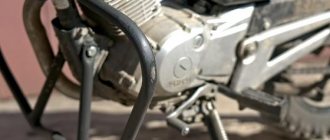
Firstly, the Ural is equipped with a fairly powerful engine, which is very similar to the displacement engines of chopper motorcycles. And secondly, the Ural motorcycle has everything we need to build a chopper. Otherwise, apart from spare parts from an old VAZ or ZAZ, we will need practically nothing.
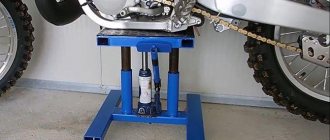
Required materials and tools
So, in order to make a chopper with your own hands, you need:
- welding machine, type Clarke 105EN;
- donor bike;
- durable steel pipes for making forks and extending the frame. The diameters of the pipes for the frame are selected so that two pipes of different diameters can be welded (this is simpler and more reliable than welded pipes of the same diameter),
- sheet steel 1.4 mm thick for hopper plates;
- 2 new chains that will be required for the enlarged frame. They need to be connected together;
- pipe bending machine. It is needed so as not to cut the elongated pipes at an angle, but to bend them, significantly changing the angles of the frame.
When you have prepared the materials and tools, you can start making a bicycle with your own hands, turning an ordinary model into a chopper.
Fork manufacturing sequence
Step 1: Which model to choose?
The Raleigh Wisp racing bike, taken as a basis, has an unusually shaped frame: the top tube goes from above to the rear hub, which is just to our advantage. It is advisable to preserve this feature. The seat can be installed on a double top tube.
You need to start making a structure with your own hands with a fork.
Step 2: Chopper Fork
First you need to choose the right one.
We start making a bicycle with our own hands by dismantling the old one, for which:
- remove the steering wheel with stem, steering column and unscrew the fork;
- We position the bike in such a way that the steering column is at the optimal height while riding, without worrying about the angles - they are not taken into account at this stage (see picture above). We measure the required length of the fork, i.e. the distance between the front wheel axle and the top of the steering column. Approximately this is 122 cm. The size is decent, but this is for a chopper - a long bicycle! We select a steel pipe, 2-2.5 meters long;
- We cut the pipe in half using an angle grinder, grind the ends on the grinder and place the pipes vertically.
Step 3: Fork Dropouts
For now, the fork consists of two pipes. In order for it to take on a normal appearance that allows you to install a seat, you will need two strong dropouts.
To make them with our own hands, we stocked up on sheet steel. The thickness of the plates should be approximately 3 mm.
The photo shows how the dropouts from a bicycle fork need to be applied to a steel plate to outline the outline for further fabrication. The blanks are cut from steel using an angle grinder.
The required accuracy should not be expected. Therefore, after the workpieces are cut out, they are brought to the desired size, clamped in a vice.
The edge must be processed carefully, since the contact between the surface and the wheel depends on this.
Next, in order to cut two completely identical sockets for the bushing axles, the two parts are clamped together in a vice. The tool used to do this is a grinding machine.
The nest is cut out carefully so that it is not large and this does not lead to the wheel popping out. The axle should sit tightly in the socket. Do not allow any play (pic below)!
When the dropout blanks are ready, they are welded to the fork using a magnetic holder.
Important: the dropouts do not need to be placed in the center of the pipe - they should be welded closer to the edge so that the spokes do not rub against the pipe.
At first, it is better to simply “grab” the dropouts by welding, and weld them securely after making sure that everything is installed correctly. At this stage, the time spent earlier on processing the edges pays off handsomely.
Step 4: make the top for the fork
For now, the future fork consists of two pipes to which dropouts are welded. This means it’s time to cut a thread on the top, which will require nuts with washers and M10 bolts. In any store such a kit is cheap.
You need to assemble the structure with your own hands, as shown in the figure, by welding each of the faces of the nut to the washer.
The bolt is no longer needed, so it can be unscrewed.
It’s time to weld the washer with the welded nut to the pipe (future fork)
Step 5: DIY chopper fork assembly
At this stage there are two pipes, to which dropouts are soldered on one side and nuts on the other. To further make the fork with our own hands, we cut off the old “leg” and make the base as flat as possible. We use cardboard as a template, on which we draw a semicircle around the pipe of the new fork.
Using an angle grinder, we cut out the crown for the new fork according to the template. We do this very carefully so that the shape is as correct as possible.
To determine the width of the fork, you need to attach a wheel to the dropouts. Having placed the rod with the crown between the pipes (it should stand level if everything is done accurately), we cut out three holes from another cardboard into which the pipes will go.
We recommend:
- Proper mountain bike position
- The benefits of exercising on an exercise bike
- Benefits of riding an exercise bike and cycling
We will use this template with three holes to make the base and top plates, after cutting the cardboard and giving it an aesthetic shape.
We start making a base plate with our own hands by cutting it out of a 1.4 mm thick steel sheet according to a template. On the steel we mark two holes for the fork legs and cut the sheet as in the photo.
After this, we weld the finished base plate to the fork crown. It is important to do everything carefully, avoiding contact with molten metal on the bearing race.
Now you need to make a stem, for which you can cut off the upper part of the existing stem or do everything from scratch if you have a steel pipe that fits the inner diameter of the fork stem. To do this, the pipe is cut at an angle of 45 degrees using the same angle grinder.
Now the pipe is shortened so that it fits the wedge and rod bolt. This completes the production of the takeaway. If you are using an existing stem, skip this step.
After the new stem is placed on the fork stem, place the stem and crown between the fork legs again, having someone hold it all down, or securing the assembly with a belt. It is important that the top nuts are located one inch below the top of the fork. If everything is centered, the plate needs to be welded to the fork.
Step 6: Second stage of making the fork
We have two pipes that are welded to the crown and stem, which means it's time to connect everything together. This requires a top plate. It is done by analogy with the basic one and the existing cardboard template. We mark on the sheet of steel the centers of the stem bolt and two legs. If bolts with a diameter of 10 mm are used, then a 15 mm drill will be needed to drill a hole in the center of the fork, since washers will be used during assembly.
The top plate is ready and needs to be bolted to the top of the fork.
The bolt retaining clamp will be discussed below. The fork is ready.
A wheel is attached to it and installed on the chopper, as shown above.
Now, to make riding comfortable, you need to upgrade the frame. And this is the next step.
MOTORCYCLE PHYSIOLOGY: METAL FRAMEWORK
Like toys on a Christmas tree, all the components and assemblies of a motorcycle are strung on a single base - the frame. The load-bearing function is the main one, but not the only one. The frame sets the geometric characteristics of the motorcycle, ensuring parallel movement of the wheels (not only statically, but also dynamically, due to its rigidity, resisting attempts to lead the wheels “astray”), setting the angle of the steering column (a parameter that directly affects handling - see "Moto", 2002, No. 3, p. 42). Since the design of the frame determines the layout of the machine, it directly affects the location of the center of gravity and center of mass.
It is clear that such an important component appeared simultaneously with the birth of the motorcycle. In fact, even earlier, since the bicycle served as the model for the chassis of the first motorcycle crews. An unexpected exception is the very first motorcycle in the world with an internal combustion engine - Gottlieb Daimler's Reitwagen, built in 1885. Even his contemporaries were shocked by the extremely archaic design of the wooden (!) chassis, copied not even from bicycles, but from their ancestors - scooter runners of the early 19th century. The current engineer is shocked by something else. The configuration of this frame is the same as that of modern sportbikes: two powerful elements running diagonally from the steering column to the rear wheel and covering all the most important components of the motorcycle.
But this is only an exception, and it is caused by the fact that Herr Daimler was not at all interested in the development of bicycle technology. The overwhelming majority of motorcycle creators of the late 19th and early 20th centuries quite adequately accepted both the bicycle frame design and the method of its manufacture (not by the usual electric welding, but by soldering). What attracted them? Firstly, proven production technology. Secondly, this classic design, formed by two tubular triangles, successfully combines low mass with high rigidity (flexural, but not torsional).
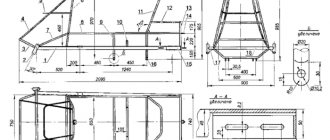
Frame making
Step 7: First Stage
To cut the frame, it must be turned over and secured.
After some actions, the carriage became closer to the front of the bike. Now the frame needs to be lengthened.
We set aside the double top tube, which will look good on a chopper.
It is better to make a mock-up of the future frame before starting assembly in order to correctly place the wheels and determine the desired height of the frame. To do this, it is enough to support the carriage and lengthen the frame using thin pipes.
In the variant under consideration, the top tube turned out to be located a little low, so it had to be bent so that the saddle was at the required height. This must be done carefully so as not to break the pipe.
Well, if this happens, welding will help correct the situation.
If the design is satisfactory, you can move on to the next step, in which the frame is lengthened using steel pipes placed in the gap between the carriage and the two pipes running from the seat tube down.
This is where you will need a model to measure the length of two pipes. Because the angle of the down tube changed, it was necessary to make a bend near the bottom bracket. A pipe bender was used for this.
For now, the seat tube remains dangling, not secured to anything, so that’s what needs to be addressed.
We will again use the cardboard as a template to make another plate of sheet steel, which will be welded to the top of the horizontal pipes under the seat tube.
So the strength of the connection between the new two pipes and the rear ones will be increased. After this, the seat tube is welded to the plate.
The top tube was left dangling.
Another plate made of steel, and a socket made with a grinder in the seat tube, into which it must be inserted and welded, thus increasing the strength of the connection and reducing the load on the weld.
All that remains is to weld the two upper pipes to the steel plate, and they will stop hanging around.
Step 8: Stage two of making the frame
All that remains is to strengthen the frame structure. This can be done using another steel pipe, welding it between the carriage and the top pipe. This makes it possible to change the location of the seat tube, which is currently directed towards the rear of the frame.
Again, using the template, we make a plate and weld it to our pipe: lightly at first, and after selecting the angle, finally. The pipe should not touch the carriage axle. It should not go deep into the carriage.
This is what a finished frame looks like, made in-house for a chopper.
Step 9: How to make a saddle for a chopper?
A plank structure is suitable. In order to make it soft, we use foam material, and for aesthetics we use leather.
The two boards are fastened together using bolts. In the bottom you need to drill two holes through which the seat will be attached to the plate. It must be securely fixed using bolts and nuts.
A construction stapler will help secure the upholstery material with staples.
The leather is also stapled to the seat.
The procedure for making the steering wheel
Step 10: Handlebar for a Homemade Chopper
There are three ways to install it:
- install the old one. But it may not fit the configuration (ram's horns, for example);
- do it yourself if there are steel pipes left. You can bend it with a pipe bender or cut it and weld it into the desired shape;
- choose one that suits the shape.
But first you need to make or select a donor lock. If one is found, mounting is not difficult.
This is shown in the photo.
Finally, you need to install the fastening clamps on the previously made top plate.
Weld them to the plate.
Also weld the clamp and insert the steering wheel into the mount. The steering wheel mount is adjustable.
What types of chopper bikes can you find?
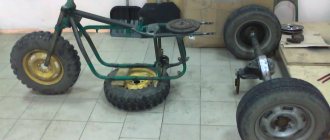
Bicycle choppers differ in several ways. They are divided according to the number of wheels:
- two-wheeled;
- three-wheeled.
Three-wheeled choppers are more popular among children and teenagers. But there are also adults on such a bike. Often a storage basket is mounted above the rear axle.
As a rule, a bicycle chopper is single-speed, but the possibilities expand with the installation of a planetary hub or disc brakes. Then the bike chopper can have up to 14 speeds.
By type of drive there are:
- foot;
- electric.
With the installation of an electric motor on a bicycle chopper, life is transformed:
- you can ride without straining;
- no harmful emissions;
- inexpensive cost of battery charging;
- when the battery is discharged on the road, you can use the pedals;
- works quietly, no smell;
- The electric drive is lightweight and can be installed independently.
Reliable brakes
Step 11: Brake System
If you planned to use wheels from a donor bike, there may not be any problems. If the wheels, for some reason, are not satisfactory, and you want to replace them with more stable ones, for example, you need a different suspension.
When carrying out welding work, be sure to cover the tire with a damp cloth to avoid damaging it.
It is important to calculate exactly where the caliper brake will be located, weld the plate onto the rear triangle seatstays, checking that the mounting hole is located in the center.
Before cooking completely, check the operation of the clamp brake again.
This is what it should look like. The brake lever will work just fine from an old bicycle.
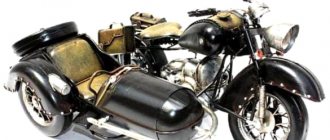
Optimal models for beginners
Virago
The chopper with a 400 cc air-cooled V-twin engine, cardan and 2 carburetors is very simple in design and easy to control due to its low weight. This is also facilitated by a low center of gravity, a relatively narrow rear wheel, and a short wheelbase. A reserve tank under the saddle helps lower the center of gravity.
Savage
Single-cylinder, air-cooled, the bike is flexible and light in weight. The 400 cc model is chain driven, the 600 cc model is belt driven.
Assembly and testing
Step 12: Final Assembly and Testing
The difficult but interesting work of making a chopper has come to an end. All that remains is to carry out tests. It’s easier to convert the bike into a single-speed one, for which you will need to buy a single-speed adapter.
They can easily replace the old gear system. It was already mentioned at the beginning that a chopper bicycle is much longer than a regular bicycle, so you will need two chains. They are connected together.
Step 13: Completing the Assembly
A self-made bicycle is disassembled to remove welding spatter, and the fork and frame are painted in the preferred color. Bearing rings must be protected from paint during work, like other threaded connections.
It is more correct to apply the paint in a thin layer - this way you will make the paint even, without drips. It is better to then apply a second coat of paint.
Step 14: Possible Design Changes
If the model gets bored, you can disassemble it and make changes to the design, cutting off, for example, the back part.
Step 15: Align the Back
Then take the rear end of a small mountain bike.
Here again you need an angle grinder to sand down the extra parts of the frame.
Step 16: Correctly installing the extension lower pipes
Two pipes are cut so that they can be welded to the frame, lengthening the latter.
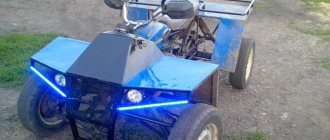
: Homemade chopper is ready
I welded two more long pipes on top. Then I painted and assembled the bike.
The rear wheel now has a coaster brake so I no longer need the old rear brake, cables and levers.
I hope you found this DIY chopper assembly tutorial helpful!