It may seem that making an ATV from the Ural is quite difficult, but it is not so. You will need to prepare the necessary parts and tools, and also review the assembly instructions. From one old but working motorcycle you can make a universal four-wheeler, which will be used both for off-road driving and on the farm.
It is worth noting that it is quite difficult to assemble a 4x4 Ural ATV with your own hands. To work it out efficiently, you will need to seek help from a team of professionals: you will need a turner, an electrician and a welder. Making the front suspension independent is more expedient than assembling a homemade 4x4 ATV from a Ural. Otherwise, control may be difficult. The fact is that to provide all-wheel drive, it will be necessary to supplement the system with a gearbox, which will lead to an increase in the weight of the ATV. To assemble a rear-wheel drive structure, you need to prepare the following:
- Work motorcycle "Ural".
- Steering rod of transverse type.
- One pair of front hubs from a rear wheel drive vehicle.
- Front suspension arms.
- Axle shaft or driveshaft.
- Thick-walled light alloy pipe.
- Rear axle.
It is worth noting that the rear axle and front hubs must be taken from the same car. This will avoid the procedure of adjusting the disks to the fixing holes. It is recommended to take these parts from Moskvich or VAZ. The work will require a set of hand tools, as well as an angle grinder and a welding machine.
How to make an ATV from a Ural motorcycle?
At the first stage of creating an all-terrain vehicle, you need to make a suspension. First, the old vehicle will need to be disassembled. The frame of the device must be freed from all elements; the technician needs to remove the shock absorbers and steering wheel. It is advisable to determine in advance what type of suspension will be installed for an all-terrain vehicle from the Urals, for example:
- Suspension on springs.
- Rigid design without shock absorber.
- Suspension with shock absorbers on springs.
Of course, it is best to go with a suspension with spring shock absorbers. They can be taken from an old motorcycle. Since the device will have 4 wheels, the missing mechanisms will have to be purchased. The pendant in this case will have the shape of the letter “A”. You need to correctly calculate the weight of the future ATV. In this case, shock absorbers will ensure a smooth ride when driving on hard off-road.
Illuminations
Illumination is also selected according to your taste. Of the headlights, many recommend installing fog lights, which will serve as low and high beams. Turn signals and brake lights are standard. But you shouldn’t be too zealous - this optics should not spoil the appearance of the vehicle, but, on the contrary, emphasize it. At this stage, the question of how to make an ATV from a Ural motorcycle with your own hands can be considered closed. Immediately after painting and installing optics, it can go for its first test drive.
So, we found out how to make an ATV from the Ural with our own hands, as well as what spare parts are required for this.
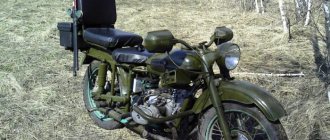
Motorcycles produced back in the Soviet era are already considered a rarity. It is unlikely that he will be able to interest any of them as a vehicle. A museum piece, nothing more! Such equipment is sold very cheaply, a little more expensive than scrap metal. Despite the fact that the old “horse” has already served its purpose, it’s time, as they say, to retire, but I don’t want to part with it. Common situation? Often such a vehicle does not have documents, you cannot go far from home in it - troubles from the police are guaranteed.
Not everyone will think that an old Ural motorcycle, gathering dust idle in the garage, can be turned into a practical unit. Such a homemade product from the Urals does not require huge financial investments, but a certain amount of patience and a few hours of free time will be very useful.
Frame
The frame for the all-terrain vehicle will have to be made from scratch. It is assembled from metal pipes, which must be both strong and lightweight. Some blanks can be taken from the Ural. Its frame is suitable for such purposes, since the weight of the structure is low. At the same time, the pipes taken from the motorcycle are characterized by good flexibility and strength.
But to assemble the frame, it is still recommended to take some more material. Such pipes should not be too thick. Otherwise, the motorcycle will turn out to be heavy, devoid of maneuverability and dynamism.
Painting
Once the technical part of the ATV is ready for use, it’s time to think about painting and illumination. As for the first point, the converted Ural will look great in the khaki style, but it is very difficult to do such a color with your own hands. Therefore, we select the color that best matches the given one. For example, ATVs painted metallic green look very nice. In general, you can choose the style and shade of the cladding parts without any criteria. Before painting, do not forget to cover the Ural with a metal profile for a more natural look.
Engines and transmission
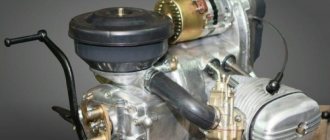
The Ural motor is most often used to create homemade ATVs. This engine is quite powerful and durable, which provides the motorcycle with high functionality. Such an ATV can be used both for off-road driving and for economic purposes.
It is worth noting that the Ural engine is quite powerful. This is a four-stroke two-cylinder engine with a volume of 750 cm³ and a power of 41 hp. With.
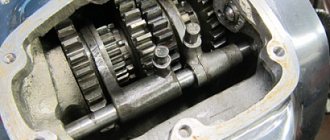
During assembly, it is recommended to use not only the engine from the Ural motorcycle, but also its transmission. In this case, the system will work smoothly. The presented motorcycle has a 4-speed gearbox and reverse gear. The standard equipment also includes a cardan drive for the rear wheel.
Required parts and tools
In today's article we will analyze the process of manufacturing a rear-wheel drive ATV, since this option is the simplest. For work we will need:
- Motorcycle Ural in working condition
- A pair of front hubs, exclusively from a rear-wheel drive vehicle
- Steering tie rod
- Front suspension arms
- Cardan shaft or axle shaft
- Rear axle
- Thick wall pipe
It’s worth saying right away that the front hubs and rear axle are best taken from the same car. In this case, you do not have to adjust the disks to the mounting holes. For an ATV from the Urals, hubs and axles from classic Zhiguli or Moskvich are perfect.
Also, in the process of making a homemade ATV from the Urals , you will need a lot of tools. Therefore, in addition to screwdrivers, wrenches and hammers, it is necessary to prepare a welding machine and an angle grinder.
Body and wiring
Attachments, a gas tank and other structural elements are attached to the assembled frame. Each node must be firmly fixed on the prepared platform. It is important that the vehicle remains stable after assembly.
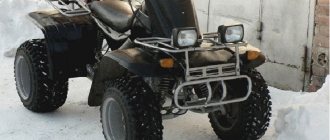
For many motorcycle owners, it is important that the appearance of the ATV is spectacular. Therefore, the design must be thought out in advance, before assembly begins. You will need to install a driver's seat and lighting fixtures. Turn signals and headlights are also removed from the donor motorcycle.
Homemade ATV
A quad bike is actually any four-wheeled vehicle, since in Latin “quadro” means “four”. In the CIS, this name most often means an all-wheel drive all-terrain vehicle, representing a symbiosis of a motorcycle and a car.
From a motorcycle, an ATV has adopted mobility, maneuverability, lightness, and speed, and from a car - excellent cross-country characteristics, power and controllability.
The result is a unique vehicle designed for a variety of purposes.
The domestic market provides only foreign models of ATVs, the cost of which is often exorbitant. At the same time, you can easily find used motorcycles and cars on the secondary transport market at an extremely low price.
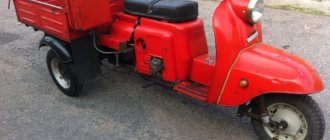
For example, the Ural motorcycle is large, bulky, heavy and power-hungry, has an excellent four-stroke engine with reverse gear and costs a penny. For this reason, it is much cheaper and more fun for enthusiasts to create their own designs of these SUVs.
A typical factory ATV - shiny, neatly built, strong and powerful.
Its homemade counterpart, which is slightly inferior in appearance, and even more so in terms of power.
How to make an ATV with your own hands
Before you start assembling, you need to make a detailed list of the units and parts that will be needed to create your own brainchild, develop a work plan and a design drawing.
Engine: the optimal choice
It is logical that first of all it is necessary to find the “heart” of the future “beast” - the power unit. Absolutely anything will do, from a regular walk-behind tractor to a six-liter V12 - there are such precedents. In most cases, motorcycle engines are used - they are economical and small-sized.
To use high gear ratios under normal operating conditions, a Minsk or Ural engine will be sufficient. In summer, the issue of overheating arises, so you should choose air-cooled models. Another good option is Soviet-made boxer engines, the undeniable advantage of which is powerful traction and a completely unpretentious driveline.
Suspensions: rear and front
There are two most common rear suspension solutions for ATVs.
- Gear-cardan system. The design turns out to be as lightweight and simple as possible, but there is no differential, which, in principle, can be sacrificed for the sake of the previously mentioned advantages.
- Using a road bridge. The design turns out to be extremely heavy, and if there is no desire to have an ATV with a car base, it is necessary to shorten the bridge, which is a very non-trivial task. The only advantage worth highlighting is the presence of a differential, which is useful when driving on highways.
There are huge possibilities for front suspension and steering. ATV suspension arms carry significantly less load than automobile ones; accordingly, they can be made independently, using available means. The best option is to create a suspension based on the existing Ural motorcycle.
Frame: drawings and alternatives
The best solution is a durable structure made of pipes or profiles welded together.
Ideally, remove the frame from the donor motorcycle and add the necessary elements - this eliminates a number of problems, but the design may turn out to be unnecessarily complex.
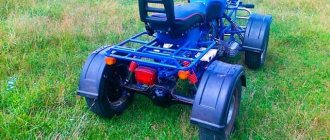
ATV assembly
Having prepared the necessary tools, donor vehicles and freed up time, you can begin to create your own ATV:
- We assemble the frame (frame). We connect the prepared metal beams, according to the drawing, to each other using spot welding. We check the structure and carry out full welding. Alternatively, you can simply remake the frame from the donor motorcycle - it will turn out no worse.
- We install the engine. It can be placed both at the rear and at the front - the main thing is to secure it firmly with bolts to the bottom of the frame.
- We mount the drive and transmission on the rear wheels. The drive does not need to be created independently - it is transferred together with the engine from the donor vehicle and installed on the frame. Again, it is necessary to properly secure the drive and transmission to the frame to prevent play.
- We also install the steering from the motorcycle. Along with the steering wheel, the fuel tank also “migrates” to the ATV. In general, if you imagine the design, it will look like this: 3/4 of the ATV is the same Ural or another motorcycle, 1/4 is a homemade frame and suspension.
- We install wheels from a small-sized vehicle (“Oka” or “ZAZ-968”). The rear wheels can go to the ATV together with the rear axle of the car, or they can be attached as follows: we take ready-made axles with disks, after which we attach a gearbox to the rear one for drive. and we install wheels on the rims, which can even be with low-pressure tires.
- We assemble a single drive with a gearbox on the rear axle and an engine (again, it will be easier if it is completely rearranged from the donor vehicle). We do this as follows: we stretch the chain from the engine to the gearbox and secure it, after which we check the functionality. Ultimately, we fix the entire structure on the frame.
- The front suspension is independent - this is more profitable in terms of time and money, since an all-wheel drive ATV requires significant modification of this unit by a professional turner, welder and electrician, which will take a lot of time. As an option, we purchase ready-made factory components for ATVs.
Advantages and disadvantages
The sample, already assembled by the engineers of the Irbit Motorcycle Plant, is equipped with an original variable gearbox with an increased gear ratio to increase traction, R12 wheels, which allow you to overcome serious obstacles - ruts, holes.
The tests were conducted by: Sergey Borisovich Motov, Yuri Grigorievich Kuzyavanov, Alexander Yurievich Tyulenev, Anatoly Mikhailovich Bekishev - all experienced drivers, specialists, who together tested the capabilities of motorcycles when climbing steep slopes with increasing loads.
This is how the degree of reliability of the technology, versatility and potential capabilities was determined.
We can talk about the following advantages of the Ural-IMZ ATV:
- increased cross-country ability;
- ease of climbing;
- compactness, versatility;
- Ease of Management;
- low fuel consumption.
If we talk about the disadvantages of an ATV, we can note the lack of protection for the driver from precipitation, wind and other natural phenomena. It is difficult to travel long distances using such equipment; in fact, it is not intended for this; also on public roads there are certain restrictions for drivers of a four-wheeled motorcycle car. In this case, the driver of the ATV must wear special equipment.
Parts selection
ATV frame
Depending on the “donor” and the design of the quad, you either have to make the frame yourself, or you can reconstruct a finished, used one.
The most important thing is that the engine is securely bolted to the bottom along the frame, which can be located either front or rear. The transmission and drive should also be firmly attached to the frame to avoid play.
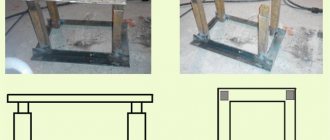
Homemade frame
The material used is ordinary water and gas pipes with a wall thickness of no more than 3 mm:
- for spars - 25 mm;
- for crossbars and struts - 20 mm.
The pipes are connected using spot welding, followed by solid welding. Ears for attaching shock absorbers and levers are welded to the frame immediately. Brackets - during installation of units and components.
Reconstruction of an existing frame
To reconstruct a finished frame, you should remove everything, leaving the frame, dismantle the back part and build up the front. Then weld elements for fastening a complete set of components and assemblies of the ATV. When reconstructing a motorcycle frame, the seatposts should be moved back by 40 - 45 cm.
The front and rear luggage racks are cut out of a metal sheet and welded to the frame. Finally, the finished frame is painted; there is no need to varnish it.
Additionally, we recommend reading our expert’s article on how to choose a roof rack for your car.