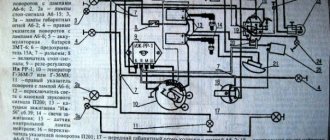
The wiring diagram of IZH Planet 5 has a simple design: a single-wire DC network is provided by a 12-volt battery, which is charged by a generator with a power of 100–140 watts. The role of the negative wire in the electrical circuit is played by the metal frame, and since the rest of the wiring has a positive charge, their short circuit is often the main cause of the malfunction.
Electrical equipment IZH Planet 5
Video: review of IZH Planet 5 wiring
Headlight and dashboard lamps
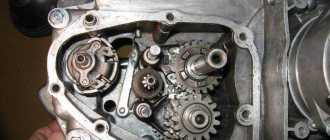
Wiring diagram IZH Planet 5
Explanations for the diagram
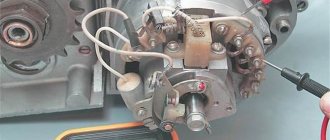
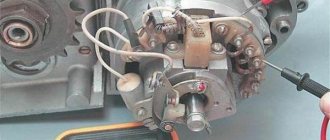
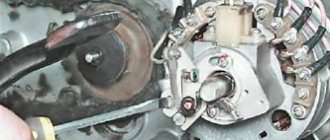
Self-check of the Planet 5 motorcycle generator in case of loss of charge
How to correctly set the gap between the contacts of the breaker?
Troubleshooting the audio signal and improving signal quality
Video: installation of electrical wiring on IZH Planet 5 with description
Comments and Reviews
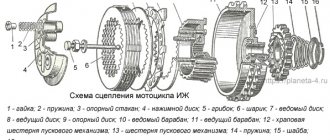
Assembly
In a carefully washed and prepared for assembly crankcase we place the input shaft, the first gear gear and the follower shaft with pre-selected shims.
We put a fork on the gear-carriage for engaging the second-fourth gear (it is smaller than the gear-carriage for engaging the third-first gear, you can’t go wrong) as shown in the picture. We put the gear on the input shaft and insert the fork pin into the upper groove of the follower shaft.
We put a fork on the gear-carriage for engaging the first-third gear, as shown in the picture, place it on the first gear gear and insert the fork pin into the lower groove of the copy shaft.
We install the fork guides in their places (with grooves towards the clutch basket). By the way, if necessary, the “Planetovskaya” gearbox can be assembled and disassembled without disassembling the clutch basket and without removing the guides. But to do this, during installation you will have to pull the tracing shaft towards you a little, insert the pins of the forks into the grooves and after that, remove the locking bar and push the tracing shaft all the way.
Install the intermediate shaft.
On older engines, the end gear is installed separately. On later ones, it is made integral with the intermediate shaft.
We fill the return spring of the gear shift shaft as shown in the picture.
We check the functionality of the gearshift shaft pawls: compress and unclench them several times
We pay special attention to their working edges: they should be sharp and not licked. And don’t forget to check the spring that compresses the pawls: it must be of the correct shape and ensure the elasticity of the pawls’ movement
We squeeze the pawls and install the gear shift shaft in its place.
We rotate the tracking shaft with the mark on the body towards the gear shift shaft and so as not to miss the mark during installation, we cover the gap between the teeth opposite the mark of the tracking shaft with lithol or paint it. It will be more noticeable this way.
We look for a mark on the sector and when putting the sector on the gear shift shaft, we combine the mark on the sector with the mark on the tracking shaft body: the tooth opposite the sector marks should strictly fit between the teeth opposite the mark of the tracking shaft.
To ensure that our marks do not get lost during installation, we tie together the sector and the copy shaft with ordinary sewing thread.
We put standard thrust washers on the input and follower shafts and insert the guide bushings of the gearbox cover into place.
We degrease the surfaces, apply sealant, lay the gasket, install the cover and tighten the mounting bolts with the maximum possible force. We adjust special washers under the bolts marked with yellow arrows.
After tightening the gearbox cover, we check the axial play of the primary and secondary shafts. Normal: 0.2-0.4mm.
If the play is greater than normal, remove the plate, seat the bearing and adjust the required number of shims under it.
Factors influencing the price level
The cost of a motorcycle piston varies from place to place. This is due to the consideration of certain factors in the price. When developing a price list, implementers take into account the following:
- State.
- Manufacturing company.
- Originality.
- Quality.
- The fame of the implementer.
- Place of purchase.
- Delivery required.
The better the condition of the part, the higher its price will be . The more famous the manufacturing company, the more expensive its products will be. You will have to pay separately for delivery of goods. Some companies deliver products for free within a city or region. In other cases, the delivery price depends on the distance between the buyer and the seller. The higher the quality of the part, the more it will cost. Original spare parts are valued higher than non-original ones.
Repair
Once the unit has been gutted, you can begin to determine the parts that need to be replaced. As a rule, you have to buy a set of shims, a set of gaskets and sealant. This is the case if there are no more serious damage. Once you have decided on the elements to be replaced, you will need to adjust the worm shaft axis, and after final assembly, the clearance along the axis of the primary, intermediate and secondary shafts.
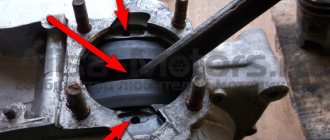
Adjusting washers are placed on the far ledge of the copy roller; they should be lubricated with a special compound. A support washer is mounted on the near edge, and the shaft is put in place. It should be turned so that the neutral sensor with its protrusion fits into the deepest groove. Then, using a ruler (without the gearbox cover yet) on the plane of the crankcase, measure the gap between the washer and the dipstick. It should be no more than 0.2 mm. Depending on the indicator, regulators are added or removed. If it is impossible to accurately set the gap, it is better to make it smaller.
Carburetor
Both motorcycles use a new K-36D carburetor with a diffuser with a diameter of 27 mm and a main jet with a flow rate of 260 cm3/min. It is a combination of parts from the famous K-36I and K-Z6Zh carburetors. The body was borrowed from the first, the atomizer and throttle needle were borrowed from the second.
Due to the new dimensions of the cylinder inlet ports, the pipes connecting the carburetor to the cylinder have also undergone changes.
The air purifier on IZ Jupiter Z and IZ Planet Z is the same with an outlet with a diameter of 57 mm (previously both models had 47 mm).
On IZH-Jupiter 3 (unlike IZH Planet 3), an additional rubber pipe with a diameter (clear) of 42 mm was introduced. It is connected to the air cleaner by an adapter flange. This was done because with a pipe with a diameter of 57 mm, the IZH-Jupiter 3 has insufficient power.
The new air cleaner replaces the two latches that secured the pan with four screws, which improve the tightness of the connection.
Common faults
The most common problem with IZ Planet 5 is the spontaneous switching off of second gear. This problem is common on many other motorcycles, but this breakdown is often associated with careless gear shifting. When the first gear “spins” to high speeds, bypassing the “neutral” gear, the engagement with the second speed gear causes an impact, which causes wear. To prevent such a malfunction, it is not recommended to spin the first gear too much. But if the second one still dies, then some ways to eliminate the problem are possible:
The simplest method that will help in some cases. Place the motorcycle on its right side, then remove the kick starter and gear shift lever along with the shaft. Then remove the left crankcase cover, and then remove the clutch basket along with the discs. During operation, the gearbox gears wear out, which causes the meshing of the teeth to deteriorate. This leads to slipping and jerking of the transmission until the second gear fails. Sometimes, when replacing a gear, the problem is not always solved, and lies in the wear of the bearings of the input shaft, which moves to the left over time due to vibrations. To fix the problem, you need to remove the stopper of the input shaft bearing, then move this bearing with light blows of a mallet or with a hammer through the “spacer”, so as to move the shaft to the right. To fix it in this position, you should place washers of appropriate diameter under the bearing. Using the number and thickness of washers, ensure that there is no play in the input shaft, then return the bearing stopper to its place, reassemble the clutch basket and other parts in the reverse order.
- If fourth gear disappears. This is often due to failure of the secondary shaft bearings. This is due to the appearance of axial play in the secondary shaft when the bearings are displaced or fail. This malfunction can be repaired in the same way as repairing the second gear by removing the left crankcase cover.
- If the gear shift jams from upshift to downshift, the spring of the shift mechanism pawls has broken and must be replaced.
- If the gearbox switches tightly after assembly, it indicates incorrect installation of the adjusting washers.
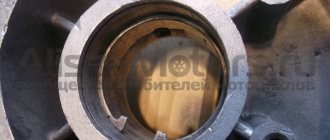
Cylinders
In order to improve the filling of the cylinders in both engines, the flow sections of the windows have been changed and the valve timing has been increased. This is clearly visible in Fig. 2. where the cylinder developments are presented. The IZH-Jupiter 3 engine uses a two-jet purge scheme, rather than a four-jet one. as it was on IZH-Yu2.
Rice. 2. Cylinder scans: on the left 2a - IZH Jupiter 3, on the right 2b - IZH Planet 3. The dotted line shows the windows of the IZH-Yu2 and IZH-P2 engines, respectively.
The thermal regime of engines of previous models, especially IZH-Yu2, was quite intense. Because of this, if the ignition or carburetor adjustments were violated, detonation sometimes occurred, the piston jammed, and the exhaust pipes darkened. To reduce the thermal stress of new engines and eliminate unpleasant consequences, the cylinders and heads were equipped with more developed fins, and on the Jupiter 3 model, in addition, the length of the exhaust channel in the cylinder was increased. Now the exhaust gases entering the exhaust pipe have a lower temperature.
Detection of faulty parts
To learn how to determine the damage and degree of wear of gearbox gears, consider the classification by which you can make the right decision about repairs. The gear needs to be replaced if:
- there is at least one broken tooth, or the presence of cracks in any part of the tooth caused by plastic deformation of the gear material.
- when the working surface of the gear is chipped by 20 percent or more, when the depth of chipping is 5 percent or more of the tooth thickness.
- if there is corrosion on the working surface of the gears;
- if the contact patch is less than 80 percent of the width of the teeth, and less than 60 percent of the height.