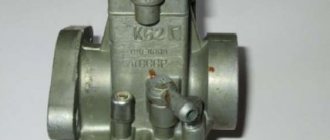
Carburetor design K 65
To adjust the carburetor of the K 65 model, you first need to become familiar with its structure. The supply and maintenance of fuel level occurs according to the following scheme. Through the fitting, fuel is supplied to the valve with an elastic locking washer. This block rests on a tongue that communicates with the floats. They are made of plastic and interconnected. The floats rotate freely along their axis.
If there is more fuel, its excess is drained through the drainage hole from the float chamber. Model K 65 (carburetor) heats up during operation. At the same time, so that the pressure in the chamber does not increase, it is connected to an unbalancing channel.
- Do-it-yourself carburetor adjustment for VAZ 2107
The next system that needs to be considered in the K 65 carburetor circuit is the dosage device.
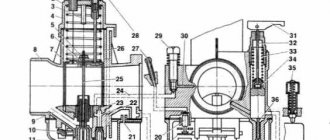
Scheme of the carburetor K-62V motorcycle Voskhod
1. Idle fuel jet. 2. Main fuel jet. 3. Float chamber. 4. Sprayer. 5. Float axis. 6. Float lever bushing. 7. Air channel. 8. Nozzles. 9. Dosing needle. 10. Body. 11. Throttle. 12. Needle lock. 13 Throttle spring. 14. Throttle lift limiter (removed after engine break-in). 15. Throttle control cable. 16. Throttle lift adjusting screw. 17. Cover. 18. Idle speed adjustment screw. 19. Fitting for fuel intake. 20. Transition hole. 21. Idle air channel. 22. Drainage hole. 23. Idle air channel. 24. Locking needle with washer. 25. Float. 26. Float sink.
Dosing system
The components of the dosage system are the main fuel jet, atomizer, air supply channel and throttle needle.
The entire system operation process occurs according to the following scheme. From the float chamber, fuel enters the atomizer through the main jet. Under the influence of liquefaction, it rises along the gap between the throttle needle and the nozzle. At the exit from it, the fuel is mixed with air, which entered through the hole in the atomizer body through the channel.
The K 65 carburetor has the following engine control system. The throttle needle can be set to one of five positions. This ensures that the engine operates at medium speeds. But at the highest power, it should be taken into account when tuning that the carburetor of the K 65 model determines the fuel consumption by the throughput of the main fuel jet.
There is a lock washer installed under the fuel pipe. It secures the nozzle.
What carburetor is used on the Ant scooter?
On the “early” Ant scooters with a cast iron engine (Tulitsa, Tourist), K62G carburetors with a diffuser diameter of 26 mm and a mixing chamber diameter of 28 mm were installed. Later the engine was boosted. They installed a reed valve on the inlet and changed the shape of the cylinder and cooling fins. In parallel with this, new K65G carburetors began to be installed on scooters. They are similar in design to the K62G.
Carburetor of Ant scooter model K62G. Side view and air damper side
The diameter of the diffuser and mixing chamber remained the same. Only the throughput of the GTZ changed (130 ml/min and 125 ml/min for K62G), the diameters of the atomizer (2.63 mm and 2.6 mm), the diameter of the needle and the transition hole. There are minor differences in the corrector design. On the K62G carburetor, a needle immersed in the well of the float chamber is used to further enrich the fuel. On the K65G, fuel is taken directly from the chamber using a fuel corrector nozzle.
Idle system
Another important system that must be taken into account when adjusting the K 65 carburetor is the idle speed device.
The presented system consists of a fuel pipe, an air channel, an idle hole, mixture quality and quantity screws, and a transition hole.
When the engine operates at low speeds, an emulsion is formed. This occurs by raising the fuel through the tube under the influence of vacuum in the mixing chamber. The fuel is combined with air, which enters through the channel. The K 65 carburetor assumes that the emulsion exits at low speeds only through the idle hole.
- Reasons for the high fuel consumption of the carburetor VAZ 2107
As the speed increases, the vacuum in the hole area increases. The same emulsion also begins to flow through it. So the fuel supply increases as the engine speed increases.
NHẬN XÉT • 34
And what kind of knitting needle is that sticking out, what is it for, you didn’t say anything about it. Maybe it's for suction?
Fuel supply is regulated by a jet
Guys, help me, why is it that when you start the Minchik and give it gas, the gas pumps into the air very badly, you start driving the crap, it won’t go, you close the tap, there’s not enough gas, it starts to drive as it should, and it starts to rip. What should I do? The carb costs 65, I tried the needle on I also tried all the fuel supply settings, no shit. What could be wrong?
It looks like you yourself don’t know what - why film?
And my idle speed is too high. I can't adjust. What to do? Igloo up and down?
Evgeny Sviridov look for air leaks, especially through the right crankshaft oil seal
Is the needle installed on the top or bottom relative to the spring?
1:20. – quality screw. ..opens air into the pan.. and the more you unscrew it, the poorer the mixture.
When you turn the gas handle sharply and lower it, it shoots like this. that I’m afraid to leave my iron horse on the move))! What is the reason?
Amir Talgatovich Kabiev ignition
Why does the carburetor force fuel into the air cylinder, but not into the piston at all?
carb is broken or clogged
Denis Manko change the reed valve and you will be happy
The fuel screw screams
This air supply screw! Not fuel! Don’t confuse people
For me it just picks up speed after switching on
@DSFY dude you wrote a year after I left a comment. I sold my motorcycle a long time ago, bought my license and moved to a car))) outside the window it’s 2019_))))
@DSFY between head and carb
@Ansar ansar what kind of gasket?
The air is sucking, I fixed this problem yesterday
DIS Balans gasket leaks
propeller that supplies fuel
and if you put it on Minsk, then by 2 turns or 3 turns
thank you, it helped, my ant turned from a dozing old man into a BEAST.
I have one of these on my ant, everything seems to work, it drives well, and has an idle speed, but it just doesn’t want to start with the handle.. what’s the reason? At first everything worked, how do I set the needle? Because this needs to be changed in the ignition?
@Andrey Astashov I have a problem: there is no idle speed, the choke is raised, it works fine, but without the choke it stalls. Help. I changed the h.h. jet and raised the needle to the last, the risks still don’t want to.
heh, but mine starts with the key))) Assembled from scratch, the body is an old Tula model, and the rear wheels from a Lada are healthy, consider it to be given a second life. But the carburetor doesn’t want to plow properly, before that it was K62, but I killed it with dust, and I don’t want to lose the mower, but after watching the video I’ll try to adjust it, in any case, thanks for the information.
Engine starting and heating system
In search of an answer to the question of how to adjust the K 65 carburetor, you should familiarize yourself with the engine starting and heating device.
On carburetors K 65S and K 65V, a starting device with an autonomous drive is installed, on K 65G and K 65Zh - with a cable drive (found in motorcycles "Dnepr", "Ural"), and for K 65I, K 65D - a corrector-heater (often used in IZH brand mopeds).
A starter with an autonomous drive includes a plunger, a trigger, a needle, a protective cap, channels, a control rod, a fuel well and holes. The normal position of the device is considered closed.
The cable-driven starter is very similar to the previous version, with the exception of the presence of a rod. The position of the plunger is adjusted by a cable.
The corrector-enricher is characterized by a functioning system in which fuel enters the starting device from the float chamber. Fuel consumption is limited by the jet. The Soviet K 65 carburetor often has such a device. IZH can serve as an example of such motorcycles.
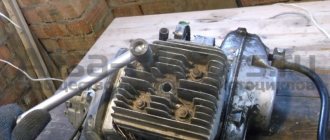
Photo report: Repair and assembly of the gearbox of the Ant, Tula scooter
An old acquaintance approached me with a request to repair the gearbox of his Tula or Ant - I still didn’t understand. The engine was half disassembled: without a cylinder and clutch. To be honest, I had nothing to do with the “Tula” in terms of repairs; I only repaired the “Ants” all the time. I only heard that the “Tula” shifts gears like a regular motorcycle, and not like the “Ant”
As for the problems with this particular checkpoint, I can only guess what problems it had. The client himself did not fully understand everything: either the third and second gears were knocked out, or these gears were slipping - I still didn’t understand... However, this is not the point. Another thing is important: the client, knowing my dislike for “left-handed” spare parts, brought a bunch of used parts in addition to the engine, which actually could not but make me happy and reassuring about the expected result of my intervention in this gearbox
From all the heaps of used spare parts, I managed to assemble two fully functional gearboxes, which, by the way, have some differences. That gearbox (on the right) which has a wider third gear intermediate gear is clearly not “Muravyovskaya” - I’ll assume that it’s either from Tula or from the old “Muravyov” or I don’t understand something anymore...
Installation and configuration
Before adjusting a new K 65 carburetor, it must be installed and adjusted.
First you will need to remove the carburetor cap. The throttle spring holds the needle through the lock. It has one round and two shaped holes. A round slot located in the center serves to attach the throttle cable. The T-shaped hole is necessary for attaching the propeller rod.
Having installed the carburetor on the engine, a cable is connected to the throttle, and the cover is secured.
Use the throttle to raise the throttle and check whether the diffuser opens completely. These actions should be performed several times. The diffuser should open and close freely without jamming.
Next, use a screw to raise the throttle so that a gap of 3 mm appears between its bottom edge and the diffuser generatrix.
If the K 65 device (carburetor) has a corrector, it should be removed as an assembly and the cable should be attached to the piston. After this, you should install the unit in place.
Next, you should adjust the position of the stops of the cable sheaths so that their free play is 2-3 mm.
The screw must be tightened until it stops, then loosen it by 0.5-1.5 turns. The fuel hose is connected to the fitting. Fuel should not leak at the connection points.
Then the peak starter turns and the crankshaft rotates 3 turns. The ignition is turned on and the start is made. After warming up, the starter or corrector can be turned off.
CARBURETOR K65: ADJUSTMENT
For many years, domestic motorcycles and scooters, as well as Buran snowmobiles, were equipped with carburetors of the K62 family or their varieties. Operation revealed a number of design flaws. Their elimination required a major modernization of carburetors and led to the emergence of an essentially new device, which was designated K65. Its implementation began at the end of last year and will be completed this year.
Since the carburetor has a long life ahead of it, we asked the engineers of the Leningrad Carburetor Plant to tell us more about it.
At first glance, the K65 carburetor is not much different from the usual K62. But this is precisely at first glance, since modernization affected not the form, but the content. And you will be convinced of this when, together with us, you examine the structure, principles of operation and adjustment of the new device shown in Fig. 1.
First, let's talk about the design and operating principles.
It all starts with a system of approach and maintaining a constant fuel level. Through fitting 20 it reaches the fuel valve 15, which is equipped with an elastic lock washer. The valve rests on a tongue 18 connected to plastic floats 17, which are interconnected and rotate freely on an axis 16.
If for some reason the fuel level rises, its excess is discharged from the float chamber through the drainage hole 32. To prevent the pressure in the float chamber from increasing when heated, it is connected to the atmosphere by an unbalancing channel 31.
The main dosing system consists of a sprayer 5, a main fuel jet 6, a throttle needle 7 and an air supply channel 8. Fuel from the float chamber through the main fuel jet 6 enters the sprayer 5, rising under the influence of vacuum along the gap between the sprayer and the throttle needle 7. At the exit from the atomizer, it is mixed with air entering through channel 8 through the hole in the atomizer body. The throttle needle ensures engine operation at medium speeds and can be set to one of five positions. At maximum power modes, fuel consumption is determined mainly by the throughput of the main fuel nozzle.
Reliable fastening of the atomizer is ensured by a lock washer 14 installed under the fuel pipe 9.
The idle system consists, in turn, of a fuel pipe 9, an air channel 10, mixture quality screws 11 and mixture quantity 27, idle hole 12 and transition hole 13.
When the engine is idling, under the influence of vacuum in the mixing chamber behind the throttle, the fuel rises through tube 9 and mixes with air entering through channel 10. The resulting emulsion, when the throttle is opened slightly (at low speeds), comes out only through hole 12. With further rise of the throttle and As the speed increases, the vacuum in the area of hole 13 increases and the emulsion also begins to flow through it. Thus, the fuel supply increases as the speed increases.
The main system for starting and warming up the engine. On carburetors of different modifications, different systems of enrichment devices are used: on K65S and K65V - a starting device with an autonomous drive; on K65G and K65Zh - with cable drive; on K65I and K65D - corrector-enrichment. Let's look at them in that order.
The starting device with an autonomous drive consists of a plunger 37, a guide 35, a return spring 36, a starting device needle 39, a sealing rubber 38, a protective cap 29, a control rod 40, as well as channels 33 and 34, a fuel well A and a hole 41.
The normal position of the device is closed. In this case, the needle 39 with the rubber seal 38 blocks the fuel channel, and the side surface of the plunger 37 blocks channels 33 and 34. To turn on the starting device, you need to lift the rod 40 up and turn it approximately 90°. In this case, the extrusions on the rod will come out of the grooves of the guide 35 and will be fixed at its upper end. The plunger will rise, opening channels 33 and 34 and fuel channel 48. Under the influence of vacuum, fuel from well A will enter the cavity under the plunger, mix with air and be fed into the mixing chamber in the form of an emulsion. The volume of fuel in the well is sufficient for a high one-time supply at the time of start. After starting the engine, the fuel level in the well decreases and the composition of the mixture becomes leaner.
To turn off the starting device, you need, of course, to turn the rod back by about 90°, after which, under the action of the return spring 36, the plunger will take its original position.
The starting device is protected from dust and dirt by a rubber cap placed on the spring guide 35.
The starting device with a cable drive is similar to the DESCRIBED one - but it does not have a rod 40, and the position of the plunger 37 is adjusted by a cable connected to the shifter.
The corrector-enricher differs in that fuel enters it directly from the float chamber (there is no fuel well A). Fuel consumption is limited by jet 43.
With the plunger fully raised, the greatest enrichment of the mixture necessary to start the engine is achieved. As the plunger is lowered, the mixture becomes increasingly lean as the gap between the needle 42 and the channel wall decreases. When the plunger is completely lowered, the needle with rubber seal 38 closes the fuel channel 48.
An additional starting device (float suppressor) is used at air temperatures from +5C and below. Using it requires no explanation.
Having examined the design and operating principle of individual systems, we can now move on to issues of operation and adjustments.
Before installing the carburetor, you need to remove its cover 2 with the throttle assembly. The cover is a rather complex subassembly on which the throttle lift screw 27, guide 28, gasket 26, throttle lift limiter 30, throttle 21 and its spring 24, protective cap 29 are installed. Screw 27 is connected to the throttle by a rod. The throttle spring 24 simultaneously holds the needle 7 through the lock 22.
The U-shaped brass throttle has two shaped holes and one round one. The latter, located in the center, serves to install and fasten the needle, the shaped one on the cutout side is for fastening the throttle cable, and the T-shaped one is for attaching the rod of the screw 27. The radial cutout on the throttle wall, facing the air filter, provides the necessary vacuum in the area sprayer.
There is a limiter 30 inside the cover - it is recommended to remove it after the break-in is completed.
After installing the carburetor on the engine, you need to attach a cable to the throttle and secure the cover to the carburetor. After this, lift the throttle using the throttle and check whether it opens the diffuser completely. Do this several times to ensure that the throttle is not stuck in any position and that the diffuser closes and opens completely. Using screw 27, raise the throttle to a position where a gap of 2-3 mm appears between its lower edge and the diffuser generatrix.
If the carburetor has a starting device or a corrector, you need to unscrew part 35, remove the corrector assembly and attach the cable to the piston 27, and then install the unit in place.
Adjust the position of the stops 28 of the sheaths of the throttle and corrector drive cables (if the latter is present) so that they have a free play of approximately 2-3 mm (this is done so that when the steering wheel is turned, the position of the throttle or corrector does not change).
Screw screw 11 until it stops, and then unscrew it 0.5-1.5 turns. Attach the fuel hose to fitting 20. Make sure that fuel does not leak at the connection points, and open the starter or corrector. If, due to weather conditions or the individual characteristics of the engine, it is necessary to use a float suppressor, it is better to do this while simultaneously opening the throttle fully, then the reception efficiency increases.
Smoothly pressing the kickstarter, turn the crankshaft 2-3 turns, turn on the ignition and start vigorously. After starting and warming up the engine, the starting device or corrector must be turned off.
In conclusion, let's talk a little about carburetor adjustments - every motorcyclist has to deal with them from time to time.
It makes more sense to start by setting the fuel level. To do this, you need to turn the carburetor over, remove the bottom of the float chamber and measure the distance from the plane of the connector to the line dividing the float in half (the mark from the mold connector). This distance should be 13±1.5 mm. If the size of your carburetor does not fall within these limits, you need to carefully bend float tongue 18 in one direction or another.
One more note in passing. If during operation the carburetor suddenly begins to overflow, you need to check whether the float is leaky. To do this, immerse it in a bath of hot water for at least a minute. Bubbles will appear - the float is bad, if not - everything is fine.
Before making adjustments, which will be discussed later, the engine needs to be warmed up. After this, lowering the throttle with screw 27, set the minimum stable idle speed, and then, slowly turning screw 11 in one direction or another, increase the speed to the maximum possible. Again, use screw 27 to try to reduce them, and then use screw 11 to raise them as far as possible. These operations sometimes have to be repeated 2-3 times.
Now check how the engine responds to the throttle. If, when the throttle is opened sharply, it stalls, tighten the mixture quality screw 11 by 1/4-1/2 turn (the mixture will become richer); if the engine, on the contrary, stalls when the throttle is suddenly closed, screw 11 needs to be unscrewed by the same amount (the mixture, naturally, will become leaner).
The quality of the mixture is adjusted in operating modes by moving the dosing needle 7 relative to the lock 22. You should start from its middle position. When the lock is moved upward, the mixture becomes leaner (of course: the needle lowers, and there remains a smaller gap between its cone and the wall of the atomizer!), when the lock is moved downward, it becomes richer. The criterion for needle movement can be the color of the insulator of the central electrode of the spark plug. If after a run of approximately 30-40 km in normal operating mode it has a whitish color, the mixture is too lean and the needle needs to be raised at least one notch; if the insulator is dark brown, with traces of soot, the mixture needs to be made leaner by lowering the needle.
Finally, if the motorcycle does not reach maximum speed, you should replace the main fuel jet with a different one with a larger calibrated hole.
The characteristics of the new family of carburetors are shown in the table.
S. NURENBERG. V. DVOYNIKOV, LenKARZ engineers
| Name | K65I Planet-3 Planet-4 Planet-5 | K65V Voskhod-ZM | K65D Jupiter-5 | K65S MMVZ-3.1122-03 MMVZ-3.1121 MMVZ-3.11211 | K65G TMZ-5.952 Ant Tulitsa | K65Zh Buran |
| Diffuser diameter, mm | 32 | 26 | 30 | 26 | 26 | 32 |
| Mixing chamber diameter, mm | 32 | 28 | 32 | 28 | 28 | 32 |
| Main fuel jet, ml/min | 270 | 200 | 260 | 165 | 130 | 330 |
| Corrector fuel jet, ml/min | 255 | — | 255 | — | — | — |
| Idle dosing tube, ml/min | 50 | 50 | 50 | 50 | 50 | 50 |
| Spray diameter, mm | 2,67 | 2.63 | 2,65 | 2.63 | 2,63 | 2,72 |
| Throttle needle cone dimensions, mm: | ||||||
| O nominal | 2,5 | 2.5 | 2,5 | 2.5 | 2.5 | 2,5 |
| O smallest | 1,82 | 1,6 | 1,9 | 1,75 | 1,75 | 1,75 |
| Cone length | 27 | 24 | 27 | 24 | 24 | 24 |
| Idle hole diameter, mm | 0,7 | 0,05 | 0,6 | 0,65 | 0,7 | 0,7 |
| Transition hole diameter, mm | 1,0 | 1,2 | 1,5 | 1.2 | 1,2 | 1.0 |
Adjusting the fuel level
Adjusting the K 65 carburetor begins with setting the fuel level. To do this, turn the device over and remove the bottom of the float chamber. Next, replace the distance from the connector to the line that divides the float into two parts.
This distance is usually 13 mm with a possible deviation of 1.5 mm in both directions.
If the size on the carburetor does not fit into these frames, you should bend the float tongue in the desired direction.
It happens that the K 65 carburetor is configured correctly, but it begins to “overflow.” This means that the float has leaked.
Testing this theory is easy. You need to fill the bath with warm water and immerse the float in it for a minute or longer. If bubbles appear, the float is faulty.
Scheme of the carburetor K-62V motorcycle Voskhod
1. Idle fuel jet. 2. Main fuel jet. 3. Float chamber. 4. Sprayer. 5. Float axis. 6. Float lever bushing. 7. Air channel. 8. Nozzles. 9. Dosing needle. 10. Body. 11. Throttle. 12. Needle lock. 13 Throttle spring. 14. Throttle lift limiter (removed after engine break-in). 15. Throttle control cable. 16. Throttle lift adjusting screw. 17. Cover. 18. Idle speed adjustment screw. 19. Fitting for fuel intake. 20. Transition hole. 21. Idle air channel. 22. Drainage hole. 23. Idle air channel. 24. Locking needle with washer. 25. Float. 26. Float sink.
Adjusting mixture enrichment
Before starting adjustments, be it the carburetor model K 65 of the Ural, Dnepr motorcycle, Buran snowmobile or other vehicles, the engine should be warmed up.
Then the minimum stable idle speed is set. To do this, use the screw to lower the throttle. Afterwards you need to increase the number of revolutions to the maximum possible. The screw is rotated in one direction or another.
Slowly the speed is again reduced and increased. This should be done 2-3 times.
After the manipulations, you should check how the engine reacts to the position of the throttle. To understand how to set up the K 65 carburetor, you need to determine the required level of enrichment of the fuel mixture for the engine.
To do this, carry out such an experiment. The throttle opens sharply. If the engine stalls, then the mixture should be enriched. To do this, turn the mixture quality screw 1/4 or 1/2 turn.
A stalling engine when the throttle is closed sharply indicates the need to make the mixture leaner. In this case, the mixture quality screw needs to be adjusted by 1/4-1/2 turn.
Ant scooter for the season No. 2) Setting up carburetors of brands: K62, K65, K63!) Quickly.
So hello everyone, they are all videos, I want to tell you about this thing, namely how to set up a carburetor on a scooter, the ant is not even on a scooter, all the carburetor with for such as you can say the initial setting of the carburetor, now I’m taking it off, I’ll show you everything clearly like this, but if you RuNet, of course, you all need to disassemble the part first, I’ll also start disassembling it, those casings, I’ll take it all off, and then I’ll start about the carburetor, how to set it up [music]. Having sorted it all out, I noticed one thing: the whole engine was full of ants, it was all dirt, look at the 1 flax game. This evening I’ll wash it all off, maybe I took a couple of photos, so let’s shoot in the carburetor, this is basically a long time and let’s give a like to those who have already opened the season because we don’t have one and I cleaned it here, I thought maybe the weather might be good again, but here we go Then my throat was filled with water, I opened it. [music]. A [music]. Yes, in general, I took it apart to open the gate all winter, I haven’t taken it apart all winter, my hands have lost the habit of it’s better than forgetting to wash the ribizi, or what, buy everything, wash it and it’s dirty, that’s the plan and I didn’t notice something about the casings, so I left it for the winter, well I think nothing bad happened, I’ll wash it and everything will continue, he’s tough and for it. It’s such a loud sound and the muffler on the non-native one can also be joking there, such a thing should come out, but that’s okay, another one is sitting with us now. Let's start setting up our carburetor from the level of the floats; if you just bought a carburetor, then unscrew these two bolts and we will arrange the url [music]. This is how we need to adjust these floats like this and look from here 26 millimeters up to the level of the float it turns out 26 millimeters they don’t know how accurate I found the picture and I’ll paste it in. I have 26 millimeters but I’ll tell you, you’ll make it 26 millimeters, assemble it, try it if If something is going to be flooded, it will be frustrating to let each carburetor need a layer of adjustment, maybe it’s different, it’s just that carburetors are such a thing, everything is fine with me, in principle, I won’t adjust anything, right now I’ll put the gasket exactly here with a hook and. [music] so the next thing you need to adjust is the screw. Air quality and mixture this screw is located here lots of these nipples, that is, here’s how to set it up, I have it set up, but if you are setting up your carburetor for the first time, you screw it all the way in and also screw it one and a half turns, do this a little bit, do one and a half turns and try everything, start it, see if something is wrong, then start adjusting this float with a needle, now I’ll show you more about the needle. Basically, I don’t want to open this top cover now because everything seems to be clear there, put the needle in the middle, I don’t know how long it takes to insert the needle in the middle and everything will be fine after you put the needle on all the settings level, try starting the scooter, you need to, well in general, another cycle to warm up the engine, tune it, so you can tune it like this, then try it for a ride. How bad is there no work, then I need to adjust the idle speed with this bolt, this bolt, you won’t say for sure now no. I’ll say this, you will use this bolt for construction and quietly you will arrive, and this is achieved due to the fact that in order to turn this bolt up, look clearly that I turn the throttle up, you see, as far as I understand, now I’ll turn it down. Everything was completely closed, that’s about it, and they scheduled an opening. For the new me, I’ll set this up, in principle it’s not so difficult, so I showed how you bought a carburetor, adjust it like this, and it seems to me that almost every carburetor needs its own slightly different approach, some with more gasoline, some with less, and this is also necessary for the ant itself.
So if I helped you in any way
Subscribe to the channel, like everyone, thank you for watching, watch other videos, that is, that's all, bye to everyone. [music]
Adjusting the quality of the mixture in operation
Adjustment of the K 65 carburetor under operating conditions is carried out by moving the metering needle relative to the lock. This should be done in a certain order.
The dosing needle is set to the middle position. To lean the mixture, the lock moves upward. At the same time, the gap between the dispenser cone and the wall of the atomizer becomes smaller.
Moving the lock down will result in a richer fuel mixture.
The color of the spark plug electrode insulation will indicate the need for adjustment. You should pay attention to it after 30 km. Under normal operating conditions, its whitish color indicates a poor mixture. A dark brown insulator with traces of soot indicates the need to lean the mixture.
Why does the Ant scooter not start, reasons?
Therefore, I want to tell you in general terms about the models of the Tula Machine-Building Plant, the names of the designers and more extensive information can be found in the links at the end of the post. It all started on April 27, when the first scooter officially rolled off the assembly line of the Tula Machine-Building Plant; now we call it the Tula T scooter. The Tula had an eight-horsepower engine with a displacement of cm3, a 4-speed gearbox in the same unit with the engine, a chain drive of the rear wheel, inch wheels, pusher type front suspension fork. It also had forced air cooling, electric start instead of a kick starter and monotube shock absorbers, which at that time were practically not used even on motorcycles.
Forgot your password?
Adjusting the carburetor of the Ural motorcycle
For an example of adjusting the K 65 carburetor, you can consider this procedure on a Ural motorcycle.
First you need to remove the air leak. Next, use a flat-head screwdriver to unscrew the screws. The K 65 carburetor of the Ural motorcycle requires unscrewing the screw 1 turn.
After this, you need to set the play on the cables. It should be the same and equal to about 3 mm.
After warming up the engine, begin to tighten the idle speed screw to the minimum stable speed. Then use the mixture quality screw to find the maximum speed. The procedure is repeated twice. The carburetor is adjusted.
Adjusting the K-62V and K65P carburetor
Adjust the idle speed in the following sequence: 1 – screw screw 18 until it stops, which regulates the air supply for idle speed. Then unscrew one turn. 2 – Open the throttle slightly using the throttle. 3 – Start the engine and warm it up. 4 – Using bolt 16, lowering the throttle valve, achieve minimal stable engine operation. 5 – Unscrew screw 18 to set the maximum speed. 6 – Using bolt 16, lower the damper again to minimum speed. 7 – Check the adjustment. Sharply open the throttle with the throttle. If the engine stalls or there is a failure in operation. When switching from idle to main working. The adjustment is incorrect. Screw 18 needs to be used to enrich the fuel mixture - tighten it by a quarter. Or repeat the entire adjustment. 8 – Adjusted correctly, if there is no dip and the motor does not stall. And it continues to gain momentum.
Carburetor synchronization
After tuning, the K 65 carburetor (Ural) must be synchronized. This can be conveniently done using a tachometer. In the absence of such equipment, synchronization can be performed using the speedometer.
To do this, place the motorcycle on a stand and start the engine. 4th gear is set. Remove the cap from one of the spark plugs and adjust the speedometer reading to 50 km/h. The gas handle is fixed with a bolt.
One cylinder turns on and the other turns off. The length of the cables is adjusted using fittings. At the same time, they achieve the same speedometer reading.
When removed, the spark plug cap must be grounded and shorted to the ground of the motorcycle. In this way you can adjust the Ural carburetor.
Adjusting the K-62V and K65P carburetor
Adjust the idle speed in the following sequence: 1 – screw screw 18 until it stops, which regulates the air supply for idle speed. Then unscrew one turn. 2 – Open the throttle slightly using the throttle. 3 – Start the engine and warm it up. 4 – Using bolt 16, lowering the throttle valve, achieve minimal stable engine operation. 5 – Unscrew screw 18 to set the maximum speed. 6 – Using bolt 16, lower the damper again to minimum speed. 7 – Check the adjustment. Sharply open the throttle with the throttle. If the engine stalls or there is a failure in operation. When switching from idle to main working. The adjustment is incorrect. Screw 18 needs to be used to enrich the fuel mixture - tighten it by a quarter. Or repeat the entire adjustment. 8 – Adjusted correctly, if there is no dip and the motor does not stall. And it continues to gain momentum.
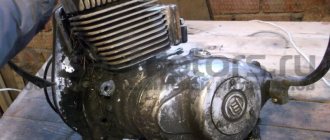
Engine
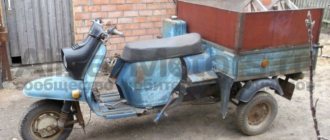
The Ant engine is somewhat different from Soviet engines of that time. The most significant difference is in the starting system: here it can be done using an electric starter (this was very cool in the 50s) or using a manual kickstarter. There was no trace of an electric starter on any Soviet motorcycle of those years.
The engine is started with the starter just like a regular car: insert the key into the ignition, turn the key all the way to the right and the engine starts.
The second difference is the forced cooling of the engine
The fan drives air through the casings, cooling the cylinder and cylinder head. The cooling system works tolerably
Mechanical clutch with cable drive from a lever on the steering wheel
The gearbox is manual, the shift lever is located on the left directly under the driver’s foot. The switching algorithm is as follows: first, second, third and fourth gears are switched up. Neutral gear is at the very beginning and to engage it you need to push the gear lever down. Controversial decision, but that's how it's done here
Twin-shaft gearbox with constant gear meshing
The engine is as simple as a broom
Electrics
The most problematic part of the Ant has always been considered its electrics, in particular the voltage regulator relay and dyno starter (generator and starter rolled into one). Due to their design features, the dyno starter and relay regulator require constant attention and qualified maintenance. If the dyno starter is not serviced on time, then it begins to undercharge the battery literally in the first season
On older models, the relay-regulator was of a mechanical type
On the latter, more advanced - electronic type
Contact ignition. The contacts are located in the cooling casing
The ignition coil and capacitor are located on the frame. In terms of repair and maintenance it is very convenient
Carburetor L65-G Ant
VIDEO ON THE TOPIC: Ant with carburetor PZ30, PZ27.
Also on sale are gasoline and diesel generators, spare parts for motorcycles and various types of tires for mopeds and scooters. My ant came to life after installing this carburetor. It immediately began to pick up speed, idling ideally. The latest scooters had a more advanced KG carburetor installed. In general, the carburetor is very good, if only because it has two systems that make starting easier in cold weather: a manual enricher on the steering wheel and a float suppressor.
History of models. Who's online?
Adjusting the ignition of an ant scooter
The electrical circuit of the Ant scooter is quite simple and does not contain heavy components. It is used for three main tasks:
- Ignition of the air-fuel mixture in the cylinder. Due to this action, the piston moves, transmitting torque to the flywheel.
- Starting a cold and warm engine.
- Supplying current to lighting fixtures and signal signs (turn signals, parking lights, brake lights).
Ant's electrical equipment is a system with one wire , and the second is the body of the moped itself. All equipment has excellent insulation, eliminating the possibility of short circuits and harm to the driver. Maintenance of electronics on a motorcycle consists only of regular cleaning of the terminals. However, to find the problem, you need to keep a tester at hand. He will accurately determine the problem that is preventing the operation of electrical equipment.
Ignition installation
Installing the ignition on an Ant scooter, as on any motorcycle with a single-cylinder engine and a battery ignition system, does not require special knowledge or effort. All you need is very thin paper, a narrow rod and a set of keys. So, how to set the ignition on an Ant scooter:
- Remove the spark plug and set the piston to top dead center (hereinafter referred to as TDC).
- Insert a rod through the hole from which the spark plug was removed and press it against the piston head. Make a notch at a length of 4.5-5 mm
- Close the breaker contacts when the piston is at TDC. Place paper between them and pinch.
- Turn the crankshaft counterclockwise as slowly as possible and pull the piece of paper at the same time.
- When the paper is released when the piston is lowered to the depth of the mark made, the ignition will be set correctly.
We recommend reading:
Assembly and disassembly instructions, repair tips
We install the ignition on the Ant...
In order for any internal combustion engine to start and “work well” (and it is the Internal Combustion Engine installed on your scooter), you need to supply fuel to it and then ignite it at the right moment. Moreover, the engine does not work in only two cases:
- or there is nothing to burn...
- or there is nothing to set on fire...
You are interested in the second case. So:
The work of any internal combustion engine is to convert the reciprocating motion of the piston into the rotational motion of the shaft. This transformation occurs with the help of a crank mechanism (CSM). How this transformation occurs is known from the elementary school “Physics” course.
For “good” operation of the internal combustion engine, all the fuel must burn in the cylinder within a very specific time - while the shaft rotates at a certain angle. Like the picture below:
In order for the fuel to burn at the necessary moments of movement of the piston along the cylinder, it must be ignited in a timely manner. In the Ant engine, the fuel is ignited by a spark in a spark gap called a spark plug. The ignition system, consisting of the following elements, organizes the formation of a spark between the electrodes of the spark plug:
- spark plug;
- ignition coil with capacitor;
- current breaker;
- current source (battery and generator);
- connecting wires.
How the listed elements work and interact with each other can be read in the same “Physics Primer” for elementary school. Here I will only remind you that a spark in the spark plug occurs at the moment the breaker contacts open. It is this moment in time that must be captured when setting the ignition timing. “Physically” this is quite simple to do. When the current source is turned off, we clamp the strip of paper with the contacts of the breaker. Smoothly turning the engine power take-off shaft with one hand, we pull our paper strip with the other. When the contacts release the strip, at that moment the event we need will occur in the spark plug.
Now you need to organize the “spark supply” at the required moment of piston movement. This process is also not particularly sophisticated. Insert a “match” approximately 250 - 300 mm long into the hole from the inverted spark plug. By rotating the power take-off shaft, we determine the position of the piston at top dead center (TDC) and make a mark on the match. From this mark we set aside 10 mm upward - this will be the ignition point of the fuel, the position of the piston when a spark should appear in the spark plug and the fuel should ignite. By rotating the power take-off shaft, we place the piston at the ignition point. Well, now, by rotating the body of the breaker with a strip of paper clamped by the contacts, we catch the moment when they release the strip.
MY MOTORCYCLE
The carburetor is one of the main components of a motorcycle, which affects the operation of your bike’s engine. Its correct adjustment affects how it starts, runs, and engine power. The second element is the ignition system. In this article we will talk about adjustments that can be found on motorcycles Minsk, IZH Jupiter and Planet, Voskhod.
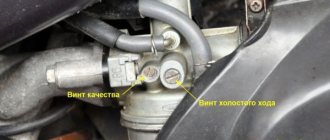
The K62 carburetor has two adjusting screws, with which you can change the idle speed, and a needle, by changing the position of which, you can change the property of the mixture (enrich or lean it). When we raise the needle, we enrich the mixture; when we lower it, we make it leaner. Adjusting the quality of the mixture is carried out by walking 2-3 km (at a speed of about 60-70 km/h) and looking at the spark plug. If the candle is covered with the working mixture (the candle is oily, dark brown or black), we lower the needle; if it is too dry (the color is white, light straw), we raise it. As a result, a light brown soot should appear. But this is just part of the adjustment; each time you need to set the carburetor idle speed. So we continue to adjust further:
To adjust the idle speed on the K62 carburetor there is a “quality screw”. This screw supplies air even when the throttle is closed. We repeat, the propeller produces air, although some people think that this propeller is designed for fuel. Therefore, by tightening the quality screw, we close the air flow, that is, we enrich the mixture. If we unscrew the screw, the mixture becomes leaner. As was said, this screw provides air in all positions of the damper, and therefore at idle speed of the crankshaft. Therefore, the quality screw belongs to the idle air regulator. At this moment, it significantly affects the operation, but if the gas is at medium or high speeds, then the influence is not large, but it is present. So, it all comes down to the fact that the idle speed is adjusted, and this automatically affects all engine frequencies. Now, after a short introduction, let’s talk about the idle speed adjustment itself. To keep things simple, let’s talk about adjusting K62 K carburetors and similar ones for Minsk and Voskhod motorcycles. But by analogy, the adjustment of all types of carburetors is the same, so it will also work on IZH and other motorcycles.