Hi all! In this article I will tell you how to adjust the carburetor on an Alpha moped. But first, I’ll tell you why a carburetor is needed.
The carburetor is needed to make the right mixture.
What is the correct mixture is 1 part gasoline and 15 parts air. With this ratio, the mixture turns out to be the most explosive, the greatest power is obtained, and acceleration becomes better.
Signs of a carburetor malfunction
There is a situation when the carburetor of an Alpha moped starts to malfunction. This problem can be noticed during the operation of the vehicle. Symptoms of malfunctions are listed below:
- unstable operation at high speeds;
- loss of power when switching from idle to normal;
- Difficulty starting the engine after being idle for several days.
If you find one of the listed problems, you can try to clean it yourself and make adjustments. If this is not done, over time the engine will stop starting.
Soot contamination
Type of spark plug: dry soft soot of intense black color on the insulator, electrodes and spark plug body.
Consequences: poor start of the scooter engine; poor operation of a cold scooter engine; interruptions in ignition of the air-fuel mixture; bad reaction to gas.
Probable causes: excessively rich air-fuel mixture; The scooter's air filter is very clogged; The thermal range is incorrectly selected - the candle is too “cold”.
Remedy: adjust the working mixture; adjust the cold start system of the scooter engine; change the scooter air filter; clean the spark plugs or replace them with new ones - with the correct heat rating.
This is interesting: A method that can help turn off a diesel engine when it is running
The design and principle of operation of the carburetor
The carburetor is the most important part of a gasoline engine. Its function is to prepare a mixture of fuel and air, saturating the fuel with oxygen. Next, this mixture is sent to the cylinders, where the gasoline should burn with the greatest efficiency. The moment air moves through the narrowing of the carburetor air throat, a decrease in pressure occurs. Due to this, fuel is sucked in.
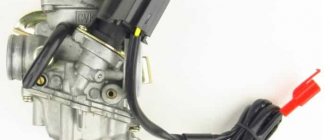
Appearance of a moped carburetor
The properties of the mixture of fuel and air are controlled by the quality screw. The more it is twisted, the narrower the air channel, and the mixture becomes richer, that is, it contains more gasoline. If the screw is unscrewed, the oxygen concentration increases and the mixture becomes leaner. The carburetor must be adjusted correctly. Otherwise, it will become more difficult to switch from idle to operating speeds, and “dips” will begin when changing the throttle. The adjustment can be entrusted to professionals, but it is also not difficult to do it yourself.
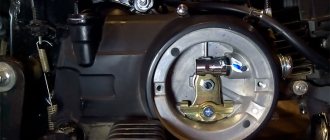
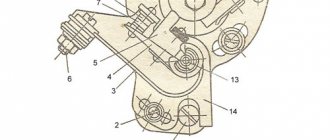
Three jets are visible on the carburetor body; only the top two are used for adjustment. The idle jet located on the right is adjusted first. It is necessary when parked, when traveling in neutral or idling.
Screws required to adjust the carburetor on an Alpha moped
When the left fuel quality jet is not adjusted correctly, the mixture will be rich or lean. As a result, wear and fuel consumption increases. The lower jet is necessary to drain gasoline and remove condensate; it unwinds counterclockwise. But you don’t need to touch it to adjust it.
Overheat.
Plug Type: Extremely white insulator with small black flecks and premature electrode erosion.
Consequences: loss of scooter power at high speed or under load.
Probable causes: the spark plug is not screwed in enough; The scooter's engine cooling system is not working properly; ignition of the scooter too early; The thermal range is incorrectly selected - the candle is too “hot”.
Remedy: check the torque of the scooter's spark plug; operation of the scooter engine cooling system; adjust the ignition timing; select the correct spark plug heat rating.
Type of spark plug: melted and burned central and grounding electrodes (or one of the electrodes) of the scooter spark plug; bubbling insulator with metal deposits on it.
Consequences: significant loss of scooter engine power; ignition interruptions. Continued use of such spark plugs may cause serious damage to the scooter engine.
Probable causes: thermal overload; significant overheating of spark plug parts due to glow ignition - combustion begins before a proper ignition spark appears; use of low-quality fuel; burning out of the remaining air-fuel mixture in the combustion chamber due to an incorrectly adjusted fuel system of the scooter or the ignition timing of the scooter; The thermal range is incorrectly selected - the spark plug is too “hot”.
Remedy: check the scooter engine, ignition system and fuel system, as well as the quality of the working mixture and the ignition timing of the scooter. Install new spark plugs with the correct heat rating.
Carburetor Adjustment Tools
It is necessary to prepare a screwdriver with a flat head, with which you will unscrew the bolts. If you have to remove the carburetor to clean it, you will need a 10mm wrench. You will also need a carburetor cleaner. It is available in aerosol form. The cleaner is very caustic, so it is advisable to purchase rubber gloves when working with it.
Carburetor cleaner
How to clean the carburetor on a moped - step-by-step instructions
Cleaning is necessary if a lot of dirt and condensation has accumulated. To ensure that this procedure is not necessary, it is advisable to disconnect and disassemble the carburetor. If it is clogged, it is useless to perform adjustments.
First, turn off the fuel supply valve, then you need to disconnect the fuel and drain hoses from the carburetor.
Next, you need to disconnect the inlet pipe from the carburetor, then unscrew the throttle valve cover and remove it from the carburetor. Now the part is held in place only by two bolts, which can be unscrewed with a 10mm wrench. That’s it, the carburetor has been removed. It is advisable to disassemble it on a white table so as not to lose small parts.
Next you need to disassemble the carburetor. First, unscrew the bolts located on the carburetor body. After this, the protective cover will be removed.
Next, the float chamber is pulled out; it is held on one pin, which is removed from the grooves. It can be removed without using tools. Together with the camera, a small cylindrical part with a cone-shaped tip will be removed - a shut-off needle, which is held between the float and the fuel supply channel. It is important to make sure that it does not fall on the floor and get lost.
Now, using a screwdriver with a straight bit, unscrew the jets, the idle speed adjustment bolt and the mixture quality screw.
The unit is disassembled, you can proceed to cleaning. First, attach the tube attachment to the aerosol canister for cleaning.
The accumulated liquid is poured out of the carburetor cap, then the internal cavity is treated with a cleaning aerosol. The jets are treated in the same way; the aerosol tube can be lowered into the recesses and holes. Then all the internal cavities will be cleaned, and all the accumulated dirt will come out. An aerosol with a nozzle can be used to treat all other carburetor openings.
Small holes need to be blown out so that there is no dirt there. The cleaned parts are wiped dry with a cloth; it is important to wait until the applied aerosol has completely dried. Then reassemble the carburetor in reverse order. It is difficult to make a mistake during assembly, since all the parts differ in size and are placed only in certain holes.
Disassembled carburetor of an Alpha moped
When installing a float chamber, first attach an element that shuts off the fuel supply through the hole near the jets. A pin is connected to the camera mount, after which the entire structure is placed on the socket. Next, the cover is mounted and the bolts are tightened. Tighten the mixture quality screw one and a half turns, then tighten the idle speed screw.
It is recommended to spray the assembled carburetor to keep it clean on the outside. Next, the part is put in its original place, first the fuel hose is connected. Then you need to open the fuel valve and wait a few seconds until the fuel fills. You can now start the engine, but it may not start or may be too loud. This means that adjustment is necessary.
You can learn more about how to clean the carburetor on an Alpha moped from this useful video:
The scooter stalls when adding gas: what to do?
Many scooter riders who have been using the same scooter model for several years must have encountered a problem where the scooter either does not start or starts but stalls after adding gas. What is this problem and what is its solution, we will consider in this article.
If you have this problem, it will be extremely difficult to fix it without special knowledge. The first step is to make sure that certain parts are working, so you should do the following:
- configure and adjust the carburetor;
- check the air filter;
- check compression, replace rings if necessary;
- check the spark on the spark plug;
- adjust the float on the carburetor;
- check the relay, generator and coil;
- as a last resort, try to replace the carburetor.
Adjusting the carburetor of the Alpha moped - step-by-step instructions
First, let's look at the express method, which is perfect for beginners or when you need to do everything as quickly as possible. You can adjust the carburetor only when the engine is hot, for example, after riding a moped. It is important that the engine idles for at least 10 minutes. Pre-cleaning is optional, but recommended. For quick setup, it is convenient to use the following instructions:
Using a screwdriver, turn the left bolt – the quality jet – clockwise until it stops. Also turn the right bolt, which is responsible for the quality of the mixture. You need to turn until the engine almost stalls.
Next, you need to turn the left jet two turns counterclockwise. The quality jet is turned in the same direction, but one and a half turns.
After express tuning, the engine should run normally, but the idle speed will be insufficient. For more precise settings you will have to spend a little more time.
The second method is to fine-tune the carburetor
First you need to increase the speed to 300-3500 per minute. To do this, you need to turn the upper right bolt, which is responsible for the speed, clockwise.
Then you should turn the bolt, which is responsible for the quality of the fuel-air mixture, to the right and left. The bolt is on the left, it is turned until the speed increases even more.
If the revolutions begin to increase, then the bolt is turning in the right direction. They should begin to increase when turned counterclockwise.
At the moment when the number of revolutions is maximum, you need to return the first bolt to its initial position, that is, turn it to the left. The bolt is located at the top right. You need to turn it to about 1250 rpm.
Quick carburetor adjustment after cleaning
Immediately after cleaning, adjustments are made in the fastest way possible. Manipulations must be performed with the engine running. The quality screw must be tightened completely, then unscrewed one and a half turns.
Then start the engine and monitor its operation. If after cleaning it cannot work normally without gas, you need to tighten the idle speed adjustment screw. The screw is screwed to the right, approximately to the middle; you can adjust it during startup. When the screw is adjusted normally, the number of revolutions on the tachometer should be at least 1000-1500. With this adjustment, the engine will not stall.
Video on how to adjust the carburetor on an Alpha moped:
Carburetor Tuning Tips
It is important to ride the moped before making adjustments so that the motor warms up well. It will not be possible to perform the adjustment correctly when the engine is cold; it will most likely stall. To make the adjustment correctly, you need to check the speed on the tachometer and listen to how the engine operates. During work, only two jets are adjusted, and each is fixed in a certain position.
Setting up a carburetor does not require expensive tools or major financial investments. It is enough to tighten the bolts correctly, and the engine will operate normally in all modes.
How to set up a carburetor on an Alpha moped: photo instructions for adjustment and tuning
3 (60%) 7 votes
Oil contamination
Type of spark plug: wet oily black deposits on the insulator, black oil deposits on the insulator, electrodes and spark plug body.
Consequences: poor start of the scooter engine, interruptions in ignition.
Probable causes: too much oil in the fuel mixture (for two-stroke engines); wear of the rings and/or piston liner - wastes oil.
Remedy: mix gasoline and oil in the correct proportion, install new spark plugs for the scooter (for two-stroke engines); inspect the condition of the scooter engine, if necessary, repair the engine, CPG; .