Payment for goods and downloading of the book in electronic form (PDF format) is made on the website.
To do this, you need to find the book you are interested in and click on the “Buy” button. The price of the book is indicated on the button.
For convenience, the price on the website for residents of Russia, Belarus and Kazakhstan is presented in rubles.
For residents of Ukraine in hryvnias, and for all other countries - dollars.
After clicking on the “BUY” button, a payment window will open where you can select a payment system with which you can pay for the selected book using any bank card (Visa, MasterCard, MIR, etc.)
When you click on the “Pay by bank card” button, the Portmone payment system will open, which is the easiest way to make a payment.
In addition, the website offers four payment systems for payment:
- Yandex (payment from any bank cards, Yandex Money account, QIWI Wallet, terminals, etc.);
- Portmone (payment from any bank cards, Portmone account);
- PayPal (payment from any bank cards, PayPal account);
- WebMoney (payment from any bank cards, payment from WebMoney wallets).
How much lubrication is required
- Any scooter owner needs to understand what kind of oil is recommended to use in their small-displacement engine and exactly how much oil should be filled in for the engine to operate efficiently in any weather. The average is 1-2 liters, but a lot depends on the specific type of scooter and its brand. For a more accurate understanding, the owner should read a book on servicing his scooter or select a model on the website and read the instructions.
- In a situation where the document cannot be found, it is better to take the advice of repairmen.
- The amount of liquid itself that you fill during replacement is on average about 1-2 liters. Experienced specialists or owners of small motorcycles will tell you a more accurate parameter. But at the beginning of use it is recommended to fill in about 1.5 liters.
When to clean or replace the filter
Scooter air filters serve to clean the air entering the carburetor and then into the engine as part of the fuel mixture. The filter element of a moped performs the same function. The consequences of untimely replacement or cleaning of them can be no less disastrous than with the wrong approach to this issue in relation to automobile air filters. In any case, the owner of a scooter or moped will start filling up more gasoline and will be annoyed that his iron friend has become sluggish and no longer accelerates to the km/h required by the passport.
Manufacturers recommend replacing the air filter of a scooter or moped at least every 5,000 km, and cleaning it after every 1,000 km.
If the scooter or moped is used in very dusty roads or terrain, then maintenance and replacement should be carried out more often. In this case, cleaning should be performed at least every 500 km traveled, and, in order to prevent premature engine wear, you can start with a test inspection and cleaning (if necessary) of the filter after the first 100 km. Based on the results of this check, it will be clear whether it makes sense to service the filter element every 100 km or whether the mileage before the next cleaning should be increased. When the time comes to change the filter altogether, it will be clear either by its appearance or by the behavior of the scooter or moped engine - after the next filter maintenance, symptoms will remain that it is clogged and the motor does not have enough air for it to work.
Oil for four-stroke engines
This phrase means that you cannot fill a moped engine with two-stroke oil. The thing is that two-stroke engines have a completely different principle of engine lubrication: they mix oil with gasoline in certain proportions (either in a gas tank or using a special oil pump), and then, together with gasoline, first enter the engine crankcase, lubricating the bearings crankshaft and connecting rod, as well as the cylinder mirror. The mixture then enters the combustion chamber, where the oil burns along with gasoline and is discharged from the engine through the exhaust pipe. Thus, two-stroke oil is not designed for long-term use , it is “disposable”.
In most four-stroke engines (and the Alpha's engine is four-stroke), oil is poured into the engine crankcase and lubricates the rubbing parts either by splashing (due to the rotating parts of the engine) or under pressure (which is created by the oil pump). Oil also helps cool the engine. Therefore, the oil in a four-stroke engine must withstand long service life at high temperatures.
Some owners ask: “Do I need to add oil to gasoline?” Remember: for Alpha mopeds (Delta, Sabur, Vento, etc.) there is no need to add oil to gasoline!
Consequences of untimely replacement
If you don't change your air filter, at best its performance will deteriorate over time. The moped will lose power and stop idling. Also, dust getting into the carburetor will clog all the channels, which will lead to unstable operation. The worst case scenario may be that dirt gets into the engine itself. Large particles will leave deep scratches on the cylinder bore and on the piston. The valve assembly may fail. Accordingly, a major overhaul of the engine will be required, so you should not neglect replacing the air filter. The consequences can be dire.
The frequency of replacement depends on the level of road pollution in the area. The cleaning system should be carefully inspected periodically.
Scooters and mopeds are equipped with an internal combustion engine. Therefore, many basic principles and rules for servicing components of gasoline engines of passenger cars also apply to them. In particular, this applies to the air filter of scooters.
Work order
First you need to decide what you will need; to change the oil in your motorcycle you will need the following tools:
- A set of wrenches - they must be strong enough, because sometimes it is not easy to tear off a nut after a long drive;
- Spring puller - can be used either purchased or homemade;
- Tool for pumping oil - it can be successfully replaced with a homemade device made from a syringe, catheter and rubber hose.
Using the scale on the syringe, you can monitor the level of the filled oil; this is very convenient and will not allow you to make a serious mistake in the calculations.
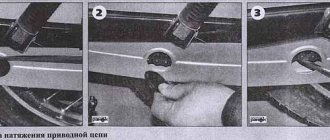
Before you start draining the oil, you should check where the lower plug is located on your motorcycle. Usually it is located either at the end or at the lower side of the fork, although it may be completely absent.
- Using the instruction manual, find out what viscosity oil should be poured into the fork;
- It is necessary to clarify the desired position of the locking lock nut, which regulates the rebound during impacts, and tighten it to this place. The tighter you tighten the clamp nut, the stiffer the motorcycle's suspension will end up;
Advice! When changing the rigidity of the motorcycle suspension, do not go beyond the limits specified in the instructions, otherwise this may lead to an imbalance in the operation of the front fork of the bike!
Advice! First of all, unscrew the top plug, and then the bottom one; if you do the opposite, the waste can flow out under great pressure and splash everything around.
- After all the waste has drained, you should rinse the fork with a special liquid or oil of lower viscosity and blow out the part using a compressor or a compressed air cylinder;
- Screw on the bottom plug and you can pour technical fluid into the fork. Check the tightness of all connections on a homemade oil injection tool and pour it into each side of the fork one by one;
- Carefully monitor the level of the technical fluid being poured; as soon as it approaches the desired level, stop pressing on the syringe. The residual pressure will do the rest of the work;
- You can tighten the top plug and, after wiping off drops of oil, check the functionality of the suspension.
Here's everything you need to know to change the lubricants in the front suspension of most motorcycle models yourself, using these instructions you can save significant money.
Maintenance of filters for mopeds and scooters
Maintenance of scooter air filters consists of cleaning and soaking them in oil if they are “wet” foam rubber (“dry” ones are blown or washed in water with washing powder).
We purchase a special product for high-quality cleaning of air filter elements - for example, K&N. Although this composition is intended for filters from this company, it is also perfect for foam rubber ones. Read the instructions and use them in accordance with them.
We wash the foam filter element in any gasoline (preferably AI-92). Gasoline is poured into a suitable container, where the foam is washed. We wash it carefully and carefully - just let the foam rubber absorb the gasoline itself, and then squeeze it out. After washing, the filter is wrung out - again, carefully, without twisting it. Then dry the foam.
We rinse in warm water with washing powder dissolved in it - excellent cleaning quality at minimal cost. During washing, you must follow the same rules as when processing in gasoline. Then wring out the foam, rinse thoroughly, and then dry.
After washing and drying, moped air filters should be soaked in oil. Or special is the best option. You can use impregnating agent for air filter elements from K&M or similar, cheaper ones from other manufacturers. Spray the aerosol from the can evenly in linear (not circular) movements over the entire surface of the filter. We wait about 20 minutes and then check the uniformity of application. If necessary, we “paint over” all identified spots that did not get oil.
Motor, diluted with gasoline 1:1. In this case, you can soak the foam rubber in a suitable container. Do not pour a lot of oil - its excess can significantly worsen the throughput properties of the filter. When the foam in the container is saturated, it is compressed. This will allow the oil to be better absorbed and remove excess. Then we dry the foam rubber from gasoline.
How to clean the air filter on an alpha moped
what you can soak in from the means at hand.
Changing engine oil
Draining used oil
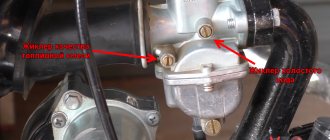
We place the scooter on the center stand; if it is crooked, we straighten it. On the left side in the direction of travel of the scooter, at the very bottom of the engine, look for the drain plug, place a previously prepared container under the plug and unscrew the drain plug with a 17mm head.
While the oil is draining, go to the right side of the scooter and unscrew the dipstick and the oil filter plug, which is located at the very bottom of the engine.
We put a good 17 socket on the plug, unscrew it and remove it with all its contents from the engine.
This is the oil filter. Immediately after unscrewing it, while the point is still important - throw all this junk into clean gasoline, give it a good shake, and then blow it out and dry it.
After the oil filter plug is removed from the engine. In order to remove any remaining oil from the engine, pump the engine several times using the kickstarter.
Then we wait about five minutes - wipe the drain holes dry, for greater reliability, apply sealant to the plugs and screw them into place.
Filling the engine with new oil and checking its level
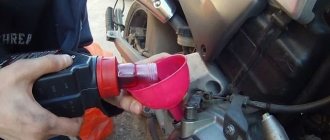
Depending on the design of the canister, pour oil into the neck either directly from the canister itself or through a funnel. The funnel must be clean!
Oil level control
The oil level is checked as follows: pour the first portion of oil into the engine, approximately 600-700 ml, wait a couple of minutes until the oil spreads evenly over the crankcase without twisting, insert the dipstick all the way into the filler neck, remove it and check the level.
The oil level must be within the control area.
- If the level is lower, add a little oil, wait a couple of minutes and take a measurement.
- If the oil level is higher than normal, drain it or, better yet, pump it out using a syringe with a tube from the neck.
The control area is indicated by red arrows. In my case, the oil level is exactly in the middle of the control section and is indicated by a blue arrow. Ideally, the oil level should be near the upper boundary of the control section. But this is ideal, but in practice, the average level is quite acceptable and does not in any way affect the reliability and durability of the engine.
How to install a cylinder head on an alpha moped
Let's start repairing the Chinese miracle of technology
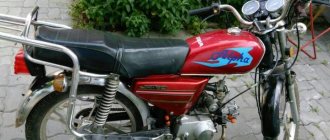
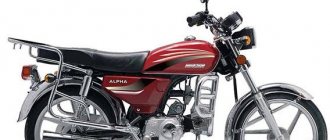
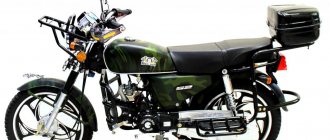
The Alpha 72cc moped is one of the most famous representatives among Chinese motorcycles.
This moped is perfect for use both in rural areas and on city roads. A durable iron frame, complete absence of plastic parts, large diameter wheels - simply created for domestic roads, the quality of which is far from European level. If you ride often, the rather high seating position of the ALPHA moped makes it possible to overcome low obstacles. A big advantage when choosing a moped is its low price, which makes the purchase quite affordable. This would be a good choice for a beginner. There are models with a side trailer. Practical to use in rural areas. A reliable assistant in the household.
Economical, with an engine capacity of 72 cubic meters and air cooling, the Alpha moped is unpretentious. This is an extremely simple transport and servicing it couldn’t be easier! You simply cannot find a simpler engine, and spare parts cheaper than Alfa’s can only be found in a dream.
Anyone can carry out tuning or repairs on an Alpha moped with their own hands.
Before you start disassembling the motor, you should fix it on the center stand and completely remove all the plastic. All power systems should be turned off - tank, carburetor and fuel filter; The oil should also be drained.
The engine should be removed along with the transmission, and the Alpha moped should be repaired on a flat surface.
You can remove the alpha engine according to the following diagram:
- remove the muffler and exhaust pipe;
- remove the camshaft gear cover;
- unscrew all 4 bolts from the cylinder cover;
- remove the top cover and cylinder head;
- We study the degree of wear of the valves, check how dirty the insides of the system parts are.
Is this your first time repairing an Alpha moped yourself? No problem! A moped is not a hadron collider; nothing has changed in 50 years of moped construction. For convenience, draw a diagram of the location of the parts so that later you can complete the assembly without any problems.
A smartphone can help, take photos of each step so that later you can reassemble in the reverse order without confusion.
If it is necessary to replace the valves, or if there are gaps in the fit, then they need to be removed:
- Place the head on a level place. To prevent the valve from being damaged during dismantling, it is better to place a layer of thick rubber or a rag under it;
- we select the socket head, place it on the valve plate and hit it hard with a hammer;
- release the crackers, remove the top plate and valve washer;
- remove the valve and guide bushing. To complete the repair of the Alfa moped engine, after replacing the parts, we begin assembling the engine in the reverse order, putting everything in its place, observing the marks. Don't forget to add fresh oil.
The gearbox of an Alpha moped often fails and requires constant attention. The author of this article got the sprockets stuck in the box while driving in 4th gear 10 years ago. When trying to force a gear change, for some reason the gearbox automatically selected first gear and the moped was driven at a speed of under 100 km/h. just braked without throwing the author of this article over the steering wheel
API classification
API is a quality classification system for automobile oils. The oil designation in this system consists of Latin letters.
The first part can be either S (Service) - oil for gasoline engines, C (Commercial) - oil for diesel engines, EC (Energy Conserving) - energy-saving oils.
The next letter is the designation of the oil generation. The designation is in alphabetical order, i.e. The farther the letter is from the beginning of the Latin alphabet, the higher the generation of oil (better performance qualities).
API categories SA, SB, SC, SD, SE, SF, SG are currently recognized as invalid, category SH is considered conditionally valid. Thus, oil of the SE and SF cannot be found on sale now. What kind of oil should you buy then? The answer is to buy any one that is further down the alphabet (SJ, SL, SM, SN), it will in any case be no worse than the recommended one.
How to remove and replace the air filter of a scooter or moped
The engines of most scooters and mopeds have a “wet” type filter (on almost all Chinese vehicles) or a “dry” type filter (mainly on Japanese ones). “Wet” is made of oil- and petrol-resistant foam rubber and impregnated with a special oil that ensures the retention of small particles. The filter itself consists of two layers:
- internal, having a fine-mesh structure - to retain the smallest contaminants;
- external, with larger cells - for filtering large particles.
SAE classification
The latest edition of the classification divides motor oils into 11 classes: 6 winter (0W, 5W, 10W, 15W, 20W, 25W) and 5 summer (20, 30, 40, 50, 60) viscosity classes. The letter W (Winter) before the number means that the oil is adapted to work at low temperatures.
Most motor oils on the market today are all-season, that is, they meet viscosity requirements at both low and high temperatures and have a double designation, for example in our case: SAE 15W-40 . The first number characterizes the pumpability of the oil at low temperatures. If you subtract 35 from the first digit, you get the minimum temperature at which a safe cold start of the engine is possible. The second number is an indicator of oil viscosity at 100 degrees Celsius. If you add 5 to the second digit, you get the maximum permissible air temperature at which the oil can be used.
How to properly wash a motorcycle?
It’s very strange to see only one piece of advice like: take a high-pressure washer and don’t worry, you’ll get rid of any dirt under pressure! Either such advisors have a share with manufacturers of motorcycle chains, or they ride on a cardan drive all their lives. Because people don’t always pay attention to the fact that high-pressure washing harms some parts of the motorcycle, and together with the dirt, it knocks off the oil seals and causes heat to the electrics.
I knew one combat “jixer” who, after a killer pressure wash, damaged the fuel system hose and did not notice. And since the “Jixer” was ancient, like my dreams, according to the law of universal meanness, a spark jumped along the road somewhere near the leaking flammable liquids. And then you guess. The route was truly fiery.
Washing a motorcycle is quite simple, just as easy as ruining something in it by vigorously scrubbing off the dirt. It's especially funny when aluminum parts oxidize from alkaline chemicals and life didn't prepare you for this. Yes, yes, if the cleaning chemistry is too aggressive in an alkaline environment, and you have a lot of aluminum parts, then oxidation of the surface may occur. As a result, the parts will become stained.
Let's look at the main points to consider:
- Washing conditions and sequence
- Chemicals
- Tools
- Drying the motorcycle
Conditions and sequence of washing a motorcycle
Cleaning your motorcycle quickly requires less space and materials. In such cases, they actually stop at special stations. But don’t forget about the main points, even when you plan to just superficially wash your motorcycle:
How often should you change the oil in your moped?
In the operating instructions, the first oil change (on a new moped) is after 500 kilometers (TO-1). The second replacement is at 1500 km (TO-2). The third replacement is at 3000 km. (TO-3). Then every 2000 km. But there is an indication that if the moped is operated under increased loads and in dusty conditions, the oil needs to be changed (maintenance) more often.
Personally, I change the oil every 1500 km.
How much oil to pour into an Alpha engine?
The owner's manual says to fill the crankcase with 0.9 liters of four-stroke engine oil. In practice, it may turn out that not all of the old oil has left the engine. I usually do this: fill in 0.8-0.85 liters of oil, control its level with a dipstick and top up if necessary.
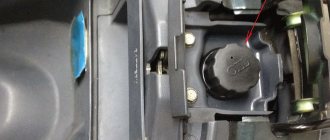
Where to fill oil in Alpha mopeds?
When faced with servicing a moped for the first time, many owners look for a separate oil filler neck on the engine. But in fact, the engine developers acted very wisely: oil is poured into the engine through the hole with the dipstick. It is located on the right side of the engine. To avoid spilling oil on the engine, I usually use a small plastic funnel bought at a hardware store; it makes filling quick and clean.
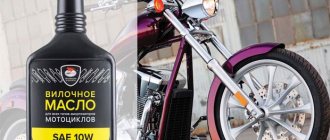
Write in the comments what oil you chose for your moped/motorcycle.
Filter selection
How to choose the right filter?
There are two types of cleaning mechanisms for the Alpha moped:
- standard cleaner;
- zero resistance filter.
The first provides basic filtration parameters and requires replacement after 1.5 thousand kilometers. The zero-resistance device is an idea that came from racing cars, where they use such filters or not use them at all to increase power. This increases engine power by 3-5 percent, but the engine loses protection from dust and dirt. Since sports cars with this type of cleaning device are used on special racing tracks, the amount of dirt and dust on the road there is kept to a minimum.
When using a zero-resistance filter on a moped, it will not provide a noticeable increase in power; the only visual difference will be the sound of operation (it will become more bassy). On the other hand, such a device does not protect the engine from small dust particles, so during its operation there is a possibility of rapid failure of the moped engine.