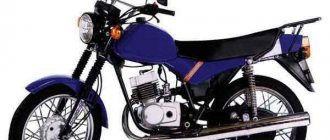
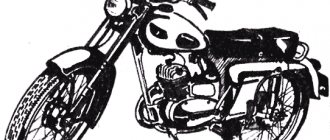
One of the most popular motorcycles in our country is Minsk. They started producing it back in the Soviet Union, and it still hasn’t lost popularity. This is due to the excellent combination of reliability, power and maneuverability. Unfortunately, despite all of the above, it also has disadvantages. But folk craftsmen have learned to bypass these nuances. Below we will look at how tuning a Minsk motorcycle is done, and we will also figure out how to paint a Minsk motorcycle. This is also a fairly common job.
Flaws
First, let's figure out what shortcomings the motorcycle has, this will allow us to decide what needs to be improved first. In general, many problems are typical for domestic motorcycles, and when tuning sunrise 3m they are faced with the same problems.
The main disadvantages of the motorcycle are as follows:
- Low-power engine. The most powerful engine is only 13 hp;
- On the earliest models, the placement of the crankshaft bearings was unsuccessful;
- Poorly designed clutch;
- Weak brakes.
These are the main disadvantages of Minsk. In general, it is worth noting that all of the above can be eliminated with your own hands, significantly improving the performance of the motorcycle.
Selection and preparation
As a basis for a cross-country motorcycle, you can choose a used small-class bike - it is best to choose models with an engine capacity in the range of 125–350 cubic centimeters. The best option would be a road-going Japanese car aged 12–15 years with a well-preserved engine and an intact frame. In addition, you can even choose a Soviet motorcycle - for example, “Voskhod” or “Minsk”. It won't catch the stars from the sky at sporting events, but it will allow you to get a lot of fun from off-road adventures.
The motorcycle will have to be disassembled - you must remove all the components from it, leaving only the frame. It is better to go through the motor, transmission and drive components, diagnosing possible faults and eliminating them before starting assembly. The frame and tank of the future motocross motorcycle should be cleaned of paint, then covered with putty and a new coating applied according to your wishes. After such preparation, you can begin selecting components and gradual assembly.
Engine tuning
Probably every motorcyclist is a fan of dynamic riding, but the Minsk motorcycle is not particularly designed for this. Therefore, first of all, owners strive to modify the engine. You can easily add a couple of horsepower here.
Typically, cylinder boring is used for this. This way you can increase the compression ratio, and, accordingly, the engine power. Let's take a closer look at how this is done:
- The block is ground down by 1.5 mm, the lower edge of the block head is also ground down, also by 3 mm. The motorcycle cylinder is being modified on a lathe;
- Increase the size of the outlet and inlet openings;
- Install new valves, better than those made in Japan;
- The piston is being modified. They take a standard piston and fit it to the modified engine. If you do not have a special lathe, or you are not entirely confident in your abilities, then it is better to give the engine to an experienced lathe.
After such processing, the engine will receive an additional 1-2 hp. But, it is worth considering that it will be more demanding on nutrition; here it needs to fill with gasoline with an octane number of at least 92.
Appearance tuning Minsk
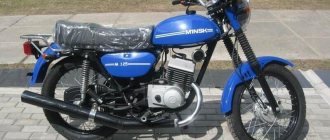
Every Minsk 125 owner has at least once thought about the appearance of his motorcycle. Perhaps we should start by repainting the frame and other parts of the motorcycle. The first thing to do is remove the handlebars, seat, tank, engine, wheels, fork and other parts to leave a bare frame. Sandblast the parts to be repainted or remove the old paint layer using special attachments for an angle grinder/drill. An attachment on a drill for an emery wheel with Velcro is also very effective for this. Be sure to get rid of pockets of corrosion. The next stage is puttying. This is necessary to get rid of deep scratches and level the surface. Parts with a leveled surface are degreased to prepare for priming. Apply primer in 2 layers. The dried soil should be sanded with 400 grit sandpaper. Then we paint it in the color we like in 2-3 layers, followed by a layer of varnish in 3 layers. The metallic color on your Minsk 125 motorcycle will look very impressive.
The next method of tuning Minsk is polishing the engine crankcase to a mirror finish.
This procedure can also be done with your own hands using a set of sandpaper with grit from 120-180 to 2500. By sanding the surface of the engine in steps from coarse to finer, you will achieve an ideal matte surface. At the end of this work, use GOI paste, a felt circle and a drill to achieve the final mirror surface. The Minsk motorcycle engine will immediately be transformed! This procedure applies to the rims, spokes and muffler - this will help them shine in a new way.
New road tires would be a good investment. The new tread pattern is not only effective when driving on wet asphalt, but also looks attractive. Replacing lighting equipment will also appeal to everyone. For example, LED turn signals and brake lights will not only give a modern appearance, but will also reduce the load on the generator, and will also increase road safety when driving at night. Separately, it is worth noting the efficiency of xenon installation. The recommended heat of light is 4300k as it is the most neutral white light, does not cause eye fatigue and provides the best illumination. A useful tuning in Minsk will be the installation of new chrome mirrors, which will also significantly increase riding safety and complement the transformation of the motorcycle. In conclusion, I would like to note that these tuning actions can be carried out selectively at will and combined according to your taste and financial capabilities.
Ignition system
The standard Minsk ignition system does not always successfully cope with its tasks. Therefore, it makes sense to carry out the revision carefully and carefully. Just like with Izh Planet 5 tuning, here they primarily work with the ignition timing.
The model has a good generator, as well as contactless ignition with an electronic switch. But, there is no possibility to change the advance angle depending on the operating mode of the moped engine. Therefore, it is recommended to install a device that forms the angle depending on the need at a given time.
You can buy it in a store; a part from any motorcycle with a similar volume will do. The connection is not complicated, so there shouldn't be any problems. The use of such a device allows you to change the ignition timing depending on engine speed. This approach significantly improves engine efficiency and also increases its power.
Parts selection
First of all, you need to pay attention to the wheels of the future motocross motorcycle, since they will bear the main load. It is better to immediately abandon the use of alloy wheels, since they will not be able to properly absorb strong impacts, which will lead to their rapid deformation. The best option is to buy ready-made wheels based on spokes. A budget-friendly way to get wheels for a motocross motorcycle is to buy rims and install spokes of the required length yourself. There is no need to think long about the size of the wheels and reinvent the motorcycle, since the sport has adopted the standard - 120/70-17 in the front and 160/60-17 in the rear.
If you want to make a cross bike from Minsk, you will have to tinker with converting the rear suspension to a monoshock absorber. It is much easier to disassemble and select a fork of the appropriate size from a 125 cc Japanese motorcycle. All that remains is to choose the shock absorber itself - in this case, it is better to select the desired model based on the weight of the vehicle itself and its rider, and then make adjustments after assembly. Remember that the rear wheel travel of a motocross motorcycle should be 200–280 mm - based on this value, rear suspension components are selected.
Next, you should take care of the front suspension, which is subject to the highest demands. Unfortunately, in this case it will not be possible to make do with economical compromise options, so it is better to buy a fork from a motocross motorcycle assembled. You don’t have to look at the performance of the shock absorbers and the presence of high-quality oil in them - some components of the fork can be changed during operation. For a motocross motorcycle, the ability to fine-tune the front suspension is very important, so you should pay attention to the integrity of the adjustment mechanisms. The fork travel should be approximately similar to that of the rear monoshock.
For safety reasons, you should also take care of installing other brake mechanisms that will effectively slow down the motocross motorcycle if necessary. The best option is to purchase a special sports kit consisting of other discs, calipers, hoses and fasteners. However, buying one can be quite expensive, so you can also buy used brakes from a larger motorcycle, which will provide fast deceleration without any problems. If your future motocross bike has drum brakes, you will either have to completely redo the wheels, or accept the mediocre performance of them, improving the deceleration slightly by fine-tuning the pads.
The last thing you need to take care of is the frame. Once you have purchased all of the above components to build your motocross bike, you will see that the standard mounting points need some work. Try to make maximum use of standard places for fixing certain parts, if possible without resorting to welding. However, you may need to completely reshape some parts of the motocross motorcycle frame, for which it is best to use high-strength steel pipes and a fairly powerful welding machine.
Exhaust system
This element must be modified if the engine has been tuned. The problem arises due to the fact that the standard muffler is not designed for increased exhaust gas pressure.
As a result, in certain operating modes, the motorcycle engine begins to choke. Optimal mufflers were installed on a motocross motorcycle, but it is now almost impossible to purchase such a part. Such versions have not been produced for more than 20 years, and therefore spare parts for them have not been produced either.
You can make a high-quality muffler yourself. To understand how to make it yourself, let's look at how it works. Using a muffler of a certain shape allows you to create reverse draft. It allows the remaining combustible mixture to be sucked into the engine. A resonator is used for this.
You can make this detail yourself. On the Internet you can find a large number of formulas by which calculations are made. It is important to remember the basic rule - the size of the resonator directly depends on the power of the motor. This kind of motorcycle tuning in Minsk allows you to achieve maximum efficiency and engine response.
External motorcycle tuning Minsk
It all depends on your desires and financial capabilities. The most obvious option is to replace the wheel rims. A simple technical operation will immediately transform your motorcycle.
New tuned wheel for a Minsk motorcycle
To improve the appearance, you can install steel leg protection. This will not only make the appearance of the Minsk motorcycle more sporty, but will also increase your safety when operating it. In addition to this, you can repaint the motorcycle, replace the seat, replace the fuel tank, change the shock absorbers, make a sports body kit, or attach luggage bags to it. It all depends on your ideas and available funds.
Tuned motorcycle Minsk 125
Ultimately, if you have a great desire and with a relatively small investment, you can completely transform a Minsk motorcycle with your own hands, turn it into a cross-country, sports, or fashionable road motorcycle. Many people want sports motorcycle tuning, but cross-tuning is better suited to this model. Photos of Minsk tuning for cross
Cross tuning Minsk 125
In this article we will look at all the stages by which tuning a Minsk motorcycle can occur - the most affordable and popular motorcycle in the USSR. We will reveal the secrets of tuning the Minsk 125 engine, increasing its power, maximum speed, as well as improving its appearance.
Minsk 125 is one of the most popular famous Belarusian motorcycles, which have been produced since 1951. They have proven to be unpretentious, cheap to maintain, and are also famous for their reliable gearbox. This motorcycle is widely used in training and passing exams for category A, as well as in the “ Minsk cross 125 ” version for teaching the basics of motocross in many sections of the country. Minsk's foreign competitor is the Yamaha YBR 125 road motorcycle, which is perfect for beginner motorcyclists.
Tuning Minsk can be divided into two main parts:
- Engine tuning Minsk
- Appearance tuning
Intake system
But, maximum engine power is impossible without proper tuning of the intake system. It is this that creates the optimal combustible mixture. First of all, we replace the original exhaust valve.
Instead, they install a petal from any foreign motorcycle. It is recommended to grind the inlet hole. Be sure to install another carburetor. It is recommended to use Japanese analogues with a diffuser of 26-28 mm. The air filter should have minimal resistance.
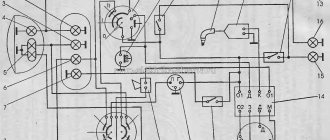
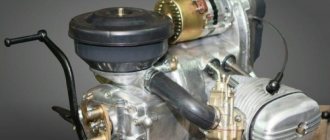
M-106 engine diagram
1 - cylinder head; 2 - cylinder; 3 - piston; 4 — piston pin; 5 — piston pin retaining ring; 6 — connecting rod; 7 — crankshaft oil seal; 8 — crankshaft bearing; 9 — bearing retaining ring; 10 — spacer sleeve; 11 — left half of the crankcase; 12 — motor transmission chain; 13 — segment key; 14 — washer; 15 - nut; 16 — driving gear; 17 — oil dipstick; 18 — gear shift pedal; 19 — clutch; 20 — ratchet gear of the trigger mechanism; 21 — input shaft bearing; 22 — left crankcase cover; 23 — thrust washer of the trigger mechanism; 24 — kickstarter oil seal; 25 — trigger shaft; 26 — kickstarter lever; 27 - screw; 28 — trigger sector spring; 29 — centering pin of the left cover; 30 — fork axis; 31 — shift fork for 1st and 3rd gears; 32 — gear shift disc; 33 — pedal return spring; 34 — adjusting screw; 35 - lock nut; 36 — right crankcase cover; 37 — shift fork for 2nd and 4th gears; 38 — plug screw; 39 — right cover plug; 40 — drive gear of the main gear; 41 — clutch adjusting screw; 42 — spacer sleeve; 43 — gearbox seal; 44 — secondary shaft bearing; 45 — gearbox oil seal housing gasket; 46 — hole for lubrication of the right crankshaft bearing; 47 - generator; 48 — outer seal of the bearing of the right crankshaft journal; 49 — gasket of the oil seal housing; 50 - right half of the crankcase; 51 — cylinder gasket; 52 — nut M7x1 of the cylinder stud; 53 - spark plug.
DIY motorcycle gearbox repair
Often the problem arises of repairing and restoring a broken tooth in a motorcycle gear, or repairing a gearbox when the speed barks (jumps out and engages and jumps out again) or simply knocks out the speed on the motorcycle. Motorcycles IZH, Voskhod, Minsk, Java, etc. suffer from knocking out and barking speed. Gearbox repair IZH, Voskhod, Minsk, Java, etc. You can do it yourself at home very simply, and restore the old gears of the motorcycle gearbox so that the speed does not bark or knock out.
Eliminating barking and speeding on a motorcycle
Speed knocking and barking on a motorcycle occurs due to the fact that the gear tooth wears out and the gears begin to repel each other, many blame the gear forks for this, but they have nothing to do with it, the job of the fork is to engage the gear in another gear and then the gears must grab each other , and not push away from each other. This problem can be solved very simply; use a cutting stone or grinder to sharpen the worn teeth at an angle as shown in the photo, and the gearbox of your motorcycle will start working like new.
Photo of how to sharpen a tooth so that the gearbox does not bark and lose speed; the arrow shows a sharpened tooth; this is how you need to sharpen all the gears in the motorcycle gearbox
Making a frame for use in the work of mounted implements
Attachment frame drawing
1 — hook (steel, sheet s5, 2 pcs.);
2 — spar (steel pipe, 2 pcs.);
3 — main cross member (steel pipe 1/2″);
4 — additional crossbar (steel angle 50x50x5);
5 — socket for mounted implements (made of steel strip 50×6 mm, 3 pcs.);
6 — locking unit of the mounted implement (M10 nut, welded, 3 pcs.);
7 — scarf (steel, sheet s5, 2 pcs.);
8 — stiffener (steel strip 300x20x5, 2 pcs.);
9 — bracket (steel threaded rod M12);
10 — U-shaped bracket for fixing the frame of mounted implements on the walk-behind tractor.
The frame was made with the ability to quickly install and dismantle it. The hooks, designed as a support adapted for attachments, are fixed in the working position using conventional shaped bolts, with the participation of L-shaped locking elements made of a metal strip.
The U-shaped comb device additionally fixes the frame in operating mode and in standby mode. Implements are installed using nesting recesses oriented to standard risers found on tractor cultivation devices.
A small box can be mounted on the former seat bars of the motorcycle frame, which will be used as a container for transporting small loads up to 0.5 quintals.
Restoring a broken tooth in a motorcycle gear
Of course, it is better to buy a new gear when a tooth is broken, but if the motorcycle is old or imported, it is not easy to find a new gear, but there is a way to restore a broken gear tooth at home. The first time I encountered such a problem with a gear tooth breaking was in my old cross-country motorcycle ChZ-250; two teeth in the first speed gear broke at once. The first time I tried to find such a gear, but I couldn’t find it, and it became very disappointing that because of two broken teeth, my ChZ-250 was at least thrown away or sold for metal. I thought for a long time and decided to try to restore the broken teeth by welding, everything worked out and the ChZ-250 has been running for several years and so far there are no problems with broken teeth. Now I will explain the whole process of restoring broken gear teeth at home without special machines, you will only need welding and a sharpener with a cutting stone or a grinder.
Let's start, in the photo you can see a broken gear tooth on a Minsk motorcycle
Photo. Next, I weld and use electrode No. 3 to replace the broken tooth. I weld in 4-5 passes and after each pass I beat off the welding slag with an electrode, so you should get a metal bulge in place of the broken tooth. After welding, I immediately cool it in water so that there is a slight hardening. But since I’m not a professional welder, it doesn’t look very good, but that’s not important, the main thing is to weld more metal.
Photo. Next, I grind the area on a cutting stone and try to give the appearance of a gear tooth, checking with another gear how the gear fits. You can see the completed work on restoring the gear tooth.
Photo. An important point, since I don’t have a tooth cutting machine and I do everything by eye, of course I can’t grind a perfect gear tooth. Therefore, I grind the tooth slightly thicker than the standard one, and since this tooth is made of softer metal, it rolls as it should while working in the gearbox. The main thing is that after the motorcycle box has been assembled, the gear should, albeit tightly, scroll in the place of the restored tooth, but not jam. A gear with a welded tooth will roll in very quickly.
The gear fork lights up and knocks the speed out of the motorcycle. Video.