Fuel overflow in the carburetor is a common phenomenon, and certainly causes considerable inconvenience to those motorists or motorcyclists who have suffered from it. Most often, such a “sore” is found on Solex and Azon carburetors, installed on many models of cars from AvtoVAZ and on all fuel supply units for mopeds, motorcycles or lawn mowers.
Of course, there is nothing good in the fact that the carburetor is flooded, but if the problem has overtaken you, then you need to get rid of it. To do this, it is enough to understand the essence of this malfunction, the reasons for its occurrence and methods of elimination. We will talk about this and much more regarding fuel overflow in the carburetor in the article below.
Scooter rider
A scooter can have many breakdowns and malfunctions and they always arrive at the wrong time. One of these breakdowns is when the carburetor on a scooter floods. In this article we will look at the following questions: – Why the carburetor on a scooter floods – Symptoms of a carburetor on a scooter flooding – How to fix this problem
Symptoms of a flooded carburetor on a scooter
If the carburetor is flooded , this can be determined in simple ways. The manufacturer of your vehicle is of great importance. Because Japanese scooters are very different from Chinese ones. In our case, the main symptom that the carburetor is flooded in a scooter is a wet spark plug. If the scooter stalls, jerks, or does not work confidently, you need to check the spark plug. If you have a Chinese scooter , then in addition to a wet spark plug, you may find that gasoline is leaking from the air filter.
First you need to check that the valve clearances are set correctly. If everything is fine with this, then we are looking for what could be wrong.
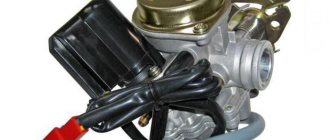
- Check the shut-off needle in the float chamber. Dirt can get under it and jam it, so the needle can no longer close the hole tightly and the fuel supply to the carburetor is disrupted. In this case, fuel may leak even if the engine is turned off. Also check the tongue on the floats. It may be bent or vice versa, this also disrupts the fuel supply. In general, you need to be very careful with these things. There is no need to go there without a good reason.
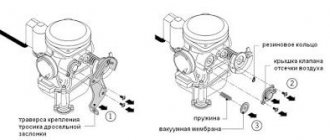
- If option 1 did not help, then the next reason why the carburetor on a scooter is flooded is the vacuum valve , or rather its malfunction. This is a kind of pump that can simply pass fuel into the carburetor, which leads to carburetor flooding. The vacuum valve may not perform its functions due to a cracked membrane. As a rule, the reason why the carburetor on a scooter is flooded is one of the first two. Although it may also be that the air filter is clogged. In this case, no air will flow into the carburetor, there will be no pressure, this can lead to carburetor overflow.
- If the carburetor is filled through the air filter , then this can be easily checked. You just need to remove the filter. If after this the problem is solved, then the problem is in the filter and you need to clean it.
- And as an option, although extremely rare, the jets are clogged. In this case, you just need to clean the carburetor , this will solve the problem.
We looked at the most important and common problems why the carburetor on a scooter floods . If you have any questions, you can leave them in the comments.
Causes of overflow
Let’s say that there is no doubt that the carburetor began to pour gasoline mercilessly. What to do next? First of all, it is important to determine the cause of the problem. By answering the question “Why is the carburetor flooding?”, any vehicle owner will be able to fix the problem on their own. Often the cause of such a breakdown is one of the following:
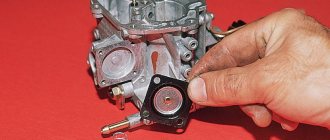
- There is a malfunction in the needle valve. A similar “sore” often affects the carburetor on a moped and similar components on a trimmer or similar devices. A malfunction of the needle valve often occurs due to its loss of a sealed state, in which it promptly and completely closes the fuel channels, thereby dosing its supply. If the valve is heavily worn or “stuck” in the open position, gasoline overflows cannot be avoided. This unit can be checked for correct functioning by supplying discharged air to it; during normal operation, the needle should stably close the fuel paths and not allow air to pass through;
- The float in the float chamber is either leaking or touching the walls of the carburetor. The owner of any carburetor unit is not insured against this kind of problem. You can check the normality of the float by removing the float chamber cover and conducting a detailed inspection of the unit;
- The level in the float chamber has increased or the one that was present all the time has ceased to be relevant. This often happens when a motorcycle, moped or car has had a faulty component for a long time that increases fuel consumption. The part has been replaced or successfully repaired, but gasoline continues to be supplied in the same quantities. As a result, it turns out that the carburetor is “flowing”. Checking for the presence of such a problem is carried out exclusively by an empirical method, that is, by “playing” with the fuel level in the float chamber;
- The fuel pump is faulty. Perhaps this is also a problem from which it is impossible to insure yourself. It appears for only one reason - the fuel pump has failed due to some of its elements. In such a situation, all that remains is to disassemble, inspect and repair the broken part;
- The check valve that returns gasoline to the fuel line when there is overflow in the float chamber has broken down. Relevant for any Solex carburetor and similar components. You can check for a problem with the “return” by disassembling it, visually inspecting it, and blowing it with compressed air. If such manipulations do not correct the situation and no other problems are observed, then you should think about replacing the check valve.
The reasons described above for the carburetor overflowing on a scooter, car or other unit occur in 80-90% of all cases during a breakdown of this kind. Much less often, gasoline overflow occurs due to a malfunction or incorrect configuration of individual elements of the fuel distribution unit. Mainly affected are rubber nozzle seals, power mode economizers, throttle valves, solenoid valves, carburetor gaskets and mixture quality adjustment screws. The functioning of these elements is checked by disassembling the carburetor and inspecting it in detail, followed by subsequent repair measures.
Debris that can cause gasoline to enter the air filter
The main sources of debris in the fuel system are:
- gasoline filled at an untested station, especially immediately after the fuel truck has left;
- rust from the inside of the tank, for example, coming off after hitting the gas tank;
- carburetor gasket elements crumbling due to physical aging;
- dirty fuel filter;
- the external environment, or rather a careless attitude towards the refueling process, when foreign debris gets into the gas tank.
This problem is especially relevant for scooters and motorcycles not equipped with fuel filters.
The debris, following into the carburetor, falls under the shut-off needle located in the float chamber. As a result, it does not descend into its seat and is not able to block the fuel channel.
To correct the problem, you need to disassemble the carburetor. After removing the float, remove the needle and put it in a dust-free place. Using compressed air, you need to blow out the carburetor. When reassembling the fuel system, it is important to protect it from debris, otherwise gasoline will end up in the air filter again.
To facilitate diagnostics, if possible, you can install a similar carburetor on your vehicle. If gasoline gets into the air filter even with a new unit, you should continue troubleshooting without wasting time disassembling the carburetor.
Carburetor assembly and operation check
After repair, the carburetor can be washed again, removing all dirt that got in during the repair. The carburetor is carefully assembled, preferably on a clean rag, and installed on the equipment.
The carburetor is installed on a motorcycle by screwing two bolts to the pipe. The hoses are connected, the gas tank is installed, the tap is opened and it is checked to see if there is any leakage from the carburetor. Even if nothing leaks right away, you need to make sure that the repair was successful. To do this, the equipment should be left with the tap open for a day. If at the end of the day there are no puddles under the motorcycle, and the gasoline in the tank remains at its level, we can congratulate you on a successful repair.
On a car, the process of installing a carburetor occurs in the reverse order of removal. First, the carburetor is screwed into its seat, then the fuel lines and all electrical wires are connected. Lastly, the throttle and choke cables are connected. After installing and connecting the carburetor, it is worth adjusting it using a gas analyzer and a quality screw.
When assembling the carburetor, do not use sealants. They will close the cracks, but over time they will clog the small carburetor holes. Carburetor sealant is used only on the road. With obligatory repair or cleaning later.
Knowing what to do if the carburetor is leaking, it will not be difficult for you to repair or clean the carburetor yourself. This operation can be carried out even on the side of the road, with a minimum set of tools in the trunk.
Vacuum valve does not hold
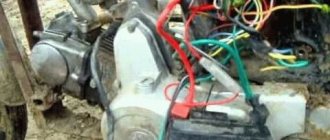
The reason why gasoline ends up outside its main path may lie in the vacuum valve. An electronic valve prevents gravity flow and excessive gasoline pressure.
To diagnose the malfunction, it is necessary to disconnect the valve from the main network and power it directly from the battery.
IMPORTANT: The valve must first be checked with a multimeter or meter for short circuits. Otherwise, the battery may be damaged and electrical injury may occur.
Chinese scooters are equipped with non-repairable vacuum valves. Repair is carried out by replacing the failed component with a new one. More serious devices use a split housing. In this case, repairs may be limited to a visual inspection of the diaphragm with a decision to replace it.
Why do you need to regulate?
During the adjustment process, the scooter carburetor needle is adjusted, the position of which affects the proportions of the air-fuel mixture, as well as a number of other adjustments.
Each tuning operation has a different effect on engine operation and fuel preparation:
- adjusting the idle speed ensures stable operation of a running engine when the transmission is turned off;
- changing the quality of the air-gasoline mixture using a special screw allows you to deplete or enrich it;
- adjusting the position of the carburetor needle affects the change in the quality of the fuel mixture;
- Ensuring a stable level of gasoline inside the float chamber avoids flooding of spark plugs.
A power unit with an adjusted carburetor operates stably in any conditions, is economical, throttle response, develops rated power and maintains speed, and does not cause problems for its owner.
Chainsaw engine malfunction
In most cases, the following problems occur in engine operation:
- the engine stopped starting;
- the engine starts, but after a while it stalls;
- the engine is not able to develop the required power;
- The engine is extremely unstable.
- the engine does not start - the engine runs unstably - the engine starts, but very often stalls - the engine quickly overheats - the engine runs normally at idle, but “chokes” under load - the engine smokes heavily, power drops
In certain situations, it is better to seek help from professionals and take your saw to an authorized service center. But you can deal with some problems yourself.
In general, in order to eliminate the cause itself, you must first correctly identify it, otherwise the entire repair will be tantamount to shooting at sparrows from a cannon, and perhaps even shooting at “fictional” sparrows, since there may not be any breakdown.
If you are trying to start a chainsaw, but it does not start, and at the same time does not make any strange sounds that are not typical for it (knocking, grinding), then you are simply starting it incorrectly (if you pull the chainsaw on the choke for a long time, the internal combustion engine is filled with fuel, and then start its difficult).
How to start a cold engine correctly? 1. Set the lever or switch to the “flap closed” position. 2. If the model is equipped with a fuel priming pump, pump the fuel mixture into the carburetor. 3. Pull the starter handle until resistance appears, then vigorously pull in amplitude, moving your hand to the side (2-3 times).
No need to try to “rip” the starter cord out of the chainsaw! The saw should start and then stall. 4. If the engine does not start, move the lever to the half-throttle position or to the working position, and try to start the chainsaw in this mode. Please note: Some models have a push-button ignition switch, make sure it is turned on.
What to do if the engine still doesn’t start? First, unscrew and inspect the spark plug. It happens that when starting a chainsaw in cold weather, the combustion chamber is accidentally filled with fuel mixture. In this case, you should also unscrew the spark plug, dry the combustion chamber by idling, clean the spark plug, and try to start the saw again.
How to check for spark on a spark plug? Place the unscrewed spark plug connected to the high-voltage wire on the cylinder and pull the starter. Be careful! You cannot touch the candle with your hands during this procedure! If you see a blue spark, the spark plug is OK. We screw the spark plug into place and try to start the saw again. If we fail again, we’ll check the connection of the high-voltage wire to the spark plugs, the coil and the ignition system.
- Dry candle. Apparently, the fuel mixture will not get into the cylinder. The problem is not in the spark plug, so we screw the spark plug back in. And we check the fuel supply system.
- A wet, heavily fuel-stained spark plug. The reason for excess fuel is hidden either in violation of the model factory rules, or in incorrect carburetor adjustment.
- The candle was covered with black soot. This may indicate the use of low-quality oil (so use only original oil for your saw), an incorrectly adjusted carburetor, or an incorrectly prepared fuel mixture. The spark plug needs to be washed, thoroughly cleaned of carbon deposits with an awl or a needle, the electrodes should be wiped with sandpaper and screwed into place.
When checking the spark plug, pay attention to the gap between the electrodes (it should be 0.5 - 0.65 mm). A worn gasket must be replaced.
How to remove and clean a scooter carburetor
In order for a scooter engine to operate correctly and steadily and to develop good power, it needs a high-quality working mixture of air, gasoline and oil (if we are talking about a two-stroke engine). This mixture is prepared in a carburetor by mixing the components in certain proportions. And such an important device as a carburetor must be clean in order to work well.
It is recommended to carry out the cleaning procedure for a scooter carburetor at least once every 1-2 thousand kilometers. What are the signs of dirt in the carburetor? First of all, unstable engine operation. That is, vagaries when starting the engine, as well as instability at idle - the scooter can simply stall when stopped.
When I first bought a scooter, cleaning the carburetor seemed no easier to me than assembling and launching a rocket into space. However, having plucked up the courage and got down to business, I was surprised to find that it was very easy to do.
In order to remove and clean the carburetor on a scooter, you will need the following tools and fluids:
- 10mm socket wrench with universal handle and extension
- Phillips and slotted screwdrivers
- tassel
- bath
- gloves
- protective glasses
- aerosol carburetor cleaner
- petrol
Since I prepared in advance to make a report, I will show everything in as much detail as possible.
How to remove a carburetor from a scooter
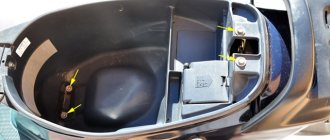
First you need to remove the seat compartment (toilet) of the scooter by unscrewing the 4 bolts that hold it. On the Honda Tact you will also need to unscrew the oil tank cap.
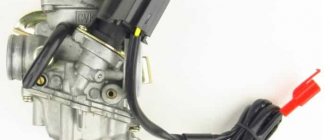
Now you need to remove the air filter. To do this, you need to unscrew the screw of the clamp securing the cuff to the carburetor, as well as 2 10-point bolts securing the filter housing itself to the engine. You will have to use force to pull the rubber seal of the filter housing off the carburetor.
Next, disconnect the gas hose and oil hose. To do this, you need to squeeze the loops of the clamps and pull off both hoses.
Take the 10mm wrench again and unscrew the near bolt securing the carburetor to the inlet pipe.
Now we go to the interior of the scooter and unscrew the second bolt.
Posts 1 page 15 of 15
1Wednesday, November 14, 2012 00:20
- Author: serg
- Participant
- From: Odessa
- Registered: Wednesday, November 14, 2012
- Invitations: 0
- Posts: 8
- Respect: [+0/-0]
- Positive: [+0/-0]
- Gender: Male
- Age: 30 [1990-07-04]
- Spent on the forum: 2 hours 31 minutes
- Last visit: Thursday, January 24, 2013 05:20
Hello. Tell me why the carburetor on a Honda Dio 27 moped may overflow. I changed the carbs, the result is the same.
2Wednesday, November 14, 2012 00:54
- Author: Pavel_DV
- Legionary
- From: Khabarovsk Ost. Stepnaya.
- Registered: Thursday, November 10, 2011
- Invitations: 0
- Posts: 503
- Respect: [+1/-0]
- Positive: [+1/-0]
- Gender: Male
- Age: 26 [1994-11-06]
- Time spent on the forum: 8 days 9 hours
- Last visit: Wednesday, August 27, 2014 22:57
Most likely the problem is in crooked hands... how did you determine what is overflowing? by candle
3Wednesday, November 14, 2012 03:06
- Author: serg
- Participant
- From: Odessa
- Registered: Wednesday, November 14, 2012
- Invitations: 0
- Posts: 8
- Respect: [+0/-0]
- Positive: [+0/-0]
- Gender: Male
- Age: 30 [1990-07-04]
- Spent on the forum: 2 hours 31 minutes
- Last visit: Thursday, January 24, 2013 05:20
I determined not by the spark plugs! I START IT, it runs a little and after a minute maybe less, gasoline flows from the carburetor.
4Wednesday, November 14, 2012 07:32
- Author: lavin
- legionary
- Registered: Saturday, August 27, 2011
- Invitations: 0
- Posts: 1621
- Respect: [+5/-0]
- Positive: [+0/-0]
- Gender: Male
- Age: 23 [1997-04-19]
- Time spent on the forum: 23 days 13 hours
- Last visit: Friday, March 5, 2021 18:07
look at the float, set the level in the float chamber. but first, clean it out. Mine was leaking precisely because it was clogged.
5Wednesday, November 14, 2012 13:32
- Author: ChiefiR777
- Honorary Club Member [M]
- From: Khabarovsk
- Registered: Saturday, March 19, 2011
- Invitations: 0
- Posts: 1203
- Respect: [+1/-1]
- Positive: [+0/-0]
- Gender: Male
- Age: 27 [1993-08-07]
- Time spent on the forum: 11 days 8 hours
- Last visit: Saturday, October 27, 2021 06:38
Is your drain valve closed? ,
6Thursday, November 15, 2012 02:22
- Author: serg
- Participant
- From: Odessa
- Registered: Wednesday, November 14, 2012
- Invitations: 0
- Posts: 8
- Respect: [+0/-0]
- Positive: [+0/-0]
- Gender: Male
- Age: 30 [1990-07-04]
- Spent on the forum: 2 hours 31 minutes
- Last visit: Thursday, January 24, 2013 05:20
the drain valve is a bolt on the sump. If it is, then it is tightened. I boiled a new carb, but it still overflows, I tried to set the float, it seemed to be set, but after working a little, it is filled with gasoline, it flows out through the side hole in the carburetor.
7Thursday, November 15, 2012 14:23
- Author: lavin
- legionary
- Registered: Saturday, August 27, 2011
- Invitations: 0
- Posts: 1621
- Respect: [+5/-0]
- Positive: [+0/-0]
- Gender: Male
- Age: 23 [1997-04-19]
- Time spent on the forum: 23 days 13 hours
- Last visit: Friday, March 5, 2021 18:07
the side hole is precisely the overflow. After you set the float, start adjusting with bolts and a needle.
8Friday, November 16, 2012 05:20
- Author: serg
- Participant
- From: Odessa
- Registered: Wednesday, November 14, 2012
- Invitations: 0
- Posts: 8
- Respect: [+0/-0]
- Positive: [+0/-0]
- Gender: Male
- Age: 30 [1990-07-04]
- Spent on the forum: 2 hours 31 minutes
- Last visit: Thursday, January 24, 2013 05:20
I played with the needle, with the fuel supply bolt... but all in vain.....maybe it is overfilling because of the fuel pump itself????
9Friday, November 16, 2012 07:22
- Author: lavin
- legionary
- Registered: Saturday, August 27, 2011
- Invitations: 0
- Posts: 1621
- Respect: [+5/-0]
- Positive: [+0/-0]
- Gender: Male
- Age: 23 [1997-04-19]
- Time spent on the forum: 23 days 13 hours
- Last visit: Friday, March 5, 2021 18:07
in general maybe. try replacing it with a known working one.
10Saturday, November 17, 2012 15:32
- Author: acrobat
- Participant
- Registered: Tuesday, June 26, 2012
- Invitations: 0
- Posts: 14
- Respect: [+0/-0]
- Positive: [+0/-0]
- Time spent on the forum: 11 hours 18 minutes
- Last visit: Thursday, July 11, 2013 10:01
I had a situation on a boat where carbs were leaking. I invited a specialist, and he tormented them for two days. Then he spat, brought new needles, for the third year everything worked like clockwork.
11Saturday, November 17, 2012 22:11
- Author: serg
- Participant
- From: Odessa
- Registered: Wednesday, November 14, 2012
- Invitations: 0
- Posts: 8
- Respect: [+0/-0]
- Positive: [+0/-0]
- Gender: Male
- Age: 30 [1990-07-04]
- Spent on the forum: 2 hours 31 minutes
- Last visit: Thursday, January 24, 2013 05:20
I have a leak from the carb, but it’s not flooding the spark plug. I think that the needle has nothing to do with it….
12Tuesday, December 11, 2012 23:19
- Author: GY6
- Participant
- From: base cafe
- Registered: Friday, December 7, 2012
- Invitations: 0
- Posts: 67
- Respect: [+0/-0]
- Positive: [+0/-0]
- Gender: Male
- Time spent on the forum: 14 hours 33 minutes
- Last visit: Tuesday, April 23, 2013 23:49
13Thursday, December 13, 2012 05:54
- Author: serg
- Participant
- From: Odessa
- Registered: Wednesday, November 14, 2012
- Invitations: 0
- Posts: 8
- Respect: [+0/-0]
- Positive: [+0/-0]
- Gender: Male
- Age: 30 [1990-07-04]
- Spent on the forum: 2 hours 31 minutes
- Last visit: Thursday, January 24, 2013 05:20
this is not a pump...what else could it be???????
14Thursday, December 13, 2012 11:00
- Author: Evgeny Mitin
- Participant
- Registered: Thursday, April 26, 2012
- Invitations: 0
- Posts: 74
- Respect: [+3/-0]
- Positive: [+0/-0]
- Time spent on the forum: 2 days 17 hours
- Last visit: Tuesday, April 28, 2015 00:11
gasoline can flow into the air intake if there is no compression. At the same time, it leaks less if you remove the air cap.
15Thursday, December 13, 2012 13:43
- Author: palladin
- Admin
- From: Khabarovsk
- Registered: Monday, February 20, 2012
- Invitations: 0
- Posts: 1358
- Respect: [+5/-0]
- Positive: [+0/-0]
- Gender: Male
- Time spent on the forum: 25 days 6 hours
- Last visit: Sunday, March 14, 2021 19:04
Post a photo of how your float is set up.