Problems with a scooter most often occur during operation, and one of the breakdowns may be a worn oil seal. Let's look at the process of replacing the oil seal on a scooter and the purpose of the oil seals.
Oil seals on a scooter play a very important role, because they prevent oil or gasoline from leaking into unnecessary places. In the design of any scooter there are many oil seals of different sizes, but they all perform one role - to maintain the tightness of the connections. Also, in addition to the fact that the seals do not allow scooter fluids to pass through, it is impossible for dust and dirt to pass through them, so you should always have the seals in excellent condition. But sometimes the seals can fail, that is, wear out. Replacing seals on a scooter is a fairly simple process; you just need to notice the leak and determine the location of the seal.
Repairing the gearbox on a scooter should not be delayed.
Repairing a scooter gearbox, or main gear, includes replacing bearings and shafts with gears.
On 50 cc 2t scooters (Suzuki Lets 2, Honda Dio, Yamaha, Chinese models), the oil change in the main gear is done after 5-6 thousand km. If such a tech. If the regulations are not followed, sooner or later the main gear will fail - there will be a crackling noise while driving, extraneous noise in the area of the rear wheel, and the scooter will howl at speed. How to carefully repair the final drive?
There are subtleties here that you need to know. That's what we'll talk about next.
Preparing to disassemble the gearbox
- Remove the exhaust pipe and rear wheel. On a Honda Dio 34, 35, it is better to do this by placing the scooter on its side on a rag so as not to scratch the plastic.
- Remove the air filter and air duct.
- Remove the variator casing.
- Unscrew the clutch drum nut. To do this, you need to fix the drum with some kind of device. Or the nut can be easily unscrewed with a pneumatic gun.
Then we press on the variator belt with the mounting tool and push it deeper between the cheeks of the variator to remove the clutch.
We disassemble the gearbox
Please note and remember that two long bolts are located where the gearbox cover guide bushings are located.
The cover cannot be pulled out using a knife or screwdriver, inserting them between the cover and the gearbox housing. Damage the gasket and break the seal. You will have to put the lid on the sealant.
We look at the condition of the bearings. They must be intact and rotate freely, without jamming, without axial and radial play. The shafts should not be loose. If there are defects, then change the bearings along with the seals without hesitation. It's better to use native Japanese ones.
On the output shaft (on which the wheel fits), the bearing is difficult to pull out. You need a special puller or you will have to remove the engine to press out the bearing.
But it can be made simpler. Unhook the rear brake cable. Take a blowtorch or a tourist gas can with a burner and heat the gearbox from the outside.
The housing will expand, and the output shaft bearing along with the oil seal will easily come out using a hammer and an extension from a set of sockets.
The input shaft with bearing will also easily come out of the heated gearbox cover.
Before heating, be sure to disconnect the breather (rubber tube).
Assembling the gearbox
Wash the inner and outer surfaces of the gearbox thoroughly with a toothbrush and gasoline (until white). We replace worn parts with new ones.
Before installing the bearings, first lubricate the places where the bearings are placed with lithol, and then heat them with a burner to about 100 ° C (if you touch them with a wet finger or splash water, it should hiss). Then the bearings will calmly, without much effort, using a mandrel and tapping with a hammer, fall into place.
We assemble the shafts and all gears in the reverse order.
If the gasket on the gearbox remains intact, then we do not change it, but only lubricate it with lithol.
Carefully place all washers in their proper places. The gears must not touch the walls of the gearbox.
We fasten the cover with five bolts. Checking the rotation of the shafts. They should spin freely. Then pour transmission oil into the gearbox.
Wipe with a rag and make sure that oil does not leak anywhere around the perimeter of the gasket.
Replacing the crankshaft oil seal
The scooter's crankshaft also has an oil seal; it is responsible for preventing gasoline from leaking. Therefore, as soon as you notice that gasoline is leaking through this hole, even in a small amount, urgently replace the scooter oil seal. But in order to install a new oil seal, you must first remove the old one, and since it is always tightly secured, removing it can be problematic. Some scooter models have additional oil seal protection, which is a protective metal cover. An old, worn oil seal can be neglected and can be pulled out by force. The easiest way is to take a sharp object and remove the oil seal without damaging other parts. Another way would be to remove the oil seal using a hook-shaped wire. Bend one side into a hook, insert it into the seal and pull it out.
Once you have removed the old part, you need to clear the area to install the new oil seal. The new oil seal should ideally match the dimensions of the old one, but in principle, a different size is unlikely to fit. Find the markings on the old oil seal and compare it with the new part. Insert it tightly and, if necessary, hammer in the oil seal, then check its operation in action. Once you have driven at least 10 km, check the condition of the oil seal. It is also advisable to buy oil seals as expensive as possible, because Chinese parts, according to statistics, break many times faster. The original oil seal has a price of 5-7 dollars, Taiwanese parts are slightly cheaper, the price is about 2 dollars, while a complete set of Chinese-made oil seals can be bought for 2 $. But still, not everyone can afford such an expensive purchase and buys risky, cheap parts. The choice is yours.
Dimensions of oil seals and bearings for Honda dio scooters Honda dio
Many people are confused about which oil seals and bearings to order for their Honda engines. Well, let's figure it out together!
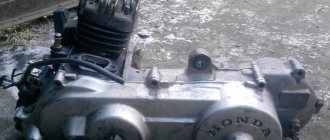
You will find the model and number of your Honda scooter engine on the front of the gearbox cover, right above the filler bolt.
1) AF-18E engine (stamped on the gearbox cover) with a “thin” 12mm crankshaft (Dio 18 and the same with a disc brake Dio 25; Dio 27 and 28 of the first releases, then they made a thick 14mm shaft on them)
You will recognize this motor by its characteristic counter jaw, 14mm variator nut and the thread itself on the shaft is 10mm, pitch 1.25:
The crankshaft bearings are the same on both halves of the crankcase, you need 2 pieces
D=52mm d=20mm h=12mm, you can buy here diomarket.ru
The oil seals are the same on both halves of the crankcase, you need 2 pieces: D=25.5mm d=15.5mm h=7mm you can buy here: diomarket.ru
2) AF-18E engine model with a “thick” crankshaft (wide belt) (almost all 27e, 28e) AF-24E engine model with a “thick” crankshaft
(HONDA TACT AF 24, AF 30/31, Giorno 24)
You will recognize this motor by its characteristic counter jaw, 17mm variator nut and the thread itself on the shaft is 12mm, pitch 1.25:
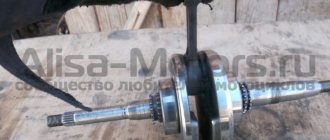
A little about the Dio crankshaft
I moved away from the “New Year” and decided to write a little about the choice of crankshaft on the Honda Dio 34/35/ZX.
I went online to order spare parts, sat down and sat... But the thing is that for the same money you can buy both a completely good crankshaft and a half-corpse that can crumble at the most inopportune moment. Therefore, you need to approach your choice wisely...
In the previous article, I already mentioned the difference in the width of the crankshaft cheeks GBL(A) and GBLK.
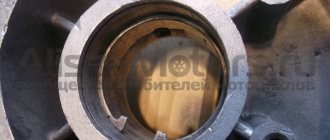
The picture shows the crankshaft for the GBL(A) engine. The first obvious difference is the presence of spacers (washers) between the connecting rod and the cheeks, which reduce the lateral load on the connecting rod (this is a factory option). Under the influence of friction between metals that are similar to each other (the one without washers, on the right), strong thermal expansion occurs, which leads to increased wear of the connecting rod and its “sticking”. Then this wear leads to the connecting rod beating and the whole thing fails, reducing the overall engine life. The second difference is the presence of a certain “depression” in the place indicated by the arrow. In a good crankshaft there is no depression, the shaft is straight.
The third difference is the connecting rod itself. A good crankshaft usually has a central groove (technological hole), this is done to allow lubrication of the separator and to remove excess heat during friction of the separator (and there the load is very good). On a good crankshaft, there are more places for oil seals to fit (indicated by brackets), which reduces the risk of oil seal leaks. Another difference is the thickness of the shaft at the seat of the variator, it is actually not ideal 14 mm, but barely less, this is an allowance for thermal expansion, because unlike bearings (which will rotate in lubricant), here the variator bushing rotates “dry” "
On good crankshafts, places 1 and 2 are usually hot, because these are areas with increased load (although now even famous manufacturers no longer do such things for the sake of saving time). But the place under the number 3 - on a good crankshaft usually contains an abbreviation from the name of the manufacturer or indicates the type of crankshaft (for example, if it is reinforced), while on bad ones there are either no designations at all, or the casting is made of poor quality (fuzzy edges, barely protruding symbols, etc.).
The thread quality of a good crankshaft is much higher; there are no “burrs” or rough edges, which means that when we install an oil pump in the engine, we will be confident in its normal functioning. In addition, all the places that have notches or threads, and the key on a good crankshaft are usually hardened, and of course the quality of the metal itself from which they are made. At famous factories that have large production capacities, as a rule, quality control of finished products is higher, and the crankshafts are calibrated on a robotic machine.
And in order for the crankshaft to run longer, you need to put it on good bearings (the original Japanese NTNs differ in everything from their Chinese copies):
- The original box is made of thick cardboard, with fine corrugation inside and a protective hologram, has rich colors, and the paint cannot be wiped off with a finger. There is a sticker on the bottom of the box (the non-original has an inscription on the box itself, not on the sticker) with the serial number of the bearing that is in it.
- In the original, the bearing has a rather deep engraving (not like a laser, but like a stamp); there is also engraving on the inner race.
- In the original, the crown (I honestly have no idea what the circle that holds the balls inside is called) is a little matte (the fake has a shine), and the rivets are spherical, like a mushroom cap (in the fake they are flat).
- In the original, the outer frame on the inside has a rounded edge, but in the fake it is the same as on the outside.
- The original has no play (with a fake you will immediately feel how the inner race wobbles even on a new one)
- The original must have a generous amount of lubricant (at least on one side).
In general, do not buy bad crankshafts and bearings, their service life is obviously lower, and changing this is another task...
P.s. It makes sense to install sports “full-cheek” crankshafts when tuning an engine together with a changed volume of the CPG, intake, fuel system, etc. If you leave the CPG with its original volume, but install a sports crankshaft, which will reduce the volume of the chambers in the crankcases (calculated at the factory), then your moped may run even worse than with the stock crankshaft, so before you “experiment”, decide whether you are doing repairs scooter or improvement of its mechanics for some specific purposes, since the improvement of one element constantly leads to the improvement of another...
Tags
- Honda
- Dio
- Cesta
- AF34
- AF35
- crankshaft
- NTN
Oil seals in the design of a scooter - purpose and correct replacement
In the design of a scooter you can find a large number of oil seals of various sizes, designs and densities, but they all have the same task - to maintain the tightness of connections, the mating parts of which move in a radial or longitudinal direction relative to each other.
In practice, everything is simple - the oil seal simply prevents oil from leaking out of any mechanism of the scooter, and prevents dust, dirt and water from entering the mechanism. In appearance, it is often a shaped ring made of oil-resistant rubber. Inside the oil seal there is usually a steel frame that determines rigidity, stability, and durability. The oil seal always has a working edge, which is pressed against the rod or shaft by a special bracelet spring.
The quality of oil seals and factors affecting their service life.
Of course, the service life of the oil seal directly depends on the quality of workmanship and the materials used in production. For example, the quality of oil seals on most modern Chinese scooters is much worse than those from European and Japanese manufacturers, which is not surprising, because the pursuit of budget makes its contribution.
Another important factor that directly affects the service life of the oil seal is correct installation . This process must be approached with all responsibility, because if the oil seal is installed incorrectly, you can expect its rapid failure even after short-term use. There have been cases when this happened after 50-100 kilometers.
Replacing the oil seal on a scooter - do it right.
Most seals can be replaced in a home garage with simple tools. It is important to understand that the oil seal is essentially a disposable part and, once removed from its seat, is usually not reused. During extraction, damage occurs to the rubber seal, working edge, and often to the metal base. Its cost is negligible and restoration is generally considered inappropriate and often impossible.
So, let's consider a number of important points and rules, the observance of which is mandatory when replacing oil seals on a scooter:
The composition of the scooter oil seal and its shelf life
If you have never seen an oil seal, you can look at the photo, where you can see a small rubber ring. There is a steel frame inside the oil seal - it is this frame that is responsible for the proper tightness and strength of the oil seal.
The oil seal, like any part, has a different manufacturer, and therefore there are both cheap Chinese oil seals and expensive original ones. The shelf life of the oil seal and its reliability during operation depend on this. In order to use the new oil seal for as long as possible, you need to pay attention to its installation, so do not rush into it - an incorrectly installed part will wear out faster.