The popularity of scooters is growing every year. And this is not surprising. Low cost, ease of maintenance, good performance characteristics make the moped an indispensable thing in the lives of many.
In many countries around the world, the number of scooters on the streets exceeds the number of cars. They have high maneuverability, which allows residents of big cities not to think about traffic jams. However, sometimes situations arise when the moped breaks down and does not want to start.
You can repair the scooter yourself or take it to a workshop. This is everyone's personal decision. Having decided to repair it yourself, you need to prepare the space for this. Most often, repairs are performed in the garage.
The most common problems associated with changing oil and filters . Incorrectly selected oil may cause the engine to not start.
First you need to drain the old oil through the drain hole. Then the carburetor is completely disassembled.
The installation and repair of Chinese mopeds should not cause big problems for a person who understands this at least a little.
DIY scooter (moped) repair
The popularity of scooters is growing every year.
And this is not surprising. Low cost, ease of maintenance, good performance characteristics make the moped an indispensable thing in the lives of many. In many countries around the world, the number of scooters on the streets exceeds the number of cars. They have high maneuverability, which allows residents of big cities not to think about traffic jams. However, sometimes situations arise when the moped breaks down and does not want to start.
You can repair the scooter yourself or take it to a workshop. This is everyone's personal decision. Having decided to repair it yourself, you need to prepare the space for this. Most often, repairs are performed in the garage.
The most common problems associated with changing oil and filters . Incorrectly selected oil may cause the engine to not start.
First you need to drain the old oil through the drain hole. Then the carburetor is completely disassembled.
The installation and repair of Chinese mopeds should not cause big problems for a person who understands this at least a little.
Photo report: Scooter plastic repair
Everything flows, everything changes... And the grass is no longer as green as before... And the sun does not shine as brightly as in former times and breathing is no longer so easy... One thing remains unchanged in this rapidly changing world - the “quality” of plastic in Chinese scooters...
Eh... How tired I am of this Chinese junk with forever burnt-out valves and plastic that breaks and flies into the trash... Well, I would understand if the plastic on the “Chinese” broke as a result of an impact or something else. But no, it breaks on its own. Even when the scooter just stands still, it bursts, for no reason. But there is nothing to do and we have to put up with it. Or buy a branded scooter. However, not everyone can afford it.
In today's lesson, as a teaching aid, we will present to you the plastic parts of the scooter that are most susceptible to various damages.
Rear mudguard shattered into three pieces
Air purifier with a huge hole in the housing
The “beak” of the scooter with a tasty crack on the right side, a la “didn’t go around the pole in time”...
You may ask, how can all this Chinese junk be repaired now? Yes, it’s very simple, I’ll tell you. And for this we need the simplest electric soldering iron and a piece of some thin wire.
The process of repairing plastic, that is, soldering, is not complicated at all. Take the soldering iron in your hand, place the tip across the crack and drive it into the plastic about half the thickness. Then, move the tip a millimeter or two and again drive it into the plastic, not forgetting to smooth out the sagging on the surface of the part that forms during the work.
Soldered a small area
And they immediately leveled it until the plastic hardened
Before repairing, remove the damaged part from the scooter. If you have the opportunity to get to the part from both sides and want to crawl around the scooter on your knees, then you don’t have to remove the part, but repair it locally. Carefully wash the part on both sides. If the plastic part is painted, then along the entire crack, about a centimeter on each side, we remove all the paint to the very base.
We plug in the soldering iron and wait for a while until it warms up. We apply the damaged parts to each other so that the joints of the faults fit exactly into each other without distortions or gaps.
We fix the parts relative to each other with our fingers, take a soldering iron in our free hand and grab it, that is, we solder the parts at several points. It is advisable to make tacks at both ends of the crack and in the middle.
After you grab all the parts together and your damaged part will acquire its original shape. Do not forget to once again check the evenness of the convergence of the joints and, if possible, control the resulting geometry of the part as accurately as possible, otherwise later, when you solder the part completely, it will be too late...
And now, in order to strengthen the resulting seam to the level of armor of the newest Russian T-95S tank, we turn the part over with the wrong side facing us, bend a previously prepared piece of wire with a snake and solder it into the crack.
How to detect a breakdown
In order to identify a scooter malfunction, it is necessary to check all elements in turn. The performance of any scooter depends on the proper functioning of components such as compression, fuel and spark. If one of the elements does not work, the scooter will not move.
Fuel may cause the moped to not start if gasoline has been added for a long time. As studies show, the octane number of gasoline decreases when it stays in the tank for a long time, that is, its quality noticeably deteriorates. There is only one result: a spark does not ignite such gasoline. If you know that you have been filling up with fuel for a long time, it is best to drain the old gasoline and fill in new gasoline in its place .
The second reason that the scooter does not start may be a dirty filter - fuel or air. A fuel filter is necessary to clean gasoline from various impurities and rust. The engine must receive clean gasoline, since this affects the wear of many parts of the moped.
The air filter is designed to clean the air that enters the carburetor. It needs to be changed quite often, since dust, dirt, etc. constantly settles on it.
The third reason that the engine will not start may be the lack of a spark. Checking whether the candles are to blame for this is as easy as shelling pears. It is enough to replace with new ones. If it is not possible to start, and the gasoline is fresh, you need to look deeper for the reasons.
❶ How to repair a moped
You will need
- Keys, screwdrivers, awl, vice, hammer and pliers.
Instructions
Inspect your faulty moped and determine which parts need replacement or repair. It is better to order new ones from a workshop or a specialized store. Don’t skimp on the details - they will pay for themselves many times over in the future, and besides, your safety on the road depends on their quality. Invite a more experienced friend to help you with the repair.
First, thoroughly wash and dry your moped. Remove elements that will interfere with your repair process. If the damaged parts are small in size, then it makes sense to take them to the table - this will make it much more convenient for you to deal with them.
When disconnecting individual elements of the moped, remember their sequence. Don't forget that eventually the entire structure will have to be put back together. Wash the parts to be dismantled in gasoline or wipe with a cloth soaked in it. Start disassembling the front wheels, boot and struts. Inspect even the smallest elements that may well affect the performance of the moped.
If a part is heavily rusted or has visible defects - chips, bends, dents, replace it without hesitation. It won't last long. After you have carefully inspected everything and removed the damaged parts, thoroughly lubricate each part.
Reassemble the structure in reverse order, replace the old parts with new ones. Try not to forget even the smallest details - they are no less important than the same wheels and steering wheel. It is better not to drag out repairs for a long time; if possible, do everything in a day or two. Otherwise, it’s easy to forget something or lose small details.
note
These tips can only help if the breakdown affected only individual parts of the rack. If, for example, your engine has failed, you are unlikely to be able to fix it yourself, and a visit to the salon will become inevitable.
www.kakprosto.ru
Do-it-yourself repair of individual parts
Having determined that neither spark plugs nor gasoline are the cause of the malfunction, we move on.
As noted earlier, engine problems can vary. Very often these problems are associated with spark plugs or the carburetor. The spark may not jump due to carbon deposits on the spark plug, which occurs due to the use of a rich mixture.
There may be a small gap, which also does not contribute to the appearance of a normal spark. In a two-stroke engine this gap is 0.6-0.7 mm. With a smaller gap, there is a high probability that the electrodes will melt. Increasing the gap causes current consumption to increase and more voltage is required to produce a spark.
There are situations when the moped stalls while moving, and then continues to move on. This occurs due to the detachment of carbon deposits from the electrode. For some time the spark is lost and the engine stops working. After self-cleaning, performance is restored.
Interruptions in engine operation may be due to moisture getting on electrical appliances and wiring. This results in a loss of voltage. After drying these parts , engine operation should be restored.
A fairly common cause in our climate is water getting into the fuel and then into the carburetor .
The reasons considered are easily eliminated by the driver themselves. However, if these steps do not bring the desired solution and the engine does not work, the scooter engine should be repaired.
Carburetor repair
As for the carburetor, the causes of malfunctions may be caused by improper mixture quality. If the mixture is lean or rich, the performance of the moped will be at risk. The quality of the mixture can be checked by the condition of the candle. A black color will indicate that the mixture is rich, that is, there is excessive oil consumption. White color will indicate a lean mixture and a decrease in engine power for this reason.
Repairing a scooter carburetor is performed on a warm engine. Before this, if there is a possibility of clogging, it should be cleaned and washed. The carburetor adjustment itself consists of the following actions:
- Step 1 – you need to adjust the idle speed.
This action is performed using the idle screw. In order to increase the speed, the screw is tightened, and to decrease it, it is unscrewed. After warming up the scooter, with the help of simple manipulations, you can set up stable idle operation of the engine.
Step 2 - check and adjust the quality of the mixture for the carburetor using a special screw.
The combustible mixture that enters the carburetor must clearly have the proportions set by the scooter manufacturer. If the mixture is too lean, the scooter loses power and overheats. With a rich mixture, fuel is used uneconomically. This problem can be solved by turning the screw. Turning the screw clockwise enriches the mixture, counterclockwise turns it leaner. The quality of the mixture will be indicated by the color of the candle. The candle is black and has carbon deposits, which means the mixture is rich. If, on the contrary, it is white, the mixture must be enriched.
Step 3 – set the quality of the mixture by moving the needle.
The following manipulations are performed with the needle: when raising the needle, the mixture is enriched, and when lowered, it is leaner.
- Action 4 – adjusting the fuel level in the float chamber.
Checking the fuel level is done with a transparent tube located at the bottom of the carburetor. The procedure is as follows: unscrew the oil screw, lift the tube up and check the fuel level. The fuel level is monitored while the engine is running. The tube should be kept above the carburetor. The fuel level should be slightly below the curb of the carburetor cover.
Features of repair of Chinese mopeds
Repairing Chinese engines does not cause any particular difficulties for most scooter owners. It should be remembered that the main fastenings of the “Chinese” are more delicate than in domestic mopeds, so there is no need to pull anything with all your might.
For example, sudden movements when repairing the carburetor of a Chinese scooter can damage the pipe . Then the muffler is removed. Many Chinese scooter manufacturers use plastic soldering. This must be taken into account when disassembling the moped.
Manufacturers have foreseen that many scooter owners will want to carry out repairs themselves, so there is simply nothing complicated in the design of such scooters. The repair manual for Chinese scooters will allow you to perform all the steps yourself. Anyone can figure out the main problems and repair the engine of a Chinese scooter.
How to fix a moped
Home » Repair and service » How to repair a moped
If you are the owner of any two-wheeled equipment, then you will definitely have to repair it or prepare the motorcycle for the next season. To perform high-quality repairs, you need to adhere to some rules and download information about repairing this motorcycle model:
- First, prepare the tools necessary for repair. This is a set of spanners and open-end wrenches, a set of screwdrivers with a set of heads. It is better to prepare all the necessary spare parts in advance.
- You also need to prepare a place in the room or at the place where the repairs will take place. Remove everything unnecessary so that nothing gets in the way.
- When disassembling a motorcycle, it is advisable to write down or remember the disassembly sequence and put the parts in the order of disassembly. This will help you assemble the motorcycle easily.
- It is advisable to do all the work carefully and not rush, so that the motorcycle repair is carried out conscientiously. You may come across rusted nuts, you need to knock them with a hammer and spray them with WD-40. If the nut does not want to be unscrewed at all and the nut has completely lost its former appearance (this often happens with Chinese nuts), then use a grinder and buy the same new nut.
- After you have completed the repair, check the motorcycle, start the engine, and do a test ride. Pay attention to the rear wheel, there should be no vibrations or unfamiliar noises. Also, place the motorcycle on the center stand and inspect it.
- During a test drive, you need to carefully listen to the operation of the engine; there should be no extraneous knocks or noises in the engine. Check the motorcycle for handling and brake performance. If the problem persists, it is best to contact a specialist.
moped-info.ru
How to fix a scooter
You will need
- — a set of open-end and ring wrenches, socket heads;
- - screwdrivers with flat and Phillips blades;
- - tester, insulating tape.
Instructions
If the engine does not start, check whether the ignition key is turned to the desired position and whether one of the brake levers is pressed. Check the serviceability of the brake light bulb or its electrical circuit. Look and replace if necessary the fuse in the main electric starter circuit. Check the terminals on the battery. Clean them from oxides, measure the battery voltage and charge if necessary. You can temporarily start the scooter using the kickstarter.
Check the serviceability of the electric starter circuit. Clean the contacts on the relay and starter, test the relay, starter windings and scooter wiring. If the kickstarter spins, check and replace defective kickstarter gears or ratchet gears. Unscrew the carburetor float chamber drain screw. If there is no gasoline in it, clean the gas tap filter and blow out the fuel line, check the serviceability of the gas tap itself and the tightness of the vacuum hose of its control. If the carburetor fuel valve is stuck, remove the float chamber cap and clean the valve seat. If this does not help, replace the valve. Unscrew the spark plug. If it is covered with a layer of unburned fuel, disassemble the carburetor, check the fuel level in the float chamber and clean the air filter. Check the serviceability of the automatic starter enricher and the spark at the spark plug. If it is missing, clean the spark plug electrodes with sandpaper or replace them. If this does not help, check the serviceability of other elements of the ignition system.
If the engine runs unstable, check the tightness of the carburetor inlet pipe and replace the gasket. Replace the crankshaft seals. By unscrewing the drain screw of the float chamber, get rid of the water in it. Blow out the carburetor jets and channels. Replace the gasoline in the tank. Remove the spark plug. If there is water on the insulator and electrodes, get rid of it in the carburetor float chamber by unscrewing the drain screw.
If there is black oily deposits on the insulator and electrodes of the spark plug, replace it with a similar one with a lower heat rating. Check and clean the vent hole in the fuel tank cap. Check the compression using a compression gauge. If it is not within specification, replace the piston, cylinder and piston rings. If there are oily marks on the head and cylinder, replace the gasket under the cylinder head or tighten the nuts securing it firmly and in the order recommended in the repair manual.
If there are extraneous sounds when the engine is running, adjust the thermal clearances in the valve drive of four-stroke engines. Check the tension and adjust the valve timing chain. Replace worn pulleys, rollers and other variator parts with new ones. If the engine stalls when the throttle valve is opened sharply, check whether the engine has warmed up sufficiently, check the carburetor adjustments and its main metering system, and the correct operation of the variator. If the engine does not pick up speed, smokes, consumes a lot of fuel, and a black coating has formed on the spark plug electrode, adjust the carburetor or install a smaller main fuel jet. If there is detonation and white deposits on the spark plug, also adjust the carburetor or install a larger main fuel jet. Also, check for clogged muffler, cylinder bores and ports. Clean them. If the muffler cannot be cleaned, replace it. If the engine begins to lose power while driving, check the fan blades and shrouds on the air-cooled engine. Replace damaged, broken or cracked ones. On a liquid-cooled engine, check for coolant leakage by checking its level in the reservoir. If necessary, replace the water pump, thermostat, radiator.
www.kakprosto.ru
Do-it-yourself scooter repair: video, tips
The popularity of scooters is growing every year. And this is not surprising. Low cost, ease of maintenance, good performance characteristics make the moped an indispensable thing in the lives of many.
In many countries around the world, the number of scooters on the streets exceeds the number of cars. They have high maneuverability, which allows residents of big cities not to think about traffic jams. However, sometimes situations arise when the moped breaks down and does not want to start.
You can repair the scooter yourself or take it to a workshop. This is everyone's personal decision. Having decided to repair it yourself, you need to prepare the space for this. Most often, repairs are performed in the garage.
The most common problems that arise are related to oil and filter changes. Incorrectly selected oil may cause the engine to not start.
First you need to drain the old oil through the drain hole. Then the carburetor is completely disassembled.
The installation and repair of Chinese mopeds should not cause big problems for a person who understands this at least a little.
How to detect a breakdown
In order to identify a scooter malfunction, it is necessary to check all elements in turn. The performance of any scooter depends on the proper functioning of components such as compression, fuel and spark. If one of the elements does not work, the scooter will not move.
Fuel may cause the moped to not start if gasoline has been added for a long time. As studies show, the octane number of gasoline decreases when it stays in the tank for a long time, that is, its quality noticeably deteriorates. There is only one result: a spark does not ignite such gasoline. If you know that you have been filling up with fuel for a long time, it is best to drain the old gasoline and fill in new gasoline in its place.
The second reason that the scooter does not start may be a dirty filter - fuel or air. A fuel filter is necessary to clean gasoline from various impurities and rust. The engine must receive clean gasoline, since this affects the wear of many parts of the moped.
The air filter is designed to clean the air that enters the carburetor. It needs to be changed quite often, since dust, dirt, etc. constantly settles on it.
The third reason that the engine will not start may be the lack of a spark. Checking whether the candles are to blame for this is as easy as shelling pears. It is enough to replace with new ones. If it is not possible to start, and the gasoline is fresh, you need to look deeper for the reasons.
Do-it-yourself repair of individual parts
Having determined that neither spark plugs nor gasoline are the cause of the malfunction, we move on.
As noted earlier, engine problems can vary. Very often these problems are associated with spark plugs or the carburetor. The spark may not jump due to carbon deposits on the spark plug, which occurs due to the use of a rich mixture.
There may be a small gap, which also does not contribute to the appearance of a normal spark. In a two-stroke engine this gap is 0.6-0.7 mm. With a smaller gap, there is a high probability that the electrodes will melt. Increasing the gap causes current consumption to increase and more voltage is required to produce a spark.
There are situations when the moped stalls while moving, and then continues to move on. This occurs due to the detachment of carbon deposits from the electrode. For some time the spark is lost and the engine stops working. After self-cleaning, performance is restored.
Interruptions in engine operation may be due to moisture getting on electrical appliances and wiring. This results in a loss of voltage. After drying these parts, engine operation should be restored.
A fairly common cause in our climate is water getting into the fuel and then into the carburetor.
The reasons considered are easily eliminated by the driver themselves. However, if these steps do not bring the desired solution and the engine does not work, the scooter engine should be repaired.
Carburetor repair
As for the carburetor, the causes of malfunctions may be caused by improper mixture quality. If the mixture is lean or rich, the performance of the moped will be at risk. The quality of the mixture can be checked by the condition of the candle. A black color will indicate that the mixture is rich, that is, there is excessive oil consumption. White color will indicate a lean mixture and a decrease in engine power for this reason.
Repairing a scooter carburetor is performed on a warm engine. Before this, if there is a possibility of clogging, it should be cleaned and washed. The carburetor adjustment itself consists of the following actions:
- Step 1 – you need to adjust the idle speed.
- Step 2 - check and adjust the quality of the mixture for the carburetor using a special screw.
- Step 3 – set the quality of the mixture by moving the needle.
- Action 4 – adjusting the fuel level in the float chamber.
This action is performed using the idle screw. In order to increase the speed, the screw is tightened, and to decrease it, it is unscrewed. After warming up the scooter, with the help of simple manipulations, you can set up stable idle operation of the engine.
The combustible mixture that enters the carburetor must clearly have the proportions set by the scooter manufacturer. If the mixture is too lean, the scooter loses power and overheats. With a rich mixture, fuel is used uneconomically. This problem can be solved by turning the screw. Turning the screw clockwise enriches the mixture, counterclockwise turns it leaner. The quality of the mixture will be indicated by the color of the candle. The candle is black and has carbon deposits, which means the mixture is rich. If, on the contrary, it is white, the mixture must be enriched.
The following manipulations are performed with the needle: when raising the needle, the mixture is enriched, and when lowered, it is leaner.
Checking the fuel level is done with a transparent tube located at the bottom of the carburetor. The procedure is as follows: unscrew the oil screw, lift the tube up and check the fuel level. The fuel level is monitored while the engine is running. The tube should be kept above the carburetor. The fuel level should be slightly below the curb of the carburetor cover.
Features of repair of Chinese mopeds
Repairing Chinese engines does not cause any particular difficulties for most scooter owners. It should be remembered that the main fastenings of the “Chinese” are more delicate than in domestic mopeds, so there is no need to pull anything with all your might.
For example, sudden movements when repairing the carburetor of a Chinese scooter can damage the pipe. Then the muffler is removed. Many Chinese scooter manufacturers use plastic soldering. This must be taken into account when disassembling the moped.
Manufacturers have foreseen that many scooter owners will want to carry out repairs themselves, so there is simply nothing complicated in the design of such scooters. The repair manual for Chinese scooters will allow you to perform all the steps yourself. Anyone can figure out the main problems and repair the engine of a Chinese scooter.
A scooter repair video will answer most questions.
We recommend reading:
(Rate this article)
motoholder.ru
Disassembling the alpha moped engine: do-it-yourself repair
Any, even the most advanced motorcycle equipment needs careful handling and professional care. The engine is the heart of the Alfa moped. If handled incorrectly, the consequences can be unpredictable. In order to avoid the risk of irreversible damage to the moped, it is important to know how to independently disassemble and reassemble the engine of this model. Repairs are easy. This will require experience, as well as knowledge of some nuances.
Engine Features
The engine of the Chinese Alpha moped has characteristic features, thanks to which fans of motorcycle technology prefer this particular model.
Engine for Alpha moped
Engine capacity - 72 cc. With the right approach, it can be upgraded to 110 cc. Also, if desired, you can increase the speed by 10 kilometers.
The weak point of the engine is the gearbox, which requires close attention and a delicate approach. When repairing the “heart” of a moped, you need to know how to correctly disassemble and reassemble this part of the motorcycle “organism”.
Alpha is equipped with a powerful engine, the circuit of which is complex. If you can’t figure it out on your own, it is recommended to contact an experienced specialist. The price of repairs is quite affordable.
Causes of malfunction
The Chinese Alpha moped, whose price is affordable, does not cause owners many problems. Interruptions in a moped engine have several causes, and once you understand them, you can quickly fix the breakdown.
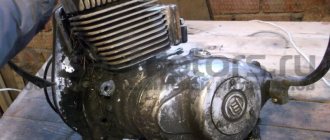
Disassembling the moped engine
So, if the engine starts with great difficulty, the muffler “shoots”, and smoke comes out of the chimney, it means that the moped is “capricious” due to problems with the carburetor. In order to solve this problem with the Alpha moped, you need to:
- clean the carburetor;
- thoroughly clean the moped's air filter;
- tighten the screws;
- adjust the moped carburetor.
If the Alpha slowly picks up speed, and its engine is not able to develop the declared power, then the reason is the incorrect operation of the moped valves. It can also “get sick” due to gaps and incorrect timing. In order to make the Alpha moped function normally, it is necessary to replace the used valves with new ones.
If the Alpha moped is not able to reach the required speed, despite the roar of the engine and solid revolutions, it is impossible to stop the spinning wheel, and gear shifting occurs intermittently, then the cause of the malfunction is clutch wear.
Moped clutch parts
To eliminate the breakdown, you must perform the following manipulations:
- remove the engine;
- remove the plastic cover;
- unscrew the tightening screw;
- Unscrew the adjustment mechanism and tighten the screw tightly;
- start a moped;
- turn on first gear and drive a few meters.
Another cause of moped engine malfunction may be wear on the drive sprockets. If they are very worn, they must be replaced with new ones.
You may encounter the problem of engine overheating. The situation can be corrected after adding oil. If oil leaks, you must immediately contact a professional service.
Alpha moped engine overheating
Engine disassembly
Disassembling the Alpha engine is quite simple. To do this you need:
- “arm yourself” with a key;
- Unscrew the bolts on the intake manifold (by 10);
- unscrew the cylinder covers and the bolts located there (4 pieces);
- remove the cylinder head.
After performing the necessary manipulations, you need to properly assemble the engine, installing all the parts in place.
A diagram can help you understand the nuances. Also, a lot of useful tips regarding repairing the most important “organ” of the Alpha moped are contained in the training video.
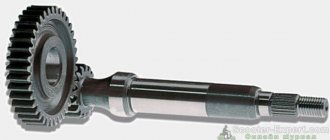
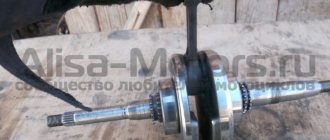
Gearbox disassembly
It is necessary to disassemble the gearbox in order to replace used parts. This is done after the following parts have been dismantled:
- rotor;
- cylinder;
- clutch block.
Gearbox disassembly
Repair of this part of the engine is carried out as follows:
- Using a screwdriver or blade, remove the retaining ring and the drive gear;
- Carefully unscrew the gear fixing bolt and remove the gear shift mechanism;
- remove the gear shift fork and shaft;
- remove the crankshaft and drum (including the core);
- After replacing the worn part with a new one, reassemble (in reverse order).
Conclusion
In order to carry out independent engine repairs correctly, you need to familiarize yourself with the training videos. The engine diagram of this model will help you avoid confusing the location of the forks and gears. If there is no access to the diagram, then you need to mark them on a piece of paper.
The Alpha moped rarely needs repairs. If the owner is not confident in his abilities, then the repairs should be carried out by a professional. Otherwise, the price of the issue will be very high.
Video on the topic
omopede.ru
autofluids.ru
Scooter repair - general principle of troubleshooting
In order for an internal combustion engine to work, it needs three components: fuel, spark, compression. The main slogan of a motorcycle mechanic is “there are no miracles.” You must always remember that if, when troubleshooting and repairing a scooter, it turns out that there is a spark, there is compression, fuel is flowing, but the engine does not start, this, as a rule, only means that one of these components is actually missing .
DIY scooter repair
Too lazy to send the scooter in for repairs and pay money for it. Common situation. Then it's time to take on the repairs yourself.
The basic principle of troubleshooting and repairing a scooter is to step by step eliminate the elements of the system, trying to identify the cause of the malfunction in any of them. Search and repair must be carried out strictly sequentially, from the very beginning of the chain to the very end. That is, for example, if there is no spark, you should not immediately change the switch. First we need to make sure that our generator is “alive”, then test the wiring. Etc.
Important note: if you have a device in front of you that, according to the owner, “used to work like a clock,” it makes sense to ask whether old gasoline was poured into the tank. A couple of months of storage is enough for gasoline to lose its octane number to such an extent that it loses the ability to ignite.
It is important to remember that before making a final diagnosis and starting repairs on the scooter, you need to make sure that a known working spark plug is installed on it, and that the carburetor is functioning normally.
In addition, you need to know that the correct operation of the engine (even at idle speed) is closely related to the correct operation of the variator, clutch, as well as the camshaft and valve group. In other words, with normally functioning power supply, ignition and CPG systems, the problem may be, for example, in the transmission, since the crankshaft torque is directly transmitted to the variator.
When carrying out diagnostics and repairs, you must remember that in some circumstances that lead to the need to repair a scooter , it is necessary to check not a separate element, but the entire system. For example, if the carburetor is clogged, provided that the air filter is intact and saturated, you need to check whether there is dirt in the gas tank and fuel filter. If the scooter has been driven for a long time without an air filter, or with an unimpregnated filter, then everything needs to be checked: the CPG, the crankshaft and the main bearings.
Below are some problems that may occur, as well as basic steps to resolve them. The links indicate places where you can find information on this item.
DIY Chinese scooter repair
DIY Chinese scooter repair
The rhythm of life in a metropolis leaves few options when choosing a means of transportation. You have to ride the subway, in close contact with similar sufferers, or spend a significant part of the day inside a car that is moving slowly in a traffic jam. There is another option. Buy a scooter at an affordable price and now you don’t have to be alone in a car showroom, or join the cramped society of a subway car.
What can this vehicle offer the owner in return for lost capabilities? Buying a scooter will give you the opportunity to significantly reduce the time spent traveling to your place of work and on the way back. There will be time to communicate with family and friends, and there will be additional opportunities to do household chores. You no longer have to put everything off for the weekend and then face the new week without having time to rest.
Do-it-yourself repairs
A maneuverable and lightweight vehicle can significantly improve the quality of life, save money, time and nerve cells. And the fact that repairing a Chinese scooter with your own hands can be done simply and inexpensively will add advantages to the scooter in the vehicle market. And the spare parts offer is impressive.
Imagine for a moment: you are a city dweller, your friends bought mopeds a long time ago and ride for their own pleasure, and now you have decided to get an iron friend yourself. When purchasing, the driver is unlikely to be given a manual on how to repair a Chinese scooter with his own hands; moreover, sometimes they may recommend the wrong oil. For example, they gave you oil for a two-stroke moped, but you ride a four-stroke. As a result, you will have to carry out chassis repairs, because the scooter
won't start. You'll have to do a complete disassembly.
Be careful when repairing your scooter
But without special equipment, you won’t be able to repair a Chinese scooter yourself; you need to have at least a screwdriver on hand. First, you need to drain the inappropriate oil that has stained the internal mechanisms. Next, complete disassembly begins. A job like removing a carburetor looks very simple at first glance. But if the part is removed abruptly, the special pipe may be damaged. Then you need to loosen the muffler, or remove it completely. Most Chinese products are made using plastic soldering.
DIY scooter repair
Do-it-yourself scooter repair involves troubleshooting by sequentially eliminating specific elements of the operating system. The basis of the operation of a scooter is three components: compression, fuel, spark. If any of these components are missing, then starting the scooter is impossible. Therefore, the entire algorithm for repairing a scooter with your own hands comes down to troubleshooting, and sometimes this is the most difficult thing in the work being performed. Remember: even if you checked all these three components, the scooter
still won't start, then you checked poorly!
For those who have worked with computer repair, I will give an example. Let's say your monitor doesn't show anything (black screen and that's it). Therefore, you first check the functionality of the operating system itself, then the monitor. If the tested components are functional, then the problem is different. You check the video card and find a problem. This is the principle of mutual exclusion, which is the basis for repairing everything, including scooters.
Repair
scooter repair always begins with the fact that it turns out that you are too lazy or sorry for the money to go to a professional workshop.
First of all, check the gasoline. Gasoline in the tank quickly loses octane number, which leads to the mixture not igniting. A couple of months of gasoline in the tank is enough for this. So we change the gasoline and try again.
MY MOTORCYCLE
Scooters can now be found everywhere; this vehicle is no longer a curiosity. But not everyone knows how to repair an engine, by the way, I’m also one of them, I had a Suzuki scooter. When it was necessary to repair something, I took him to the “uncle master” and he straightened everything out for me. Now I want to give you (and myself) an example of repairing a Minarelli engine (an engine of this color is mainly found on all small-capacity scooters).
Over its long history, the Minarelli two-stroke engine has become perhaps the most widespread in the world: 50- and 100-cc models from Yamaha, Italjet, Aprilia, Malaguti, Benelli are built on it, and the Chinese, without further ado, copied it, which only added to the latest popularity. Using the example of the popular Yamaha Jog scooter, we will show how to properly capitalize a Minarelli.
There are few indications for overhauling a two-stroke engine: a rumble in time with the crankshaft revolutions means “tired” upper and lower connecting rod bearings, a dull noise means the death of the crankshaft main bearings. “Jumping” idle and inadequate response to the throttle when the carburetor is correctly configured – crankcase depressurization. The engine can suck air between the crankcase halves, and (which happens more often) through the crankshaft seals.
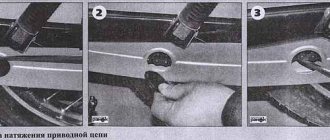
When the symptoms described appear, the first thing you need to do is figure out what exactly the problem is. In principle, you can damage the motor without “rolling out” it, but this is not very convenient. It’s good to disassemble, and most importantly, to assemble the motor only on a workbench, so let’s start by removing the engine (photo 1). To do this, you need to disconnect the rear brake cable (if the brake is a disc brake, it is most convenient to remove the caliper without disconnecting it from the hose), the carburetor, disconnect all the electrical wiring connectors and the oil pump hose (oil will flow out of it, so it is better to put it in a bottle or squeeze).
We unscrew the lower bolt of the shock absorber, remove the motor mounting axis and “roll out” the block with the wheel (photo 2). We begin disassembly by dismantling all the attachments: muffler, cooling casings, wheel, center stand and variator cover. We unscrew the transmission, remove the starter and overrunning clutch. The clutch has a needle bearing and three spring-loaded rollers, so carefully, so as not to shake out small parts, we put it aside (photo 3). On the right, remove the cooling impeller and magneto.
To remove the magneto, special pullers are sold, but before purchasing one, you need to take into account that Minarelli generators come in different varieties. On our “experimental” ignition 5VM, the magneto is removed by the threaded holes securing the impeller, but on most engines with ignition 2JA, the magneto has a thread for a puller (photos 4 and 5).
Having removed the magneto, unscrew the board with the generator stator and remove the oil pump. Having pulled out the locking rings, remove the oil pump drive. Check the condition of the fit under the generator bell key on the crankshaft. Now, holding the end of the crankshaft with your hand, it is easy to check the presence of vertical and horizontal play in the main bearings and see the condition of the seals (photo 6). If the seals look alive, but the engine still sucks in air, it will have to be “inflated”, but more on that later (photo 30).
Crosswise, gradually loosen the nuts and unscrew them (photo 8). We remove the “head” and the cylinder itself - now you can see the condition of the “mirror” on the cylinder, visually assess its wear and check for scratches on it. Ring wear can be assessed by measuring the gap in the lock. To do this, you need to insert the compression ring inside the cylinder, use the piston to align it perpendicularly in the area of the lower limit of the working stroke and measure the gap in the lock with a feeler gauge, the norm is 0.1–0.2 mm.
At a distance of 5 mm from the edge of the skirt, across the piston pin axis, we measure the piston diameter, tolerance from 39.957 mm to 39.977 mm. Even if the piston and rings are in order, and the cylinder seems “alive”, it is not superfluous to check its production in the area of the piston skirt near BDC. To do this, insert a compression ring into the cylinder and align it with the piston. If gaps are visible in the light, the cylinder will have to be bored or replaced.
In our case, the cylinder is in perfect order, so it will go for assembly. To check the condition of the upper connecting rod bearing, simply grab the connecting rod with one hand and the piston with the other and check for radial play. If there is play, you will have to replace the needle bearing and piston pin. With the lower bearing it is more difficult: the pin of the lower connecting rod head is pressed between the crankshaft cheeks and cannot be repaired.
We take the connecting rod and check for radial and axial play. Axial play is not critical, but radial play is an indication for replacing the crankshaft and connecting rod assembly. On our engine, the crankshaft has expired and will have to be replaced (photo 7). Remove the retaining ring from the piston and pull out the pin. Using ordinary automotive feeler gauges, we measure the distance between the crankshaft cheek and the crankcase wall: 0.75 mm on one side and 1.45 mm on the other (photo 9). A crooked installation in our case caused the premature death of the bearing.
The engine will have to be “chopped”. To begin with, thoroughly wash the outside of the engine (photo 10). We remove the intake manifold and take out the “house” of the reed valve. We move the locking ring on the motor mounting axis and knock it out by a third with light blows (photo 11). Everything is ready - let's proceed to the most difficult and important part of the work. Crosswise in several stages we loosen and unscrew the bolts holding the crankcase halves together. Using a gas burner or a technical hair dryer, we heat the crankcase (no more than 200 °C!), install the puller and “pull out” the smaller half.
There are some pitfalls here too. In addition to the bolts, the halves are held in place by two guide bushings, and if there are no problems with the upper one, the lower one, due to its location, turns sour. When pulled apart, it causes a misalignment, so fill the joint with penetrating lubricant and carefully monitor its exit from the groove. The misalignment of the halves when opening threatens to bend the crankshaft. The same goes for disassembling the engine without a puller: you can do without it, but the crankshaft will most likely have to be thrown out.
Before starting work, it is important to have not only a set of tools and pullers, but also the necessary spare parts. At a minimum, new main bearings and seals. Unlike a four-stroke engine, where oil will simply ooze through a “tired” oil seal, a “two-stroke” will suck air and, accordingly, work incorrectly or not work at all. New cylinder gaskets or a piece of paronite of suitable thickness will not be superfluous. You also won’t be able to do without two or three bottles of carburetor cleaner for cleaning and degreasing parts, a liter of engine oil and grease. You shouldn’t skimp on sealant either – petrol- and heat-resistant, preferably rubber-based. Coolant and gas cylinders for a small burner or a technical hair dryer will come in handy. As for the tools, everything is not so simple: the usual set will have to be supplemented with a torque wrench, feeler gauges (simple automotive ones will do) and a rubber mallet. Anyone who takes a fundamental approach to engine overhaul will have to buy a generator puller, a regular bearing puller, as well as special devices for pressing out and pressing in the crankshaft.
If a new one has already been purchased, and the old one is completely useless, disassembly without a puller is acceptable (photos 12 and 13). After removing the small half of the crankcase, we perform a similar operation with the large one: heat it up and press out the crankshaft. If you only need to replace the main bearings, use a puller to pull them off the crankshaft. It is important to remember: if you plan to install the crankshaft backwards, you need to check it for runout (photo 14), it should not exceed 0.03 mm.
We carefully wash the released crankcase castings (photo 17), remove the remaining gaskets and sealant and knock out the old oil seals (photo 15). Afterwards, use sandpaper to clean the oxides on the guide and at the place where it fits (photo 16). We check: the halves should fit together easily and evenly by hand. Now you can start assembling.
New bearings must first be washed from preservative grease. In our engine they are lubricated with a mixture of gasoline and oil and there is no need for thick lubricant. We heat the bearing seats with a hair dryer or burner (photo 18), cool the bearings and insert them into the seats. Due to the temperature difference, and therefore compression-expansion, the bearings smoothly enter the grooves under their own weight (photo 19).
We lubricate the main bearings and the crankshaft with oil (photo 20) and use a special device to pull it into the bearing of the large half, leaving a gap a millimeter larger than calculated. (Before disassembly, we measured the gaps between the crankcase walls and the shaft cheeks on both sides: 0.75 mm and 1.45 mm, added together, we got 2.20 mm. Dividing this number in half, we calculate the gap we need on each side.)
Even a piece of pipe can act as a device; the main thing is to rest it against the inner race of the bearing and not disturb the alignment (photo 21). Before pressing the crankcase, you must wait until the temperature of both halves drops to room temperature and equalizes. We degrease and apply high-temperature (above 200 °C) gasoline-resistant sealant to the mating surface, including around the “souring” bushing, to avoid problems with it in the future (photo 22).
Lubricate the crankshaft axis with oil and press the shaft into the small casting to the same gap as on the right one. Avoiding distortions, we align the gaps on both sides (photo 23). Crosswise in several steps, tighten the bolts connecting the crankcase halves with a torque of 10 Nm (photo 24). Using feeler gauges, measure the gaps between the crankshaft cheeks and, if necessary, align the left and right. The gap (in our case) should be 1.1 mm on each side. After assembly, it is important to ensure that there is no “stress” on the bearings and shaft.
We place the crankcase on a flat surface and, after making a few revolutions of the crankshaft, release the connecting rod. A correctly installed shaft returns to the 12 o'clock pin position under its own weight (photo 25). If the connecting rod pin does not rise upward under the weight of the crankshaft cheeks, it means that the shaft is deformed or during assembly “tension” was created between the bearings due to over-tightening or, if they tried to pull the shaft, under-tensioning. It is treated with the opposite action - pulling and pulling the shaft with pullers.
Lubricate the working edges of the oil seals and their seats with grease. We press them in using a mandrel. It is best to install the variator oil seal using a special mandrel. It minimizes the risk of deforming or distorting the oil seal, and most importantly, it does not allow you to “miss” with the depth (photos 26 and 27). In our case, the installation depth of the oil seal is 10.5 mm. The motor is assembled.
We install the reed valve and the intake manifold with new gaskets or, if they are missing, with sealant. We install a new gasket (photo 28) under the cylinder, piston, retaining ring and, carefully squeezing the compression rings with your fingers, insert the piston into the cylinder. We place the head and crosswise tighten the bolts in several steps with a torque of 12 Nm (photo 29). To check the tightness of the motor, we will have to “inflate” it.
Let the sealant dry (otherwise the pressure will squeeze it out), plug the inlet and outlet holes, and screw a compression gauge into the spark plug hole. We pump air into the motor at a pressure of 2 kgf/cm2 and leave it for an hour. If the pressure drops noticeably, you will have to look for leaks - for example, in a water tank or by spraying with soapy water. If the motor is assembled correctly, there should be no problems (photo 30).
We fill the cavity around the oil pump with grease, put on the retaining rings, replace the cotter pin and gear of the oil pump, as well as the oil pump itself (photo 31). We put the generator and variator in place, put on the cooling covers and the rear wheel. “Roll up” the motor and connect all the hoses. It is important to remember to attach the hose to the oil pump and fill the empty oil tank (photo 32).
In our case, among other things, a new non-original crankshaft led to the need to reconfigure the carburetor. At the same time, we washed and soaked the air filter (photo 33).
Source: Moto Magazine
Do-it-yourself wheel studding.
Good day everyone! This article is from the category “It was evening, there was nothing to do.” This is not an instruction manual, it is just a description of my studding process. I haven’t discovered America, but maybe someone will find it useful. I’ll try to explain everything in an accessible way.
Lyrical digression
Recently my wife and I moved to my mother-in-law, and now I live in a remote village. The nearest city, where there are glimpses of civilization, is about 20 kilometers away. Of these, 5 kilometers are off-road, where the wheels of snow removal equipment have never driven, the remaining 15 are just snow rolled by cars. For personal transport, I have a mountain bike and a scooter. No, a bicycle is, of course, good, but it’s slow, and the load capacity of a scooter is better.
As always, winter suddenly came, and the question became acute: how to get to the city? After the first attempt to ride in snowy weather on ice, thoughts about preparing the scooter for winter appeared in my head. It was decided to install studded tires. Because Factory tires are expensive, so I started googling how to make studs with my own hands. Unfortunately, this issue is poorly covered on the Internet. On one forum I came across instructions from Evgeny Matveev. TYTS
In principle, from what I read, almost everything becomes clear, the only thing that is not clear is what the length of the screws and the diameter of the washers should be. And it’s not clear how much there should be, and how much all this fun will cost. I have experimentally determined that the optimal length of screws for me is 16 millimeters (5x16), although it’s probably possible to take it shorter. And the washers needed are 5x15. I didn’t have spare tires, so I went to a scooter workshop, where they kindly gave me two dead tires. They gave us different tires, one a little larger. But, as they say, “Don’t look under the tail of a gift horse.” Having marked the tenon markings with a pencil, I counted 100-150 screws per wheel. I decided to take with a reserve (in case my imagination runs wild), and took only 350 pieces. All this cost 95 UAH (about $11.5).
The tenon took 225 screws. 75 for the front, and 150 for the rear wheel. One tire was softer, so I had to put washers on the inside to prevent the screw heads from falling through. I have cameras in my wheels. To prevent them from rubbing against the heads of the screws, I made gaskets from old inner tubes around the entire circumference of the wheel. Perhaps it will also hold air on tubeless cameras, because... everything is held together very tightly. I note that the most convenient way is to tighten all the nuts and tighten everything with a screwdriver with the appropriate attachment. The spikes protrude by 10-11mm. There are 6-8 studs per contact patch.
Studded tires side view
I immediately carried out a test run, the result exceeded all expectations! The scooter handles very confidently on snow and sometimes drifts a little on ice. It also drives fine on asphalt. You can drive on a flat surface at speed without fear of falling. The wheels do not slip, the spikes cling tightly. The brakes work very well. Since I put wide tires on the front, the spikes caught the beak a little when driving, so I had to shorten them a little. If you drive on asphalt, the spikes may wear off quickly.
PS.PS: On video
test drive immediately after studding. I drove slowly, because... I’m not used to it yet, and the thorns caught the beak. Now I drive faster and more confidently.
Video: Changing the oil in the rear gearbox of a scooter
Note: if you are looking for high-quality spare parts for the 139QMB engine, you can buy them on the website www.mtzmoto.ru.
Related materials:
- Choosing oil for a motorcycle If you need to buy oil for a motorcycle, follow a few nuances to avoid making a mistake and not purchasing low-quality...
- Chinese scooters - quality at an affordable price For those who have a strong desire to buy their first scooter, but do not have the opportunity to spend a large amount, scooters are suitable...
- Preserving scooters for the winter This article lists the main processes that are associated with preparing a scooter for storage during the winter. Washing Wash the scooter...
- Breaking in a scooter After purchasing a new scooter, or replacing a piston or piston rings, the first thing you need to do is to properly break in the scooter. Running in...
- A scooter is also a vehicle. In the last few years, you can increasingly see on the roads, in addition to the motorcycles we are used to, so-called scooters. There are quite a few reasons...
Scooter repair: what you need to know
For more than a decade, two-wheeled scooters (colloquially referred to as scooters) have become a common, cheap, affordable, inexpensive and, accordingly, widespread means of transportation in both cities and rural areas.
Their owners, like any other two-wheeled vehicle, regularly face such an unpleasant need as scooter repair. The reasons why you may need to repair your vehicle can be very diverse, ranging from factory defects or poor quality of components and assemblies to breakdowns caused by accidents or natural wear and tear of parts during operation, since nothing lasts forever in nature.
Major breakdowns
If you intend to repair the scooter yourself, and not use the services of special workshops, then you need to understand that all faults can be divided into several large categories, namely:
Each category also includes several subcategories. The most common faults are those related to electrical equipment and the engine power supply system. Therefore, we will consider them in more detail, since repairing a scooter often consists of eliminating them.
Troubleshooting
The first and main sign that the equipment needs repair is the inability to start the engine. Scooter repair begins with identifying the fault and then eliminating it. In this case, the breakdown must be looked for starting from the place where the thermal energy of the burnt fuel is converted into mechanical energy of the rotating crankshaft of the engine. So let's get started:
— determine whether fuel enters the combustion chamber,
— is there a spark between the spark plug contacts?
If all of the above factors are present, then the following malfunctions are possible:
1. There was a breakdown of the spark plug insulator. To do this, simply replace the spark plug.
Troubleshooting
Malfunctions of electrical equipment and fuel systems are the most regular of all problems that arise among scooter owners.
It often happens that a breakdown suddenly occurs to the scooter. Repairing the carburetor, as a rule, allows you to resume the functioning of your “faithful horse”.
Usually, to do this, it is enough to remove the carburetor, clean the dust from the outside and the tarry deposits of gasoline and other debris inside. Clean and blow out the air and fuel channels and jets, check the condition of the fuel needle and throttle valve, and then reassemble and adjust it.
Fixing more complex breakdowns at home is not always possible, since specific tools are often required that are not widely available.
Thus, for a technically literate person, repairing a scooter with your own hands will not be very difficult if you have minimal knowledge and skills in handling equipment, as well as the necessary tools.
Engine Features
The engine of the Chinese Alpha moped has characteristic features, thanks to which fans of motorcycle technology prefer this particular model.
Engine for Alpha moped
Engine capacity - 72 cc. With the right approach, it can be upgraded to 110 cc. Also, if desired, you can increase the speed by 10 kilometers.
The weak point of the engine is the gearbox, which requires close attention and a delicate approach . When repairing the “heart” of a moped, you need to know how to correctly disassemble and reassemble this part of the motorcycle “organism”.
Alpha is equipped with a powerful engine, the circuit of which is complex. If you can’t figure it out on your own, it is recommended to contact an experienced specialist. The price of repairs is quite affordable.
Causes of malfunction
The Chinese Alpha moped, whose price is affordable, does not cause owners many problems. Interruptions in a moped engine have several causes, and once you understand them, you can quickly fix the breakdown.
Disassembling the moped engine
So, if the engine starts with great difficulty, the muffler “shoots”, and smoke comes out of the chimney, it means that the moped is “capricious” due to problems with the carburetor. In order to solve this problem with the Alpha moped, you need to:
If the Alpha slowly picks up speed, and its engine is not able to develop the declared power, then the reason is the incorrect operation of the moped valves. It can also “get sick” due to gaps and incorrect timing. In order to make the Alpha moped function normally, it is necessary to replace the used valves with new ones.
If the Alpha moped is not able to reach the required speed, despite the roar of the engine and solid revolutions, it is impossible to stop the spinning wheel, and gear shifting occurs intermittently, then the cause of the malfunction is clutch wear.
Moped clutch parts
To eliminate the breakdown, you must perform the following manipulations:
- remove the engine;
- remove the plastic cover;
- unscrew the tightening screw;
- Unscrew the adjustment mechanism and tighten the screw tightly;
- start a moped;
- turn on first gear and drive a few meters.
Another cause of moped engine malfunction may be wear on the drive sprockets. If they are very worn, they must be replaced with new ones.
You may encounter the problem of engine overheating. The situation can be corrected after adding oil. If oil leaks, you must urgently contact a professional service .
Alpha moped engine overheating
Engine disassembly
Disassembling the Alpha engine is quite simple. To do this you need:
- “arm yourself” with a key;
- Unscrew the bolts on the intake manifold (by 10);
- unscrew the cylinder covers and the bolts located there (4 pieces);
- remove the cylinder head.
After performing the necessary manipulations, you need to properly assemble the engine, installing all the parts in place.
A diagram can help you understand the nuances. Also, a lot of useful tips regarding repairing the most important “organ” of the Alpha moped are contained in the training video.
How to repair a moped
Home » Repair and service » How to repair a moped
You will need
- Keys, screwdrivers, awl, vice, hammer and pliers.
Instructions
Inspect your faulty moped and determine which parts need replacement or repair. It is better to order new ones from a workshop or a specialized store. Don’t skimp on the details - they will pay for themselves many times over in the future, and besides, your safety on the road depends on their quality. Invite a more experienced friend to help you with the repair.
First, thoroughly wash and dry your moped. Remove elements that will interfere with your repair process. If the damaged parts are small in size, then it makes sense to take them to the table - this will make it much more convenient for you to deal with them.
When disconnecting individual elements of the moped, remember their sequence. Don't forget that eventually the entire structure will have to be put back together. Wash the parts to be dismantled in gasoline or wipe with a cloth soaked in it. Start disassembling the front wheels, boot and struts. Inspect even the smallest elements that may well affect the performance of the moped.
If a part is heavily rusted or has visible defects - chips, bends, dents, replace it without hesitation. It won't last long. After you have carefully inspected everything and removed the damaged parts, thoroughly lubricate each part.
Reassemble the structure in reverse order, replace the old parts with new ones. Try not to forget even the smallest details - they are no less important than the same wheels and steering wheel. It is better not to drag out repairs for a long time; if possible, do everything in a day or two. Otherwise, it’s easy to forget something or lose small details.
note
These tips can only help if the breakdown affected only individual parts of the rack. If, for example, your engine has failed, you are unlikely to be able to fix it yourself, and a visit to the salon will become inevitable.
www.kakprosto.ru
❶ How to fix a moped
Instructions
To repair the front shock absorber struts, you must first remove them from the scooter. To do this, first remove the front wheel and release both struts. Unscrew the nuts, take them out, and then pull out first one and then the other rack. Clean dirt from them and rinse in gasoline. Remove the rubber boot from the stand. Next, remove the stopper from its socket. Do this with an awl or a very thin screwdriver. Clamp the chrome rod in a vice. Place the rack in a comfortable way and try to pull. Insert the pre-prepared axle into the hole for the wheel axle and hit it with a hammer in the direction the rod comes out. But be careful. Hit just a couple of times and the structure will move on its own. Carefully remove everything, clean and inspect. Wash this unit well in gasoline. Remove the bushings from the stem and assess their wear. After this, remove the damping spring from the rod. The main spring remains in the strut; you need to get it out, and don’t forget the rubber bumper in the very depths. Use a long screwdriver or narrow pliers. After this, thoroughly clean the inside surface of the stand. After disassembling and checking the parts, you can improve your racks. To do this, place two valve springs from the car in a row for shock absorption, as well as one spring for damping in a separate rack. Use an emery reamer in an electric drill.
Then proceed to making new bushings. Entrust this work to an experienced turner. Give him the rod and the old bushings with the stand. Please note that bushings cannot be made from aluminum, as they will instantly become unusable.
After this, check the stem. Don't worry if it turns out to be rusty. But if you still want to replace it, then order a new one from the factory.
And the final procedure is thorough lubrication. Drill small holes with an area of about 0.5 sq.cm in the lower bushing, which is located at the very bottom of the rack. Then the oil from the bottom of the rack will not interfere with the operation of the spring mechanism.
After this, reassemble the rack in reverse order. Don't forget to install the rubber bumper first. And be sure to check that you have put the retaining ring in place.
www.kakprosto.ru
Alpha moped repair
The affordable price has made the Chinese 50 cc moped “Alpha” the literal favorite in the demand for “stools”; in the same bunch is its slightly more durable twin brother “Delta”. Economical, with an engine capacity of 72 cc and air cooling, the Alpha moped is unpretentious and easy to maintain. The clear design of the Alpha moped engine allows you to repair or tune the equipment yourself.
Alpha moped engine repair
Before disassembling the engine of the Alpha moped, we fix the scooter with the central stand and free it from the plastic. We disconnect all engine power systems and do not forget to drain the oil!!!
We remove the engine along with the transmission, and on a flat surface we continue the home repair of the Alpha moped.
It will help to properly dismantle the Alpha moped engine by disassembling it according to the following scheme:
- remove the muffler and exhaust pipe;
- remove the camshaft gear cover;
- unscrew all 4 bolts from the cylinder cover;
- remove the top cover and cylinder head;
- We look at valve wear, internal contamination and the condition of other system parts.
If this is your first time doing a DIY repair on an alpha moped and you need to disassemble it, don’t forget to sketch a diagram of how everything was in place! If the valves need to be replaced, or if there are gaps in the fit, then they need to be removed:
- Place the head on a level place. To prevent the valve from being damaged during dismantling, it is better to place a layer of thick rubber or a rag under it;
- we select the socket head, place it on the valve plate and hit it hard with a hammer;
- release the crackers, remove the top plate and valve washer;
- remove the valve and guide bushing.
To complete the repair of the Alfa moped engine, after replacing the parts, we begin assembling the engine in the reverse order, putting everything in its place, observing the marks. Don't forget to add fresh oil.
Alfa moped box repair
The gearbox of the Alpha moped sometimes fails and requires constant attention. Repairing a gearbox at home is not particularly difficult for a beginner.
We carefully read the instructions for the alpha moped, do-it-yourself gearbox repair.
Let's take it slowly, in order:
- We first dismantle the cylinder, then the rotor and clutch block;
- carefully remove the retaining ring (you need a screwdriver and a thin knife or blade) and the drive gear;
- To remove the speed unit, unscrew the fastener - the bolt on the back side.
- remove the gear shift fork;
- remove the crankshaft and drum.
When the repair of the Alpha moped box is completed, assemble the gearbox using the reverse algorithm.
Tuning
For many, Alfa moped repair begins almost immediately after purchase. Thanks to the presence of spare parts and the simplicity of the Alpha moped engine, tuning is common. This could be replacing the not very comfortable original seat, or increasing the engine capacity to 110 cc. Replacing the sprocket from 14 to 15 or even 16 will increase the speed to 10 km/h.
Increase in cylinder volume - replacement from 50 cc. at 70 cc., will add power, which is sometimes lacking. To do this, in addition to the cylinder head, you will have to change the pistons and carburetor. You can carry out such maintenance of the Alpha moped yourself. If you bought an Alpha moped, repairing the gearbox and engine yourself will be a good opportunity for you to study your equipment.
And finally, some useful tips that will make repairing an Alpha moped a more enjoyable experience for you.
Have you disassembled the timing belt and CPG? Place parts in separate boxes. Sketch the position of the gears and forks on paper before removal. If you decide to increase the speed of the Alpha moped using an asterisk, do not forget that the front and rear change at the same time.
Monitor the speed, prevent clutch wear, and change fluids in a timely manner.
Don’t be afraid of repairs, learn the hardware, watch video lessons, and you won’t need the services of a mechanic.
Hang panniers, change headlights and mirrors. The Alpha moped is from the series that will respond to any of your concerns with reliability in thousands of your future kilometers.
Rate this article
www.real-biker.ru
How to repair a moped?
Published: 08/01/12
A scooter or scooter is a popular means of transportation in Asian countries, but in the last ten years it has managed to win its admirers in our country. What is noteworthy is that if in Asian countries everyone rides scooters indiscriminately (adult men and women, teenagers), then in Russia this means of transportation is the prerogative of mainly young people. This statement is also supported by the fact that driving a scooter does not require a license. Although amendments to the legislation are already being considered to change this oversight.
Despite the fact that a scooter is a rather primitive vehicle, its repair still requires certain skills. This is not about replacing the battery. This is too simple an operation to consider, especially since you can buy a battery for a scooter at any auto parts store. Let's talk about more significant problems. The most common breakdowns of scooters include problems with the electrical part, with the engine, deformation of the body, as well as plastic parts. In addition, after serious accidents, additional welding and frame repair work may be required.
In order for this vehicle to last longer and not present unpleasant surprises in the form of breakdowns, it must be periodically taken for technical inspection. On average, maintenance costs scooter owners 1,500-2,000 rubles. During maintenance, technicians find faults and deficiencies. The need for electrical work may arise for several reasons. But it is important that it is the electrician who is responsible for starting the engine, as well as for the operation of all vehicle systems. Engine repair is a completely different story. Despite the fact that a scooter engine is not nearly as complex as a car engine, repair work can only be entrusted to specialists. Engine problems can lead to either an unexpected stop while driving, or to the fact that the moped will not start at all.
Body work, oddly enough, is no less relevant when repairing a scooter. And this despite the fact that their dimensions and quantity are miniscule. But the smaller the parts, the more difficult it is to repair them. That is why, in some cases, owners of these vehicles prefer not to spend money on expensive repairs, but to purchase new spare parts. These are the stages, in short, that moped repair is divided into. It is worth noting that scooter repairs in Moscow are carried out by a sufficient number of workshops, so there should not be any problems with finding a competent specialist.
Gearbox disassembly
It is necessary to disassemble the gearbox in order to replace used parts. This is done after the following parts have been dismantled:
Gearbox disassembly
Repair of this part of the engine is carried out as follows:
- Using a screwdriver or blade, remove the retaining ring and the drive gear;
- Carefully unscrew the gear fixing bolt and remove the gear shift mechanism;
- remove the gear shift fork and shaft;
- remove the crankshaft and drum (including the core);
- After replacing the worn part with a new one, reassemble (in reverse order).
❶ How to fix a moped
Instructions
To repair the front shock absorber struts, you must first remove them from the scooter. To do this, first remove the front wheel and release both struts. Unscrew the nuts, take them out, and then pull out first one and then the other rack. Clean dirt from them and rinse in gasoline. Remove the rubber boot from the stand. Next, remove the stopper from its socket. Do this with an awl or a very thin screwdriver. Clamp the chrome rod in a vice. Place the rack in a comfortable way and try to pull. Insert the pre-prepared axle into the hole for the wheel axle and hit it with a hammer in the direction the rod comes out. But be careful. Hit just a couple of times and the structure will move on its own. Carefully remove everything, clean and inspect. Wash this unit well in gasoline. Remove the bushings from the stem and assess their wear. After this, remove the damping spring from the rod. The main spring remains in the strut; you need to get it out, and don’t forget the rubber bumper in the very depths. Use a long screwdriver or narrow pliers. After this, thoroughly clean the inside surface of the stand. After disassembling and checking the parts, you can improve your racks. To do this, place two valve springs from the car in a row for shock absorption, as well as one spring for damping in a separate rack. Use an emery reamer in an electric drill.
Then proceed to making new bushings. Entrust this work to an experienced turner. Give him the rod and the old bushings with the stand. Please note that bushings cannot be made from aluminum, as they will instantly become unusable.
After this, check the stem. Don't worry if it turns out to be rusty. But if you still want to replace it, then order a new one from the factory.
And the final procedure is thorough lubrication. Drill small holes with an area of about 0.5 sq.cm in the lower bushing, which is located at the very bottom of the rack. Then the oil from the bottom of the rack will not interfere with the operation of the spring mechanism.
After this, reassemble the rack in reverse order. Don't forget to install the rubber bumper first. And be sure to check that you have put the retaining ring in place.
www.kakprosto.ru