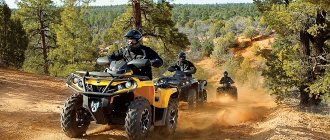
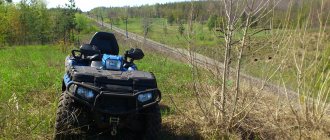
Many people wonder whether it is possible to ride ATVs in winter. In fact, it turns out that lovers of a sports lifestyle choose a motorcycle for the summer and a snowmobile for the winter. But there are also those who manage to use ATVs all year round, regardless of weather conditions. A dose of adrenaline and saving space in the garage, as well as budget funds for two types of equipment, are the main reasons for this approach. Each type of transport also requires a separate technical inspection and driving permit.
But if you are wondering whether it is worth riding an ATV in winter, take care of its proper operation and preparatory work for it. There is nothing complicated about this, and such preparation is not much different from preparing a motorcycle. Let's take a closer look.
Engine.
An ATV is a kind of hybrid of a tractor and a motorcycle, that is, a motorcycle engine is bolted to the structural design of the tractor chassis. Preparing the engine comes down to adjusting the carburetors (if the engine is carburetor) to a low temperature and changing the oil to “winter” oil, that is, with improved starting characteristics in cold weather.
For the vast majority of ATVs, the instructions require the use of motorcycle oil with a viscosity of SAE 10W-40 and a JASO MA quality level. It is usually called semi-synthetic, and it is considered operational down to a temperature of -20 ° C, which is clearly not enough for winter use in the middle zone, let alone Siberia and the North. Therefore, before winter, even if the oil has not reached its required service life, we mercilessly change it to a fully synthetic one with an extended temperature range, for example: Liqui Moly ATV 4T Motoroil 5W-50. This lubricant has improved cold start temperatures and is able to resist overheating. Many may be surprised by this phenomenon when riding an ATV in winter, but in fact it turns out that it is not so rare. It occurs when slipping in the snow, so this must be taken into account in advance.
How to prepare an ATV for winter trips?
Preparation is not just a necessary condition for the smooth operation of equipment in low temperatures, but also a guarantee of the safety of the driver and passengers.
So how do you prepare your ATV for winter? The entire preparatory stage can be divided into several actions that must be completed before driving an ATV:
- Washing. This procedure is necessary not so much from an aesthetic point of view, but in order to be able to visually inspect for external defects and breakages.
- Change of oil. Synthetic oil used in summer and winter is different. So what kind of oil should you put in your ATV in winter
? At low air temperatures, it is necessary to use a product with an equally low viscosity level. For example, if in summer it is optimal to use the brand “10 W-40”, then in winter it is more advisable to fill it with “5W-40”. You should not use motor oil for cars, as it often contains special additives that ensure the vehicle operates with a wet clutch. Use only a specialized product designed for a specific group of vehicles. - Checking the cooling system. At the end of the summer season, condensate – water – often accumulates in the system. It is necessary to get rid of it, since at low air temperatures it can freeze. As soon as the water has been drained, you can safely fill in high-quality antifreeze or antifreeze. Ignoring this operation will result in damage to the ATV as a result of failure of various engine components.
- Checking the oil in the rear and front gearbox. Riding in wet areas or in bad weather may result in water or foreign mixtures entering the gearbox. If this happens, then before the start of the winter period the oil will have to be changed.
- Changing the operating tire pressure. Driving on summer and winter roads are completely different things. For winter, the optimal tire pressure is 0.5-0.8 atm. This indicator guarantees good cross-country ability of the ATV even in snowy and icy conditions.
Lifehack:
There are two more specific winter problems with the ATV engine when driving:
- The first is resolved as it arises. When driving for a long time through loose snow in cold weather, the air filter becomes clogged with snow dust and the engine stalls. Just shake out the filter and engine operation will be restored. The main thing is to be aware of the potential problem so that you can correct it immediately.
- The second problem needs prevention. The fact is that the breathers of the gearbox, variator and engine are led out into the lower part, under the engine. These are long plastic tubes that become blocked due to freezing of water condensate in frosty weather. As a result, the pressure in the crankcases increases, and oil may be squeezed out. Prevention involves treating the tubes with Liqui Moly Silicon-Spray, which will prevent ice from accumulating. To solve a problem that has already arisen, you can use the Liqui Moly Anti-Ice defroster. The same alcohol liquid will help unlock the gas trigger and other control levers if they are not equipped with heating. By the way, the brakes can also freeze, especially when parked after a fast ride.
What to do if you can’t start in winter
Having followed all the above recommendations, you can safely operate the ATV in winter and enjoy the winter weekend. However, here are a few more recommendations in case the equipment has been properly prepared, but still refuses to start with the onset of cold weather. If such a situation occurs, then you should:
- check the battery charge level. If it is low, it is recommended to charge it in a warm room;
- try to warm up the carburetor and engine. To do this, you can use a hair dryer or a heat gun. You should also warm up all rubber parts and hoses, but without fanaticism;
- in some cases there is a need to warm up the candle;
- If all else fails, there are liquids that are used for a quick start. As a rule, they have the form of a spray, which is sprayed in small volumes into the air filter, thereby facilitating the start;
- When the ATV starts working as it should, you shouldn’t immediately pull it off, but stand a little and warm it up, this will make the engine work easier and will prolong its life.
Thus, it is worth noting that the all-terrain vehicle is capable of perfectly coping with the tasks assigned to it, regardless of the season, but for this you need to properly care for it.
Transmission.
She doesn't need any special events. It is advisable to replace the axle oil with a fully synthetic one if you have not done so previously. Motorbike synthetics are excellent for heavy loads - Motorbike Gear Oil VS 75W-140, if the operating instructions allow such oil. Boots on CV joints must be regularly treated with silicone so as not to lose elasticity in cold weather. In winter conditions, the chain needs treatment less often and you can use the same chain lubricants as in summer, for example: Motorbike Kettenspray Enduro.
How to make a snow scooter with a chainsaw engine with your own hands
To make a children's gas snowmobile with your own hands, you can take the motor from a chainsaw. For example, common options:
“Friendship” is simple, the device will be without unnecessary details. At the same time, the weight is 12 kg, and the power is small - 1 kW
Another disadvantage is that there are no safety covers, which is especially important for children. “Ural” - the weight is approximately the same (almost 12 kg), while the power is much greater - 3.6 kW. The engine is two-stroke and works even in cold weather. “Shtil” is a saw of medium power, but it is not so noisy
It does not produce strong emissions, which is also important for children.
Required materials and tools
To make a snow scooter with a motor with your own hands, you will need ready-made structures and installations: a gasoline engine, steering wheel, windshield, seat, chassis, shock absorbers. You can take a ready-made backrest for a snow scooter or make it yourself.
For work you need to prepare the following materials and tools:
- Welding machine with electrodes.
- Duralumin pipe D16.
- Bearings: 2 pcs. 16 mm each, 1 pc. – 10 mm.
- Plugs for plastic pipes – 2 pcs.
- Star element.
- Tracks 5 cm.
- Plywood, plastic or fiberglass (sheathing).
- Steel shafts.
- Pipe for frame with a diameter of 25 mm.
- Aluminum profile (letter “P”).
- Profile steel pipe with a cross section of 20*20 mm.
- Fastening elements (nuts, bolts).
Drawings and assembly diagram of a snow scooter
The easiest option is to take a ready-made children's snow scooter and mount the motor yourself. If you wish and have the necessary elements, you can assemble the structure yourself by taking the engine, steering wheel, making the chassis and other parts. You can take a ready-made drawing as a basis.
When assembling products with your own hands, you must follow safety regulations.
Step-by-step instructions for assembling a snow scooter with a motor consists of the following steps:
- First you need to make a frame. Using spot welding, a steel sheet 2 mm thick is connected in the middle of the entire structure. The chain drive shaft will be mounted here, as well as the gearbox.
- A seat is located in the middle of the frame. You can do this yourself - then you can save money on assembling a snow scooter with a motor yourself.
- The support base is fastened with a beam to the front axle crossbars. A water pipe with a diameter of 15 mm or more can be used as a connecting element. Bushings for the steering wheel are welded at the ends, and a stand is mounted in the middle.
- The next stage of assembling a snow scooter with a motor with your own hands is the stand. For installation, use steel corners with sides of 30*30 mm. They are connected by steel crossbars - 2 mm gussets are suitable for this. The motor will be mounted on this rack.
- The caterpillar is taken ready-made, for example, from the Buran snowmobile. The workpiece needs to be shortened by 50 cm. The caterpillar is secured with transport tape. And the gears are made from cardboard sheets 15 mm thick.
- The drive shaft is made of 14 mm thick pipe. The gears are fixed with the upper flange, and trunnions (tips) are welded behind the drive shaft.
- Now you need to attach the scooter motor. You can also do this with your own hands at home. To do this, take a working unit, weld it and mount it to the rear.
- To make sprockets, you need to take two tips, and the right one should be longer than the left one (to make a keyway that will fix the chain drive sprocket). The sprocket is secured with a pre-threaded nut.
- You can also make the snow scooter's steering wheel yourself. To do this, take a ready-made device from a bicycle or scooter. For proper installation, it is necessary to place it on the central axis so that the traction force controls the skis well.
- At the last stage, you can install a windshield, as well as headlights for illumination at night. It is not necessary to install the brakes yourself for a children's snow scooter with an electric motor or a gasoline engine, since the vehicle does not gain high speed. If necessary, you can always brake with your foot or release the gas.
A finished snow scooter with a motor, assembled with your own hands, is in no way inferior to the factory design
Brakes.
Ruthlessly change old brake fluid in winter for ATV riding. The accumulated water insidiously freezes in the brake machines and working cylinders. As always, this happens suddenly, and you already know what happens when the brakes fail. Brake Fluid DOT 5.1 has good low-temperature properties. It remains fluid at temperatures even below -50 °C, which is why it is used by travelers to Arctic latitudes.
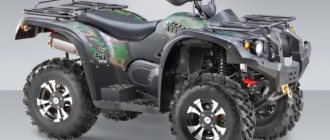
Rarely does anyone change tires on an ATV to winter ones, considering the usual mud version suitable for winter conditions. However, on clear ice, rough off-road tires are completely helpless. The situation can be improved by studding large tread blocks with cargo studs. Such services are provided by both some tire shops and cargo services. You can “cut” the rubber into small lamellas using a grinder or a special device, but this is a very labor-intensive and literally dirty undertaking.
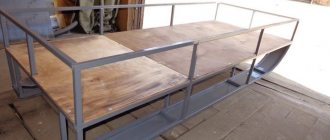
Step-by-step instruction
Before starting work, calculations are made of all design parameters, draw a diagram of the snowmobile on a sheet of paper, prepare all the parts and tools:
- wide ski up to 80 cm long;
- two small metal pipes with a cross section of 50 mm;
- a small piece of channel;
- a metal plate measuring 25x50 mm, thickness 4-5 mm;
- cameras from a KAMAZ vehicle;
- wrenches of different sizes;
- hammer;
- pliers;
- electric drill;
- welding machine.
The experts have established experimentally that for good performance and stability of the snowmobile, it is better to use pipes with a diameter of 40 mm and a profile of 25x25 mm, with a wall thickness of 2 mm.
Assembling the front part of the snowmobile
It’s best to start by replacing the front wheel with a ski to reduce friction with the snow. Making your own skis is not difficult.
To improve the quality of the structure, it is recommended to make skis from duralumin or chipboard.
- To do this, take 4 pieces of plywood with a thickness of 5 mm. Pieces of plywood are glued together and attached to the steering base.
- Then a spring made of high-strength steel is well secured to the structure. Instead of a homemade ski, an old skateboard or out-of-use factory skis are also used.
- The next step is to remove the front wheel of the bicycle. Then fasten the piece of channel in the center to the prepared ski - this is done using four M8 or M10 bolts.
- Then cut two pieces of pipe of the same size, attach them to the bicycle fork - one pipe for each arch of the bicycle. To make the structure strong, it is better to secure the pipes to the bicycle fork using clamps or clamps - use at least two fasteners for each fork arc.
- The pipes must be fastened symmetrically relative to each other. To make the structure durable, rigidity is added. To do this, through holes are drilled in the middle of the tubes, which are tightened together with bolts.
- The tubes attached to the bicycle fork bars are cut to be 20-30 cm longer than the bottom of the bicycle.
- The ski is mounted with a bracket. To do this, symmetrical holes are drilled on both sides of the channel. At the edges of the fork tubes, holes are made the same size as in the channel - no less than 11-13 mm. The structural element is connected with long M10-M12 bolts.
- To strengthen the frame at the joints of the parts, weld a transverse pipe to the bottom of the steering wheel. You need to attach the ski attachment to the transverse pipe using hinges.
- Using a washer, bushing, steel pin, and two nuts, assemble the hinge joint.
After all the operations have been completed, the ski is already installed on the bike - it moves vertically, which means the descent or ascent is made at any angle, just like on a bicycle.
Winch.
In order for riding an ATV to be normal in winter, you should pay attention to the winch, as the only means that can pull you out of snow captivity. To do this, it is necessary to competently maintain the structural element even before the onset of winter, according to the instructions attached to it. To do this, it is necessary to change the lubricant to low-temperature lubricant and remove water if it has entered the gearbox. For the latter, Liqui Moly Marine Winschfett marine waterproof synthetic lubricant with Teflon is optimal. Its temperature range allows you to use the winch down to -35 °C, and one tube is just enough. Electronic-Spray contact lubricant is well suited for servicing electrical contacts and solenoids; it will also protect against freezing.
Homemade tracked all-terrain vehicle ARMATURA
Dear visitors to the “ Samodelkin Friend” , today we will look at the assembly of a homemade tracked all-terrain vehicle. Step-by-step assembly photos and video tests are attached.. Initially, the author decided to make a certain tracked all-terrain vehicle with a Ural motorcycle engine. Having assembled a tracked platform and installing a frame with an internal combustion engine of a heavy motorcycle on it, the decision was made to redo everything) namely, to install a more powerful domestic automobile engine VAZ 2108 ( the engine is located in the pocket) the gearbox is also an eight. The frame of the all-terrain vehicle is welded from a square pipe 80 x 80 x 2 mm, the wheels with VAZ hubs are used as support rollers, the tension roller and the drive sprocket are also made from car rims. A drive sprocket with metal teeth made from a 110mm pipe cut in half; the disc is pre-welded with a 2 mm sheet of metal.
Fuel system.
Pay attention to the fuel system. Both carburetor and injection systems need care, for which the Motorbike 4T-Bike-Additiv additive is well suited for cleaning. It cleans the system of carbon deposits, makes it easier to start the engine, improves traction and protects against corrosion.
With proper care, an ATV will give you pleasure both in summer and winter. There is nothing scary or frightening about winter trips; it is enough to prepare your equipment and acquire the appropriate equipment.
Homemade motorized dog: technology
Before starting work, you need to prepare all the necessary tools and equipment for the motorized dog. You can learn more about the progress of the work by watching the thematic video.
Preparing for work
To avoid problems with using a motorized dog, it is important to immediately determine its main technical parameters:
- load capacity;
- engine power;
- transmission type;
- engine starting system - manual or electric.
You should also think about additional accessories for the motorized dog - a winch, lighting, protective elements, seats. Then an accurate drawing is drawn up, which will reflect all the nuances. Next, you can order a set of parts for a motorized dog or select them yourself from those available from other equipment.
Required Tools
When working, you cannot do without a welding inverter, a drill and grinder, and a set of wrenches. Also, to install the motorized dog, you will need screwdrivers, a file, and other small tools. The craftsman must have access to lathes and milling machines.
Assembling a motorized dog
First, they make the frame of the motorized dog, which will help secure the engine, gearbox, and chassis. To do this, selected pipes (a beam or channel is also suitable) are welded into a rectangular frame. Then the fastenings for all the important components of the motorized dog are welded. Afterwards you can install the engine.