Carburetor adjustment K-301 and K-302G
During operation of the motorcycle, engine operation at low idle speed, throttle response, and operation of the carburetor control drive are checked and adjusted.
Before making adjustments, it is necessary to warm up the engine, since adjustments made on a cold (unheated) engine will be disrupted when it warms up. Adjustment at low idle speed is of great importance for engine performance.
Each carburetor is adjusted separately. It is necessary to adjust the left carburetor K-301 in the following sequence: a) REMOVE the cap from the spark plug of the right cylinder; b) loosen the locknut 28 of the stop of the sheath 29 of the left carburetor spool drive cable and tighten the stop, ensuring a gap between the cable sheath and the stop; c) loosen the locknuts of throttle screw 9 and idle speed screw 21, tighten the idle speed screw all the way, and use screw 9 to set the minimum stable engine speed; d) by unscrewing the idle speed screw 21, set the maximum possible number of engine revolutions at a given position of the throttle valve screw;
e) gradually unscrewing screw 9 of the throttle valve, set the lowest stable speed. After adjustment, tighten the lock nuts of the screws. Turning off the left cylinder, proceed to adjust the right carburetor. The adjustment procedure is the same as when adjusting the left carburetor.
Carburetors must provide the same number of engine revolutions when one (left or right) cylinder is idling. The operation of carburetors is checked as follows.
With a running warm engine with adjusted carburetors, turn off the cylinders one by one by removing the cap from the spark plug of either the right or left cylinder. The change in engine speed during operation on each cylinder is determined by ear. If the engine speed when operating on the right and left cylinders is different, then the carburetors are adjusted by screwing in and unscrewing the set screws of the throttle valves until the same number of revolutions is achieved. After this, tighten the locknuts of the throttle valve set screws.
When adjusting low idle speed, you must pay attention to ensure that the idle speed screws are not screwed in all the way. Operating a motorcycle with the carburetor idle screws turned all the way is under no circumstances permissible.
The synchronized operation of both engine cylinders in different modes is achieved by simultaneously raising the spool valves of the right and left carburetors. Unsynchronous operation of even well-adjusted carburetors can cause overheating and rapid wear of parts of one of the engine cylinders. To achieve synchronized operation, you need to turn the throttle lift handle to set the engine speed corresponding to a speed of 30 - 40 km/h with 4th gear engaged, and then, alternately removing the caps from the spark plugs of the right and left cylinders, determine by ear whether the number changes. engine speed.
Taken from factory instructions
BuffoG
opposit.ru
Adjusting the carburetor K-301
In this topic, I would like to talk not so much about adjusting the carburetor itself (because there are a lot of articles about this on the Internet), but about determining the fuel level in the float chamber. On my M67-36, when I got it, there were K-301 carburetors, from which a stream constantly flowed. Having looked through a bunch of articles on the Internet, I read an opinion that these carburetors are constantly leaking, they cannot be adjusted, it is better to immediately replace them with new ones. But something told me that it shouldn’t be this way. I took it apart, checked the needle valve - it locks. The brass float is fine. But for the life of me everything flows. The thought arose that the float chamber was overflowing, it was necessary to move the needle in the float, but how much to move, try it at random? And how do you generally determine the level? My father suggested the idea. (I apologize for a lot of buffoonery at the beginning, now I’ll get to the point.). There is a fuel filter screw at the bottom of the carburetor float chamber. Having unscrewed this same screw, I drilled a hole in it and pressed in a copper tube (by the way, the outer diameter of the tube is 4.8 mm, the diameter of the hole is 5 mm.) and put on a transparent hose. Then we screw this screw into place, install the carburetor on the cylinder, Let's start the fuel and see what level is in the float chamber. By the way, on both carburetors it was much higher than normal, I had to make another groove on the needle and raise it.
Only registered and authorized users can leave comments. Register or log in.
uralmotoclub.ru
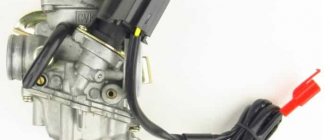
Carburetor K-301D. Device and adjustment.
The engine is powered by two K301D carburetors, identical in design, but not interchangeable (right and left), installed on the cylinder heads.
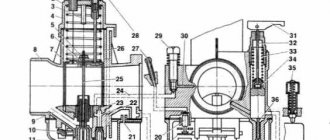
The carburetor structure is shown in the figure:
1 — throttle thrust screw; 2 - drowner; 3 — float chamber cover; 4 — float needle; 5 — float; 6 — filter plug; 7 - gasket; 8 — filter spring; 9 — fuel filter; 10 — main jet; 11 - plug; 12 — gasket; 13 - gasket; 14 - plug; 15 — low speed jet; 16 — air filter housing; 17 — air filter mesh; 18 — screw for adjusting the quality of the mixture at low speeds; 19 — hole sawing the low-speed jet; 20 - sprayer; 21 — nozzles; 22 — adjustment needle; 23 — throttle needle lock; 24 — throttle body; 25 — throttle spacer spring; 26 — carburetor body; 27 — throttle travel limiter; 28 — carburetor cover; 29 — spring; 30 — stop lock nut; 31 - fitting; 32 — throttle cheek; 33 — low speed air jet channel; 34 — air spray channel; 35 — fuel supply channel to the spray hole; 36 - main fuel channel
Adjusting carburetors.
During operation of the motorcycle, the operation of the engine at low idle speed, the synchronization and efficiency of the operation of the carburetors, as well as the operation of the carburetor control drive are checked and adjusted. Before you start adjusting carburetors, you need to check: the size of the gap between the spark plug electrodes (0.6-0.75 mm), the size of the gap between the breaker contacts (0.4-0.6 mm), as well as the size of the gaps between the valve stems and the ends of the rocker arms (0.07 mm).
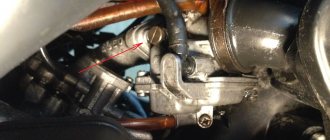
The carburetors are adjusted individually with the engine running and warm. To adjust the left carburetor to low engine idle speed, it is necessary to remove the cap from the spark plug of the right head and loosen the lock nut 30 (Fig. 15); screw in fitting 31, ensuring a gap (2-3 mm) between the tip of the cable sheath and the fitting. Then loosen the lock nut and screw in screw 1 so much that the throttle is raised and the engine runs at higher speeds, then loosen the lock nut and screw in screw 18 for adjusting the mixture quality until it stops. When unscrewing screw 1, reduce the engine speed if possible. After this, unscrewing screw 18, select a position in which the engine would operate evenly and develop the highest speed. Then, unscrewing screw 1, reduce the speed to the minimum stable (at the end of the adjustment, lock screw 18 with a lock nut), lift the throttle of the adjustable carburetor by the cable; If the speed increases, the adjustment is considered complete.
Place the cap on the right head spark plug and turn off the left cylinder and begin adjusting the right carburetor. The procedure for adjusting it is the same as when adjusting the left carburetor.
Carburetors must provide the same engine speed when the left and right cylinders are idling. The correctness of the adjustment is checked as follows. With a running warm engine with adjusted carburetors, turn off the cylinders one by one by removing the cap from the spark plug of either the right or left cylinder. The change in engine speed when operating on each cylinder is determined by ear. If the revolutions on the right and left cylinders are different, then the carburetors are adjusted by screwing in or unscrewing the thrust screws / throttles until the same number of revolutions is obtained. After this, tighten the locknuts of the thrust screws.
To achieve equal, synchronous operation of the cylinders, you need to place the motorcycle on a stand, start the engine and engage fourth gear. Then turn off one cylinder (remove the cap from the spark plug), increase engine speed to a speedometer reading of 50 km/h. After waiting a few seconds to make sure that this is a steady state, without changing the position of the throttle control, turn on the second cylinder and simultaneously turn off the first. By raising or lowering the throttles by rotating fittings 31 on the carburetor covers, achieve the same speedometer readings. Since such adjustment takes a relatively long time, care must be taken to ensure that the engine does not overheat. When the throttle is fully lifted, the amount of fuel passing through the atomizer depends mainly on the throughput of the main jet.
Engine operation at medium loads depends on the position of the needle in the throttle, so adjusting carburetors involves choosing the correct needle position. If it is necessary to enrich the mixture, for example, when switching from summer to winter operation, during the break-in period, or to increase engine power to the detriment of its economical operation, carburetors are also adjusted by correspondingly changing the position of needle 22. The adjusting needle is connected to the throttle body using lock 23. The needle has six annular grooves. By inserting the lock into one of the needle grooves, you can achieve six different carburetor adjustment positions. The lower the needle is, the poorer the mixture, and the higher it is, the richer it is.
The correct adjustment of the carburetors for medium load mode is checked by sharply increasing the engine speed. If you hear popping noises in the carburetor, then the mixture needs to be enriched by raising the adjustable needles by one or two notches.
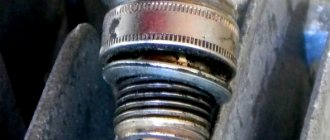
Carburetor care. It is recommended to wash and vent carburetors every 5,000 km. When washing carburetors, it is necessary to unscrew plug 6 (Fig. 15), remove fuel filter 9 and wash it. After this, blow out the nozzle in the channel from the side of plug 14. If the low speed nozzle 15 is clogged, it must be unscrewed and blown out with air.
Steel wire should not be used to clean the nozzle, as this may cause a change in its cross-section and, consequently, malfunction of the carburetor.
It is not recommended to unscrew the main jet unnecessarily, as this may damage it. If it is necessary to disassemble the throttle (changing the position of the adjusting needle, removing the throttle cable), the body and cheek are disconnected, and it is necessary to overcome the force of the spacer spring, which is also a locking spring, preventing spontaneous separation of the body and cheek.
After installing the throttle needle and cable tip into the corresponding sockets of the throttle body, it is necessary that the cheek with its spikes fits into the grooves of the throttle body. In this case, it is necessary to overcome the elasticity of the spacer spring. It is necessary to install the assembled throttle into the carburetor body with the throttle cutout (cheek) towards the inlet pipe. When assembling the carburetor cover, make sure that the protrusion on the cover fits into the corresponding groove in the carburetor body.
During daily maintenance, you need to monitor the condition of the carburetors. If fuel leakage is detected, the fastening parts should be tightened or the sealing gaskets should be replaced.
Fuel leakage through the carburetor drainage device indicates a leak in the float chamber shut-off valve. In this case, it is necessary to grind the float needle, but under no circumstances should the holes in the air filter housing 16 be plugged.
Taken from here: https://www.airhunter.ru
SHTRLZ
opposit.ru
Which carburetors are better to install on a Dnepr motorcycle?
Hello Dear Like-minded People! So, I thought about installing one carburetor, instead of the old K301. Because it was very difficult to set up synchronization, the consumption was high, and in general they were outdated. I thought for a long time about which one to choose, there were many options - Solex, DAZ, K133, from a tractor launcher, etc. I read a post on this resource that you can install one K65D carburetor from Jupiter. Here was my topic about one K65D, logically it would have been better to install the K65I from the Planet, but it turned out the way it turned out. K65D (Pekar, Russia). Diameter of the mixing chamber, mm – 32; Diffuser diameter, mm – 30; Throughput, mlmin - GTZh - 260 - idle metering tubes - 50 - fuel corrector nozzle - 255 Ambient temperature range at which the engine starts and stable operation is ensured in all operating modes - from -20C to +50C.
A stainless steel pipe with a diameter of 28mm was found, and 4 pipe angles with a diameter of 25-28mm were purchased, the diameter of the angles varied. The flanges were made of metal 5mm thick, there were two more metal options - 3-3.5mm, 10mm. 3mm - in my opinion, too thin, most likely they would begin to bend when tightened, and 10mm - this is too much, and it is more difficult to work with such material.
Here is the finished flange.
The most difficult thing was to make a structure with a flange that was attached to the carburetor, or rather to make a hole in the pipe, it took a long time. Since the drills did not have such a diameter, it turned out that it was decided to use a trick, namely, take a piston pin with a diameter of 30 mm, cut longitudinal lines on it with a grinder, it turned out something like a milling cutter. We didn’t drill the hole, but squeezed it out, the finger was red-hot.
It was difficult to secure the manifold to the flanges in place. Fortunately, four pipeline bends were purchased; without them, it’s unlikely that anything would have worked; we would probably have had to bend the pipe. And so we put one knee, on the other it turned out, something like the English letter “S”. Thus, we made a less abrupt transition.
Of course, there was a lot of welding stuck on, the welder offered me to remove everything with a grinder, I refused. All the same, the collector needs to be covered with something and insulated. There is an idea to cover it with outdoor insulation for the wires. The whole rework took quite a long time; they started at 13:00 and were finished at 21:30. Because it was dark, the collector was poorly welded, leaving many small holes. I noticed this already at home, so I went to the welder again. The second time they boiled it well, checked it, put it in water and blew into the collector, everything was clear.
The first launch went surprisingly well. There is nothing, without changing the position of the needle in the carburetor in the middle. I installed it, replaced the air filter with a sock, pumped it up, grabbed the first kick, but stalled, and started on the second. I adjusted the idle and that's it. The precise operation of both boilers was a pleasant surprise. After unscrewing the throttle, a shot followed, it was the first and the last. This didn't happen anymore. The traction at the bottom is crazy, at first you can even climb the wall. The top was most likely cut off, acceleration was normal up to 70 km/h, then I don’t know. The collector cools down strongly, even in the heat of 30C, it is covered with dew. The consumption, it seems to me, is still high, the candles indicate this, they are too black. I lowered the needle to the very last mark, it didn’t seem to be as black as before. Maybe this is because I drive mostly at idle... This is the experience of converting it to one carburetor, I’m happy, I definitely won’t go back to two. I apologize for the photos because I took them on my phone!
Thank you for your attention!
How to install one carburetor on a Ural motorcycle | Life in RGV style
One of the disadvantages of heavy and large motorcycles is the constant need to adjust the carburetor in order for them to work in sync.
In such a situation, instead of 2 conventional carburetors, you can install one, but very powerful one. To do this, you need to create an exact replica of the lower carburetor part using a metal plate. Then you need to make a thread, put on the nuts and weld them to the plate itself.
At the end parts of the plate, it is necessary to cut holes in the form of an ellipse, insert metal strips into them and weld them. The thickness of such a strip should be no more than 1 mm. After welding all the parts, the place where the carburetor is screwed must be aligned and it is necessary to determine whether the dimensions are suitable for future installation.
Carburetor K-301D. Device and adjustment.
The engine is powered by two K301D carburetors, identical in design, but not interchangeable (right and left), installed on the cylinder heads.
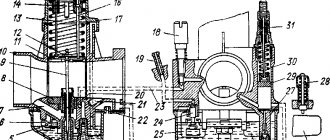
The carburetor structure is shown in the figure:
1 — throttle thrust screw; 2 - drowner; 3 — float chamber cover; 4 — float needle; 5 — float; 6 — filter plug; 7 - gasket; 8 — filter spring; 9 — fuel filter; 10 — main jet; 11 - plug; 12 — gasket; 13 - gasket; 14 - plug; 15 — low speed jet; 16 — air filter housing; 17 — air filter mesh; 18 — screw for adjusting the quality of the mixture at low speeds; 19 — hole sawing the low-speed jet; 20 - sprayer; 21 — nozzles; 22 — adjustment needle; 23 — throttle needle lock; 24 — throttle body; 25 — throttle spacer spring; 26 — carburetor body; 27 — throttle travel limiter; 28 — carburetor cover; 29 — spring; 30 — stop lock nut; 31 - fitting; 32 — throttle cheek; 33 — low speed air jet channel; 34 — air spray channel; 35 — fuel supply channel to the spray hole; 36 - main fuel channel
Adjusting carburetors.
During operation of the motorcycle, the operation of the engine at low idle speed, the synchronization and efficiency of the operation of the carburetors, as well as the operation of the carburetor control drive are checked and adjusted. Before you start adjusting carburetors, you need to check: the size of the gap between the spark plug electrodes (0.6-0.75 mm), the size of the gap between the breaker contacts (0.4-0.6 mm), as well as the size of the gaps between the valve stems and the ends of the rocker arms (0.07 mm).
The carburetors are adjusted individually with the engine running and warm. To adjust the left carburetor to low engine idle speed, it is necessary to remove the cap from the spark plug of the right head and loosen the lock nut 30 (Fig. 15); screw in fitting 31, ensuring a gap (2-3 mm) between the tip of the cable sheath and the fitting. Then loosen the lock nut and screw in screw 1 so much that the throttle is raised and the engine runs at higher speeds, then loosen the lock nut and screw in screw 18 for adjusting the mixture quality until it stops. When unscrewing screw 1, reduce the engine speed if possible. After this, unscrewing screw 18, select a position in which the engine would operate evenly and develop the highest speed. Then, unscrewing screw 1, reduce the speed to the minimum stable (at the end of the adjustment, lock screw 18 with a lock nut), lift the throttle of the adjustable carburetor by the cable; If the speed increases, the adjustment is considered complete.
Place the cap on the right head spark plug and turn off the left cylinder and begin adjusting the right carburetor. The procedure for adjusting it is the same as when adjusting the left carburetor.
Carburetors must provide the same engine speed when the left and right cylinders are idling. The correctness of the adjustment is checked as follows. With a running warm engine with adjusted carburetors, turn off the cylinders one by one by removing the cap from the spark plug of either the right or left cylinder. The change in engine speed when operating on each cylinder is determined by ear. If the revolutions on the right and left cylinders are different, then the carburetors are adjusted by screwing in or unscrewing the thrust screws / throttles until the same number of revolutions is obtained. After this, tighten the locknuts of the thrust screws.
To achieve equal, synchronous operation of the cylinders, you need to place the motorcycle on a stand, start the engine and engage fourth gear. Then turn off one cylinder (remove the cap from the spark plug), increase engine speed to a speedometer reading of 50 km/h. After waiting a few seconds to make sure that this is a steady state, without changing the position of the throttle control, turn on the second cylinder and simultaneously turn off the first. By raising or lowering the throttles by rotating fittings 31 on the carburetor covers, achieve the same speedometer readings. Since such adjustment takes a relatively long time, care must be taken to ensure that the engine does not overheat. When the throttle is fully lifted, the amount of fuel passing through the atomizer depends mainly on the throughput of the main jet.
Engine operation at medium loads depends on the position of the needle in the throttle, so adjusting carburetors involves choosing the correct needle position. If it is necessary to enrich the mixture, for example, when switching from summer to winter operation, during the break-in period, or to increase engine power to the detriment of its economical operation, carburetors are also adjusted by correspondingly changing the position of needle 22. The adjusting needle is connected to the throttle body using lock 23. The needle has six annular grooves. By inserting the lock into one of the needle grooves, you can achieve six different carburetor adjustment positions. The lower the needle is, the poorer the mixture, and the higher it is, the richer it is.
The correct adjustment of the carburetors for medium load mode is checked by sharply increasing the engine speed. If you hear popping noises in the carburetor, then the mixture needs to be enriched by raising the adjustable needles by one or two notches.
Carburetor care. It is recommended to wash and vent carburetors every 5,000 km. When washing carburetors, it is necessary to unscrew plug 6 (Fig. 15), remove fuel filter 9 and wash it. After this, blow out the nozzle in the channel from the side of plug 14. If the low speed nozzle 15 is clogged, it must be unscrewed and blown out with air.
Steel wire should not be used to clean the nozzle, as this may cause a change in its cross-section and, consequently, malfunction of the carburetor.
It is not recommended to unscrew the main jet unnecessarily, as this may damage it. If it is necessary to disassemble the throttle (changing the position of the adjusting needle, removing the throttle cable), the body and cheek are disconnected, and it is necessary to overcome the force of the spacer spring, which is also a locking spring, preventing spontaneous separation of the body and cheek.
After installing the throttle needle and cable tip into the corresponding sockets of the throttle body, it is necessary that the cheek with its spikes fits into the grooves of the throttle body. In this case, it is necessary to overcome the elasticity of the spacer spring. It is necessary to install the assembled throttle into the carburetor body with the throttle cutout (cheek) towards the inlet pipe. When assembling the carburetor cover, make sure that the protrusion on the cover fits into the corresponding groove in the carburetor body.
During daily maintenance, you need to monitor the condition of the carburetors. If fuel leakage is detected, the fastening parts should be tightened or the sealing gaskets should be replaced.
Fuel leakage through the carburetor drainage device indicates a leak in the float chamber shut-off valve. In this case, it is necessary to grind the float needle, but under no circumstances should the holes in the air filter housing 16 be plugged.
Taken from here: https://www.airhunter.ru
SHTRLZ
opposit.ru
How to adjust the carburetor on a Ural 2 Electron chainsaw
The Ural 2 Electron chainsaw has long established itself as an excellent workhorse, with high performance, ease of repair and reasonable cost. Almost the only thing that can happen to this tool during proper operation is that the carburetor settings are lost.
What kind of carburetor is used in the Ural chainsaw
Ural 2 Electron chainsaws are equipped with a KMP-100U carburetor, famous for its reliability and ease of adjustment. The body is completely metal, the jets are calibrated, and the membrane is made of a material resistant to a mixture of gasoline and oil.
To quickly start the chainsaw at subzero temperatures, the carburetor is equipped with a cold engine start lever. As for adjusting the quality and quantity of the fuel mixture, screws are responsible for this, which you can independently set to the desired position.
How does a carburetor work on a Ural chainsaw?
The design of the carburetor cannot be called complex, which is definitely an advantage of the Ural 2 Electron chainsaws. The main components responsible for the performance of the carburetor include:
- A float chamber made in the form of a reservoir. This element is used to maintain the fuel level at an optimal level before mixing with air occurs.
- Channels through which the fuel mixture enters. From the float chamber, the fuel is initially transported to the nozzle, and then enters the atomizer.
- A diffuser, which is a narrowed tube. With the help of this element, the rate of entry of air masses is increased to obtain a high-quality fuel mixture.
- A special tube resembling an aerodynamic design. This is the main element of the carburetor through which air masses pass. This tube is equipped with a special damper that regulates the amount of air supplied.
When the carburetor needs adjustment
All new Ural 2 Electron chainsaws supplied by the manufacturer have already undergone standard carburetor adjustment at the factory. However, for proper running-in of the tool, it would be useful to purposefully lower the engine speed, and then make fine adjustments. This process allows the engine to operate as efficiently as possible.
In addition, after a certain period, the carburetor settings of the Ural chainsaw are lost. But this is natural, since various difficulties may arise during operation. Symptoms indicating the need to adjust the fuel mixture supply and preparation system include:
- Increased gasoline consumption. This is caused by oversaturation of the fuel mixture with gasoline.
- Engine stalling or not starting at all. In this case, the cause is excess air and shortage of gasoline.