Carburetor from Oka (DAAZ 1111) to the Urals/Dnepr. Carb setup. Adapter.
Dear Colleagues, Brothers!
I decided to write another article.
This time I’m writing an article on a carburetor from Oka to the Ural/Dnepr (DAAZ 1111)
I installed this carburetor for myself. A lot has been written about making an adapter for one carburetor for a long time (so with these questions, go to the search).
I am writing in this article about setting up a carburetor for a motorcycle. Everything was learned through our own experiments.
Reasons for installing this carburetor: 1) I wanted to install a good carburetor that would work normally on a motorcycle (K63, K68 - I didn’t like it, imported carburetors are expensive). 2) The cost of the carburetor should be low. 3) This carburetor is a two-chamber carburetor - there are no dips when you sharply twist the throttle. 4) There is no need for cylinder synchronization (one carburetor provides a homogeneous mixture to both cylinders).
5) The space under the feet has been freed up - as a result, the landing has been slightly changed.
I chose a carburetor from Oka (DAAZ-1111) with a similar volume. I decided to experiment with it.
To begin with, I will give a link to a detailed description of this carb, its standard settings, etc., etc. https://karbiuator.ru/karbiurator-daaz-1111
In general, I planned it and did it. As a result, I encountered problems in setting up the carburetor. With standard adjustments, the carburetor becomes rich. The candles were the color of graphite (like pencil lead).
I leaned the mixture to the very end of adjusting the quality screw - the mixture is still quite rich and still throws the spark plugs.
As a result, after reading many forums, I decided to lean the mixture by reducing the cross-section of the main fuel jets of the 1st and 2nd chambers.
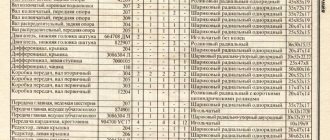
According to the manual for this carburetor, the following calibration of jets is indicated:
I found out that in these carburetors different jets are installed for different volumes 650/750: Calibration of carburetor jets for 650 1 chamber - main fuel 92.5 (95), air (pipe) 190 (195)
Chamber 2 – main fuel 95, air (pipe) 95
Calibration of carburetor jets for 750 1 chamber - main fuel 92.5 (95), air (pipe) 170
Chamber 2 – main fuel 95, air (pipe) 85
To begin with, I changed the fuel jets. My standard settings were 92.5 on the first camera and 95 on the second camera. I set it to 90 for the first camera, 92.5 for the second camera (I used the standard one from the first camera)
The jets come from VAZ carbs (I bought them at a stall selling VAZ spare parts, in particular there were spare parts for carbs).
To help you - calibration of VAZ jets https://autocry.narod.ru/injection/markirovka_zhiklerov.htm
Although there is no 90 jet in this table, they dug one out for me from somewhere (you just need to ask).
While searching for information on carbs, I came across a good video on setting up a Solex carburetor. VIDEO on setup here https://vk.com/video108387681_162080234 Special respect to the author of the video.
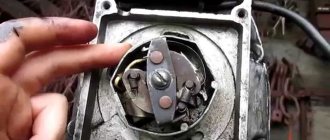
After watching the video, I was inspired and decided to properly configure the accelerator pump. The point of the adjustment is to adjust the nozzle of the sprayer in such a way that a stream of gasoline, when opened slightly, hits directly into the crack formed without touching the walls and the valve clearly in the center.
Having thought carefully, I did not put both accelerator pump nozzles into one chamber (so as not to overfill the carb), but bought a nozzle from Solex and installed it. The sprayer was standard - calibration 35 (first chamber) and 40 (second chamber), I installed one sprayer at calibration 45 (from Solex with one spout).
The introduction of this sprayer required modifying the carburetor with a “file” (I cut a channel in the wall of the carb for this sprayer)
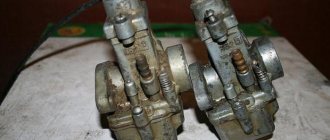
In general, here are some photos and diagrams of how it all turned out.
Standard sprayer.
Built-in sprayer (the nozzle was bent).
TUNING RESULT: It doesn’t blow spark plugs, the color is normal, there’s practically no soot. (Red brick color, more like pink)
I liked the carburetor's performance better after my adjustments than in the standard configuration. Quite acceptable gasoline consumption (I feel like I haven’t measured the consumption yet).
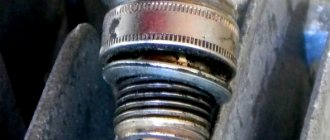
RS: Check all connections in the adapter for leaks, especially the heads. If the spark plugs are different colors, air is sucked in somewhere and the mixture in the cylinder, where the spark plug is whiter, becomes leaner.
PPC: For good carburetor tuning, I recommend using an IKS spark plug. https://oldaudi.ru/remont/article3/index.php
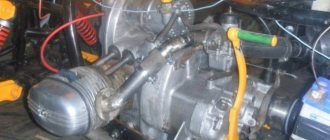
ADAPTER For those who are interested, my adapter is implemented like this
I made it from 2 issues from Izh. First I welded a common tube with flanges for pots. After that, I made a cut in the middle of this tube and welded a box for the carburetor to this cut.
That's actually something like this.
FILTER Many questions have been asked here regarding the air filter. In general, my filter is implemented like this. I took a Moskvich filter (suitable in diameter for this saucepan), cut it with a grinder to 4 centimeters wide and glued single-layer cardboard on both sides with silicone. A platform is made on the carb on which the filter itself (with silicone) is placed and the whole thing is covered with a decorative saucepan. Everything is done hermetically, dust does not suck in anywhere. I will say right away that this system is not very convenient to use. Well, at least not on my frame. The plans are to weld a beautiful box and put flat filters on both sides of the carb.
Accordingly, closing them with decorative chrome caps.
There are a couple of signs on the jets to help you. Calibration of VAZ jets
Optimal ratio of fuel jet to air jet
I hope this information will be useful to you.
Messages [9]
1↑ Topic from timezero 08/19/2014 00:14:40
- timezero
- Assistant
- Inactive
- Name: Lyubomir
- From: Ukraine Lvov
- Registered: 04/13/2014
- Posts: 265
- Reputation: 9
- Motorcycle: Dnepr 11
Topic: carburetor from ZaZ
one friend advised me to buy a carb from a Cossack, he says the consumption will be minimal, synchronous operation and traction, who will say what?
2↑ Reply from 14 00:22:16
- 666
- Technical support, materials scientist
- Inactive
- Registered: 06-05-2010
- Posts: 6,591
- Reputation: 602
Re: carburetor from ZaZ
The minimum consumption can be achieved on any carburetor without exception, but whether it is possible to achieve good dynamics is the question... at best, you will get an increase in power of zero point tens, if it’s worth it, then good luck)
3↑ Reply from pet.mikh.mikh 08/19/2014 04:53:47
- pet.mikh.mikh
- Elder
- Inactive
- Name: Mikhail
- From: Tyumen
- Registered: 05/20/2014
- Posts: 1,443
- Reputation: 81
- Motorcycle: Ural IMZ-8-103-10 1993
Re: carburetor from ZaZ
Yes, there seem to be such topics here, read them.
4↑ Reply from drakone 08/19/2014 06:15:51
- on drakone
- Elder
- Inactive
- Name: Albert
- From: Omsk region. Omsk city
- Registered: 07-12-2012
- Posts: 4,972
- Reputation: 125
- Motorcycle: Ural 8.103.10, GAZ 31029
Re: carburetor from ZaZ
Yes, 3-4 liters per 100 km, I heard
How to install a Solex carburetor on a VAZ 2107
5↑ Reply from devil 08/19/2014 07:53:16
- devil
- Pro
- Inactive
- Name: devil
- From: Western Dvina
- Registered: 04-09-2012
- Posts: 891
- Reputation: 50
- Motorcycle: Dnepr 10-36,11, Ural 8-103-10, Izh Planet 4, monster based on ZAZ 968.
Re: carburetor from ZaZ
Yes, I had installation experience, although the Solex from 08 lasted me for a week. The consumption decreased, but the power, the dynamics dropped, the engine got very hot, the mixture was very lean, I never adjusted it. Get it out of your head, your settings are fine
6↑ Reply from Luis 08/19/2014 14:50:54
- Louis
- Elder
- Inactive
- From: Sakhalin
- Registered: 04/07/2014
- Posts: 2,525
- Reputation: 160
- Motorcycle: Dnepr 11
Re: carburetor from ZaZ
People have always surprised me - they want more and for free. they want it to not eat gasoline and fly like a rocket
7↑ Reply from pet.mikh.mikh 08/19/2014 15:05:49
- pet.mikh.mikh
- Elder
- Inactive
- Name: Mikhail
- From: Tyumen
- Registered: 05/20/2014
- Posts: 1,443
- Reputation: 81
- Motorcycle: Ural IMZ-8-103-10 1993
Re: carburetor from ZaZ
Well, we all want this in our hearts, but we already understand that it is not possible, and there are many more who do not understand yet.
8↑ Reply from drakone 08/19/2014 19:06:05
- on drakone
- Elder
- Inactive
- Name: Albert
- From: Omsk region. Omsk city
- Registered: 07-12-2012
- Posts: 4,972
- Reputation: 125
- Motorcycle: Ural 8.103.10, GAZ 31029
Re: carburetor from ZaZ
Well, we all want this in our hearts, but we already understand that it is not possible, and there are many more who do not understand yet.
Perhaps, but not on Russian technology
9↑ Reply from ingwar 08/19/2014 23:04:01
- ingwar
- Pro
- Inactive
- Registered: 08/28/2012
- Posts: 795
- Reputation: 111
Re: carburetor from ZaZ
In my Urals there is monocarb. My opinion: if it is Ural, you need monocarb. On the Dnieper, the carbs are slightly at an angle, and this is enough for complete freedom of the legs. But you have to tinker a lot with monocarb: if the collector is not very good, then the mixture in the pots will be different, in one it is poor and in the other it is excessively rich; you’ll have to adjust the carb yourself, carburetor specialists don’t bother with motorcycles, and the old zazocarbs have probably already forgotten what they look like; It’s very inconvenient to install an air filter (on mine, the frame was created taking into account the monocarb, I welded the housing of a new filter). But otherwise, if you can do it, there will be no loss of power, the same super-efficiency, but the consumption will be less. Much has been written about the installation and adjustment of zazocarb on the box with illustrations.
Edited by ingwar (19-08-2014 23:05:41)
DRIVE2MOTO - motorcycles and motorcyclists
Manufacturing a manifold for one car carburetor for a Dnepr, Ural motorcycle. Collector diameter 20mm.
We cut out a slightly curved plate for the base of the entire structure.
The bend of the plate is exactly the same as the bend of the tide under the air filter of the gearbox of the Dnepr MT 11 motorcycle.
Marking the plate for the studs.
Manufacturing of studs for fastening the entire structure.
Making the collector in a simple way, we weld a corner to the site. There is a red tube screwed into the hole for the plug, in this photo, it serves for accessibility and ease of processing the insides with stone. At the end of the work, the pipe is unscrewed and a plug with an adjusting tongue is inserted. The main function of the plug is that, if necessary, you can weld a tongue to the plug and you can adjust the mixture for each cylinder.
We grab the welded manifold to the mounting plate and center it.
We calculate the difference between the pipes and shift the collector to the left.
We set the alignment. We begin to make a flange for the head of the Dnepr MT 11 motorcycle.
Since the installation of an Oka carburetor is experimental in nature, potential is built into the flange. If something happens, you can weld a 30mm pipe into it without any problems. I used 20mm diameter.
We set the alignment. In the center of the pipe, where the tacks are, then about 2 cm is cut out; to make it easier to dismantle the structure, we use a thick-walled hose as a seal and fix it with clamps. It will be possible to remove both the flanges and the manifold separately.
There is enough height for a turtle, so we begin to build a pipe for the air filter. First we make the base, an ellipse.
Solex carburetor 21083. — logbook Lada Oka 4-wheeled motorcycle Ural 2005 on DRIVE2
I installed a Solex 21083 carb. It refused to start on standard jets. Only with the choke fully extended, but then the revolutions were about 4 thousand, which is clearly not good for an engine at -30 (yes, I did everything in the cold again). I installed jets from the Oka and everything was fine =) I just adjusted the idle (it was about 1400 when warmed up) with a very convenient plastic screw on the back side and a very inconvenient recessed screw on the one hundred side of the Akum. I took a ride. It's not clear yet. Acceleration is a little faster. A little. So it may be self-deception. Let's measure the flow, maybe I'll play with the jets. By the way, there are three gaskets under the carb - a standard sandwich for a eight. Two simple and paranito thick. The lows are quite good, more like a standard Kaarb. I managed to leave the pan as standard, bending the hole in it with pliers. I have not yet figured out how to make this thing airtight. Probably the simplest thing is to buy an elastic band for a 08 pan and straighten the shackle even further. By the way, I have just unscrewed the standard 08 pins for the pan. Then I’ll make a template out of cardboard, drill holes in the okovsky pan and cut off the attachments to the valve cover on it. I will do the return closer to summer.
Installing one carburetor on a Ural motorcycle
In this article, we decided to look in detail at how one carburetor is installed on a Ural motorcycle.
Of all the domestic motorcycles, it was the heavy Urals and Dniepers that motorcyclists fell in love with. They were mainly valued for their engine - a boxer, four-stroke, two-cylinder, with a large volume that gave the rider an indescribable sensation. Alas, the engines were very unique and demanding. In order to move carefree on your horse, you either had to be a good mechanic, to know all the nuances of the engine in order to set everything up properly, or you could approach the problem from the other side, getting rid of its source. In this article we decided to look at how to install one carburetor on a Ural motorcycle? You might also be interested in the article: Ural motorcycle tuning.
It's not a simple procedure, but it saves you hours of agony trying to synchronize two carburetors. To make it more clear how difficult this task is, the owners of Ural and Dnepr compare it with trying to synchronize two mopeds standing next to each other. In comparison, installing and servicing a single carburetor is a simple task, which has a number of other advantages, such as fuel economy, lighter throttle control and the ability to install a set of handles on one cable. But let's look at the whole procedure in order.
How to adjust the second camera
To adjust the carburetor, you don’t have to touch its second chamber - standard jets are usually enough. The carburetor also has an econostat - this is a tube that is located in the second chamber. It is installed at a slight angle and can be used to adjust settings.
The Solex econostat is a separate carburetor system that supplies additional fuel when the engine operates at high speeds.
The task of the econostat is to ensure fuel suction when the throttle is fully open. In this case, a vacuum occurs in the carburetor, which causes suction. To adjust the second chamber, which allows for “pick-up”, jets are installed, with the help of which the fuel assembly is enriched. They are selected in exactly the same way as for the first camera.
With a properly configured carburetor, the car's efficiency increases, engine performance improves, and the concentration of CO in the exhaust gases is reduced. Usually, setting up Solex is trusted to car service technicians, but if you understand the structure of the carburetor and the principle of its operation, you can set it up yourself.
Source
Choosing a carburetor for the Urals, Dnepr
Let’s answer the most common question in advance - no, none of the old carburetors are suitable for this job. You can explain for a very long time why, in general, this model is designed for one cylinder, but you will have to “feed” two, so let’s move on. The second question is “Which Solex or Moskvich carburetor should I choose?” The answer is none. We immediately dismiss all car carburetors for their unreliability and difficulty of maintenance. There are many articles that describe the conversion of the Urals to carbs from various domestic cars or foreign cars, but they all end with the owner constantly suffering from its incorrect operation, etc.
From the above, we conclude that we need a motorcycle carburetor capable of feeding the volume of our engine. For example, the Soviet K28G or from Japanese two-cylinder engines of similar volume.
Change or leave, what do you prefer?
If you don’t do everything as expected, then selecting and installing a carburetor for a Ural motorcycle will only be a waste of time, effort and money. But even when all the conditions are met, it should be remembered that such a modification, although it will make it possible to easily adjust the supply of the fuel mixture, will create other problems:
- In the intake manifold, which is necessary to switch to a single carburetor, condensation will accumulate in cold weather. This will make starting the engine more difficult.
- A converted Ural with one carburetor will lose some power and will consume more fuel. After all, the filling of the cylinders will worsen.
- You will need to decide where to install a new air filter that matches the parameters, of which there will also only be one now.
After studying the issue, many leave the option with two carburetors
Based on the above, many prefer to leave two carburetors on the Ural motorcycle, as before, replacing them with more advanced ones. Models with constant, rather than variable, discharge in diffusers are better suited for this. They allow you to get rid of failure during acceleration - a disease of many two-cylinder four-stroke engines.
Creating the Intake Manifold
Having chosen which carburetor to install, we proceed to the next step - creating an intake. First, we remove everything unnecessary - old carbs, filter, freeing up the area. Now you need to make three mounting plates. To do this you need to use metal, no thinner than 5 mm. The plate will act as a tip that is fixed to the cylinder (similar to the plates on the exhaust elbows). On the cylinder side, it must retain the mounting points and have an internal diameter corresponding to the diameter of the inlet port. You can use the old plate on the carburetor side by cutting off part of the seat from the original part (if the design allows). Parts can be ordered from a turner or made from CNC equipment. The last resort is to do everything yourself, using a drill, a file and a lot of patience. Now we need to put everything out. The plates are screwed into their seats, and the carburetor is rigidly fixed in its future location.
Important! When aligning the carburetor, please note that it must be raised relative to the gearbox by at least a few centimeters.
The next stage is the selection of pipes and welding machine. It is best to use stainless steel pipes, perform rough “on-site” fasteners using manual electrode or semi-automatic welding, and finally weld the parts using argon or gas welding.
Such a high-quality finishing weld is needed to ensure that the inside of the manifold is in a perfectly smooth condition, otherwise swirls or irregularities may appear that prevent normal intake. If there is only rough welding, then it is worth welding the manifold in stages, polishing the welded joint each time. Note! Due to the peculiarities of the arrangement of the cylinders in a boxer engine, the manifold created in this way cannot be of equal length, so try to make the intake pipes as equal as possible. On the other hand, if you install the carburetor not symmetrically, relative to other parts, the problem can be avoided. Solving the problem with the air filter. As you already understood, the old air filter is no longer suitable for installation. Some people get sophisticated by installing one carburetor behind the filter, making an incredibly long intake. This option has a lot of disadvantages, but the most obvious is the inability of the system to adequately respond to gas and they do not work at low temperatures. The way out of this situation is a new filter. You can make it yourself; many people approach the issue creatively, placing the filter inside a flask, leather bag, first aid kit, etc. Such a new element looks quite original and can fit well into the overall style of the motorcycle. On the other hand, the market is simply overflowing with short filters of zero resistance, which will ideally fit in a new place.
Messages [21 to 40 of 165]
21↑ Reply from Watto 10/30/2012 21:59:48
- Watto
- Elder
- Inactive
- Name: Vladimir
- From: Nizhny Novgorod region
- Registered: 09/22/2012
- Posts: 1,664
- Reputation: 229
- Motorcycle: ZiD-50, DKW SB200, Dnepr MT 10-36
Re: which carburetor should I install?
I agree - Wise!
Edited by Watto (30-10-2012 22:00:22)
22↑ Reply from PATRIOT 31-10-2012 14:04:55
- PATRIOT
- Patriot IMZ
- Inactive
- Name: Ilya
- From: Krasnodar region, Krasnodar
- Registered: 02/18/2011
- Posts: 3,148
- Reputation: 176
- Motorcycle: No. Next will be the K750!
Re: which carburetor should I install?
Well, if you drive a normal Ural and get a kick out of it, then two carbs should be standing. And if grandpa goes to the market to buy potatoes once every three weeks, then you can supply one carb...
From: no longer important
Registered: 09/25/2012
Posts: 728
Reputation: 33
Motorcycle: Remained in dreams. the future mot will be a Ural
Settings
The last stage is starting the Ural engine and setting it up. Some imported carburetor models do not have an enricher, which must be taken into account when purchasing. Otherwise, the idea is simple: when the engine starts, we do a test drive, with maximum spin in low gears and try to reach speeds of more than 100 km/h. If the engine does not pull, perhaps a more efficient jet will solve the problem; you also need to work some magic with the idle speed setting.
Note! This entire system has one significant drawback - problems with operation at low temperatures. In cold weather, condensation forms in a long manifold, which inevitably leads to deterioration in engine performance.
You can try to isolate the inlet with rubber pads or other insulating materials. Plus, you shouldn’t do test runs and adjustments in the cold season.
Conclusion
Now you know how to install one carburetor on a Dnepr or Ural motorcycle. Before you start work, weigh the pros and cons, correctly assess your abilities, because if you don’t have a lot of money to entrust this work to workshops, you will have to use the skills of a welder, designer, mechanic and others. On the other hand, by correctly completing all the described points, you will lighten the burden of owning Soviet equipment and will be able to ride a motorcycle without any problems, even in everyday use.
Which carburetor is better to install on a Ural motorcycle?
Since 1985, the IMZ plant, Irbit, Sverdlovsk region, began to equip mass-produced Ural motorcycles with carburetors of the new K63 model. The K63 carburetor replaced the K301, K302 previously used. This carburetor is installed on the Ural motorcycle to this day. The machine is equipped with a two-cylinder engine, which is equipped with two K63 models of the same design.
Rice. 1. K63 carburetor for the Ural motorcycle
What needs to be done to install a monocarburetor
If you install one carburetor on a Ural motorcycle, this will largely solve this problem. This is a possible, although not ideal, solution. In bringing the plan to life, certain difficulties will have to be overcome. Necessary:
- Clear space above the engine crankcase. This is where it is most convenient to secure the intake tract and connecting flange.
- Make an intake manifold.
- Select a suitable carburetor according to the parameters.
All this will require a significant investment of time and money.
Preparation of the air-fuel mixture
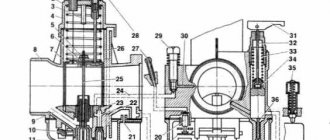
From the starting device into the carburetor on the Ural motorcycle, the fuel mixture is directed through channel 17 to the mixing chamber.
The non-separable plunger 34 has built-in parts:
- conical needle 36;
- spring 33, which prevents needle 36 from jamming;
- the tip to which the rod is connected.
The nozzle of the main dosing system 12 is pressed into the housing 11, where 4 radial holes are made. The throttle, which has a U-shaped cross-section, is made of a sheet of brass. The throttle wall has a semicircular segment cut out. It faces the air purifier. This groove ensures that the carburetor in the Urals receives the specified vacuum above the nozzle while the engine is operating at low idle loads.
The materials from which the dosing needle is made are stainless steel or brass. There is a thread on top that serves to move relative to the sprayer. With significant differences in temperature conditions, overcoming high mountain areas, and increased load operating conditions, this provides the opportunity to change the composition of the mixture.
When starting a cold engine at an external temperature of 15°C and below, it is necessary to ensure a strictly controlled mixture composition. For this purpose, the carburetor in the Urals motorcycle is equipped with a float quencher 35. The mechanism body, the plunger tip of the starting device, the cover, the nozzle, and the float chambers are cast from a stainless zinc alloy.
To facilitate the start of a cold engine, plunger 34 is raised using lever 31 to its uppermost position. By turning the crankshaft with a kick starter, a vacuum is created behind the throttle. Thanks to this, fuel flows through nozzle 37 to the cavity under the plunger.
Penetrating into the carburetor in the Urals, gasoline is mixed with air entering through the channel from the inlet pipe. Next, the rich emulsion follows along channel 17 to the mixing chamber, and from there to the engine cylinder. If the plunger is fully raised, the mixture is enriched as much as possible, limited only by the throughput of nozzle 37.
As the plunger begins to descend, the mixture gradually becomes leaner. The fuel supply is controlled by the gap between the channel walls and the metering needle. If you lower the plunger completely, the needle will block the fuel channel, the carburetor for the Ural motorcycle will stop supplying the air-fuel mixture to the engine combustion chamber, and the vehicle will stall.
Adjusting the main carburetor systems in the Urals
Adjustment of carburetors on a Ural motorcycle is carried out after checking and adjusting the gaps between the spark plug electrodes, breaker contacts, valve stems, and the ends of the rocker arms. Each of the two carburetors is separately adjustable. It is necessary to begin adjusting the carburetor in the Urals after measuring the gap between the tip of the cable sheath and the fitting, which should be 2-3 mm.
Rice. 3a. The main elements of the carburetor: 1 - main air path: 2 - throttle valve; 3 - subsidizing haze; 4 — air nozzle; 5 - sprayer; 6 — air channel; 7 - well; 8 — main fuel jet; 9 — float chamber (central location).
Rice. 3b. Fuel corrector: 1 — air inlet channel: 2 — spool; 3 — spool needle; 4 — fuel jet: 5 — sprayer; 6 — output emulsion channel; 7 — spool return spring; 8 — corrector control cable.
If the gap does not correspond to the specified size, the union locknut is loosened. Turn to the right or left to set the required gap. After this, the fitting is re-locked with a lock nut and the carburetor of the Ural motorcycle is adjusted. By turning off the warm engine at a minimum engine speed without load, the basic settings are made. The idle system is adjusted for each of the two mechanisms separately. The Ural carburetor is adjusted with the second cylinder turned off.
Idle adjustment
By rotating screw 28, the crankshaft speed is set to the minimum stable engine speed. Screw 29 is slowly unscrewed gradually until the motor begins to malfunction. It also gradually, slowly twists until a calm, stable speed is achieved. Once again, use screw 28 to reduce the opening angle of the throttle valve until the minimum speed is reached.
At the same time, screw 29 adjusts the saturation of the mixture. Such operations are repeated until the minimum stable engine crankshaft speed is obtained. The carburetor of the Ural motorcycle is adjusted in the same way for the second cylinder. The test is carried out by sharply opening and closing the throttle. In this case, you must sharply turn the throttle towards yourself and release it to its original position.
Operating modes
Modes of medium loads are characterized by the position of the needle relative to the throttle. Adjustment is carried out by choosing its most optimal position. The settings must be repeated when seasonal conditions change (winter-summer), during the running-in of new vehicles, in order to increase engine power. In this case, the dosing needle 25 moves along the thread relative to the bar 6. The locknut 5 is loosened.
When screwed into the bar, the needle rises in relation to the nozzle hole. The mixture becomes richer. When unscrewing, the mixture becomes leaner. One revolution of the needle moves 0.5 mm. The quality of the adjustment is checked by sharply turning the throttle knob. The loud pops that the carburetor makes on a Ural motorcycle indicate that the mixture needs to be enriched. To do this, the needle rises.
When operating motorcycles, owners often wonder which carburetors are best to install on a Ural motorcycle. Now Chinese carburetors are widespread in the Urals. There are some good examples among them. Foreign-made Solex and Weber models performed well in operation. However, their prices are higher than domestic ones.
What carburetors should I put on the Ural IMZ motorcycle? In my opinion, a Russian-made K63 carburetor would be good for the Urals. This is a trouble-free mechanism, the professional adjustment of which allows it to last for several decades. Every 5 thousand km it is recommended to clean it, blow it out, and rinse it.
The jets must be washed with acetone. The parts are wiped with rags or soft vinyl. The throttle should be installed after servicing with the cutout facing the air filter. Regular maintenance will ensure long-term trouble-free operation of the K63 model.
A little about carburetors for boxer engines and their alternatives
Since the time of Tsar Goroksa, domestic boxer cars have been equipped with carburetors made in the city on the Neva. All that could change was the location of the float chamber, the diameters of the jets and the shape of the throttle valve. Just as everything changes in the process of evolution, consumers received the latest device for preparing the fuel mixture - K-68. Although it is already morally outdated in our time. But this does not change the topic of conversation.
It is clear that it is better than its predecessors, but by how much? That is the question! I also have K-63 on my K-750 and they perform well! In general, K-65 carburetors are praised, even those of Chinese origin. I personally bought it for the boys in Kharkov, and they performed great! I don’t know what kind of new Urals they are putting in now in Irbit. We don’t put anything on the Dnieper at all, because they don’t produce them anymore))))))))
But this is all reasoning during which the question arises: which carburetor is best suited for a four-stroke engine? So let's try to figure it out a little.
First, let's find out what types of carburetors are installed on motorcycle engines and why. They are distinguished by the way the throttle valve moves. Hence, all modern carburetors (of mass use, of course) are divided into two types: direct drive and vacuum.
- Variable resolution carburetor: 1 - throttle valve; 2 — throttle cable.
- Constant vacuum carburetor: 1 - throttle valve: 2 - air damper; 3 - piston; 4 - return spring; 5 - vacuum channel.
In the technical literature they are called differently - with variable vacuum in the carburetor diffuser and with constant vacuum (previously they were called SU), respectively. K-62-68 is a representative of the tribe of carburetors with variable vacuum. They have a throttle valve with a metering needle attached to it. A cable from the throttle handle is attached to the damper. It's simple; If you want to go faster, turn the throttle towards you, pull the cable, it raises the throttle valve in the carburetor diffuser. The throttle, rising, frees up the passage of more air into the cylinder. A larger amount of air, mixing with fuel in the diffuser, creates a larger amount of fuel-air mixture. As the engine speed increases, your device accelerates. Everything is extremely simple. But in this simplicity lies the reason for failures that cannot be eliminated in principle. Air passing through the tapering section of the diffuser, in full accordance with Bernoulli's law, has a pressure below atmospheric pressure - a rarefaction occurs. It is the vacuum that causes the fuel to rise from the float chamber up to the diffuser and mix with air. Roughly speaking, the air in the diffuser sucks fuel out of the carburetor. The presence of vacuum and its magnitude (at least 9 mm Hg) is a necessary condition for the carburetor to work.
Let's go back to failure. You quickly open the gas, and the diffuser cross-section also quickly increases. But the engine speed cannot increase instantly and at the first moment remains unchanged. The flow area of the diffuser has increased, but the air flow has not yet changed, therefore, in accordance with the aforementioned Bernoulli law, the vacuum has decreased and fuel has stopped being sucked out of the carburetor - which is why a classic failure occurs. To avoid it, you must either open the gas slowly, and then the engine has time to “spin up” following the movement of the throttle, or abandon the carburetor with variable vacuum. Nowadays, the Ural is perhaps the only motorcycle in the world with a large-volume four-stroke engine, equipped with variable-pressure carburetors. But again, this applies to motorcycles that are a little older. Previously, motorcycles kept him company, but today even the Americans have moved away from the archaic design. All other companies install carburetors with constant vacuum on their four-stroke motorcycle engines. (see photo below - one of the options)
Keihin CVK30 CV carburetors for Kawasaki Ninja 250R. Constant vacuum carburetor
As one of the options for robots of this type of carburetors
What is their fundamental difference? Here two elephants stand one after the other: air and throttle. The throttle valve is located in the same place as in the carburetor with variable vacuum. The air, driven by a throttle cable, is placed in front of the throttle - closer to the intake valve. The throttle valve with the metering needle is moved in the well by a special piston. The piston is designed as follows: a very soft spring placed in the space above the piston tends to move the piston along with the throttle valve towards the closing direction. The vacuum in the diffuser created between the throttle and air valves is supplied through a special channel to the space above the piston and tends to raise the piston and throttle valve when the engine is running.
How does it all work? Suppose you are driving in third gear at a constant speed of 20 km/h and then suddenly give full throttle. With carburetors of the K-62 type, for the reasons described above, a deep failure occurs in the operation of the engine. To avoid this, suppose you installed Mikuni carburetors (see photo). Pretty good carbs!
When you open the gas, you open the choke and... one might say that they informed the carburetor of their intention to accelerate - nothing more. Since the speed was low before the gas opened, the air flow through the diffuser is also small, which creates a small vacuum in the diffuser. The force created by this vacuum and forcing the piston to open the throttle valve cannot overcome the action of the spring, and the throttle remains closed. As the engine speeds up, the vacuum increases and the throttle valve opens further and further. By opening the gas to full speed at low speed, you perform an incorrect action in relation to the carburetor, and it itself, with the help of the pneumatic throttle valve, corrects this error. The throttle valve is always automatically opened as much as required for best acceleration. It is this property that allows you to enjoy the process of movement without constantly thinking about how much gas you can “open”. It’s a pity, but the guys in the opposition can only dream about it.
The whole advantage of the K-68 over the old K-62 lies in the cylindrical throttle - it allows you to maintain stable idle characteristics. The K-62 type carburetor, when repeatedly opened and closed with the throttle handle, provided the engine with arbitrary idle speed. And with the next release of gas, the engine continued to operate at increased speeds - that’s why you have to use the quantity control screw to reduce the speed. But the next time you open and close the throttle, the engine spontaneously stalls. And so on ad infinitum. Since a true biker strives to fly past even a red traffic light, the operation of the carburetor at idle, whether good or not, is not very important to him. Another thing is drive. And here carburetors of the K-62-68 type are powerless: the rapid “opening” of gas does not lead to acceleration of the motorcycle, but to the loss of all power. And in order to continue moving, you will have to close the throttle and repeat the movement with your hand, but more slowly. Motor power works like a voucher - it is available, but cannot be used.
The only justification for the K-62-68 is that there is always a failure when accelerating a motorcycle with a four-stroke engine if a carburetor with variable vacuum is used. Regardless of where it is made - in Russia or Japan. But there is a good cure for such “sores”: the same ones mentioned above, any Japanese “Mikuni” or “Keihin” of constant vacuum, will be suitable for the “Ural” and “Dnepr”. Their distinctive feature is the characteristic cylindrical canister above the throttle valve - this is the throttle pneumatic drive. As a rule, Japanese motorcycles have one carburetor for each cylinder. Since the power of each cylinder of a 400 cm/cc engine (the most common second-hand capacity) is approximately equal to the power of a Ural or Dnepr cylinder, the carburetors of motorcycles of the 400 cm/cc class are suitable for the bore section. But to install them on the Ural, you need to prepare. First you need to make adapters to secure the carburetors to the heads. Attention, carburetors are mounted only on elastic suspension! Next, the air damper drive also needs to be slightly modified - in accordance with the design of the drive in the Ural. The second stage is setting up carburetors for use in the Urals. It is absolutely necessary, because a K-62 carburetor with all fuel-metering elements (and there are already twelve of them on the K-62!) is tuned to the Ural engine and can work better than any “Japanese” that is not tuned to this engine.