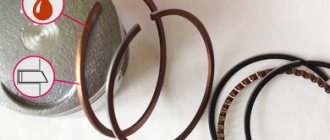
Accordingly, when installing, they are placed with the bevel upward. The bevel can be determined by eye, but usually a letter is engraved on the top side. Sometimes the top ring is chromed on the outside; its surface is lighter. We put on the rings.
I put the top one on through the top, the bottom one through the bottom. Don't forget to place a ring spring under the bottom ring. You put the central part of the ring on the piston, then put it on one by one.
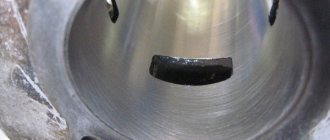
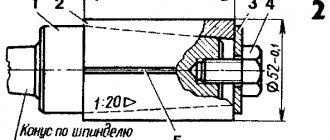
Then spread the ends apart with your thumbnails and lower the ring down to the groove. Inside the grooves there are stopper pins that should fit into the slot of the ring on the right half of the pattern. Keep an eye on this when installing rings, and even more so when assembling the piston. The ring should dangle freely in the groove, completely fitting into it. If it moves slowly or doesn’t fit at all, then you either installed it upside down, or confused the top with the bottom, or the groove was poorly cleaned from carbon deposits, or you have an unexpected problem.
An unexpected problem - how to install Honda Dio standard rings. Mokikis are often ten years or more old, and piston rings are produced in our time.
In the set of a pair of rings I bought, the top one fit perfectly, and the bottom one turned out to be 1 thick. As it turned out, the problem is completely solvable. Take a flat glass surface or a very flat glass surface, place some sandpaper on it and start grinding the ring down to the required thickness. I don’t remember the grain of the skin, but it is noticeably larger than zero. Grinding layer 0. It is more convenient and correct to grind the ring not on sandpaper, but on a corundum block.
Moreover, you only need to grind one side - the one that will work. The ring is extremely hard and is very difficult to grind off. I adjusted it by rolling it in the piston groove and working out the places where it was stuck. At the time of writing this article, there are already three hundred models with new rings on how to install Honda Dio rings.
Before assembling the piston, practice using the removed piston to insert the piston into the cylinder and insert the retaining rings that hold the pin in the piston.
Before inserting the piston into the cylinder, lubricate everything with engine oil, align the ring cuts with the stoppers in the piston grooves, squeeze the rings with two fingers; they completely disappear into the piston grooves and insert the piston into the cylinder.
The piston will only fit perfectly along the axis of the cylinder; at the slightest misalignment it will jam. Accordingly, if it doesn’t climb, then you need to shake it slightly, catching the axle.
The piston should enter the cylinder with a slight force of about half a kilogram. Do not press, otherwise you will either break the rings or tear off the cylinder. If the rings are new, break in the engine.
Nice ride. Often, piston rings on a scooter become unusable after several years of use, since the bulk of small-displacement two-wheeled vehicles from near and far abroad have already seen a fair amount of use in their motorcycle life. As a rule, even those who like to repair everything with their own hands do not know how to properly replace piston rings, which ring to put first on the piston, which one second, how to correctly install the piston in the cylinder, why the piston and rings are marked with letters or arrows.
When repairing a cylinder-piston group, abbreviated as CGP, you can either completely replace the CGP or partially repair it by replacing worn parts, usually only rings. If the cylinder has significant wear or scratches on its internal walls, it is possible to either completely replace it or bore it for repair rings and the piston; as a result, the piston volume will increase, power will increase, and fuel consumption will increase.
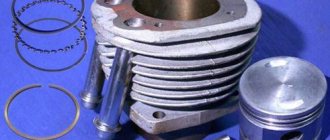
A complete repair kit may consist of a cylinder, two rings and an optional bellows ring; its task is to spring the lower compression ring of the piston, the piston pin, to secure the piston to the crankshaft mechanism, and two piston pin retaining rings, the purpose of which is to lock the pin in the piston along with lever of the crankshaft mechanism. A small set may consist of piston rings, a piston and a pin with retaining rings. The minimum set may consist of standard or repair size rings.
As for the third piston ring in the kit, not all manufacturers make it and not all service stations install it, so if it’s missing, don’t worry too much, repairs are possible without it. Compression rings - also known as piston rings - for Honda scooters and scooters from other manufacturers may be the same, or they may differ, both in thickness and in the cross-section of the Honda Dio rings.
As a rule, the upper one is thinner than the lower one and has a different cross-section. If it is not possible to distinguish the upper ring from the lower one, then ring manufacturers indicate the first upper ring with the number 1, and the second lower ring with the number 2. Pay special attention, piston compression rings must be placed with the letter facing up, it must be present unless the rings have been machined turner. First, you need to put on the lower ring, then the upper one.
Do not bend the rings; they are very fragile; do not use brute force. On the piston in the grooves for the compression rings there are so-called locks, they look like a bump in the groove, the gap on the rings should fall under the lock, how to install Honda Dio rings there is a place for the edges of the ring under the lock.
Otherwise, it will not be possible to insert the piston with rings into the cylinder. It is also very important that the piston has an arrow on top, the inscription EX or other letters; this is an indicator that says that this side of the piston should be directed downwards towards the gas outlet window. While manipulating the cylinder-piston group, cover the crankcase, for example, with a rag, so that debris does not get into it and cause another breakdown.
When placing the piston and rings into the cylinder, lubricate the cylinder walls with oil, this will make the process easier and help avoid unnecessary scratches. Install the pin retaining ring on one side in advance so it will be easier. Check the condition of the pin bearing cage, check the connecting rod for flaws.
You need to tighten the cylinder bolts carefully without unnecessary force, crosswise, preferably using a torque wrench, of course. It is recommended to replace old gaskets with new ones, even if they were not torn when removing the cylinder; if the gaskets are intact, many do not install new gaskets.
How to install a piston on a scooter? This question is how to install Honda Dio rings for thousands of people who are faced with the problem of replacing a piston on a scooter or an entire piston group. Everyone knows that the piston plays an important role in the engine, so the agility of your two-wheeled friend depends on its technical condition. In this article we will try to provide detailed information on how to correctly install the piston, and also clearly show several types of pistons with different marks and designations.
To avoid getting into such a situation, before installing the piston into the engine, you must first inspect the piston itself and figure out what inscriptions or designations are on it. Markings on the piston of a four-stroke 4T scooter. Regardless of the engine size, be it 50 how to install rings on a Honda Dio Cube. It is with this mark that the piston should be installed to the intake manifold.
Markings on the piston of a two-stroke 2T scooter. On two-stroke scooters, there are markings on each scooter model - the piston is marked individually. The situation is also the same with piston manufacturers; some can put inscriptions on the piston, while others can simply put an arrow.
Below we will look at the most common designations on pistons. Next, let's look at an example of a tag on a Yamaha Jog scooter. Let's move on to the next example - the mark on the piston of the Suzuki AD scooter. To summarize the article, we will highlight an important clarification, namely regarding the marks on two-stroke pistons.
Insert the second retaining ring. Install a new gasket. Before installing the gasket, inspect the surface; if there is damage on it, repair it using sealant. Lubricate the rings with oil, being careful not to get any on the gasket. To avoid breakdowns and how to install Honda Dio piston rings, when installing the piston into the engine cylinder, we make a clamp from a strip of tin and compress the rings with it.
When compressing the rings with a clamp, make sure that the ring locks are strictly in the center of the locking pins in the piston grooves. After compressing the rings, twist the clamp slightly to the right - to the left, the rings should not rotate with the clamp. We fix the clamp using a bracket bent from the same strip of tin. Using a syringe, apply oil to the surface of the cylinder and spread it evenly over the entire surface. After lubricating the cylinder mirror, how to install rings on a Honda Dio, the plane of the crankcase and cylinder and install a new gasket, if necessary, seal the gasket.
Everything must be perfectly clean. We unscrew the spark plug and unscrew the nuts on how to install Honda Dio rings securing the cylinder head. Before unscrewing the nuts on the head, you need to thoroughly wash the junction of the cylinder and crankcase and the cylinder and head, since even if the engine was washed, a lot of sand still remained under the ribs, and when removing the cylinder it could easily get into the chamber.
We remove the head and cylinder; if it doesn’t work, you can pick it up with a pry bar. Also, if the old cylinder gaskets have become stuck and come off in pieces, you need to: So that the surface is even. If the aluminum gasket between the head and the cylinder is damaged, it can be cut out of the walls of several cola cans; it is advisable to remove the paint and varnish. Be sure to place a clean cloth between the connecting rod and the crankcase walls to prevent foreign objects from getting into the crankcase, which could cause damage to the crankshaft and piston group.
Remove the piston pin stopper and push out the pin. The finger sits very tightly in the piston, you have to apply a fair amount of pressure. While you are pushing the pin, make sure that there is no side load on the connecting rod. It may bend. It is better to do this operation by resting the piston sideways against some object, for example, against a wall through a piece of wooden beam - this will relieve the connecting rod and prevent it from being accidentally broken or bent.
How to change rings, piston, cylinder on a Honda dio scooter
In this case, by the way, it will be possible not to put pressure on the finger, but to carefully knock it out with a hammer through a mandrel of suitable diameter. We remove the piston. We take out the bearing separator.
Remove the old gasket. Assembly is carried out in reverse order. We install the separator, lubricate it with oil; it is best to use a medical syringe for this. The oil is the same that you pour into tank 2. Attention, the new piston, cylinder, piston pin... before installation, rinse in gasoline and blow with compressed air to remove the preservative. Install the rings.
Do this very carefully as the rings are easy to break. It is more convenient to put on the top one through the top, and the bottom one through the bottom. Don't forget to place a spacer ring under the bottom ring. Place the central part of the ring onto the piston, then put both ends on in turn. Then spread the ends apart with your thumbnails and lower the ring. How to install Honda Dio rings grooves.
Inside the grooves there are stopper pins that must fit into the slot of the ring. Keep an eye on this when installing rings, and even more so when assembling the piston. The ring should dangle freely in the groove, completely fitting into it. If it is difficult to walk or does not climb at all, then the rings are either placed upside down and are installed with the lettering facing up: An unexpected problem - a change in standards. Scooters are often ten years or more old, and piston rings are produced in our time.
how to install rings on honda dio
Posts 1 page 1 of 1
Share12011-04-25 15:44:31
- Author: MEGAnik
- Always on the forum
- From: Borovichi
- Registered: 2011-04-24
- Invitations: 0
- Posts: 366
- Respect: [+2/-0]
- Positive: [+2/-0]
- Gender: Male
- Age: 25 [1994-11-15]
- ICQ: 76668045
- Spent on the forum: 1 day 4 hours
- Last visit: 2012-10-24 12:32:35
Today we will look at how to replace a standard piston Honda dio with a tuned Malossi using the example of a Honda dio af 27.
The design and position of the 27 dio engine is so simple that it can be repaired in the “field” conditions.
I will try to show how you can change the CPG without almost disassembling the scooter.
For all the work we will need two keys for 8 and 10.
First we remove the “toilet bowl”. To do this, unscrew all the bolts inside the trunk. We remove it, and in front of us is the engine itself:
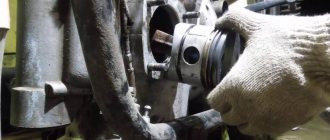
The next step is to remove the exhaust pipe. To do this, unscrew all the bolts shown in the picture:
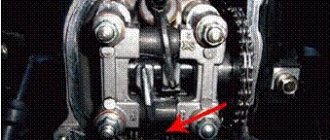
Next, we climb under the scooter and unscrew the bolts attached to the cylinder.
And this is what a fresh German Malossi Sport 72 cc CPG looks like. It also includes a few stickers so everyone knows what's "inside" you.
We will put all the bolts in this jar so that they don’t get lost.
And so, we removed the exhaust pipe:
Next, we look inside the scooter (through the trunk) and see that the casing still needs to be removed from the engine.
Remove the right side of the casing. At this point it is worth mentioning that the screws with which this half of the casing is screwed are located almost under the engine itself, and for ease of unscrewing, remove the bottom strip of the side plastic (plastic fastener near the taillight and two screws under the “legroom”), move the plastic slightly force in the direction of the rear light and remove it.
Next, remove the remaining part of the casing and unscrew the spark plug. The casing is secured with 2 bolts. Moreover, access to one (which is closer to the wheel) of them is very difficult.
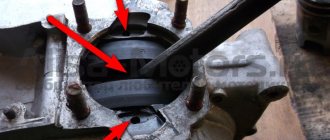
Next, unscrew the 4 cylinder head bolts. This is what should happen: Now remove the cylinder itself. Just be careful there may be a gasket underneath that could tear.
Now let's start removing the piston. This is not a simple matter. First, put some cloth inside the crankcase (under the piston) so that nothing falls inside and gets wedged in the future. Now we take an awl or tweezers and remove the locking rings of the finger, which are located on the sides of the piston. One day, a retaining ring like this fell inside the crankcase. I thought nothing would happen, so I put it back together. I started the engine, and after 15 seconds, it jammed. It was very disappointing. So that's why we put a cloth inside. After we have removed both retaining rings, we take a suitable pin and, with light blows of a hammer, knock the pin out of the piston. Perhaps you can do without a hammer, just squeeze out your finger with your own efforts. This is what it should look like for you:
Next, we look inside the scooter (through the trunk) and see that the casing still needs to be removed from the engine.
Let's prepare a new piston for assembly: put rings on it. Let's align the protrusion on the piston with the cut of the rings so that they do not spin during operation.
We put the new piston in place. We insert the pin into it and into the connecting rod at the same time, and secure it on the sides with locking rings. We put a new gasket under the cylinder. And carefully install the cylinder, having previously lubricated it with the oil you use to fuel the scooter, so that the cylinder sits easier. Instead of the usual gasket to ensure tightness between the engine head and the cylinder, the kit comes with a rubber seal, we install it. Now we put the cylinder head in place and fasten it with 4 bolts:
Next, screw in the spark plug. Screw in the bolts with double-sided threads to secure the exhaust pipe. We replace the ring between the exhaust and the engine with a new one from the kit.
Put the casing back on and screw on the exhaust pipe:
We start the scooter from kickstarter. Leave the scooter idling until half the tank is used up. Next, we go through the run-in and enjoy. One caveat with a tuned CPG - we fill the scooter with only 95 gasoline.
Replacing the standard piston Honda dio with a tuned Malossi sport 72cc
For the entire operation we need only two keys: 8 and 10.
First, let’s remove the “toilet” and we will immediately have access to the engine.
We are dismantling the exhaust pipe. In my case, this is a tuned Leo Vince SP3 pipe.
And this is what a piston
Malossi 72cc kit. This kit also includes three stickers that can be used to cover the plastic parts of the scooter “so that everyone knows what they’re riding on.” It makes sense to stick stickers on unbroken plastic, so not now
Piston and rings on a HONDA DIO ZX mokika (AF28) Ring replacement procedure
I have not seen any information on the Internet about the design of the piston. During engine assembly, this caused both piston rings to break. I think people will be interested in familiarizing themselves with the design of the piston and not repeating my mistakes. As they say, from teapot to teapot. All dimensions refer to the Dio ZX engine.
Ring replacement procedure:
Remove the cylinder. Take a clean cloth and line the crankcase space around the connecting rod. Let the connecting rod stand vertically, resting on it. There is no such thing as perfect cleanliness, and the less dust that gets into the crankcase, the better. If even one grain of sand gets in, it can very seriously tear off the cylinder later.
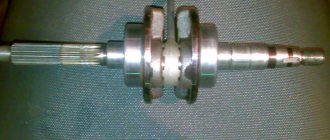
The piston and connecting rod are connected with a finger (this is a metal rod, empty inside). It needs to be taken out. To do this, you need to remove one of the two locking rings. The easiest way is to pick it up with an awl and pick it out. It says on the Internet that they can be bent, but I doubt it.
In fact, proper snap rings have tendrils at the ends or a loop-like bend in the center. The antennae are brought together with thin pliers, and the loop is hooked with an awl towards the geometric axis of the piston pin - and the ring is easily removed. But there are also irregular rings - without antennae and loops, they have to be painfully picked out with a thick needle or a sharp awl.
After this, the finger is pushed out to the side from which the stopper was removed. The finger sits very tightly in the piston, you have to apply a fair amount of pressure. While you are pushing the pin, make sure that there is no side load on the connecting rod. It might break.
It is better to do this operation by resting the piston sideways against some object (for example, against a wall through a piece of wooden beam) - this will relieve the connecting rod and prevent it from being accidentally broken or bent. In this case, by the way, it will be possible not to put pressure on the finger, but to carefully knock it out with a hammer through a mandrel of suitable diameter.
SjMakar › Blog › Honda DIO 35 ZX engine capital (Part 1)
after the events of January 2, after dreams were destroyed, and the financial issue became a lump in the throat, and in the near future there is only construction of housing purchased a few weeks before the accident (yes, for a couple of weeks I was generally the happiest person who had everything ...), so, based on the circumstances, dreaming about a new project or about any kind of reincarnation of this is out of the question... after a month in a cast, my head was swollen with thoughts, and my hands were itching to twirl something! since the property was purchased not far from the place of residence, it is impossible to get there on foot, as always, and by car is not rational, and not always convenient, then for such a case I got equipment last year...) August 15, 2021 it was purchased here This
This is a Honda DIO 35 ZX...
in the summer when I assembled the Lada after painting and was somehow already in the mood for the finals, there wasn’t much to do there and it was somehow boring and I remembered more and more the school years and so, when all my free time was spent on a moped...) when I had Yamaha JOG Next Zone, when 10 hryvnia was enough to fill a full tank...) I drove 30,000 km on it, my dad didn’t even believe in such a mileage))) we rode wherever we wanted, constantly sat somewhere in the evenings, in general we spent our time in a completely different way as modern youth do while sitting in front of a monitor... this was my first vehicle with an internal combustion engine which I began to “tune”... increasing the volume, refining the transmission, complete painting, all sorts of lighting that were fashionable in those days...) and I parted with that moped for the sake of “casting” 15” for a Lada...)) the sale announcement is still in the archive on the sales website.)
Increasing the piston volume to 76 cc on the Honda Dio scooter
Any scooter tuning is limited to certain limits and has a limit.
The limit is determined by the financial component (for the purchase of high-quality expensive parts), the capabilities of each specific engine (not all engines can be boosted equally well) and the need of the scooter owner (exactly why he is tuning the scooter). The last factor should be decisive, namely, why do you want to increase the dynamic and speed performance of your scooter? What goals are you trying to achieve and will it pay off in the future? Often scooterists engage in pseudo-tuning, not understanding the possible consequences for the equipment.
Scooter tuning and reducing engine life
It is important to understand that any boost to the engine definitely leads to a decrease in the reliability and overall service life of the engine components. Increasing volume and maximum speed inevitably leads to premature wear of the standard main bearings and crankshaft. When installing a piston with a volume of more than 62 cc, there is a need for additional adjustment of the oil and gasoline supply.
Increasing piston volume using the example of Honda Dio
One of the most common types of urban scooter tuning is increasing engine capacity. Let's consider the possibilities of such a boost using the example of a Honda Dio scooter with an AF18E engine. The manufacturer here provides a piston volume of 49.9 cubic centimeters, and the piston diameter is 39 mm.
List of models with the same engine:
- Honda Dio AF-18.
- Honda Tact AF-24.
- Honda Dio AF-27.
- Honda Dio AF-28.
- Honda Tact AF-30.
- Honda Tact AF-31.
- The piston also fits the Honda Lead AF-20, Cabina AF-33 and Broad AF-33 scooters.
- Honda DJ-1RR.
- Honda Dio SR AF-25.
- Honda Dio Fit AF -27.
- Honda Dio XR Baja
The dynamic and speed performance of these scooters are often inferior to those of similar equipment from Yamaha and Suzuki, however, the reliability of Honda engines has never been in doubt.
Volume matters
Most often, to increase engine capacity on these scooters, a 60cc or 65cc CPG is used. This volume allows you not to bother with major adjustments or replacing the carburetor, and the stock bearings and crankshaft are able to cope with slightly increased loads. In this case, the speed does not increase, since the engine speed remains the same, but only the dynamics increase. For many, this is enough for comfortable movement around the city. In this case, there is no need to change the cylinder head.
For more serious tuning enthusiasts, piston kits of 72cc or even 76cc (piston diameter 48 mm) are available. Just a few years ago, finding them was quite problematic, but now, with the increase in Chinese and Taiwanese factories of spare parts for scooters, there is no problem with this. You can buy one of these kits, for example, here: CPG 76cc Honda dio. The old cylinder head will no longer fit in this case, so usually all kits should also include a new head.
The process of replacing a stock piston with a larger volume kit
Installing a kit is no different from a standard piston replacement:
- We place the scooter on the central support.
- We remove the “toilet”.
- Disconnect the carburetor along with the intake pipe and reed valve.
- Unscrew the muffler and move it to the side.
- Unscrew the bolts securing the cylinder blower casing and remove the casing to the side.
- We unscrew the 4 bolts on the cylinder head, remove the cylinder, and replace the piston with a new one.
- We install the new kit in reverse order with the gaskets from the kit.
Everything is simple here, now about the consequences:
Consequences of increasing piston volume on a scooter
- Just adjusting the carburetor, as was the case with the 60cc, will no longer be enough. The stock carburetor cannot fully deliver the required amount of fuel-air mixture due to its low flow rate. Ideally, you will need to replace the original carburetor with a model with a larger diffuser (for example, 18 mm).
- Naturally, the performance of the stock oil pump will not be enough. Adjusting oil pumps on Honda scooters, in this case, does not solve the problem. You will need to additionally add oil to gasoline at the rate of 1 to 25 (1 part oil to 25 parts gasoline) in the summer and 1 to 40 in the cold season. Converted to a liter of gasoline, we get, respectively, 40 grams of oil per 1 liter of gasoline in hot weather and 25 grams of oil per 1 liter of gasoline in the cold season. Ignoring this rule will inevitably lead to oil starvation of the engine and the corresponding consequences.
- Naturally, the service life of the stock main bearings and crankshaft is reduced.
- The maximum speed does not increase because the maximum engine speed is limited. To increase speed, you will need to either lengthen the gearbox or increase engine speed using a tuning switch. The second option with stock bearings and original crankshaft is not desirable, since increasing engine speed further reduces engine life.
- The dynamics increase significantly. You may have to reconsider the weight of the variator rollers.
This is such a budget tuning. Whether it is needed or not, everyone decides for themselves.
You can also read other articles on the topic:
How I restored a Honda DIO AF28 moped Part 2
Last weekend I settled on painted wheels. Today I want to offer you a continuation of my story on the resuscitation of a purebred Japanese!
Now the most interesting thing for me is replacing the cylinder-piston group (CPG or simply a piston with a cylinder). The photo shows the condition of my piston and cylinder, which I removed from the moped. There was a decent amount of scuffing and wear in the cylinder, there was no gasket. Big snot from sealant. There are such notches on the cylinder that mother don’t worry.
I installed a new CPG, saved money and now I understand that it was in vain. The new piston installed without problems, but the compression was 6.5. This means I need to break it in properly and it will last for two seasons, at best.
After that, I replaced all the seals, fortunately they are sold as a set and only 6 or 7 pieces, I don’t remember. And the cost is 130 rubles. And, of course, after replacing the oil seals and cleaning out all the space under the variator and clutch covers, I replaced the rollers in the variator (mine were 8 grams, but they were not perfectly round in shape). I set it to 9 grams - this is the standard, but it turned out that this was too much and it would be better to set it to 7 grams on the contrary. I'll keep this in mind for the future.
Of course, I had to change the variator belt, as well as buy a full set of gaskets for this model. Some of them remained untouched, since I did not change the crankshaft bearings, but they will not be superfluous...
Time to paint the plastic. I painted the plastic with the same Montana that was left over from painting the wheels. Degrease well, then lightly coat paint. After drying, the layer is thicker, and the third is the final one.
But it looks a little strange, you must admit. A grown man can paint his moped in these bed colors. BUT the whole point is that further it will look quite aggressive, but for this it needs to be assembled and add zest to the appearance.
Namely, let's add BLOOD. More BLOOD. Zombies attacked our area and one got wrapped up in a wheel. To achieve this effect, you need to take a can of red paint and apply blots all over the body. I’m not very happy with the fat splashes, but with the blots it turned out great. As a result, the moped attracts attention and looks interesting, and anyone can do this.