Payment for goods and downloading of the book in electronic form (PDF format) is made on the website.
To do this, you need to find the book you are interested in and click on the “Buy” button. The price of the book is indicated on the button.
For convenience, the price on the website for residents of Russia, Belarus and Kazakhstan is presented in rubles.
For residents of Ukraine in hryvnias, and for all other countries - dollars.
After clicking on the “BUY” button, a payment window will open where you can select a payment system with which you can pay for the selected book using any bank card (Visa, MasterCard, MIR, etc.)
When you click on the “Pay by bank card” button, the Portmone payment system will open, which is the easiest way to make a payment.
In addition, the website offers four payment systems for payment:
- Yandex (payment from any bank cards, Yandex Money account, QIWI Wallet, terminals, etc.);
- Portmone (payment from any bank cards, Portmone account);
- PayPal (payment from any bank cards, PayPal account);
- WebMoney (payment from any bank cards, payment from WebMoney wallets).
Payment via Yandex Cashier
After selecting payment via Yandex, the Yandex Cashier payment system will launch, where you need to select a convenient payment method (bank card, QIWI, Yandex Money account, etc.)
After specifying payment details and confirming payment, payment for the goods will occur.
If you have a bank card in a currency other than the ruble, then the money will be debited from the card at the rate of the Central Bank of Russia at the time of the purchase.
This payment method is optimal for residents of Russia, Kazakhstan and Belarus.
Official website of the Yandex Kassa payment system https://kassa.yandex.ru
Payment via Portmone
After selecting payment through Portmone, the payment system will launch, where you need to select the payment method: bank card or Portmone account.
The price in the Portmone payment system is converted into dollars at the exchange rate of the Central Bank of the country where you are located.
If you have a bank card in a currency other than the dollar, then the money will be debited from the card at the rate of the Central Bank of your country at the time of the purchase.
After specifying payment details and confirming payment, payment for the goods will occur.
Official website of the Portmone payment system https://www.portmone.com
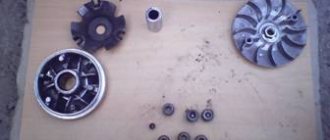
We disassemble the pulley
The variator pulley is quite easy to disassemble. This unit consists of a housing, a back cover and rollers. You need to disassemble the pulley in order to inspect the rollers. There are 6 of them in total, they should not be worn out. Otherwise, they will need to be replaced.
The rollers in the variator pulley have a direct impact on the traction and speed of the scooter. During operation, the rollers wear out and their weight changes. As a result, the dynamics of the vehicle changes. Worn rollers will need to be replaced with new ones; they cannot be repaired.
The variator pulley and the variator itself are assembled in the reverse order. But before you begin assembly, do not forget to inspect the oil seal on the crankshaft. It must be intact and not heavily soiled. If there is too much dust, clean the oil seal from dirt before assembly. Also inspect the main components of the scooter; if necessary, lubricate them.
Did you like the post? Share with your friends and support the site:
Payment via PayPal
After selecting payment via PayPal, the PayPal payment system will launch, where you need to select the payment method: bank card or PayPal account.
If you already have a PayPal account, then you need to log into it and make a payment.
If you do not have a PayPal account and you want to pay using a bank card via PayPal, you need to click on the “Create an Account” button - shown with an arrow in the picture.
PayPal will then prompt you to select your country and provide your credit card information.
After specifying the information required to make the payment, you must click on the “Pay Now” button.
Official website of the PayPal payment system https://www.paypal.com
Troubleshooting a scooter's CVT
Everyone is happy with the transmission, which is based on a variator: it is quite reliable, durable, repairable, it works without steps and in fully automatic mode, but, as we all know: “nothing lasts forever,” therefore, after reaching a certain mileage of the scooter, the parts of the variator wear and a number of malfunctions characteristic of this type of device appear.
The malfunctions of the variator themselves are not as terrible and critical as, for example, in the braking system or in the steering, but still, the variator is the main element of the scooter’s transmission - directly affecting the maximum speed, dynamics, control comfort, belt service life and the overall safety of operating the scooter .
It is advisable to carry out a complete inspection of the condition of the variator parts at the beginning of each season, or, in extreme cases, once every two seasons. Taking into account the fact that you bought the scooter in a store “from scratch” and no one had time to stick their dirty paws in there before you. For used scooters, the CVT should be inspected immediately after purchase.
So, we remove both variators from the engine for edrenefene, prepare a work place for ourselves in advance, look for or take from someone a straight metal ruler (preferably a pattern), buy some kind of refractory grease, I use copper grease to lubricate the variator (if anyone has objections on this matter, then please speak out in the comments) or pasta - it doesn’t matter. The name is different, but the meaning is the same.
We remove all the rollers from the front variator housing and carefully inspect them. The rollers must be perfectly round (minor abrasions on the working surface of the rollers are allowed), and not hexagonal (as is usually the case), the working surface of the rollers must be intact and without cracks, the weight and size of all rollers must be strictly the same.
An example of “dead” rollers that are unsuitable for further use:
Severe wear on the working surface
Crack on work surface
We take the outer plate of the variator and carefully inspect it for visible damage, wear of the working surface and pay special attention to the condition of the internal splines for the crankshaft axle.
An example of a variator impeller that has damage in the form of two broken fan blades. By and large, a couple of broken fan blades is not such a big problem. But it’s still a problem, no matter how you look at it.
At high engine speeds, this weight imbalance can cause accelerated wear on the crankshaft main bearing and cause increased engine vibration. Therefore, in order to restore balance, you should strictly go in the opposite direction - break out entire fan blades (marked with arrows) in an amount equal to the missing ones. And then the weight balance will be completely restored.
We take the second plate of the variator in our hands and carefully inspect the integrity of the guides for the support washer, the slots for the rollers, the degree of general wear and the presence of visible damage.
Particular attention should be paid to the condition of the guides under the support washer. Because the torque developed by the engine while the scooter is moving has a direct impact on them, and in the event of critical wear or extreme loads on the engine, the guides break, the support washer rotates in the variator body, and then how lucky... Either the engine floor or only the variator will grind .
Examples of common damage to the internal plate; with such damage, these variator parts are unsuitable for further use.
The absence of one guide (it was broken off when they tried to unscrew the nut on the trunnion without a puller). The absence of one of the guides risks the fact that the entire load will be transferred not to three points, but to only two, which will lead to a significant increase in the load on the remaining guides.
Critical wear of the plate body at the point of contact with the support washer. As you can clearly see, the support washer ate a decent piece of metal in the body.
Critical wear of the guides under the support washer. There is nothing to comment on here; the thickness of the guide together with the greatest wear does not exceed one millimeter. Just a little more and the plate would have turned in the body.
Not critical, but already the maximum permissible wear of the guide; for clarity, a ruler is attached to the place of greatest wear. In principle, you can still drive with such wear and tear, but not far...
An example of a plate in perfect condition. As you can see: there are completely no signs of wear, all the guides are intact and undamaged, there are no visible damages either.
The support washer must be of the correct shape, the central hole for the crankshaft journal must be free of visible wear and damage
After everything has been done, we alternately check the working surface and the variator plates for acceptable wear. To do this, put a ruler on the work surface and look at the whole thing against the light. The ruler should lie flat on the surface with no gaps, and therefore there should be no gaps on the working surface.
An example of a variator working surface in perfect condition
The ruler lay along the entire surface without a gap
At first glance, it may seem to you that the presence of wear on the working surface of the variator is not a serious problem and such a variator can still be used and used...
Actually this is not true. As the working surface wears out, the original geometry of the pulley is disrupted. The optimal angle at the place of constant operation of the belt becomes blunter, and the distance between the pulleys and the angle at different radii of the belt operation become different. Plus, as they wear out, depressions and ridges appear on the surface of the pulleys - the so-called “lips” - when passing through them, the belt is subject to severe wear.
What does this all ultimately lead to? Moreover, in different modes of operation of the variator, the belt will not come into contact with the plane of the pulley with the entire working surface, but only with a small part of it.
That is, at low engine speeds (small radius), the belt will come into contact with the pulley surface with its entire working surface (the contact patch will be maximum). Since, in low engine speed mode, the scooter is practically not used, so the output at a small radius will be minimal, even with a large mileage of the scooter.
And as the engine speed increases, the belt will extend to a larger radius where there is a strong wear on the working surface of the pulleys, and therefore the original angle and distance between the pulleys is violated.
All this will lead to the fact that the contact patch in the place of maximum production, between the belt and pulleys, is reduced to a minimum and the belt simply begins to slip, overheat and ultimately break or burn.
An example of a terrible development, on the order of several millimeters. A plate with such a huge output cannot be used for further use.
Another important point: many idiots like to sharpen the end of the variator guide bushing, and they do it with very zealous zeal... How many times have I asked these idiots: “WHY THE FUCK DID YOU GRIND IT???” Answer. Almost always it was the same: “the belt will tighten better”... ??? I'm sick of these tusks...
Of course, it’s their business - they want to sharpen it, they want not to sharpen it. The point is not this, but the fact that when the length of the bushing is reduced, either upward or downward, the alignment of the central axes of the pulleys is disrupted, which is why the belt works with a severe misalignment and ultimately burns out prematurely or breaks.
An example of a loosened bushing. On the left is the drainage, on the right is the collective farm. By the way, the belt burned on the scooter within a week and continued to burn, and the bushing was sharpened and sharpened until it was ground down a whole centimeter...
We have sorted out the front variator a little and it’s time to move on to the rear, the so-called torque driver. We put the rear variator on some table - we disassemble it, wash all the parts and start checking.
We carefully inspect the working surface of the central axis; there should be no scratches or traces of wear on it; the surface of the axis should be smooth and shiny without the so-called faceting and sagging of metal.
Thoroughly wash both halves to remove any remaining old grease and dirt. We connect the halves to each other and try to swing them with our hands. There should be no play between the two halves, well, maybe if you feel a slightly noticeable play, then in principle there is nothing to worry about. But if you feel a pronounced play, then there is nothing you can do, you will have to throw the variator in the trash.
We inspect the holes along the pins; the holes should be perfectly straight without signs of wear or damage. The pins, after being installed in the hole, should be straight along the axis without distortion.
Example of heavily worn pin holes
Due to severe wear of the holes, the pins during operation of the rear variator stood with a large distortion relative to the central axis and their side edge ate the spring guide.
We inspect the guides along which the pins run. The working surface of the guides must be smooth without holes, edges, or metal deposits.
An example of severe wear on the guide; a deep pothole has formed at the point of constant contact between the guide and the pin. This guide is not suitable for further use.
Inside view
An example of a guide in perfect condition. There are no potholes, sagging, wear and tear on its surface.
Inspect the pins for wear. The pins must be in the correct shape without wear or damage.
We check the condition of the bearings, and there are two of them in the rear variator - one needle, and the second regular - ball. And the condition of the rubber seals, if there is any suspicion of wear of the bearings or rubber rings, we change these parts without regret.
We apply some high-temperature lubricant (I use copper) into a special recess on the inner surface of the movable plate of the variator, rub the whole thing evenly over the surface and remove excess lubricant.
We assemble the halves and put a little of our lubricant into the guides.
Several times we move and push the halves together, remove any excess lubricant from the working surfaces and complete the final assembly of the variator.
Payment via WebMoney
After selecting payment via WebMoney, the payment system will launch, where you need to select the payment method: bank card or WebMoney wallet.
If you already have a WebMoney wallet, then you need to log into it and make a payment.
If you do not have a WebMoney wallet and you want to pay in another way, you need to select any of the methods that WebMoney offers and make the payment
After specifying payment details and confirming payment, payment for the goods will occur.
Official website of the WebMoney payment system https://www.webmoney.ru/
How to remove a variator on a scooter?
Despite the fact that the variator is one of the most durable and wear-resistant components of two-wheeled vehicles, sooner or later the motorist faces the problem of replacing it. A beginner inexperienced in the intricacies of motor mechanics, in view of the widespread opinion about the ease of operation and maintenance of minibikes, will most likely consider this a piece of cake, but everything is far from so simple .
Replacing a CVT in a home garage is quite difficult. The reason is that to dismantle this unit you must have dexterity (that is, straight hands), an understanding of the structure of the vehicle being repaired and, most importantly, specified tools.
If the first and second are purely a matter of profit, then the availability of the necessary repair kit will not be solved by itself. At specialized service stations, the variator is replaced using special pullers, which are provided by official representative offices of brands or are made independently by Kulibin motorcycle mechanics.
Downloading a book
After successfully completing the payment (by any method) and returning to the KrutilVertel store from the payment system website, you will be taken to the successful payment page:
On this page you need to indicate your e-mail, where access to download the book will be sent.
If you are already registered on our website, then simply follow the link to your personal account.
The book you purchased will be in your personal account, from where you can always download it.
Please note that after making the payment, you need to return back from the payment system website to the KrutilVertel website.
If for some reason you did not return back to the site and closed the payment system tab with a message about the successful completion of the payment, please let us know - we will send you a letter indicating access to download the book.
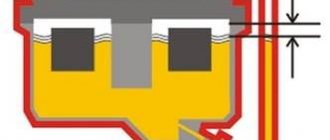
Design and principle of operation
The fundamental elements are two pulleys and, accordingly, a belt. The cut belt has a trapezoidal shape. The name of the belt (V-belt) comes from the principle of its operation. The transition of the belt to the maximum radius is similar to a wedge. As the pulleys wear out, the radius becomes smaller and the scooter loses speed.
The main condition for stable operation of the variator is its tightness on the pulleys and the absence of slippage. Experienced users of this type of technology claim that 100% absence of slippage cannot be avoided. But it is necessary to minimize it as much as possible. In case of severe slippage, the operation of the entire transmission is at risk. Breakdowns and replacement of parts cannot be avoided. In addition, efficiency is significantly reduced. A striking example of slippage is the drop in engine speed at the very start (the engine seems to be running, but the movement of the equipment is not significant).
Also, straight belt slippage depends on the pulley spring. If it has lost its rigidity, it must be replaced. In addition, unstable, deteriorated performance may be due to wear of the belt itself.
High-quality famous belts from 6000 km.
How else can you determine the correct operation of the variator? – when starting to move, the engine speed is the same until the start of acceleration. At maximum throttle, the engine speed should approximately correspond to the engine power. “People’s” craftsmen sometimes do some “alterations” so that the dynamic qualities of the scooter increase. Also, to speed up the scooter, there is an option to completely replace the variator. For example, you can buy a sports variator for a 50 or 150 cc scooter.
Problems when paying with bank cards
Sometimes difficulties may arise when paying with Visa/MasterCard bank cards. The most common of them:
- There is a restriction on the card for paying for online purchases
- A plastic card is not intended for making payments online.
- The plastic card is not activated for making payments online.
- There are not enough funds on the plastic card.
In order to solve these problems, you need to call or write to the technical support of the bank where you are served. Bank specialists will help you resolve them and make payments.
That's basically it. The entire process of paying for a book in PDF format on car repair on our website takes 1-2 minutes.
If you still have any questions, you can ask them using the feedback form, or write us an email at [email protected]
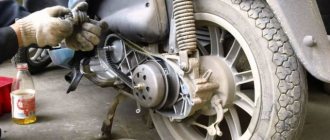
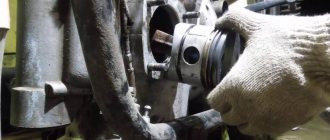
Removing the variator
A variator is a unit responsible for transmitting traction to the rear wheel. CVTs rarely fail because they are highly reliable, but sometimes there is a need to remove them. It won't take much time to disassemble the variator, but if you don't have the skills to work with tools, you'll have to tinker a lot.
To remove the variator you need to have a set of tools suitable specifically for your scooter, as well as a special lift. The work begins with dismantling the cover, then you need to perform the following operations:
- The front and rear variators are located under the cover. We begin dismantling from the front device. Unscrew the nut on the drive pulley. Remove the nut and take out all the parts of the variator;
- then you can remove the pulley itself;
- remove the spitz washer and then the drive gear;
- take out all the other parts.
It is important to remember the sequence of removing all elements of the variator in order to assemble it in the correct order. If you don’t rely heavily on memory, you can write it down or take a photo on your phone.