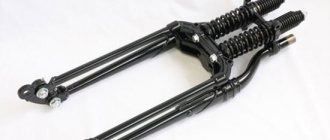
The most common front fork is the telescopic design. The so-called “telescopes” are found on all Soviet-made boxer motorcycles and appeared back in the distant 30s of the last century. During the period of constant improvement and refinement of the design, many manufacturers went their own way, making significant changes to the seemingly simple design. Changing the oil in the front fork of a motorcycle must take into account all the design features and operating principles of each specific vehicle model.
The most widely produced motorcycles are those with a fork design that uses two tubes. One is steel, with a larger diameter. The second is chrome plated, which is called the fork leg. Moving up and down with the steering wheel, there is a hydraulic valve located inside for each side. The structure is strengthened by a powerful spring. Protection is achieved by installing anthers and seals. Changing the oil in the front fork of a motorcycle is done by pouring fluid directly into the cavity of a smaller diameter tube.
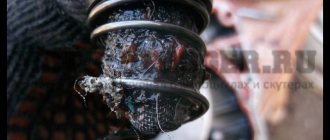
As a result of active movement, reacting to each bump or hole, the oil is the first to become unusable. This happens because all kinds of debris and small metal shavings begin to get into the liquid due to the friction of metal parts. After just a year of active riding, a change in the behavior of the fork . Following the oil, the anthers and seals also deteriorate. They begin to let in water and all kinds of pollutants. The oil absorbs them and ceases to perform its function.
Changing the oil in a motorcycle fork can be simple if the manufacturer provides holes for draining and filling oil, but it can be complicated when a total repair or restoration of some elements is necessary.
Working conditions of a motorcycle shock absorber fork
The front fork is two long tubular pieces that hold the front wheel to the motorcycle. These parts move up and down to compensate for unevenness in the road surface.
Unlike a car shock absorber, the spring assembly allows the fork leg to compress and then spring back, resulting in a better ride and improved traction. Each of the front fork tubes for most motorcycles contains a spring and oil. Back in the middle of the last century, fork legs were just a spring inside a pipe. When the spring was compressed by the impacts, the front of the motorcycle bounced.
After the development of the damping system, this bouncing motion became much smoother. However, to soften shock impacts, the system must contain an incompressible fluid that can easily withstand shock loads - fork oil. The most common design is one where inside each shock absorber fork leg there is a tube with holes and chambers that control the movement of oil.
Functions and Features
Despite the wide range of products offered, there are many discrepancies and uncertainties in their designation and parameters. Thus, the operational requirements for fork oils include:
- Ensuring optimal fork damping and stable performance over a wide temperature range.
- Independence of oil performance from fork design.
- Prevents foaming.
- Elimination of corrosive effects on metal parts of the shock absorber and fork.
- Chemical inertness of the composition.
All brands of fork oils for motorcycles are hydraulic fluids, and therefore even some general purpose industrial oils in accordance with GOST 20799-88 with a suitable viscosity can be used. Note that with increasing oil viscosity, the fork will return to its original position more slowly. On the other hand, with increasing viscosity, the performance of the oil increases, especially when driving on bad roads, for motocross motorcycles.
Motorcycle IZH-Planet.
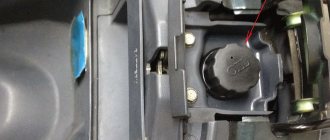
Operation, maintenance and repair. >> Telescopic fork. Telescopic fork - removal, disassembly, assembly and installation. Replacing shock absorber fluid "World of Autobooks" LLC
Telescopic fork - removal, disassembly, assembly and installation. Replacing shock absorber fluid
Removal
The telescopic fork has to be removed and disassembled when there are knocking noises during movement, deterioration of vibration damping, leaks, as well as a planned replacement of shock absorber fluid.
1. Remove the front wheel with the brake drum cover (see p. 98).
2. Disconnect the front wheel mud shield from the left sliding pipe of the fork.
3. Using a 14 mm wrench, loosen the tightening of the nut of the coupling bolt of the upper yoke of the steering column.
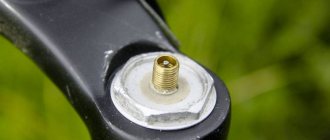
4. Using a 27 mm wrench, unscrew the shock absorber plug a few turns.
5. Using a 17 mm wrench, loosen the tightening of the nut of the lower bridge (cross beam) coupling bolt.
6. Using light blows of a hammer through a wooden spacer, knock out the supporting pipe from the upper and lower traverses.
7. Remove the fork leg from the lower crossbar.
Similarly, remove the second fork leg.
Installation
Install the plug in reverse order.
Disassembly
1. Remove the fork leg from the motorcycle (see above).
2. Turn out the shock absorber plug completely.
3. Turning the fork blade over, drain the shock-absorbing fluid.
4. Holding the pen in a vice by the lower tip, use an 11 mm socket wrench with an extension to remove the bolt securing the hydraulic shock absorber.
5. Take out the shock absorber along with the spring.
6. Using a special ring or “gas” wrench, unscrew the oil seal housing.
7. Remove the sliding pipe from the supporting pipe.
8. Clamp the shock absorber in a vice through the gasket at the lower tip.
9. Using a 13 mm wrench, unscrew the nut and locknut of the rod, having previously remembered (written down) the size of the protruding threaded part of the rod.
10. Remove the nuts, washer and spring.
11. Using a 12 mm spanner, unscrew the rod tip.
12. Remove the rod assembly from the shock absorber strut.
13. We wash all parts of the removed shock absorber in kerosene or white spirit.
14. After washing, inspect the shock absorber parts. We replace damaged parts.
15. Check the condition of the rubber seals. There should be no significant wear on their edges, cracks or loss of elasticity.
If any malfunctions are found, replace the oil seal housing assembly.
16. Use a screwdriver to pry up the felt seal (the seal has an oblique cut) and remove it from the housing.
17. Using a caliper or micrometer, measure the outer diameter of the support pipe.
18. Using a bore gauge, measure the internal diameter of the sliding pipe ring.
The difference between the outer diameter of the support pipe (see paragraph 17) and the inner diameter of the ring (gap) should not exceed 0.3 mm.
19. Measure the outer diameter of the ring.
20. Using a bore gauge, measure the internal diameter of the sliding pipe. The difference in diameters (see clause 19) of these parts (gap) should not exceed 0.25 mm.
In case of increased wear (increased clearances), we replace the worn parts or the fork leg assembly.
Attention!
The chrome-plated surface of the sliding pipe (mirror) must be completely smooth. In case of scuffs, nicks and other damage to the surface layer, we replace the pipe or fork leg assembly.
Assembly
1. Assemble the shock absorber in the reverse order, paying attention to the position of the rod tip pin. The pin should fit into the hole in the bottom of the sliding pipe.
To do this, rotate the shock absorber by hand, grasping the rod nuts. Only after this can you tighten the bolt with an 11 mm socket wrench.
2. We wash the felt seal in gasoline, wring it out, then soak it in engine oil, lightly wring it out again and install it in the body.
Replacing shock absorption fluid
We replace the fluid in both fork legs at the same time.
Place the motorcycle on the center stand. We take out the front wheel axle (see p. 98). It is not necessary to disconnect the brake and speedometer cables from the wheel.
1. Using a 14 mm wrench, loosen the tightening of the nuts of the coupling bolts on both sides of the upper crossmember of the fork.
2. Using a 27 mm wrench, unscrew the plugs of both shock absorbers.
3. Remove the plugs.
4. Using an 11 mm socket wrench with an extension, remove the bolts at the bottom of the sliding tube of each fork leg, placing a small container under them.
5. Remove the bolts and drain the fluid from both shock absorbers.
Attention!
Be sure to check the condition of the plastic washers on both bolts. We replace damaged washers or put sealant on the bolts.
6. Tighten the bolts.
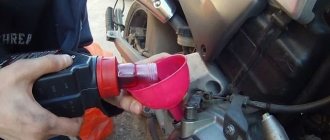
7. Pour 200 cm3 of kerosene or white spirit into the upper part of each shock absorber and tighten the plugs. We place a wooden block under the lower ends of the fork.
8. Using vigorous movements, pressing the steering wheel from top to bottom several times, pump the shock absorbers, washing them.
9. Having unscrewed the lower bolts, drain the flushing fluid (if it is very dirty, you should fill in clean fluid again and repeat the flushing).
10. We tighten the lower bolts and fill the shock absorbers with 175 cc. see fresh shock absorber fluid. As a shock absorber fluid, you can use power steering oil, automatic transmission oil (ATF) or spindle oil (AU). The first two types are preferable due to the content of anti-friction and anti-foam additives. This allows you to increase the time required to replace the fluid and reduces wear on parts. Engine oil, and especially transmission oil, is unsuitable for the front fork; it is too viscous, which will make the suspension stiff, especially in cold weather. Attention!
The shock absorbers must be filled with liquid of the same type (brand).
11. We tighten the shock absorber plugs and the nuts of the upper crossmember coupling bolts in the reverse order.
12. Check the tightness of the shock absorber. Even the slightest leak of shock absorber fluid is unacceptable! If necessary, you can “put” the lower bolts on an oil-resistant sealant, but so that the sealant particles do not get inside the shock absorber.
13. Similarly, replace the fluid in the other shock absorber.
14. After assembling and installing the telescopic fork (see above), we test its operation when the motorcycle is moving at low speed on an uneven road. The shock absorbers should move smoothly, without knocking, clicking or jamming. Damping of vibrations should occur quickly and completely, the front wheel of the motorcycle should not bounce on uneven surfaces.
Contents :: Next >>
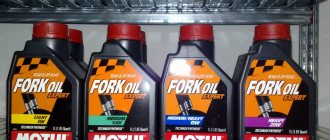
How to choose fork oil?
First of all, by its viscosity. As is known, kinematic viscosity is measured in centistokes (cSt), and represents the speed of fluid flow through a conventional tube of a certain cross-section. In practice, the dimension mm2/s is more often used. In relation to fork oils, the standards of the American Society of Automotive Engineering (SAE) apply, which relate viscosity values at a certain temperature (usually 40 °C) to the density and weight of the product. Weight in English weight; From the initial letter of this word the designations of fork oil brands are formed. So, when considering fork oils for motorcycles of brands 5W, 10W, 15 W, 20W and so on, you should remember that, for example, 10W class oil corresponds to a product with a nominal viscosity of about 10 mm2/s.
Fork oil weight is determined by an industry standard for hydraulic systems called Saybolt Seconds Universal (SSU). Unfortunately, the voluntarism of the main manufacturers often leads to confusion among the labeling of fork oils. The following correspondence of viscosity parameters was experimentally established:
| Marking | Actual viscosity value, mm2/s at 40 °C, according to ASTM D 445 for brand products | |||
| RockShox | Liqui Moly | Motul | Motorex Racing Fork Oil | |
| 5W | 16,1 | 17,2 | 18 | 15,2 |
| 10W | 33 | 29,6 | 36 | 32 |
| 15W | 43,8 | 43,9 | 57 | 46 |
| 20W | — | — | 77,9 | 68 |
How to replace fork oil?
To calibrate the oil, a much more sensitive viscosity calibration scale is used, so in practice you can get a conditional 7.5W or 8W “for yourself” by mixing ordinary industrial oils in the required proportions. For the performance of a product under specific operating conditions, it is not the viscosity value itself that is important, but the so-called viscosity index. It is usually indicated on the Saybolt Seconds Universal (SSU) scale at 100°C. Let's assume that the numbers indicated on the container read as 85/150. This means that the SSU value of the oil at 100 ºC is 85. The viscosity of the oil is then measured at 40 ºC. The second number - 150 - is a value showing the difference in flow between the two temperatures, which determines the declared viscosity index.
What does this have to do with motorcycle forks? The friction created by sliding metal parts and oil moving back and forth increases the temperature inside the assembly. The more constant the oil weight remains, the less likely it is that the fork damping will change.
Thus, it is quite possible to replace fork oil with industrial oil, combining its brands according to the operating conditions of your motorcycle.
With certain reservations, this principle can be used for other vehicles (with the exception of racing motorcycles).
Sequencing
In order to understand what kind of oil to pour into the front fork of a motorcycle, read the manual or instructions for your vehicle. This information is very important because oil can have different densities. Therefore, the denser the oil, the stiffer the fork will behave. A rigid fork transmits more vibration, making movement less comfortable. However, the main advantage is the absence of strong shock and deformation of the fork if you catch a hole at high speed.
It will be necessary to very accurately fill the oil to a certain level. There are two ways to do this correctly:
- When removing the fork, measure the former level - this only works if there are no oil leaks or deformation of the glasses;
- Fill exactly the amount indicated in the manual.
A plug that is too airy or overfilled will not function properly. In the first case, the movement of the motorcycle will fail, in the second, the reaction to unevenness will be too noticeable. It is the oil level that determines the volume of the air gap, which interacts with the road. For expensive and sports motorcycles, it is important to know what kind of oil to pour into the front fork of the motorcycle. It comes in viscosities of 2.5, 3.5 and 7.5 W. It is noteworthy that by mixing two oils of different viscosities, you can obtain a medium viscosity.
Remaining oil is removed by moving the piston up and down. If you see a significant excess of service life based on the color and contamination of the drained oil, you need to wash the internal surfaces with kerosene. Having filled in new oil to the previously determined level, you can begin reassembly.
Important! If you have already disassembled the fork, immediately check all the elements for scuffs and damage. A caring motorcyclist immediately changes all boots and seals to prevent leakage in the future, so immediately take care of the availability of spare parts. Particular attention should be paid to inspecting the bushings, which should secure the fork and not interfere with the operation of the seals. Often, a broken bushing gives freedom to oil seals and anthers, which quickly wear out. An inexperienced motorcycle owner changes boots regularly, but does not eliminate the cause of their wear.