How to clean the vacuum tap on a scooter?
Let's figure out how to clean the vacuum tap on a scooter. I would like to immediately reassure you that this process is not complicated, it is more difficult to get to it.
On some scooters it is necessary to remove a lot of trim. For example, for the Yamaha axsis I had to remove the seat and the entire upper trim. Here you will have to work hard, if you don’t want these worries, then contact the service center, and if you want to dig around yourself, then read on. After we removed the lining and got to the vacuum tap. It is necessary to drain the gasoline. He won’t just run away from the phone on his own. So we remove the gasoline supply hose from the carburetor and insert it into a clean and dry canister or bottle, we also remove the second air supply hose from the carburetor, put it in our mouth and try to suck air from it (the feeling is not pleasant, but don’t worry, gasoline is with it won't leak). Thus, due to the resulting pressure, the membrane opens the way for gasoline and almost all of it flows into the canister. After draining all the gasoline.
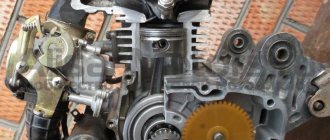
Remove the gasoline supply hose and the compression supply hose. And unscrew the two bolts that hold the vacuum valve. Unscrew it, remove it and unscrew the four bolts on the vacuum valve. We remove the cover, there we see (photo) a membrane, one spring. Carefully remove the membrane and look at the inner walls of the vacuum valve. If you see a white coating, you need to clean it well; this coating was formed from water. We thoroughly clean the vacuum valve of the scooter with gasoline and use a screwdriver to remove all deposits. Reassemble the vacuum valve in reverse order. We check the gasket between the vacuum valve and the tank for any damage.
Carefully put it back, gently tighten the bolts on the tank, if you break the threads there, you won’t have any trouble, be extremely careful. After putting the vacuum valve in place, connect the hoses. You should not immediately install the entire lining, wait, fill in gasoline, check for leaks, start it and let it run, if possible, drive it. After making sure that there are no leaks, we install the entire cladding.
Advice: put a filter on the gasoline supply hose, it will be more reliable, it is not so expensive that you can save on it. Fill with high-quality gasoline, do not use 80, Yamaha are especially picky, once you fill it up, then there will be problems with traction, it will even be difficult to start.
I think our article “how to clean the vacuum valve on a scooter” helped you solve your problem, thank you for your attention. If you decide that I missed something, write in the comments, I will be happy to read your comments.
Overheat.
Plug Type: Extremely white insulator with small black flecks and premature electrode erosion.
Consequences: loss of scooter power at high speed or under load.
Probable causes: the spark plug is not screwed in enough; The scooter's engine cooling system is not working properly; ignition of the scooter too early; The thermal range is incorrectly selected - the candle is too “hot”.
Remedy: check the torque of the scooter's spark plug; operation of the scooter engine cooling system; adjust the ignition timing; select the correct spark plug heat rating.
Type of spark plug: melted and burned central and grounding electrodes (or one of the electrodes) of the scooter spark plug; bubbling insulator with metal deposits on it.
Consequences: significant loss of scooter engine power; ignition interruptions. Continued use of such spark plugs may cause serious damage to the scooter engine.
Probable causes: thermal overload; significant overheating of spark plug parts due to glow ignition - combustion begins before a proper ignition spark appears; use of low-quality fuel; burning out of the remaining air-fuel mixture in the combustion chamber due to an incorrectly adjusted fuel system of the scooter or the ignition timing of the scooter; The thermal range is incorrectly selected - the spark plug is too “hot”.
Remedy: check the scooter engine, ignition system and fuel system, as well as the quality of the working mixture and the ignition timing of the scooter. Install new spark plugs with the correct heat rating.
Repair of a vacuum tap on a Chinese scooter Super Sport Acar
Do-it-yourself repair of a vacuum tap on a Chinese 4-stroke 50 cc scooter Super Sport Acar with a 139QMB engine
It's already March. The season is coming and it’s time to take up the scooter again (Super Sport Acar Scooter and the story of its restoration). In the fall, all that remains is to finalize the fuel system and kickstarter. On this page we will talk about the vacuum fuel tap, which did not hold gasoline and was blown out at all ends. You can just install a manual one, but the design of the vacuum faucet is still more advanced and I didn’t want to give it up, although the design of the manual faucet had also already been made. First, I disassembled the faucet. It was not made to be dismountable, but I carefully used a screwdriver to flare out the collar securing the lid, which in general was not difficult - the metal turned out to be soft, rather than brittle. It’s definitely not possible to roll it back, but I already had one thought about this.
Upon opening, as expected, the diaphragm turned out to be torn. Stores with spare parts for scooters are far away and we had to make do with improvised materials. The farm found a used diaphragm (you need gas-resistant, elastic, thin rubber) from a starter carburetor, from which I cut it to a suitable size for a vacuum tap. Next I assembled the faucet. To achieve the tightness of the structure, I made a clamp-clamp from a fairly thick corner. The compression force is adjusted with a bolt.
Tips and tricks
When performing adjustment operations, it is important to follow a number of rules:
- perform adjustments only after the engine reaches operating temperature;
- rotate the adjusting elements smoothly, observing the operation of the engine;
- Make sure there is no debris inside the fuel chamber and the jets are clean.
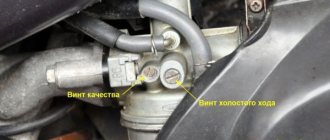
Before starting work on setting up the carburetor, you must study the operating instructions and clearly determine the location of the quality and idle screws. If you have a 150cc scooter, the carburetor adjustment is done in a similar way. After all, the process of regulating the fuel system is the same for engines of different powers.
The design of a scooter carburetor is quite simple; Once you understand it, you will be able to understand how to properly configure the carburetor so that the vehicle does not let you down in bad weather, how you can tune it and improve the performance of the engine. You will be able to control the quality of the mixture and many other processes that affect the operation and operation of the device.
Design features of the fuel valve
The principle of operation of the fuel tap of a scooter is similar to the operation of the simplest locking devices. The membrane located inside the housing, thanks to the force of the return spring, is pressed against the fuel channel and blocks it.
When the engine is running, a vacuum is formed in the intake manifold, which passes to the membrane through a rubber tube. Under the influence of vacuum, the membrane, compressing the return spring, moves back and opens the fuel channel. Gasoline begins to flow freely into the carburetor through a special fuel line.
If the engine stops running, the process occurs in the reverse order. Due to the drop in vacuum in the intake manifold, only the return spring acts on the membrane. The partition is pressed tightly against the fuel channel and shuts off the fuel supply. Gasoline does not enter the carburetor.
Thus, three tubes fit to the fuel tap:
- — one hose is designed to supply fuel from the tank;
- — another tube leads to the carburetor;
- — the third hose (air) serves to transmit vacuum from the intake manifold under the membrane.
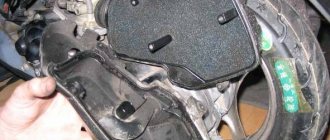
The fuel valve is mounted directly on the scooter frame and is covered by the side fairing.
Supply system
The power supply system for scooter engines includes: fuel tank, fuel tap, fuel filter, carburetor and air filter. Fuel tanks are made of high-strength plastic and can hold, depending on the model, 4.5-6 liters of gasoline.
The fuel taps for all models are automatic, requiring no action from the driver. Such valves open only when the engine starts, and when it stops they close immediately. The operation of the valve is controlled by the vacuum that occurs in the inlet pipeline. A fuel filter is inserted into the line between the tap and the carburetor, which prevents dirt from entering the carburetor.
An important detail that extends the “life” of the engine is the air filter, which also plays the role of an intake noise muffler. It consists of a housing with a cover and a foam air filter that allows repeated cleaning.
Air filter (Nexus Viper)
Air filter design:
- lid;
- foam filter element;
- partition;
- frame;
The main device of the power system is the carburetor; it prepares and accurately doses the air-fuel mixture entering the cylinder. Its design is quite complex; it includes several fuel dosing systems. Without going into details, the carburetor must supply enough gasoline to maintain an optimal ratio in all modes, approximately one part by weight of gasoline to 15 parts by weight of air. When the proportion of fuel is higher, the mixture is called rich, less - lean. Running the engine on rich mixtures increases power, while running on lean mixtures increases efficiency. However, too rich mixtures do not burn completely in the cylinder and worsen efficiency, while poor ones lead to engine overheating, flashes and pops in the carburetor, and a drop in power. In addition to the fuel metering systems, the carburetor contains a float chamber in which the float maintains the fuel level at a constant level. Otherwise, the dosage by the carburetor is violated.
Main parts of the carburetor:
- starting enrichment;
- throttle valve;
- frame;
- idle jets;
- float;
- float chamber cover;
- float chamber cover;
- main fuel jet;
Another automatic device included in the carburetor that allows the driver not to think about what to do when starting a cold engine is a starting enricher with a heating element. When starting a cold engine, the enricher shut-off needle is retracted, the fuel nozzle cross-section is completely open, and the fuel-air mixture is enriched. After starting the engine, current from the generator flows to the heating thermoelement; after a certain time, sufficient to warm up the engine, its working fluid expands and, acting on the enrichment needle, closes the fuel channel.
Checking the fuel tap
The simplicity of the crane design significantly increases its reliability. However, you need to remember that the fuel taps of the scooter cannot be repaired. This is due to the integrity of the product body, which cannot be disassembled.
To check the functionality of the faucet, you need to disconnect the hose from the carburetor and place it in any container that is at hand. Unscrew the air tube from the engine through which vacuum should be supplied. You can simply draw in air through it, and gasoline should begin to flow out of the fuel hose.
If fuel does not flow from the carburetor hose, it means the valve is clogged or faulty. It is imperative to clean the fuel filter installed on the tap. It is not recommended to blow the product with a compressor or pump; this will not give an effective result and will only increase the likelihood of serious damage to the membrane.
Application area:
- Medical institutions - prevention of iodine deficiency
- Municipal children's institutions, including: kindergartens, schools, boarding schools for mentally retarded children, orphanages, health schools - prevention of iodine deficiency, combating delayed mental and physical development.
- Private schools and kindergartens - prevention
- Private sanatoriums - prevention
- Sports schools
- Large hotels in Moscow - increasing hotel ratings
- Commercial enterprises – increasing staff efficiency
- Fitness centers
- Transnational companies in the region – increasing the physical and intellectual performance of employees
- Private cottages
- Private clients - with thyroid diseases, pregnant women, parents of frequently ill children, people suffering from various bronchopulmonary diseases, allergy sufferers, parents of newborn children, elderly people.
How to clean the vacuum tap on a scooter?
Let's figure out how to clean the vacuum tap on a scooter. I would like to immediately reassure you that this process is not complicated, it is more difficult to get to it. On some scooters it is necessary to remove a lot of trim. For example, for the Yamaha axsis I had to remove the seat and the entire upper trim. Here you will have to work hard, if you don’t want these worries, then contact the service center, and if you want to dig around yourself, then read on.
After we removed the lining and got to the vacuum tap. It is necessary to drain the gasoline. He won’t just run away from the phone on his own. So we remove the gasoline supply hose from the carburetor and insert it into a clean and dry canister or bottle, we also remove the second air supply hose from the carburetor, put it in our mouth and try to suck air from it (the feeling is not pleasant, but don’t worry, gasoline is with it won't leak). Thus, due to the resulting pressure, the membrane opens the way for gasoline and almost all of it flows into the canister. After draining all the gasoline.
Remove the gasoline supply hose and the compression supply hose. And unscrew the two bolts that hold the vacuum valve. Unscrew it, remove it and unscrew the four bolts on the vacuum valve. We remove the cover, there we see (photo) a membrane, one spring. Carefully remove the membrane and look at the inner walls of the vacuum valve. If you see a white coating, you need to clean it well; this coating was formed from water. We thoroughly clean the vacuum valve of the scooter with gasoline and use a screwdriver to remove all deposits. Reassemble the vacuum valve in reverse order. We check the gasket between the vacuum valve and the tank for any damage.
Carefully put it back, gently tighten the bolts on the tank, if you break the threads there, you won’t have any trouble, be extremely careful. After putting the vacuum valve in place, connect the hoses. You should not immediately install the entire lining, wait, fill in gasoline, check for leaks, start it and let it run, if possible, drive it. After making sure that there are no leaks, we install the entire cladding.
Comments • 50
But if I have a wels alpha zs125-12 moped, then it’s poorly written
Does that mean you have to change position every time you ride?
Yes, you can leave it open all the time, nothing bad will happen
Is this the same on all motorcycles?
I don’t understand, tell me they say differently: top reserve or bottom reserve. The arrow itself on the edges should not be up or something, if not in reserve, or something down.
I've never ridden on reserve, I'll have to try it.
Respect I was looking for this video for a long time
What to do if there is gasoline, you turn on the fuel tap and the fuel does not flow, but the reserve level is normal
How to start it after switching to reserve? Will it start immediately from the starter?
Source
Repair of a vacuum tap on a Chinese scooter Super Sport Acar
Do-it-yourself repair of a vacuum tap on a Chinese 4-stroke 50 cc scooter Super Sport Acar with a 139QMB engine
It's already March. The season is coming and it’s time to take up the scooter again (Super Sport Acar Scooter and the story of its restoration). In the fall, all that remains is to finalize the fuel system and kickstarter. On this page we will talk about the vacuum fuel tap, which did not hold gasoline and was blown out at all ends. You can just install a manual one, but the design of the vacuum faucet is still more advanced and I didn’t want to give it up, although the design of the manual faucet had also already been made. First, I disassembled the faucet. It was not made to be dismountable, but I carefully used a screwdriver to flare out the collar securing the lid, which in general was not difficult - the metal turned out to be soft, rather than brittle. It’s definitely not possible to roll it back, but I already had one thought about this.
Upon opening, as expected, the diaphragm turned out to be torn. Stores with spare parts for scooters are far away and we had to make do with improvised materials. The farm found a used diaphragm (you need gas-resistant, elastic, thin rubber) from a starter carburetor, from which I cut it to a suitable size for a vacuum tap. Next I assembled the faucet. To achieve the tightness of the structure, I made a clamp-clamp from a fairly thick corner. The compression force is adjusted with a bolt.
The design turned out to be clumsy, but this, one might say, is an experimental sample, which tests the possibility of repairing a vacuum tap with your own hands using improvised means.
When connecting the tap to the fuel system, to my surprise, the gasoline held just fine, although before installing it on the scooter, when I tried to check it by blowing with my mouth, it seemed that not everything was so tight and the tap would leak a little bit of gasoline when not working engine But to my joy, my fears were not confirmed. After several test runs of the engine, I have not yet discovered any problems with the repaired vacuum valve.
Medium and high speed tuning
Using the quality adjustment screw, the fuel proportions at idle speed are ensured. For medium and high rotation speeds, the engine operating mode is adjusted using a different method. After turning the gas handle, the fuel nozzle starts working, supplying gasoline to the diffuser. An incorrectly selected jet cross-section causes a deviation in the fuel composition, and the engine may stall when gaining power.
To ensure uninterrupted operation of the motor at a higher frequency, it is necessary to perform a number of operations:
- remove debris from internal cavities;
- set the gasoline level in the carburetor;
- adjust the operation of the fuel valve;
- check the cross-section of the jet.
The correct operation of the engine is indicated by its quick response when turning the throttle.
Design features of the fuel valve
The principle of operation of the fuel tap of a scooter is similar to the operation of the simplest locking devices. The membrane located inside the housing, thanks to the force of the return spring, is pressed against the fuel channel and blocks it.
When the engine is running, a vacuum is formed in the intake manifold, which passes to the membrane through a rubber tube. Under the influence of vacuum, the membrane, compressing the return spring, moves back and opens the fuel channel. Gasoline begins to flow freely into the carburetor through a special fuel line.
If the engine stops running, the process occurs in the reverse order. Due to the drop in vacuum in the intake manifold, only the return spring acts on the membrane. The partition is pressed tightly against the fuel channel and shuts off the fuel supply. Gasoline does not enter the carburetor.
Thus, three tubes fit to the fuel tap:
- — one hose is designed to supply fuel from the tank;
- — another tube leads to the carburetor;
- — the third hose (air) serves to transmit vacuum from the intake manifold under the membrane.
The fuel valve is mounted directly on the scooter frame and is covered by the side fairing.
How does a scooter carburetor solenoid valve work?
The starting enrichment on a 2t scooter and on a four-stroke moped works according to a fairly simple algorithm.
On a cold power unit, the spool needle occupies the upper position. It is responsible for opening the fuel channel, and the position of the damper affects the volume of supplied air. The first revolutions when starting the engine cause a vacuum inside the emulsion channel, and gasoline is sucked into the engine. The result is a highly enriched mixture, making it easier to start a cold engine. Before reaching operating temperature, the power unit needs to be fed with an enriched mixture.
The current generated by the generator of the running engine is supplied to the contacts of the heater that controls the thermoelectric valve of the intake system. Due to heating, the temperature of the powder drive increases, which causes the rod to gradually extend up to 4 mm. The force is transmitted to the pusher, which ensures the movement of the damper.
The starter enricher on a scooter works according to a fairly simple algorithm.
As the engine warms up, the spool with the needle lowers, followed by the air-fuel channel closing. After five minutes, the damper closes completely and the mixture becomes lean. Now the gasoline enrichment system on a warm engine is regulated by the carburetor.
After stopping the engine, the valve stops heating, and as a result of powder compression, the damper drive using a pusher and rod returns it to its original position. The system is ready for subsequent startup. The cooling and return process takes no more than two minutes. The enricher has a drawback - it works separately from the motor.
Checking the fuel tap
The simplicity of the crane design significantly increases its reliability. However, you need to remember that the fuel taps of the scooter cannot be repaired. This is due to the integrity of the product body, which cannot be disassembled.
To check the functionality of the faucet, you need to disconnect the hose from the carburetor and place it in any container that is at hand. Unscrew the air tube from the engine through which vacuum should be supplied. You can simply draw in air through it, and gasoline should begin to flow out of the fuel hose.
If fuel does not flow from the carburetor hose, it means the valve is clogged or faulty. It is imperative to clean the fuel filter installed on the tap. It is not recommended to blow the product with a compressor or pump; this will not give an effective result and will only increase the likelihood of serious damage to the membrane.
The principle of operation of the enrichment
Inside its plastic body there is an electric heating element through which electric current begins to flow as soon as the scooter's motor starts running. At this moment, the thermal element begins to heat up, and from its heat the capsule with a special composition is heated, which expands as the temperature rises and pushes out the enrichment needle.
When the current flow to the heating element of the enrichment unit stops, the capsule cools down and the needle rises to the upper position.
When starting a cold engine, the scooter's generator begins to produce current, and at the same moment the thermoelement of the enrichment begins to heat up, receiving current from the generator. Until the enrichment needle drops to the bottom position, the channel in the carburetor remains open for an additional portion of gasoline entering the engine, this makes it easy to start a cold engine.
But the engine should not constantly run on a rich mixture, if only because this will lead to excessive fuel consumption. In fact, with an enriched mixture, the scooter motor only works for the first few minutes, because after the motor starts working, the heating element of the enrichment heats up more and more (after all, the generator is running and current is supplied to the heating element), the needle of the enrichment gradually lowers, and blocks the path to the additional flow of gasoline, as a result of which the fuel mixture acquires a normal composition.
From this moment on, the motor can operate normally. In turn, after the engine stops, the generator stops producing current, the enricher thermoelement stops heating, it cools down, the needle rises to the upper position, and now, when starting, the enriched mixture will again be supplied to the cylinder.
How does a vacuum valve on a scooter work?
by k_petrovich » Jun 08, 2011, 10:04 am
Re: vacuum fuel tap
by Korider » Jun 08, 2011 10:36 am
Re: vacuum fuel tap
Mars » June 08, 2011, 10:50
Re: vacuum fuel tap
by k_petrovich » Jun 08, 2011, 02:37 pm
Re: vacuum fuel tap
by toofat » Jun 08, 2011 3:05 pm
200 grams per week (cold garage), carefully removed the hose with the filter and put it first into a jar and then into a canister. That's how I spent the winter. I would have already changed it, but I can’t get around to it. In the summer it doesn’t seem to “shrink” and doesn’t flow so noticeably. I attributed it to the Korean climate. So, I don’t know. maybe I was unlucky, but if possible, I would remove it from there
Re: vacuum fuel tap
by k_petrovich » Jun 08, 2011, 03:43 pm
Re: vacuum fuel tap
by toofat » Jun 08, 2011 3:52 pm
Maybe it stalls because of it, depending on how it stalls. Why new? Cut off the membrane mechanism with a hacksaw and press the pipe under the hose into it. Further along the main line, somewhere to install an on/off faucet was sold at KMZ.
Re: vacuum fuel tap
yurka73 » June 08, 2011, 15:55
Re: vacuum fuel tap
by k_petrovich » Jun 08, 2011, 6:39 pm
Re: vacuum fuel tap
yurka73 » Jun 08, 2011, 07:51 pm
Re: vacuum fuel tap
by k_petrovich » Jun 08, 2011, 08:22 pm
Re: vacuum fuel tap
RuslanRB » June 09, 2011, 08:55
Re: vacuum fuel tap
by k_petrovich » Jun 13, 2011 7:19 pm
Re: vacuum fuel tap
10021971 » June 15, 2011, 12:10
But the version about the crapness of the Hughes faucet was not confirmed?
Re: vacuum fuel tap
by Vlad » June 15, 2011, 12:26 pm
Re: vacuum fuel tap
10021971 » 15 June 2011, 17:49
Re: vacuum fuel tap
by Vlad » June 15, 2011, 6:17 pm
Re: vacuum fuel tap
10021971 » June 15, 2011, 6:31 pm
So I thought it was good that the tube fell off in my hands, and not somewhere on the road. There it was rolled up, I don’t remember how. I installed the whole thing with epoxy and now it’s reliable. It’s just that when it fell away, I was blown away by how beautiful this world is!
Re: vacuum fuel tap
by k_petrovich » June 17, 2011, 2:20 pm
Who's at the conference now?
This forum is currently viewed by: no registered users and guests: 0
Soot contamination
Type of spark plug: dry soft soot of intense black color on the insulator, electrodes and spark plug body.
Consequences: poor start of the scooter engine; poor operation of a cold scooter engine; interruptions in ignition of the air-fuel mixture; bad reaction to gas.
Probable causes: excessively rich air-fuel mixture; The scooter's air filter is very clogged; The thermal range is incorrectly selected - the candle is too “cold”.
Remedy: adjust the working mixture; adjust the cold start system of the scooter engine; change the scooter air filter; clean the spark plugs or replace them with new ones - with the correct heat rating.