It’s very strange to see only one piece of advice like: take a high-pressure washer and don’t worry, you’ll get rid of any dirt under pressure! Either such advisors have a share with manufacturers of motorcycle chains, or they ride on a cardan drive all their lives. Because people don’t always pay attention to the fact that high-pressure washing harms some parts of the motorcycle, and together with the dirt, it knocks off the oil seals and causes heat to the electrics.
I knew one combat “jixer” who, after a killer pressure wash, damaged the fuel system hose and did not notice. And since the “Jixer” was ancient, like my dreams, according to the law of universal meanness, a spark jumped along the road somewhere near the leaking flammable liquids. And then you guess... The route was truly fiery.
Washing a motorcycle is quite simple, just as easy as ruining something in it by vigorously scrubbing off the dirt. It's especially funny when aluminum parts oxidize from alkaline chemicals and life didn't prepare you for this. Yes, yes, if the cleaning chemistry is too aggressive in an alkaline environment, and you have a lot of aluminum parts, then oxidation of the surface may occur. As a result, the parts will become stained.
Let's look at the main points to consider:
- Washing conditions and sequence
- Chemicals
- Tools
- Drying the motorcycle
Do not wash your bike while the engine or exhaust pipes are still hot.
Hot metal and cold water are not the best of friends, so don't throw cold water on your bike right after a long ride; it's not the wisest thing to do. The fundamentals and basics of physics teach us that when heated, metals have the property of expanding, gradually returning to their previous sizes as they cool.
Sudden changes in temperature can cause damage to metal parts or their finish, and repairing such a stupidly ruined part can be very, very expensive.
Well, what about metal hardening many of you will ask? We answer. The process of hardening metals necessarily adheres to certain technical rules, i.e., temperature, speed and methods of hardening, as well as cooling temperature and many other factors.
Hardening or tempering of metal parts is a scientific and industrial technical process, unlike regular motorcycle washing. All the reactions that occur during the hardening process have nothing to do with the most anti-scientific approach, i.e. with how to quickly cool a hot motorcycle or car engine using cold water.
In the worst cases, the engine block can either crack or warp. The same is true for hot exhaust pipes. If you act too hastily and unscientifically, you can easily damage the coating of the pipes.
There is only one way out, you need to wait a little and let the motorcycle cool down. Saving ten minutes will not make a difference, but this time will save your bike from further and unpleasant repairs.
You need to prepare for washing your bike in advance and thoroughly.
Washing a bike, friends, is naturally not building a rocket, but... As in any other activity, you must always be ready to solve the task at hand. For a quick and high-quality result, it is most convenient and correct to have all the necessary tools and means at hand, so you can do all your work in one, as they say, time.
If it seems to you that purchasing certain and too expensive things is an unnecessary waste of money, then do not rush and think twice about it, because you will use these funds more than once, but you will achieve much more results, and even more so, what you need.
Please make sure that you have a water supply with a hose, chemicals and all the necessary car shampoos, as well as leather conditioners, clean rags and brushes at hand, including the time that you can devote to cleaning your device (bike).
If you need to quickly wash a layer of dirt off your motorcycle, that's one thing, so it can be dealt with in a few minutes. But if you really intend to restore your chrome-plated cruiser to that “just from a motorcycle dealership” state, then this procedure will take you at least half an hour, and that’s for sure.
Make sure, friends, that you have the necessary free time for this work.
Please take your time and look carefully before you start cleaning your bike to see if you have everything you need.
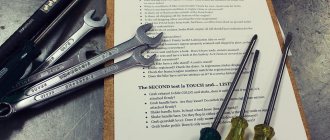
Tools
Again, the division is between a quick wash “I just need to shake off the dust” and a full-scale foam party. In the first case, you use the set that is at hand, but following the above rules. It is better to wash under pressure not point-blank, but from a distance. By the way, it is recommended to apply foam from special nozzles from bottom to top, and wash with water from top to bottom. While you go from below, the foam begins to work on the dirt, which is more at the bottom.
For complete cleaning, you should have a set of soft cloths, microfiber and a minimum of protruding lint so that it does not cling and does not leave threads. Sponges are often recommended. But they have a significant disadvantage: until you wash the foam out of the sponge, it will leave streaks on the body longer than a soft rag. Suede cloth is used for drying.
For hard-to-reach places, it is recommended to prepare brushes of different sizes.
Remember to pre-clean the chain before washing the entire motorcycle.
Motorcycles with a chain final drive require increased care and cause a lot of trouble for their owners; the chain has to be cleaned, lubricated and periodically tightened. All this is relevant for those who do not want to change sets - chain - sprocket too often, which leads to unnecessary and considerable overpayments, but why do you need them?
True, if you are a really rich guy who neglects cleaning the bike, then instead of this prevention (cleaning) you can resort to surgical methods, replacing the chain and sprocket. But few people can afford such stupid and useless waste.
Since cleaning a motorcycle chain is a really dirty job, it makes sense to start at the very beginning.
By using special means for cleaning the chain using a stiff brush, you will certainly increase your chances of high-quality cleaning without causing any damage to the pins, seals and, accordingly, the links.
Always use products specially designed for chain care, since ordinary shampoos and household chemicals will not help here; you will need stronger products.
Shock absorber and front fork maintenance
Shock absorbers are replaced:
- If liquid leaks out of it.
- If you hear characteristic creaks and knocks while driving.
- If there is a loss of vibration damping properties.
Shock absorbers cannot be repaired. It’s easier to buy a ready-made shock absorber and replace it. When replacing the shock absorber, the joints must be replaced.
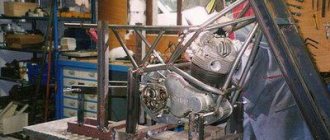
To remove the shock absorber, place the motorcycle on the center stand. Then unscrew the upper fastening bolt, followed by the lower fastening bolt. We remove the shock absorber. Installation is in the reverse order.
It is recommended to check the front shock absorbers every 5 thousand km. mileage The rear ones are replaced if fluid has leaked.
Since the front fork bears a very heavy load, it requires constant maintenance. Maintenance consists of removing dust and dirt, as well as changing the oil. The oil is exposed to pressure and high temperatures, so it needs to be changed periodically. Changing the oil in a hydraulic system is a rather complex task that requires certain skills and a large number of tools, so it is better to entrust this process to professionals. You shouldn’t buy cheap options, it may end up costing you
It is necessary to pay attention to its technical characteristics
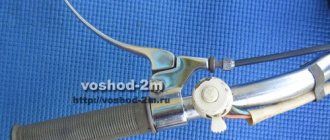
Control cables also need maintenance. To prevent them from cracking, they must be lubricated periodically. A few drops of engine oil should be poured into the cable sheath every 2 thousand km. mileage In most cases, this will prevent the cable from breaking far from home. Periodically, the cables must be removed and washed in kerosene. And then pour transmission oil into the shell. Just 5 ml of oil is enough, but every 2000 km.
Do not pressure wash the chain on your bike.
Caring for a chain is such a multifaceted and complex process that it can be the subject of a separate discussion in the next How-To, but here, friends, we will only touch on the basics. The main tenet of which you must remember well is that - Using a high pressure washer to clean the chain of your motorcycle will do the most with it, i.e. After a short period of time, you simply took it to the trash heap.
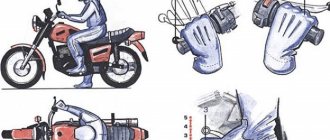
If you friends don’t know this, then you need to remember that between the metal links that make up the chain, the manufacturers inserted special tiny rubber gaskets (oil seals) into it. You have most likely already heard about such markings as: Z-rings, O-rings or X-rings. So, these same letters reflect exactly how these oil seals look in cross-section.
More important than their appearance or their name is what these rubber seals do. The pins that connect the chain links together are lubricated when the chain is assembled so that this lubricant remains in place and dirt itself does not get inside. That's what these rubber seals are used for, friends.
When using a high-pressure washer, a powerful stream of water can penetrate the space between O-rings, pins and links, thereby displacing the lubricant from the inside and driving in moisture and dirt in its place. The water that gets behind the seals will certainly evaporate after some time, but the dust itself will remain, thereby reducing the mileage of the part to a minimum.
Proper chain washing is described in our third section.
Do not wash off the stuck dirt immediately, let it soak.
If you have been riding a motorcycle for a long time or have covered a long distance on it, and after that you decide that you need to continue the ride on a clean motorcycle, then do not wash your bike right away, while washing it, allow the accumulated dirt to soak thoroughly first, this will be a good idea. idea. This is especially useful when getting rid of dead insects that have found their grave on the shiny surfaces of your bike.
Speaking of insects. It will be ten times easier to get rid of these difficult-to-remove biological contaminants with the help of special sprays that you can purchase in advance. The purpose of these sprays for easily getting rid of insect stains is the same as for fighting dirt. Apply this cleaning agent and wait a little, let it saturate this very stain, but you won’t have to scrub the stain with all your might with a sponge and then pour plenty of water on it.
The same goes for the thick layer of dirt that has formed. Pre-wet the dirty layer with water, this will make it easier to remove the dirt later without having to over-wash your motorcycle. The only thing that cannot be soaked in water are lubricants mixed with road dust and dirt that accumulate in certain areas, such as the front and rear sprockets of chain-driven motorcycles and other places where oil or fuel Gradually seep in and dust and dirt settle on them.
Use a wide range of detergents that were listed above in our article, which will help you just as they helped with cleaning the chain, which we already mentioned in the second point of our tips.
In general, today stores sell a variety of detergents in abundance, with which you can achieve good results in the shortest possible time. But dear friends, there’s no need to rush when washing your bike; it’s better to wait a little and the dirt will gradually drain off on its own.
Where to go?
And washing your bike correctly means, first of all, choosing the right place where you can do it. The most logical thing for many people is to wash their vehicles in the yard. All you need is:
- water;
- soft fabric;
- cleaning composition.
You don't even have to deliver the bike home. Therefore, the home will remain in perfect order, and there will be no need to clean up the dirt there. Drying the bicycle is possible (in good weather) in the same place where it was cleaned. But some cyclists prefer to use a garage for washing, or rather, a concrete area at the entrance to it. The bike is dried on the same site, and after drying, it is stored inside the garage or sent on a new trip, depending on the circumstances.
When traveling in nature, cyclists often encounter severe clogging of their vehicles. Sometimes dirt even blocks further movement. Therefore, you often need to wash your bike in nature, without using any devices or ready-made areas.
The hardest thing to do is wash bicycles at home. But city apartment owners don’t have much of an alternative—they have to clean their bikes in the bathroom. The procedure must be carried out with extreme care, and it will take longer than usual. And even the most tidy people then need to wash the floors. Sometimes the question may arise: is it possible to wash a bicycle at a self-service car wash?
This procedure is necessary if you have been riding your bike for a long time off-road in wet weather. Powerful high-pressure jets will remove almost all accumulated dirt.
Don't scrub too hard.
If the dirt does not want to “go away” after it has been soaked and treated with the desired composition, you will only need more patience, but not force. Using sandpaper when washing a motorcycle is categorically unacceptable, even if you want to do it for good purposes, such experiments will send you straight to the paint shop of the nearest car service center.
When washing your bike, always use a soft cloth and if you can't get everything clean, add more cleaner and wait a couple of extra minutes rather than frantically scrubbing the surface with zeal. Overzealousness will leave a permanent mark on the paintwork or chrome of your motorcycle.
An amateur, as they say, can be seen right away by his motorcycle. If faded parts stand out in the overall color or the chrome of the motorcycle sparkles in one place and is dull in another, then it is likely that the reason for this was the excessive force exerted by its owner when cleaning his bike. Needless to say, this looks unaesthetic and unsightly, and the bike itself with such defects when sold will cost much less than its real price.
Having become familiar with the key aspects of washing a motorcycle, in the continuation of this article we will offer you some additional tips, which in terms of the importance of their points are also quite important and without which this description would not be complete.
All our 11 tips will help you not only give your favorite bike an aesthetically pleasing look for a longer time, but will also help protect your motorcycle from unwanted breakdowns or other unpleasant problems.
Drying
As mentioned above, a suede cloth is suitable for drying. I like the blow gun idea. It will not always be possible to crawl into a hard-to-reach place with a rag.
Pay attention to the lubrication of the moving parts of the motorcycle after washing (is there enough now?) and the water that has accumulated in the brake pads. Don't forget to remove excess water from the nooks and crannies of the bike, as well as excess lubricant from the surface of the motorcycle chain. Otherwise, on the first trip it will splash everything around!
Do not use WD40 everywhere you can.
It would be really interesting to compare all the positive qualities of the miracle product WD40 and its negative properties, so to speak, to compile a general list of all the things destroyed and rendered unusable by this truly unique product of the chemical industry.
We will not deny that WD40 has amazing properties, but at the same time it should not be used as a remedy for all problems.
There are many examples where WD40 can actually help, but sometimes its unjustified use leads to serious damage.
Always keep in mind that it is still a “chemistry” and not water, which can interact differently with the different materials your motorcycle is made from.
It is better not to use WD40 on:
— plastic body parts;
- colors;
- stickers;
— various hoses and some rubber products.
Before using it as a magical cleaner, it is advisable and better to spray some of this WD40 on a small piece of cloth and then test it on the small part where you intend to use this product. If something goes wrong during the test exposure to WD40, stop the experiment immediately.
Naturally, you can use WD40, but very carefully, especially if other means are simply powerless against this contamination.
Chemicals
It's no secret that there are all kinds of chemistry options for any occasion. Woe to anyone who buys one thing and hopes that it will clean the whole motorcycle equally. Not the same. The aggression of alkaline chemicals on aluminum parts has already been mentioned. Thanks to the manufacturers of car shampoos, who on some lines indicate “do not wash motorcycles”, but as always, the instructions are in small print on the back. To thoroughly clean a motorcycle, you should separate the chemicals for metal parts (which are not only dirty, but may also be covered in oil), select a separate product for the motorcycle body, and pay careful attention to the seat cover. People rarely think about the seat at all, and then only when it cracks or breaks.
Chrome parts love to create problems no less than aluminum ones. The windshield and mirrors are ideally cleaned with glass cleaner.
After cleaning, polishes are often used. If the seat is leather or made of delicate fabric that will require attention, it is also treated.
Do not trust “super remedies” unconditionally.
In a sense, point 8 (eighth) in our article is similar to point No. 7, since it says the same thing, namely, there are no magic remedies in the world for everything and for everything. When they start telling you the opposite, then run away from such a person, and run and don’t look back! He won't teach you anything good.
There is no need to confuse effective means with pseudo-effective ones. You can achieve a good result faster and easier, but it’s simply impossible to do it instantly!
Always be consistent.
By acting in accordance with a thoughtful and reasonable plan when washing your bike, you will significantly reduce the time of this operation and thereby create an effective workflow for yourself.
Start cleaning the bike with the most dirty parts and gradually move on to the rest of it, i.e. not to such dirty areas. Your productivity will increase many times over.
Don't get carried away with pressure washing.
High pressure washers like Karcher are definitely much more convenient when it comes to cleaning motorcycles. They are these Karchers, much more productive than a garden hose, with such sinks all the work will be done much faster.
But nevertheless, friends, there are pitfalls here too. Setting your washer to the highest setting is not always a good idea. As with a chain, water pressure can cause serious damage to your motorcycle.
Dirt can get stuck behind the O-rings and damage them, and paint under the pressure of water can begin to peel off and fly off; even a leather seat can be pierced through by a jet of water if you bring the nozzle close enough to it and turn the washer on at maximum.
It is better to be extremely careful and take your time, thereby setting the device to medium or minimum pressure.
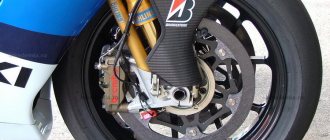
Brake system care
With prolonged use, dirt, dust, and oil residues may accumulate on the brake system elements. All this poses a threat to driver safety. This system must be thoroughly cleaned at least once a year. Also, do not forget about the brake fluid and maintain a constant level. Brake fluid is changed once a season. The level can be checked in the expansion tank window.
The brake system should be checked immediately after purchasing the vehicle and every year before the start of the season. The main element of the braking system is the brake disc. The most common problem is wear and tear. To determine the level of wear, the center of the disc is measured with a caliper.
The wear limit is 3 mm. The disc must be smooth and free of longitudinal waves, otherwise the brake pads will wear out very quickly. Pads are consumables. The minimum thickness of the friction layer is 0.8 mm.
If this value is less, the metal base of the pads will begin to wear off. Replacement of pads should be carried out carefully so as not to confuse the left with the right. The process of replacing pads is simple. Just unscrew the bolt on the side and lift the caliper up.
It is also necessary to monitor the condition of the brake hose. The most common cause is aging and stretching. This can be easily checked by pressing the brakes. If the pedal goes very deep, the hose must be replaced.
Be mindful of sensitive parts of the motorcycle.
Water, in contact with spare parts that may be installed on a motorcycle, can have the opposite effect. Suede and leather can suffer from moisture, and it is better not to fill the electrical accessories themselves with water at all, as this can lead to their failure.
To prevent this from happening, protect them from direct exposure to water. If necessary, wipe them with a damp but not wet cloth. This way you will protect the most moisture-sensitive parts of your motorcycle.
See also: How to prepare a motorcycle for winter
After the final rinse, let the motorcycle dry thoroughly, wipe it with a dry soft cloth and let it dry in the shade.
After all the procedures have been completed, check for scratches and damage on the motorcycle. If they are not there, then everything went without problems, you can rub the motorcycle with protective pastes and go on the road. Good luck to you friends!
Brakes
The most important thing for a motorcycle is the braking system, since the safety of the driver depends on it - if the car has a handbrake with a cable drive or electromagnetic control, then this luxury is absent here. The brake fluid is changed once a year - after changing it, you must bleed the hydraulic circuit to release air that impairs the performance of the system
It is better not to skimp on brake fluid for a motorcycle, since its quality also directly affects human safety. Every month it is worth checking the condition of the brake hoses - they should not be cracked or stretched. It is quite easy to find out that it is time to change the hoses - if they are worn excessively, the pedal will fail, and the pads will begin to close with the disc at the very end of its stroke.
The brake disc on a motorcycle is subject to very heavy wear; it is advisable to check its thickness with a caliper every month. The same applies to the pads - their linings should prevent metal-to-metal friction, which can quickly destroy the entire braking system of the motorcycle. Parts should be replaced if the thickness of the disc is 3 millimeters or less, and the lining on the pads is 0.8 mm.