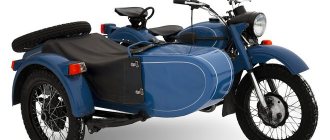
“There are two ways to get the legendary boxer with a sidecar: buy a new one from a dealer of the Irbit motorcycle plant or restore some old device that has been preserved in good shape in that same grandfather’s garage.
This summer, the newly-minted owner of the Ural approached us, choosing the painstaking but noble path of restoration. The task was set: to make the seats of the passenger and driver more comfortable, to restore (and in fact, to make again) the chair in the stroller and to sew a new cover for it.
And so that quickly and without unnecessary expenses - after all, this is a restoration, not a custom build. Therefore, we save the budget and act as quickly as possible.
To begin with, we decided to deal with the driver and passenger seats.
Obviously, they are not very comfortable, so it was decided to install several layers of foam rubber in them and make the same soft covers.
Let's try on the volume and type of foam that will soften the seat to a fairly comfortable level:
We immediately decided not to limit ourselves to the outer layer and additionally install several sheets of denser foam rubber directly into the rubber structure. This will make the seat even softer and more comfortable. Shock-absorbing properties should also improve.
Having dealt with the foam rubber, we cut out a rough version of the cover.
A draft is needed in order to understand how the material will behave. In addition, you need to understand the case fastening system. A live model will give you a better look at all the pitfalls and take into account the design features when sewing the final, finishing version.
We cut, sew, try on the seat:
For a sample it turns out quite well. The question arose about fastening. Unfortunately, the design engineers did not provide a system for attaching the cover to the seat frame. It would have been possible to install it with metal rivets, but this solution was abandoned in order not to make major changes to the appearance.
We chose a simpler and more aesthetic way - to secure the cover using a lacing system.
We install the eyelets and figure out the weaving pattern:
The thread allows you to understand the length of the lace that will be needed in order to firmly secure the case.
Having been satisfied with the test sample, we confidently proceed to the final product.
The appearance of the cover was previously agreed upon with the customer.
There was also an option with buttons, but after some consideration, we realized that this could affect comfort. Therefore, it was abandoned in favor of stitching.
The option chosen was one with decorative square stitching and highlighting the contour of the contact patch.
We prepare the patterns and cut the cover:
We cut, sew, stretch on the seat and in the end we get the following result:
The seat has become moderately plump and soft - the driver and passenger will definitely appreciate this.
On one side, the seat began to look like an airfield cap, which was once popular among Georgians.
And on the other - on a rugby ball.
Satisfied with the result, we take the finished seats (and we have two of them - driver and passenger) and head to the workshop where the motorcycle is being prepared.
Let's see how they will look installed.
Seats
Initially, this motorcycle had the original separate Ural seats, which were not particularly comfortable. And sometimes you have to drive for several hours along overgrown or washed-out forest roads, or even completely off-road. Therefore, it was decided to install a more comfortable seat on the Ural motorcycle. The choice fell on seats from the Gazelle (minibus), which cost only 400 rubles for 2 pieces at a car dismantling station. The passenger seat was four bolted onto the rear fender without modification. I had to tinker a little with the driver's license.
Seats from Gazelle to the Urals
At first there was an idea to put a backrest for both the driver and the passenger. But in this case, boarding the passenger was much more complicated, and sitting was not very comfortable: the driver’s backrest was in the way, so we had to abandon it. In the end, only the seat cushion was installed, the front of which was pre-narrowed for a more comfortable fit.
Driver's seat in the Urals
Of course, it would be possible to do without a passenger backrest, but with it it is much more comfortable for the passenger, especially on long trips. In addition, fishing rods, a shovel and a bag with a metal detector are attached to the back using straps. It turns out that this DIY motorcycle backrest not only adds comfort, but is also very useful from a practical point of view.
Attaching luggage to the backrest
Restoring the Ural: reupholstering the seats: One comment
Thank you, very interesting and useful information, I will follow your advice.
A good saddle is the basis for a comfortable motorcycle ride. And on a custom, the saddle (as well as other design elements) emphasizes the style of the motorcycle. Therefore, the manufacture of the saddle must be treated with care. First of all, you need to have a clear idea of what to make.
It is necessary to install the saddle when the tank and rear fender are finally placed on the homemade product. It is also necessary to install the pedal assemblies. It is the placement of these components (i.e. footpegs + controls), the shape and position of the saddle that determine the comfort of riding a motorcycle.
Saddle designs vary greatly. And almost everything can be repeated in “garage” conditions. For devices designed in the “old school” style, a good solution would be to use standard rubber separate saddles “Uralov” and “Dneprov”.
Let's look at the most common saddle design. This is a saddle with a metal frame and a soft element made of foam rubber or latex.
Such designs are used on almost all production motorcycles in the “Custom” style. However, it is worth noting that often the base of the saddle is made of plastic, and exclusively molded foam rubber is used as an elastic element. Whereas latex has much better quality. A saddle with such an element, with good softness, is never pressed down to the base. Sheet latex is very expensive and is practically not available for sale, including in specialized furniture stores. Since even for expensive sofas they now use cheaper foam rubber. The question arises: where to get this material?
Latex was used in the saddles of Dnepr and Ural motorcycles, as well as in car seats until approximately 1995. That is, if you do not have an old motorcycle saddle in good condition, you will have to go to the dismantling of “Muscovites”, “Zhiguli” or “Zaporozhtsev”. For one large new two-seater motorcycle saddle you need about one and a half old motorcycle saddles or one car saddle.
Also a good material for saddles is the material used in gymnastics mats. They can be purchased at sports stores and are very expensive. This material consists of particles of foam rubber, latex and microporous rubber pressed into one sheet.
So, you have the material and now you can start making the metal frame of the future saddle. For this, sheet steel with a thickness of at least 1.5 mm is used. Thinner metal may sag or even bend when tightened.
The saddle frame must have a flange for gluing the covering material and must have a number of holes for air outlet.
Trunk
For forays into nature, a trunk on a Ural motorcycle is vital. The luggage compartment is a plastic toolbox attached to the back of the rear seat and to the bottom of the handle (which is near the taillight). Plus, using the straps, you can attach a bag with a metal detector or other luggage to the backrest. In the future I plan to install additional panniers on the Ural under the rear seat.
Trunk from a box
Customizing
Continuation of the story about the restoration of the IMZ "Ural" motorcycle.
This part is devoted to working with the stroller, or more precisely, restoring the passenger seat in the cradle. As mentioned earlier, the main task set by the owner as part of the restoration of the Ural was to make a new seat for the stroller. To do this, it was necessary first of all to disassemble the old seat, take the original dimensions and try to take into account all the design and fastening features...
In this form, we saw the factory cradle passenger seat, consisting of two cushions with a plywood base. Inside each there is a spring, no different from those that were installed in almost all Soviet upholstered furniture, including mattresses and household sofas.
For softness, the pillows were stuffed with technical wool, stitched to a piece of burlap. The insides have accumulated a huge amount of dirt and dust, and have already begun to rot.
We disassemble the pillows and study the design of the plywood base. The spring is secured with the help of chains, which in appearance resemble toilet chains (the flush handle was usually hung on these).
We are getting rid of the aforementioned springs and retaining chains, since in the new version of the stroller seat we will use foam rubber. It will provide sufficient softness and save several centimeters of volume in the stroller.
Using the measurements taken, we draw mock-ups of the bases and make new ones from 6 mm thick plywood.
We provide holes that are needed in order to fasten the layers of foam rubber and subsequently mount the seat in the cradle.
We prepare a “sandwich” from foam rubber. The main, bottom layer is dense and elastic foam rubber made from recycled materials (the so-called recycled foam rubber), the top layer is softer, “thirty-fifth”, for passenger comfort.
We assemble the resulting foam rubber “sandwich”, attach it to the base and wrap it with film...
... to go from the resulting structures to the workshop, where work on the restoration of the Urals is in full swing.
Meanwhile, the cradle has already been painted and is ready to accept the seat. Let's try it on.
Due to the fact that the new seat was created according to the original dimensions, it fits perfectly into the cradle. This means you can start working on the case.
In the process of thinking about the appearance of the new seat, photographs of various design solutions were studied. As the main reference, we chose one of the options that we liked the most. We look at the buttons that the owner liked:
We draw sketches, estimate the sizes and placement of buttons and send them to the customer for approval of the working version:
The buttons will help tighten the surface of the cover evenly and give the seat an original appearance.
Next, we cut and sew the covers, and also prepare the buttons.
Having selected plastic buttons of the required size, we cover each one with leatherette - they will “work” on the front side of the seat.
We try on the covers with the buttons installed.
Before pulling the cover on, we think over the system for attaching the buttons to the base. We mark the attachment points, after which we pass a nylon cable through the layers of foam rubber and fasten it on the reverse side using pins.
We also mark four bolts for installation - they will go through the plywood base. With their help, the seat will be fixed in the stroller.
We attach plywood bases, stretch and shoot the cover.
Test sessions on the new chair were successful. The chair turned out to be quite soft and moderately elastic.
Once again we go to the workshop and try on the finished seat to mark the holes for mounting the chair to the stroller.
At this point, the work with the seat can be considered complete! We give everything to the masters who work on the motorcycle, and a few days later we go to look at the result:
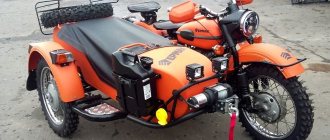
General view with the new chair and seats.
The stroller is covered with a new cover.
The chair is larger.
New seats, which were discussed in the previous post
Lacing used to attach seat covers
Photo with near-zero mileage for memory
In total, all the work - from developing sketches to the final photography - took about 1.5 months.
Special thanks to the master mechanics who put the motorcycle on wheels, and of course to the owner for his dedication, patience and creative cooperation!
Protection
We won’t dwell on plastic hand protection; You can buy it in any place where Ural spare parts are sold. Let’s take a closer look at the peculiar safety arc. In general, roll bars on a Ural motorcycle are not particularly needed when driving off-road, but it’s still better with them.
Safety bars in the Urals
This arch was made from a metal bed frame, to which 4 bolts were welded for fastening to the frame. The arc performs the following functions: - makes the fall softer (although it may bend); - protects against tall grass and bushes that it crushes under itself; - can be used to install additional headlights (although they should be installed higher); - serves as an excellent support for mounting the motorcycle near a tree or on a homemade side stand. By the way, the homemade side stand is a durable bent Z-shaped tube.
Safety bar
Muffler
The original muffler, in my opinion, strongly “chokes” the engine, so it was decided to replace it with a homemade one. Of course, it was possible to install a direct flow or do without a muffler altogether, but why tire yourself with a loud exhaust and attract unnecessary attention to yourself. Making a homemade muffler for a Ural motorcycle is quite easy if you have a welding machine and pipes of different diameters. It is better to take thick-walled pipes, otherwise, due to resonance, the effect may be exactly the opposite.
Homemade muffler for Ural motorcycle
This muffler for the Ural motorcycle consists of two pipes, one of which is located inside the other. The exhaust gases first enter the inner pipe, which is welded on the reverse side and has many holes along its entire length. Through these holes, the smoke passes into the outer, and then into the last, downward-curved pipe. The sound is quite quiet and pleasant, and when crossing a ford, when the muffler is under water, gurgling is heard.
Exhaust pipe
Improved technical characteristics
The surface of domestically produced engines has many roughnesses. To make the surface smooth, you need to stock up on a file, felt, sandpaper and patience. You can speed up the polishing process by using drill attachments with felt wheels.
Despite the fact that the Ural has impressive power, the owners still strive to improve the performance of their “iron horse”. In order to tune the engine of a Ural motorcycle, you should:
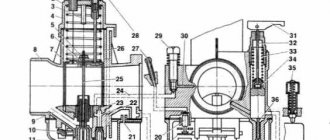
- clean the cylinder head channels;
- replace the original carburetor with the K-301B model;
- install two air filters, parts from Moskvich-412 or GAZ-24 are suitable;
- adjust the synchronization of the carburetor;
- diagnose the correct ignition setting for each cylinder, the advance should be from 40° to 42°.
If everything is done correctly at all stages, engine power will increase to 42 horsepower. Engine power can only be increased in new models or motorcycles that have undergone major overhauls. When tuning an old engine, there is a danger of damaging it.
Installing a homemade muffler will result in failure to pass the scheduled technical inspection .
Tuning a Ural motorcycle requires a lot of time and effort, but the result is definitely worth it. A stylish retro-style motorcycle, customized to suit you personally, is a great option for urban conditions.
Painting
In order to make the motorcycle less noticeable in the forest, khaki paint was chosen, which was used in 2 cans. As you can see in the photo, there wasn't enough paint. Painting a Ural motorcycle from a spray can is a simple and interesting process. First you need to clean the surface from dirt, treat it with sandpaper (so that the fresh paint sticks better) and degrease it with gasoline. After this you can paint. The paint, which costs about 170 rubles per can, dries within a couple of hours.
Ural khaki