Many modern motorcycles are replete with plastic panels; they are needed to create a complete appearance of the bike, improve aerodynamics and protect important components. In order to protect these parts from damage, modern polymers are made flexible and shock-resistant, but even this does not save the motorcycle from falls and accidents. In such cases, the manufacturer offers to replace the part with a new one, which costs a lot of money. We have prepared several affordable options for making plastic for a motorcycle with your own hands.
Yamaha XJ900 1996 → Flood about repairs Sabotage part 3, short and without pictures
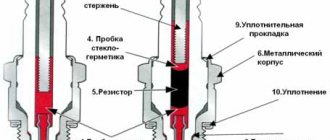
1. I came across the problem of selecting an oil seal. On the side where the speedometer cable is attached, a 45x56x6 oil seal is used, 4 days of searching did not yield any results. How I decided to get out of the situation: I managed to remove the cuff itself carefully without damaging it, the cuff is not yet oak, it looks like it. The only thing that was damaged was the spring that presses the rubber side of the cuff against the shaft. Well, I bought a donor oil seal with an internal diameter of 45 mm for 15 rubles and the spring from it was moved to the old oil seal. It turned out okay) 2. The epoxy glue did not harden properly, either I mixed something incorrectly, or the temperature is too low for the epoxy to harden. The glue froze into a soft, white, opaque mass and that’s it. I made a box out of cardboard and directed a fan heater into it, after 10 minutes the glue became transparent and soft, I left it like that overnight, today I’ll see what happened. What are your opinions, brothers and sisters?
Soldering with chemical solvents
Connecting the edges of plastic parts using the presented method involves wetting the material with a solvent. After some time, the polymers begin to swell and acquire a viscous structure. In conclusion, it is enough to join the elements and hold them under pressure for some time until the seam hardens. The connections gain strength after several hours. To speed up the process, slight heating is allowed on the surface, which promotes accelerated evaporation of the solvent from the structure of the material.
Partially crystalline plastics are resistant to chemical solvents. Therefore, soldering using the presented method will be ineffective here. Most often, the method is used when it is necessary to process products made from amorphous thermoplastics.
The use of solvents is a relatively inexpensive way to process plastic parts. However, it is recommended to resort to it only in extreme cases when it is not possible to use a specialized tool. Because solvents are overwhelmingly toxic, and their fumes are harmful to health.
Honda CB750F2 1996 → Restoring plastic fasteners
Greetings! Some experience in repairing side plastic struts. In my case, the upper mushroom stand on the left side plastic was missing. In a VK group dedicated to Cb750, one participant suggested making a silicone impression of the stand on the other side. Then pour epoxy into this mold. And only then in place of the missing stand. I found this idea difficult for some reasons: - I have no experience in creating silicone molds. — I don’t know what and where to buy materials. — Epoxy is brittle and is more likely to break under loads and vibration. — Many stages and their complexity. I decided to make such a stand using a 3D printer from the same ABS plastic and glue it with dichloroethane or acetone. In the online editor I made a model of the fungus based on the approximate dimensions on the other side. I found a company in my city that prints on a 3D printer. One such stand cost 100 rubles. Below the cut there are more details.
Most common problems
The more plastic there is on a motorcycle, the more expensive it is, the more expenses and problems the owner will have. Plastic for Chinese motorcycles can be purchased in good condition, used or new, but it is not always possible to quickly select suitable parts for a specific model. Replacing and installing new components will not take much time; more effort will be spent on finding good deals.
The cause of damage may be:
- An accident - serious or not, large-scale or not, the main thing is that the motorcyclist is not injured;
- Loss of control on the highway, resulting in the motorcycle falling and sliding on the asphalt;
- Performing tricks, complex figures, jumping - hitting the ground, pillars tangentially;
- Sports events - plastic for a motocross motorcycle is always in demand due to frequent damage and extreme riding conditions;
- Falling of a parked motorcycle, including in a garage. It's an unpleasant thing.
DIY motorcycle plastic repair
The modern design of ATVs, motorcycles and scooters contains a large number of plastic parts. Their purpose differs for different types of vehicles. For example, sports plastic is installed on a motorcycle in order to improve its aerodynamic properties and handling, and for ATVs, plastic becomes an inexpensive and functional element that is easy to repair.
Unfortunately, motorcycles tend to fall over. The question is not if this will happen, but when. You can injure your bike at high speed, while driving around the city, or even in your own garage. Restoring motorcycle plastic is not a very complicated procedure that allows you to reduce the cost of maintaining and repairing your bike.
In any case, the health and life of a motorcyclist are more expensive than iron and polymers, and if you want to preserve the condition of the motorcycle along with them, you should not accelerate to prohibitive speeds and be childish, unnecessarily exposing yourself to risk.
Soldering with a specialized welding machine
A soldering iron for plastic is a kind of “iron” that contains special holes for pipes of various diameters. The edges of the latter are placed in the appropriate openings, after which they are heated to melting temperature. Soldering plastic using the machine is performed in the following sequence:
- The evenly cut end of the pipe is inserted into the heating sleeve. The device is connected to the mains. The metal surfaces of the unit are heated to the required temperature. Next, the edges of the plastic pipes are melted.
- After the material has softened, the pipes are abruptly removed from the connectors and connected to each other in fittings. In this case, a noticeable influx of molten material should form at the junction of the edges.
- Before heat treatment of the edges of the next pipes, the welding machine is thoroughly cleaned of any remaining frozen material.
Types of equipment
Next, we will discuss the existing technology, analyze its advantages, and what plastic it is suitable for.
Handheld welding gun
The most common device due to its simplicity is a manual welding gun for soldering plastics. The ergonomics of devices of different brands are different, as is the power.
Well-known factories put higher prices on hair dryers, but you can find them cheaper on Chinese websites and domestic markets. But in any case, the principle of their operation is unchanged. They melt the solder and the edges of the elements, connecting them together with a continuous seam.
This device got its name because of its similarity to a regular household hair dryer. The only difference between them is temperature. The welding gun creates a temperature voltage of up to 500 degrees.
Step-by-step instruction
Before starting work, prepare:
- It is necessary to remove the plastic part and conveniently place it on the table for future soldering;
- Find a soldering iron with power adjustment, preferably a powerful one;
- Test the operation of the soldering iron on a piece of plastic (many people have fragments or pieces of plastic, for example, from a previous body kit);
- Clean the soldering area with a grinder or sandpaper so that there is no debris, paint residue, or chips left there;
Next, a metal mesh, quite strong but elastic, is applied to the plastic. The soldering iron is placed on top and heating begins. You should be able to fuse the metal structure into the plastic so that the part is securely fixed.
Be careful and attentive, because there will be no second chance. If the body kit “walks”, it is necessary to fix it on the machine with a clamp or at least with electrical tape or tape.
There is another method that is often used by more experienced plastic restoration specialists for motorcycles of any type - soldering with a jet of hot air. The essence of the method is to weld plastic using a hair dryer and a special nozzle. This results in a monolithic joint, a diffusion type of welding and a reliable connection.
You can repair plastic on a motorcycle with your own hands using special kits and mixtures for gluing, but the quality of processing and their price cast doubt on the feasibility of such processing.
Recovery methods
The two most commonly used methods for restoring minor damage to plastic are gluing or soldering. Gluing is done with epoxy resin, polymer and synthetic compounds. The hope that a tube of ordinary glue will correct the situation evaporates after the first attempts.
The fact is that while driving a motorcycle encounters a large number of factors affecting the plastic. This includes a headwind, engine vibration, vibration of the entire body due to surface unevenness, mechanical damage from gravel, and pieces of dirt.
Repairing the plastic of a motorcycle with glue also involves the use of fiberglass. The main task is not only to eliminate the breakage site, but also to reinforce the breakage site of the base material, making it flexible and ductile.
The same applies, by the way, to soldering plastic with a soldering iron, only a fine mesh stainless steel mesh is used as a reinforcing base. Gluing usually occurs from the inside. Aerobatics masters manage to make a special groove for fiberglass with a grinder or sandpaper, so that later, after puttying, an ideal surface remains.
In this case, the painting of the motorcycle plastic will be even, smooth, without visible flaws. However, the owner cannot be insured against the appearance of a crack or chipping of the new coating. The solution is to attach a sticker or a fashionable label, which is often used by novice bikers.
Soldering is the level of reliability that can be achieved as much as possible when working with plastic on motocross and sports motorcycles. Of course, this type of work will not prevent cracks from appearing under a strong impact, but if you want to save money and have a couple of extra hours of free time, you can try it. A common mistake is trying to do everything “in a hurry” without following technology.
The boots used are usually very powerful, and the stainless steel mesh is very rigid. The result is poor-quality soldering, seams filled with burnt plastic and the same tear as when using fiberglass.
What is the best way to solder plastic car bumpers?
Good afternoon everyone, in order, if you are not a professional solderer, a regular soldering iron of 100-150 watts will do, push the tip as far as possible into the inside of the soldering iron, a reach of 1.5-2 cm is enough, sharpen the tip to 60-70 degrees,
we prepare the bumper - we connect the two burst parts end-to-end (DO NOT REMOVE the chamfer), use a soldering iron to make a couple or three spot solderings and immediately cool them with a wet rag (under the soldering there is - at one point you make a kind of ditch with a sting and fill it - smooth it with what has come out on the sides)
then go along the entire length of the seam with a soldering iron like a plow, about half the thickness of the plastic - you get a good and necessary chamfer that has climbed up the sides, carefully cut it off with a stationery knife or a shoemaker's knife
We clean the outer paint in the area of the seam down to about a centimeter of plastic on the sides (a grinder with a circle covered with segments of 100-120 grain sandpaper will do) while removing the paint, do not overheat the plastic, that is, with light touches, although it is better not to do this, since then you will have to clean the seam anyway after soldering
preparation of electrodes (should have been put at the beginning of the entire list) we determine the type of plastic, usually all automotive plastic has a marking (somewhere inside) as a rule it is ABC or PP; all additions to these brands like PPEV, etc. are unlikely to interfere with the process and further operation :) BUT on each the bumper has additional stiffening ribs, or lower edges invisible to the eye, from which if you cut about 1-0.5 cm into electrodes, no one will notice if you are careful (like that: wink:)))), so, yeah, electrode,
the strip should have a cross-section of about 5 * 2 mm, the length is arbitrary, by the way, check whether the plastic fits easily on an invisible part, solder the tip of the electrode, cool it down (required), try to tear it off if it holds tightly, then THAT!!!!
soldering, we adjust the tip flat to the chamfer and with our left hand we attach the electrode to the upper part of the tip, warm it up, and slowly and at the same time we guide ourselves, allowing the electrode and plastic to warm up so that after the passage of the electrode there remains a seam approximately flush with the surface of the plastic, ALWAYS make the first seam from the outside since it is easier to control the profile of the surface, we turn the product with a crack: wink:)) we repeat the same operations and here with one basin of the end of the seams at the ends we additionally go through transverse passes of about 3-2.5 cm, pre-FLARES!! To avoid cutting the main seam (THESE POTTACKS HAVE MORE THAN TIMES SAVED CARELESS PAINTERS WHO OVERHEATED THE BUMPER AFTER PAINTING WHILE DRYING)
And never put in shit like mesh, wire or any kind of glue, remember once this bumper or something may come back to work again after another ugh-ugh accident, then you will scratch the top of your head and remember someone’s mother :)))
If anything is not clear, write, I’ll tell you everything, I’ll give you a hint, because I worked for 5 years as a bumper painter and a car painter
FUUUUUUUUUUUUUUUUUUUUUUUUUUUUUUUUUUUUUUUUUUUUUUUUUUUUUUUUU
What can you do if the plastic on your bike is damaged?
It happens that by dropping a motorcycle or accidentally catching it somewhere, we can damage the plastic on it (lining or something like that). So what should we do? Buying a new one nowadays is quite expensive, especially if the motorcycle is quite serious and popular, unless of course you are a tycoon!)))) You can’t always draw a used one either, or they will slip you some kind of garbage (this happens too)! Then the only option left is the folk method, if the damage is minor - glue it together!
Now, of course, there are enough workshops that do this, but what to do if it’s a little expensive or there’s no suitable garage with smart guys nearby!? Glue it yourself!
But this process is painstaking and you need to be well prepared so as not to create a whitebird! Because in most cases, nothing meaningful comes of these attempts at handicrafts. After all, what is sold in the nearest auto store with advertising; “Glues everything”, as a rule, only glues well fingers stained with this composition. “Professional” adhesives require a professional attitude, and they are not cheap. When the next sticky mass has demonstrated its failure, and the lining has fallen apart again, you can give up and wipe it off. The remaining plastic is thrown away, and the motorcycle turns into Naked - naked, or is waiting for new plastic (that is, when the grannies get ready for it))))))
It's a pity? And how! But the plastic could have been saved. Typically, the lining is made of thermoplastic plastic. This means that it can be melted, and when it hardens, all its strength properties will return to it. Moreover, it can be melted many times.
Motorcycle linings are made from different types of plastic, the solder must be from the same material. The most common ones are PP (polypropylene), ABS and RA (polyamide). On Yamaha Rl, R6, Honda Fireblade, for example, the “faces” are made of ABS, and the sides and bottom part, subject to strong heating, are made of PA. Critical parts that are exposed to high temperatures are not made from PP. Solid and heat-resistant RA is also used to make cooling system radiator tanks and various linings, for example, under a chain shoe.
Determining the type of material to be welded is important not only for the correct choice of solder. The melting points of different plastics are different, and the maximum temperatures to which they can be heated are also different (see table). When overheated, they begin to boil or decompose, and the weld becomes porous, interspersed with decomposition products. You can’t even dream about the strength of such a seam. If, on the contrary, it is underheated, the material will not be welded, but will seem to stick together - the strength of the seam will again be “not the same.”
Due to the strict temperature limits, it is impossible to reliably weld plastic with a conventional soldering iron: the temperature of its tip, as a rule, is much higher than necessary, and because of this, plastic decomposition products accumulate on the tip. They will inevitably get into the seam and reduce its strength. Then use a special hairdryer that warms up the parts with a stream of hot air.
1. A machine for welding plastic - the same hair dryer (in the photo above), designed for long-term operation.
The air temperature is regulated within 200-600*C. Air flow - 1-4 l/s. The rotation of the drill spindle (pictured below) can be varied from 3 to 10 thousand rpm. Plastic solder rods are sold at hardware stores. 2. Before welding, the pieces of plastic must be secured so that they do not move relative to each other. The most convenient way to do this is with spring-loaded clamps, similar to large and powerful clothespins. When welding, you need to tilt the rod at an angle of 45′ and press it towards the seam with a force of about two kilograms. Direct the flow of hot air more towards the solder rod.
3. It is better to clean the welding seam on one side - then it will be stronger. For finishing work, the drill should only be used by those who have already acquired the appropriate skills. For beginners, it is better to use a file.
Welding happens like this. First of all, warm up the hairdryer for 10-15 minutes so that the temperature of the hot air stabilizes. In the meantime, you put together the whole “picture” from the wreckage. The easiest way to secure them in the desired position is with special clamps-clothespins (as shown in the photo). Along the future seam, parts need to be cleared of paint - otherwise it will penetrate into the seam and impair its strength. When welding, it is important to heat the thin plastic and thick solder rod evenly. If the fairing parts heat up faster, the weld will sag and the resulting hole will be difficult to fix. To facilitate the initial stage of welding, you need to sharpen the end of the rod. The heating speed can be adjusted by the air flow rate. When welding, you need to tilt the rod at an angle of 45″ and press it towards the seam with a force of about two kilograms.
The upper and lower “muzzles” are ready - now you can connect them. When the welding is completed and the part has cooled, the seam is cleaned.
It is easiest to file flat and convex areas with a regular metal file. It is better to take a new one - one that has never been used to process the metal. Cutting slippery plastic is much easier with fresh cutting edges. To clean the seam in the recesses, you will need a drill with metal cutters. Files and cutters clog quickly and need to be cleaned periodically with a wire brush. If seam defects are revealed during filing, they need to be cut out with a thin bur and the area must be “boiled” again. Before painting, the part must have a smooth and clean surface, otherwise the painter will have to level it with putty, and this is no longer great: what if it bounces off due to vibration? It is better to clean the seam only from the outside. A seam that is cleaned on only one side will be stronger. And also, as an option for cheap plastic from an inexpensive motorcycle/scooter: I took epoxy resin and a regular bandage! Cover the bandage with resin and apply it to the plastic (from the inside and in those places where it definitely won’t be noticed) with several balls! Then place it on a flat surface, horizontally if possible, and let it cool! When everything has set on the outside, cut a small groove along the seam itself and coat it with the same resin! then clean and paint! But, again, I repeat, it is only suitable for something inexpensive and in places where there is not strong vibration and pressure on the plastic! I had gut on my scooter (I glued the muzzle on), so I sold it!
Soldering using a gas torch
Do-it-yourself plastic soldering can be done with heated gas emanating from the burner nozzle. Nitrogen, carbon dioxide, and argon can serve as refueling here. The choice of the type of gaseous substance depends on the characteristics of the plastic that will be melted. As practice shows, the most durable connections using the thermal method of joining plastic parts can be obtained by heating the material with argon or nitrogen. The presented soldering technology allows work to be performed with or without additives. In the first case, a plastic rod with a diameter of no more than 6 mm is used, the melting of which makes it possible to create a fairly thin, neat, but at the same time durable seam. The additive must be made of a material identical to the elements being connected.
When using a gas burner, the temperature at the outlet of the device nozzle must be maintained at least 50°C higher than the fluidity index of the material being processed.
The processing method is relevant not only when it is necessary to connect pipes, but also in cases where restoration of a car bumper, interior elements, and other parts is required. In such situations, a plastic solder mesh is often used, which is placed over the damaged areas and then filled with molten material.
Scooter plastic repair
1. First, remove all dirt from the plastic.
2. Then take a sharp knife and cut off the corners of the welded edges from the outside and inside. You end up with triangular grooves.
3. From the prepared pieces of plastic, cut into square or rectangular parts with a width equal to the width of the grooves.
4. Melt the spiral across the seam in 10-20 mm increments using a soldering iron. Be careful: do not boil the plastic through, but make a sufficient number of strong seams.
5. Start welding the damage from the “dead end” part of the crack. To do this, first melt a small (5-10 mm) section of the groove and attach a prepared plastic rectangle to it. Move the flame along the groove, melting the part and placing it on the molten area. Then melt the crack inside and out.
6. After merging all existing cracks, “boil” all the seams again to relieve stress and strengthen them.
7. Wait until the area to be repaired cools down and treat it from the outside until a smooth surface is formed (sand it).
The described method is suitable if the damage is large enough and the cracks are large. If there are no large chips or cracks on the plastic, you can simply glue it together. This is possible if the cracks are no more than 1-2 cm, and there is no additional load on the damaged area, for example, fasteners.
How to restore the plastic appearance of a scooter
Some of the plastic parts of the scooter are not painted. These parts are made of polypropylene. Polypropylene is very bending-resistant and relatively scratch-resistant, so it is made of those parts that are potentially subject to mechanical damage: flooring, side fairings (“skis”), rear fender, air filter housing, etc.
Over time, under the influence of nature (moisture, sun), even polypropylene takes on a “tired” appearance: the surface becomes whitish and unsightly with stains. There is no point in painting the polypropylene of a scooter in the area of the polypropylene, because it will still be peeled off by shoes.
Therefore, I recommend restoring its appearance by heat treatment with a technical hair dryer (also known as a heat gun). The point is to heat the top layer of plastic, then it will melt slightly and return to its original color.
We take a heat gun, set the temperature to about 500 degrees and start moving the hair dryer nozzle over the plastic from a distance of 4-5 cm. The hair dryer should always be in motion, it is important not to overheat the plastic, otherwise it will deteriorate. And cover/bypass those elements and parts of the body that do not need to be heated (for example, painted ABS plastic, or the ignition switch, etc.). Only polypropylene can be heated!
Below you can see the difference between the treated plastic of the scooter (the corrugated platform under the foot on the left) and the rest, which is whitish and ugly.
The next photo shows the glove compartment door.
And finally, all the internal plastic has an updated color!
With this simple procedure, you can rejuvenate your scooter by several years in half an hour.
Motorcycle plastic repair and restoration
Many modern motorcycles are replete with plastic panels; they are needed to create a complete appearance of the bike, improve aerodynamics and protect important components. In order to protect these parts from damage, modern polymers are made flexible and shock-resistant, but even this does not save the motorcycle from falls and accidents. In such cases, the manufacturer offers to replace the part with a new one, which costs a lot of money. We have prepared several affordable options for making plastic for a motorcycle with your own hands.
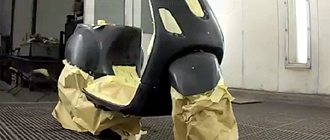
First of all, it is worth determining the extent of the damage. With the right approach, you can restore a completely broken part, but sometimes the cost will be the same as buying a new one. If the damage is relatively minor and relates to a non-load-bearing structure, such as part of a motorcycle body (maxi scooters), then cosmetic repair methods are suitable.
Cracks, chips and gluing of several pieces of plastic can be done using soldering with a hot air stream or a soldering iron. Critical, load-bearing structures, as well as parts with a high degree of damage, are best repaired using methods that involve restoring the mass of the plastic part and its characteristics (rigidity, elasticity, etc.). In cases where the plastic can no longer be repaired with a patch or gluing, there is an option to manufacture part from scratch. To do this, you will need to carefully study the entire modeling process and have a lot of combined time and nerves. Often, in such cases, it is easier to purchase a used spare part and repair it, or even buy new plastic.
Hot air soldering
To repair the plastic of a motorcycle with heated air, you will need a hair dryer, but not just any hair dryer, but one with a temperature regulator. You can use the cheapest device, but then there is a risk of overheating the plastic, which will lead to the loss of its basic properties. Overheated material will be brittle and may break due to vibrations from driving on normal roads. You will also need a special nozzle with a thin nozzle, approximately 5-8 mm.
In addition to the hair dryer, you will need a large piece of plastic identical to the one being welded
To do this, you should pay attention to the markings of the part; most likely, you will see a product of the PP, RA or ABS brands. Polypropylene PP, for example, melts at 300 degrees, and begins to burn at 350, so it should be welded at a temperature of 300 - 340 degrees
Polyamide or RA should be welded at 410 - 460 degrees, ABS at 360 - 400. Soldering process:
- For greater convenience, remove the part from the motorcycle and wash it from dirt and oils.
- We clean the edges of the parts with medium-sized sandpaper, level the edges, and try to make a hollow in areas close to the surface.
- If we weld broken parts, then we lean the pieces against the base and use a heated hairdryer to grab them in several places (from the inside). Otherwise, if you weld the parts one by one, some areas may twist and it will be impossible to achieve a flat surface without leveling with additional materials.
Advice. If the plastic initially twists a lot, then to make it easier to work with, you can fasten it with staples.
- From a piece of plastic with a suitable composition, cut out a strip 0.8 - 1.5 cm thick; this will be our solder.
- From the edge of the crack (it’s better to start from the inside), we begin to heat the seam; as soon as it starts to melt, we lean against the solder and then direct the jet partly to the seam and partly to the solder. As the plastic melts, it will fill the seam; you can help this process by lightly pressing on the plate at the moment when the material has become sufficiently liquid.
- If the fracture shape has many turns, make solder plates with a margin of up to 5 mm, and connect several sections only by complete melting. When the seam is ready, you can begin work on the front part. If you did everything correctly, the internal seam will give the piece of plastic sufficient rigidity, so the external repair will be more of a cosmetic nature. The process itself looks identical, with the exception of the solder strip, which should be made thinner. After welding of the front part is completed, the plastic should be cleaned and, if necessary, a paint coat should be applied to it or the error should be hidden with a sticker that suits the style.
When is it worth repairing plastic?
First of all, it is worth determining the extent of the damage. With the right approach, you can restore a completely broken part, but sometimes the cost will be the same as buying a new one. If the damage is relatively minor and relates to a non-load-bearing structure, such as part of a motorcycle body (maxi scooters), then cosmetic repair methods are suitable.
Cracks, chips and gluing of several pieces of plastic can be done using soldering with a hot air stream or a soldering iron. Critical, load-bearing structures, as well as parts with a high degree of damage, are best repaired using methods that involve restoring the mass of the plastic part and its characteristics (rigidity, elasticity, etc.). In cases where the plastic can no longer be repaired with a patch or gluing, there is an option to manufacture part from scratch. To do this, you will need to carefully study the entire modeling process and have a lot of combined time and nerves. Often, in such cases, it is easier to purchase a used spare part and repair it, or even buy new plastic.
Plastic repair in Moscow and the Moscow region: types of work
Tank repair
Almost any plastic containers can be repaired: fuel tanks, gas tanks, expansion tanks, tractor gas tanks, water and reagent tanks, watering machine tanks, diesel tanks from JCB equipment and other manufacturers, gas tanks for construction, watering and other equipment.
Tank repair
It often happens that plastic containers leak, crack and begin to leak water. If this happens, we can send a specialist to the site of the breakdown - in Moscow or in any other region of Russia. The technician will repair the problematic tank as soon as possible. We repair polyethylene water tanks, chemical containers, polypropylene containers.
Septic tank repair
Modern septic tanks in Russia are made from polyethylene or polypropylene. During the operation of septic tanks, difficulties periodically arise: leaks, holes caused by soil shifts, the wall of the septic tank has been squeezed out, the neck needs to be enlarged due to improper installation, a pipe needs to be welded into the septic tank, a partition needs to be installed, or other problems. Call us, we will send a specialist for repairs and advise you on how best to carry out repair work.
Soldering ABS plastic
Our plastic repair department in Moscow often encounters orders for the repair of plastic bumpers, motorcycle plastic, plastic parts for cars, motorcycles, ATVs and other units. Several technologies are used to repair such plastics. We will determine the optimal one and correctly, taking into account the chosen technology, will carry out work on restoring the parts.
Tank repair
Storage tanks also require maintenance and repair. Often water or reagent tanks break or crack. This happens for various reasons: due to temperature changes, during transportation or due to residual stresses in the plastic.
If there is a crack, hole or other damage in the tank, it is not necessary to throw it away or replace the tank with a new one, you can repair it. This will save money and time.
A gas tank crack, plastic tank cracks, or plastic cracks are fairly easy to repair. To do this you need to know the plastic material. Our specialists will help you determine the brand of plastic, and then repair the fuel tank, diesel tank, or plastic tank for water (or reagents).
If you cannot determine the leak in the tank, bring it for inspection to our base in Moscow, we will determine the location of the tank leak and fix the problem.
Repairing plastic on a scooter
I'm sure a lot of scooters have problems with the frame, namely the plastic. Despite the fact that installing a plastic case is a very stylish and beautiful idea, there are many disadvantages to this use.
First of all, the plastic of a scooter can easily break even with a minor fall or if you are involved in a scooter accident . And that’s why it often needs repairs, because buying a plastic scooter is not so easy; its price is almost half the entire cost of a moped. The approximate price of plastic in the store is from 3,000 rubles. And therefore, the only adequate solution would be to independently repair the necessary part. Also, when buying a new plastic, there may be a problem with the element you need, because there may not be plastic for all models.
Manufacturing a replacement part
When talking about restoring motorcycle plastic, don’t forget about completely replacing missing or damaged parts. Here we divide the process into making the panel from scratch and making the missing piece. The hardest part is making the part yourself. The factory forms can only be completely replicated using fiberglass. The process is very long, not the cheapest and is only suitable for enthusiasts. Initially, you should make a matrix that repeats the shape of the future part. A layer of fiberglass and resin is gradually applied to the matrix, thereby forming the part. Then the product is sanded, primed and painted. Such a part will last until the next incident, because fiberglass is very fragile, and its repair does not make sense due to the loss of rigidity of the entire structure. Finally, plastic repair can be done using a piece of plastic of suitable composition and size. A shape should be cut from the workpiece that replicates the missing part. The method is suitable for straight sections and with a slight spherical bend. A bend can be obtained by heating the part, shaping it and fixing it until it cools.
Not the most successful experience in restoring the plastic of a scooter
I’m writing a post so that they don’t repeat my mistakes when restoring plastic.
So this is what happened.
My scooter, I could have bought a new wing, but I was wondering if I could restore it.
The recovery method was chosen to be the one I use to restore laptop cases.
We take old plastic from the laptop and solder it into the crack with a soldering iron.
It holds up very well, I tried to break it, but a crack appeared on the wing itself where there is no seam.
It turned out like this
Then I sand everything and apply putty with fiberglass, it dries for 15-20 minutes.
And again the skin.
And here was my mistake, I didn’t buy small skins
Then we primed everything, and the primer turned out to be transparent (for plastic)
Well, 4 layers of paint
My mistake was that I needed to take a fine piece of sandpaper and rub it until it was perfectly smooth, but I decided that the primer would fill all the small irregularities and that’s where I was wrong.
Because of the coarse sandpaper, the paint came out in lumps, and I was a little unsure about the color)
Here's for the future -
Superglue and baking soda = strength.
The polymerization reaction occurs with the release of temperature. As a result of temperature fluctuations, strong bonding is achieved, and this only takes a few seconds. Thanks to this action, a clear fixation of various parts from different materials to each other is achieved. One example of the interaction of superglue with baking soda, demonstrating the strength of the result, is the use of a plastic bonding agent. Both the smallest part and large plastic parts can be joined using this method. Once the mixture is applied, it usually hardens very quickly, resulting in a dense material similar in consistency to plastic. By the way, soda can be replaced with another loose powder with an adhesive effect, for example, fine plaster.
You can use a mixture of superglue and soda to: Restore the figured part of any part. Often, in the working mechanisms of any equipment, clamps or other small blades are super-adhesive. Some, out of ignorance, consider the mechanism to be inoperative. You can recreate a damaged part using superglue and soda. Since the artificially formed part will be durable, it will be able to stably fulfill its purpose.
Filling the cavity. Systematic damage to plastic and other products is inevitable. Most often they take the form of formed grooves or depressions. You can fill the “gap” with superglue and soda. Moreover, for this you do not need to first clean the surface, but you can immediately fill the cavity with soda and glue on top.
You can also add soda to superglue for any use.
Blog named after sixbisix → How to weld motorcycle plastic?
A friend told me: “Don’t buy a sport bike as your first motorcycle!” There is a lot of plastic, but it will cost a lot to fall!” I partially disobeyed and bought A-la Sport and realized that modern motorcycles are not only two wheels and a bunch of pieces of iron made of various alloys, but also a bag of plastic parts. Therefore, along with the skill of fixing levers, you need to have the skill of restoring plastic parts. Parts made from modern materials are expensive and success in this matter will help save a lot of money. There is a lot of information on the Internet about how and with what to weld split plastic. Watch, learn and do! So, by chance, I decided to also weld plastic and describe this process again.
Garage → We treat plastic in garage conditions
This post will be of interest to fans of the “crazy hands” entertainment. Anyone who thinks that repairing plastic is not something worth bothering with, and that you only need to buy new and only original plastic, can safely skip this post and not spoil your mood and my mood.
I ask you in advance not to judge strictly, because... I’m not an expert in this matter and I don’t have much experience, but what I have, in my opinion, may be valuable to someone. I also want to say that the plastic is NOT PAINTED at the current stage, but only its integrity is restored. There are plenty of articles on painting on the Internet, and doing it yourself in the garage is a collective farm of pure water (this statement does not apply to those who have experience and equipment for professional painting). So where do we start? Let's start, as always, with the background. As I mentioned in my post, I initially bought the motorcycle seeing that the plastic was cracked and would either have to be replaced or restored. Naturally, changing this is not for me, otherwise you would not be reading this mini report. In fact, from the moment I bought Zyuzik, I periodically scoured the Internet and collected information on methods for restoring ABS plastic. There weren’t that many of them, except for the “masters” who “repair” anything from hot melt glue to cold welding. The most “correct” way to repair plastic, according to the Internet, is considered to be soldering with a hair dryer with plastic electrodes, but for such work you need to have the hair dryer itself, electrodes and sufficient experience in using these tools. Since I didn’t have anything from the list above, especially experience, without which repairing plastic with a hairdryer could have ended with the purchase of new plastic, I decided to resort to a simpler but lower quality (again, according to the Internet community) method - namely soldering soldering iron But if soldering was only done with a soldering iron, then I probably wouldn’t write this post, because... There seems to be nothing new here, and besides, you can’t grow pieces of plastic that don’t exist with a soldering iron. Also on some forum I found a review of gluing plastic with the same plastic. It sounds strange but in essence it is true. Its essence is that the same plastic (abs) is taken and dissolved in 746 solvent (if I’m not mistaken with the number), and the plastic dissolves well, as my experience has shown, then the seam is filled with this “glue”. To be honest, there is something in this, but for the most part, vegetable oil is bullshit and a little later I will give reasons for my statement. I did not use gluing plastic with epoxy resin reinforced with fiberglass fabric, because... There is experience that in some cases this is not reliable enough and under strong vibrations the eboxy peels off from the plastic.
Soldering plastic with hot metal
The simplest, most accessible, but less reliable method for connecting elements of plastic products is thermal exposure using heated metal. In this case, it is enough to heat an iron plate or any other suitable tool. It is advisable to fix the latter in a vice, and then lean the edges of the parts against the hot surface. As soon as the melting of the necessary elements of the products occurs, they must be removed from the plate and firmly pressed together. Before soldering plastic using this method, it is recommended to clean the surfaces of the parts to be joined from any contaminants that may interfere with the tight joining of the material. If materials are stained with oils, alcohol, acetone or white spirit should be used as degreasers.
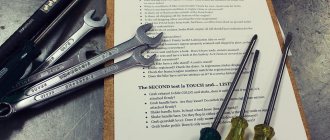
Motorcycle repair tools
Whether you use your motorcycle often or rarely, preventative and repair work is inevitable. Therefore, it is best to stock up on the necessary tools in advance. You will need the following tools to repair motorcycles.
- Spanners. The best option would be a combination set.
- Socket heads. They are also sold as a set and have different sizes. Make sure the kit includes a spark plug head. It is convenient to use it to remove the candle while holding it. To loosen and screw in fasteners, you need a wrench that has a ratcheting mechanism.
- A wrench used to tighten threaded connections as necessary. It's called dynamometer.
- Screwdriver Set.
- Hammers. The steel head on the hammers should have different weights, from one hundred to five hundred grams. It is convenient to have a hammer that has a plastic or rubber head.
- Wire cutters, pliers, pliers.
- Pliers used to remove circlips.
- To knock out axles or shafts, you will need drifts made of soft metal. And in order to knock out the pins, you need steel drifts.
- Several types of chisels with different blade widths.
- Puller.
- A pressure gauge will allow you to check your tire pressure.
- To measure the diameter of the cylinder, you need a bore gauge.
This is not a complete list of tools that you will need for repair work. The point is that some specific tools will be needed for some specific jobs. And you can purchase them if the need arises.
Motorcycle repair books
Books on motorcycle repair can be of great help to you. Although you can find other information you need in them. In the books you can learn the history of the development of your favorite motorcycle model, its design, and the principles of safe driving. In the books you will find a lot of useful and necessary information. Various exercises and practical tips that will help you drive a motorcycle competently and safely, and easily carry out minor repairs.
Good luck on your journey. Your iron friend will never let you down if you treat him accordingly.
Motorcycle plastic repair
From the editor: Every mechanic has his own working methods, and every master has his own secrets. We have already paid attention to plastic repair on the pages of our publication, but today you will learn about another method of restoring the beautiful appearance of your motorcycle’s “facing”.
Motorcycles tend to fall over. Moreover, they fall regardless of whether you want it or not. It’s good if the consequences of the fall are minimal – both for the equipment and for the pilot. But even with a slight slip, which occurred, say, due to some unexpectedly jumped out bastard, the plastic suffers. And the more plastic, the greater the damage. There are three possible scenarios here: buying new or used plastic (damaged elements), removing it and turning the motorcycle into a naked one, and, finally, repairing the fairing.
The first two options are extremely clear, but the last one should be discussed in more detail. There are several popular ways to repair plastic: gluing with a “special composition for plastic”, gluing with epoxy resin and fiberglass, soldering with a metal mesh. “Superglues” are a way to “deceive” naive and greedy people who think that “with this jar for 100 rubles you can fix all my plastic, and there will still be a little left.” Epoxy and fiberglass aren't much better. Having glued it from the inside, people forget that the crack still remains. Then this crack appears in the fresh paint.
Aerobatics - soldering with a metal mesh - a panacea for all ills and the plastic will be “like new”. This is wrong. The metal mesh almost does not bend - try bending it in your hands. And the soldering iron, which is usually used to solder the mesh, heats up to a temperature much higher than the melting point of the plastic. This causes destruction of the plastic structure and contamination of the seam with combustion products. As part of this article, I would like to talk about a little-known, but nevertheless very reliable method for repairing plastic fairings. This is hot air jet welding. A stream of air uniformly heats the part being repaired; its temperature (air) is equal to or slightly higher than the melting point of the plastic. Welding is performed using filler rods, which are made from the same grade of plastic as the part itself. These two conditions ensure the homogeneity of the material, and therefore high strength.
To repair plastic we will need:
- a special hair dryer (otherwise known as a hot-air blower),
- nozzle for hair dryer with a diameter of 5-8 mm,
- drill with a set of accessories (mills, cutters, grinding emery wheels, etc.),
- rods of filler plastic. Their brand depends on the brand of plastic from which the broken fairing is made.
Hairdryer
I use a professional Steinel hair dryer - it has the necessary set of functions: temperature control 50-650 degrees in 10-degree steps, smooth air flow control, memory for several modes (for different brands of plastic). I tried to use a small-sized hair dryer for soldering radio components, but experience showed that it is only suitable for performing delicate work, such as, for example, welding torn lugs and fasteners.
Long seams, especially if the plastic is thick, are very difficult to weld and the result will be, as they say, “not ice.”
Bormashinka
It must be powerful enough to handle tough plastic. 120-150 W is quite enough. Drill attachments come in different shapes and designs. Mills and cutters are used for cutting the seam, emery wheels are used for stripping the paint before welding and the seam after it. Cutting circles are needed to cut out missing pieces from the donor plastic.
Plastic rods
Rods are a scarce item due to low demand. Especially ABS, although most of the elements of motorcycle fairings are made from it. And they have to be “extracted” in the literal sense of the word. As I already said, the most commonly used plastics are ABS (acrylonitrile-butadiene-styrene) and PP (polypropylene). PA (polyamide) is used very rarely, it is usually used to make the lower parts (fangs) that are located in close proximity to the exhaust manifold. This is explained by the increased heat resistance of RA. Because The bottom of the plastic rarely suffers from falls; I exclude it from the RA review.
So let's get started
First you need to determine the brand of plastic from which this part is made. In most cases, on the reverse side there is an inscription like >ABS< or >РР< (usually with such checkmarks). If there is no inscription, take a lighter and set fire to a corner of the plastic somewhere in an inconspicuous place (just a little). ABS has a sweetish, pungent odor, while PP smells like a wax candle. I hope your sense of smell did not let you down, and we have identified the brand of plastic =))). Go ahead. We fix the broken pieces that we will cook with masking tape, clamps or another method so as not to disturb their relative position. We set the hair dryer to warm up (at least a couple of minutes - so that the temperature stabilizes), and in the meantime we clean the future seam and the paint around it with a drill. It is advisable to cut the crack 2-3 millimeters deep (the main thing is not to saw through it).
The paint has been stripped and the seam has been stripped. Now comes the most crucial moment - actually, the welding itself. The rod must be sharpened before welding to facilitate the start of the process. We lean the stripped end of the rod against the beginning of the seam and heat the part and the additive. As soon as the plastic begins to melt, lightly press the rod while rotating it back and forth until a small influx of plastic forms. Then we slowly begin to guide the rod, pressing it with little force and tilting it towards the air stream. When we reach the end of the seam, we need to carefully separate the rod from the part, without tearing out the freshly welded plastic that has not yet had time to cool.
To do this, we rotate the rod without pressing, then slowly pull it towards ourselves (still continuing to heat it with a hairdryer). That's it, the welding is finished, you can take a break and admire (if you have anything) the fruits of your labors. During the resting process, it is important not to forget to then boil the part on the reverse side. =)))
Let's assume everything went well. You need to let the part cool, then start processing it. It’s not worth cleaning the inside: firstly, many elements are very inconvenient to process from the inside, and secondly, it’s stronger this way. We clean the outside in 2 stages. First, with a drill - roughly, leaving a reserve of “meat” for further manual processing, then by hand, with coarse sandpaper. We can stop here. The rest is the work of the painters. That's it, you can congratulate yourself on the successful completion of this labor-intensive process!
I warn you in advance - you shouldn’t take on the important details right away. It won't work the first time. From the second too. First you need to practice on scraps of unnecessary plastic, break it and weld it, then break it again and weld it again. It is necessary to “fill” your hand. Heating speed and temperature, bar tilt, distance to the hair dryer nozzle, etc. you need to feel it. It is necessary to achieve uniform heating of the part and the filler rod. If you heat the rod more, the plastic will seem to be “smeared” onto the crack without being welded. If you heat the part itself more, then when you press it, it will press in, and the edges of the crack will move apart. In general, you need to train, and then an understanding and awareness of all the subtleties will definitely come.
PS: Of course, it’s better not to fall. But if this happens, the described method can help quickly and relatively inexpensively return the motorcycle to its former appearance, which is important in the conditions of our short northern motorcycle season. Eh, I wish it would come sooner...
Good luck on the roads! See you again!
Text and photo Anton Konovalov Source: MotoMania magazine, motomaniya.ru
216
Gluing plastic
Repairing the plastic of a motorcycle can be done by gluing parts together. To do this we will need:
- epoxy resin and hardener;
- fiberglass;
- gloves;
- Castor oil.
The gluing process: First of all, we remove the defective part, wash it thoroughly with hot water, then we clean the areas around the cracks and the ends of the chips, and finally we degrease the parts being processed. Next, we dilute the resin with the hardener, keep in mind that the material will remain in a plastic state for 2-4 hours, so it is better to prepare it in small parts
If you add a little castor oil to the mixture, it will become more flexible, which is especially important for flexible plastics. Apply the finished resin on the inside of the part with a brush in one layer
Next, we place a layer of fiberglass no more than 5 cm wide and cover it with another layer of glue. In total, you should get 3-5 layers of mesh, and the final layer is glue. Remember! All work with epoxy resin should be carried out with gloves and safety glasses. Upon completion of the work, leave the part to dry for a day at room temperature. A sign of hardening of the material is the lack of adhesion and structural strength. You can apply light pressure to the seam to test its strength and make sure the material is curing. If everything is satisfactory, the repair is completed, otherwise we completely remove the layer and apply a new one. There is still an outer part left, but it should be treated with putty to prevent damage and then painted over. Gluing is needed to create a strong base, and final work is best done with materials that are more amenable to processing.
How to restore plastic on a scooter
Finally, I finished my titanic work of restoring the plastic.
As usual, I got involved in serious work in an industry about which I knew practically nothing. I had to learn on the go. I warn you right away - this work is for a beginner amateur in the field of putty, so be a pro, criticize, criticize, but don’t laugh. This article was very helpful in my work, I highly recommend it: https://sergius41.ru/rabota-so-shpaklyovkoy From there I took the method of preparing putty - I made myself an easel from a piece of tin, before each batch, put fresh paper on it, stir the putty with a 2.5 electrode. I didn’t believe it myself until I tried it - but this is a very convenient and simple way to prepare putty.
I’ll immediately share the first mistake - on the can of putty, there was an inscription 2-100, i.e. 2 parts hardener per 100 parts putty. I gave it that way (or maybe I didn’t give it enough), as a result, the first batch of putty on the test part still didn’t dry even after a week. After reading the article, I give 5% and everything dries perfectly.
In general, I often get scooters whose plastic is in poor condition. Until now, I have easily dealt with cracks, fasteners, and holes. But then a scooter arrived, one part of which was 40% destroyed. The owner wanted to buy a new one, but couldn’t find one, so I offered to restore it. And so this almost two-week brain-fucking began. After studying many useful articles on the Internet, I stocked up on: suitable wire mesh (the smallest one I found in a hardware store), epoxy glue in bottles (I couldn’t find a bucket of resin for sale), a soldering iron, metal scissors, a drill, sandpaper, superglue, putty for plastic (it costs 48 UAH for me. Half a kilo, half a kilo and I took it)
, and also stocked up on patience and swearing. All this was useful to me.
There are no first photos of what the part looked like before repair - it was a pile of plastic debris, which was handed over by an owner who doubted its success. I also doubted it for a while, turning the fragments in my hands. Then he began to work. First, I glued the parts together in a couple of places with superglue, then glued them from the inside with epoxy and bandages, in a thick layer. I made sure that the epoxy got into all the cracks not affected by the superglue. After drying for a day, I cut out a couple of suitable pieces from the mesh (with a margin, of course) and began to solder them with a soldering iron, forming the missing parts. It took half a day. The soldering iron burned out, I had to swear and buy a new one for 145 UAH. It will not work to solder the mesh onto epoxy; you have to be careful here and not overdo it with the epoxy itself at the initial stages.
I spent a lot of time to give the product its final shape. Unfortunately, I didn’t think of making a template from the surviving right half, because they are symmetrical. In the future, this resulted in mismatched parts. Please note that making a wire base is a very important process; you cannot waste it and hope that the putty will smooth everything out. In my case, it was barely enough to get the job done.
Go ahead. When everything is ready, you need to glue the wire from the inside with something, so that you can then apply putty to the outside of the mesh. I used a scrap rag, epoxy and superglue. Superglue showed the best results - you only need to fix the fabric so that it does not fall off when you spread the putty on the other side. You can do without any glue at all, and try to apply the putty, holding the fabric on the other side with your hand, whichever is more convenient for you. The whole problem is in my net, it is quite large. With a fine mesh, such problems would not arise. I’ll also note that on the front of the part there used to be an oval hole, for the sake of size, I think. Since the dimension went to its forefathers, and I had no idea about the geometry of the hole, I simply repaired it. If necessary, you can always cut through.
So, let's assume that everything is ready for puttying. Apply the first layer. Let it dry for a day.
Soldering with a soldering iron
This DIY motorcycle plastic repair is practically no different from the previous one. The main difference will be the tool used. You'll need a high-power soldering iron that you don't mind getting dirty. Here, too, the type of material being welded and the appropriate solder are important. The latter can be found in the form of special tapes in stores. Welding process:
- We dismantle the part, wash it from dirt, clean the edges with sandpaper and degrease it.
- We assemble a puzzle from broken pieces, spot welding them from the inside using a soldering iron. (further work is carried out exclusively on the inside of the product).
- Starting from the edges, we lean the soldering iron against the seam and, melting it almost right through, we form a deep hollow.
- Now the parts are holding, but not yet strong enough. The next step is the direction of the new layer; for this we melt the solder with a soldering iron near the hollow. While the plastic is still liquid, level it with a sting to get an even layer.
This way the process will take much longer and require greater concentration, but the layers of plastic will stick better, which means the connection will be stronger. If you did everything correctly, then in the end you will get a strong seam, which looks rough on the inside, but with the outside turns out to be almost perfectly smooth. This can be achieved through deep melting of the mass when forming a recess.
DIY scooter plastic repair
Let's look at the sequence of repairing plastic on a scooter with our own hands.
You will need material and tools:
— fittings for welding: you can use metal spirals, mesh or paper clips from a stapler; - a hand vice, if the plastic is broken into separate pieces, or if the cracks are large; - pieces of plastic; — a device for melting (softening) with narrowly targeted action: use a heat gun or a hand-held gas torch.
So, you have prepared everything you need for repairs. Now it's time to start fixing it.
Use of a soldering iron
Let's assume that the plastic bumper of a car is seriously damaged and needs to be repaired by soldering. How to do it?
To make it easier to solder the structure, it must be removed from the car. It also doesn’t hurt to look at the labeling in advance. Most likely, the part will be made of ABS plastic.
Then you should clean the surface of the bumper from dirt, remove paint and varnish residues. Additionally, the entire plastic part must be degreased. Next, you need to connect all the fragments of the bumper together.
For such a connection, it is important to use clamps or staples. But this must be done carefully so that they do not penetrate through the car plastic.
Soldering plastic with a standard soldering iron should begin from the inside of the car bumper. To do this, one of its edges is securely fixed, and special plastic electrodes are laid along the future seam (although the name “electrodes” in this case is very arbitrary).
At the next stage, a soldering iron for soldering plastic melts the electrode material, and it fills all the recesses of the crack. This operation must be repeated as many times as stitches need to be made, that is, it all depends on the initial number of defects and damage.
Bonding plastic
To glue the plastic, prepare:
- dense sack fabric (also called “canvas”); - good glue or cold welding for plastic.
To glue plastic, follow these steps.
1. Make large cuts and scratches on the back of the plastic. This is necessary so that the tenacity of the glue increases - it simply will not stick to a smooth surface.
2. Grip the damaged area with a vice or have an assistant hold it. Fill with glue and, without waiting for it to dry, place a piece of burlap (the size should be approximately twice the length and width of the crack). Once again, generously fill everything with glue.
3. Wait for it to dry completely and sand the seam from the front side with fine sandpaper.