Fans of fast driving from time to time are faced with the need to update the appearance of their “iron friend”. Painting a motorcycle is an exciting, but at the same time responsible business. Any incorrect action can lead to dire consequences: poor-quality painting, rust, surface defects.
When do you need to paint your motorcycle?
There are many reasons why you need to start painting work. Main list:
- removing traces of rust;
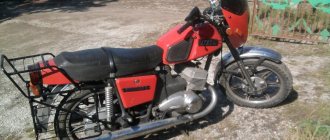
- buying an old bike and then transforming it;
- elimination of scratches, dents, signs of falls;
- change of image, color of equipment.
Regardless of the circumstances, painting a motorcycle with your own hands is a responsible undertaking. Only targeted and step-by-step manipulations will allow you to achieve a good result.
Rust is one of the reasons for repainting
Some scratches can be painted over
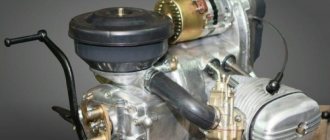
SUSPENSION
| Name of works | Price, rub | Note |
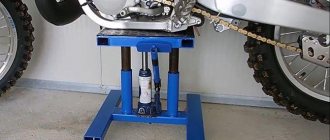
| Fork bulkhead, with replacement of oil seals. (reversal) | from 3000 | including dismantling and installation |
| Fork bulkhead, with replacement of oil seals. (telescope) | from 2500 | including dismantling and installation |
| Replacing steering column bearings on a classic | from 3000 | check the price with a mechanic |
| Replacing steering column bearings on a sportbike | from 2500 | check the price with a mechanic |
| Replacing rear shock absorbers | from 800 | |
| Replacing the monoshock absorber | from 1000 | |
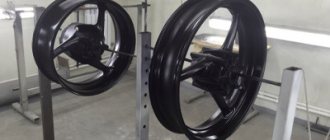
| Replacing front wheel bearings with wheel removal | from 1000 | |
| Replacing rear wheel bearings with wheel removal | from 1500 | |
| Editing disks | — | check the price with a mechanic |
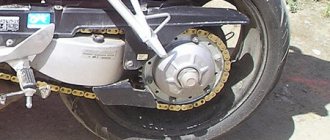
| Replacing chain and sprockets | 2500 | |
| Chain lubrication | 200 | |
| Changing the oil in the gearbox | 300 | |
| Chain tightening | 200 | |
| Removing and installing wheels | 500 | |
| Cleaning and Lubricating the Chain | 800 | |
| Replacing swingarm bearings | from 2000 |
Choosing paint for a motorcycle
First of all, you need to select one of the paints and varnishes. Motorcycle paint must be suitable for its intended purpose. The following types will be required:
- Acrylic compositions are presented in a wide range of colors and are resistant to mechanical stress. Disadvantage: they are easily washed off with gasoline and are not suitable for application to the tank area.
- Alkyd paints are more resistant to chemicals, durable, and easy to apply. Disadvantage: relatively high cost, poor range of shades.
- Nitro-enamel types have proven themselves to consumers due to their low price, ease of use, and range of colors. Against the background of significant advantages, there are significant disadvantages: the surface is exposed to adverse factors, both mechanical and chemical in origin, and has a low shine. This is a seasonal option that requires annual renewal.
It all depends on the budget and time that you are willing to spend on your “iron friend.” This is interesting: car varnish in a can.
Acrylic enamel
Alkyd enamel
Nitroenamel
Color selection
Painting a motorcycle in one color or another reflects the character and preferences of its owner. Many fans of fast driving like to experiment, combine shades, and radically change color. However, if you wanted to repaint the motorcycle, for example, from red to black, then this must be recorded in the traffic police. Common shades: red, blue, black. Usually the frame is painted one color, the tank and protective elements in another, and small parts in a third. But it is possible to apply a single color preference. Professionals do not recommend using paint with a metallic effect. The recommendation is due to its high cost, difficulties of application at home and errors that will be clearly visible on the surface as a result of painting.
Please note: Basic principles of painting a car fender
Materials and tools used
Even in artisanal conditions, that is, in your own garage, the work of painting a motorcycle can be completed at a fairly high level. You just need to strictly follow the motorcycle painting technology, as well as use high-quality materials and tools. The material component of the process includes such components.
Dye. What type, texture, color is determined by the owner, based on his own preferences or objective circumstances (for example, during local repairs, you will have to match the color of the new paint to the old one). Primer. Another irreplaceable component that provides the required level of adhesion - adhesion of paint to the surface of the part. In addition, some of the primers may contain anti-corrosion additives.
This is especially important when it comes to metal parts with pockets of corrosion. Putty. This is a plastic mass that is used to smooth out the geometry of painted parts (scratches, dents, holes, etc.)
P.). Abrasives. Coarse and fine-grained materials used for removing old coatings, as well as roughing and finishing surfaces. Protective materials. This is a set of film products designed to protect those parts or components of a motorcycle that should not be painted.
As for tools, special attention should be paid to the means of applying putty and primer masses and the paint itself. In the first case, sets of spatulas are used, but the primer and paint will have to be applied using special spray guns (paint guns) to improve the quality of the layer.
Preparing a motorcycle for painting
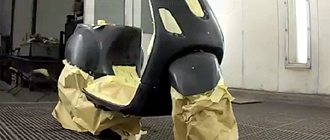
Before you get started, you need to figure out how to properly paint a motorcycle. Firstly, an important stage is the preparatory work. If you do not perform a number of preliminary steps, you may not expect a good result. Let's consider the manipulations in stages: Stage 1. Preparing the site. Thorough cleaning of the room from dirt, sticking a protective film on the ceiling. The floor can be moistened with water to prevent dust from rising. You will also need to dismantle parts that need painting. They need to be cleaned of dirt and dust particles, rinsed and dried well. Stage 2. Preparation of materials. You will need: sandpaper, abrasives, degreaser, removing old paint, solvent, masking tape, protective materials, putty, primer, tools for applying preparatory layers, as well as the paint itself (air compressor with a spray gun and a set of sprayers, gloves, respirator). Stage 3. Surface cleaning. Using sandpaper, clean the parts from the paint layer and rust. If the paint is factory-made, then you can perform surface manipulations, stripping only to the primer layer. When repainting or damage is present, the motorcycle is stripped completely to bare metal. To speed up the process, you can use chemicals and removers. Apply the solution to the surface, then clean off the remaining layer with a spatula or knife. After cleaning, the surface must be degreased. Stage 4. Putty. Applying plastic material, smoothing visible defects. The work is performed in several steps. Each layer is applied at intervals to allow the previous coating to dry (20-30 minutes). Finally, treatment with abrasives, grinding, degreasing. Stage 5. Primer. Provides reliable adhesion of the coloring composition to metal or plastic. It is important to take into account that treat plastic parts with primer for plastic, metal components with an anti-corrosion or universal compound. The primer is applied in several layers with an intermediate drying period (about 30 minutes). Finish by sanding it down with P-400 sandpaper.
Remember! All work is carried out wearing gloves and a respirator. Don't ignore precautions. Protect your skin and lungs from the harmful effects of chemicals and fumes.
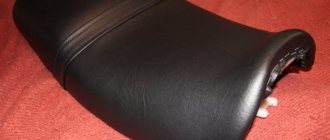
Sanded tank
Applied primer Pay attention to: Technology of painting scratches on cars: surface preparation, choice of composition and methods of its application
Vinyl film: principle of pasting
One of the alternatives to painting motorcycles may be to decorate parts through a process such as covering them with vinyl film.
This approach has at least two advantages. Firstly, it becomes possible to eliminate minor surface defects without the need to paint them. In addition, the preparatory stage is significantly reduced. Secondly, pasting takes much less time than painting and polishing, and its labor intensity is noticeably lower. Thirdly, pasting allows you to create a unique decorative effect, which cannot be achieved with any paint. The structure of vinyl can be two- or three-layer. A process such as covering a tank, frame or plastic with vinyl film consists of the following steps.
- Select a color (if you are going to use a plain film) or a pattern.
- Surface preparation, which involves washing and degreasing metal or plastic.
- Pasting with film. It can be applied dry or wet. The second option is more technologically advanced, as it allows you not only to eliminate air bubbles, but also to apply the vinyl itself repeatedly, achieving an ideal result.
Naturally, it is unlikely that you will be able to complete all the work yourself. This will require special equipment, especially for complex surface topography. But the result of the work done and the uniqueness of the motorcycle equipment are definitely worth the money spent.
Today you can find several main types of vinyl on sale, used for decorating and protecting parts of cars and motorcycles.
- Simple. It is distinguished by its durable color and glossy or matte structure.
- Graphic. Vinyl, which allows you to apply images or patterns on a digital plotter, after which the motorcycle will be covered with such film.
- Texture. A special type of vinyl that allows you to imitate the structure of natural materials, such as chrome, wood, leather, etc.
- Carbon. One of the most popular types of vinyl, since it is most often used for self-covering with film. Formally, it is a subspecies of the textured type, but differs from it by a characteristic structure like carbon fibers.
- Chameleon. A special type of film that changes color depending on the angle of view and exposure to sunlight.
- Anti-gravel. Vinyl, the main role of which is to protect the paintwork of motorcycle parts.
Previous PaintingTypes of decorative painting of a car body Next PaintingHow to apply and how long it takes to dry car varnish
Motorcycle painting
After the surface has been processed, you need to build an algorithm for how to paint the motorcycle. Step by step instructions: 1 step. The paint in the jar needs to be strained several times. If necessary, dilute with solvent in a measuring cup, strictly following the instructions in the instructions. Step 2. Next, we load it into the spray gun, adjust the spray spot so that the applied layer is in the range of 80 - 120 microns. Spray painting requires shaking it before use. Step 3. We apply the first thin developing layer at a distance of 25-35 centimeters, holding the spray gun at a right angle to the area to be painted. Deviations of no more than ten degrees are allowed. Step 4 The paint is applied in strips at a speed of 40 cm/s, maintaining an overlap of 4-6 centimeters. We wait for the first layer to dry and lightly sand it. Step 5 We apply a second layer, denser and thicker, also wait for it to dry and sand. Step 6 If necessary, a third layer is allowed. To finish painting the motorcycle, leave its parts to dry for a day. Step 7 Cover with varnish. The protective coating is carefully applied in 3–5 layers. Step 8 Polishing. A simple application of polishing paste will add shine and eliminate minor irregularities and scratches. Please note that painting a motorcycle gas tank requires following basic rules. So:
- Be sure to drain all the gasoline and dry the tank until the vapors completely disappear;
- clean the coating down to the metal base;
- we fix the chips, you can photograph them;
- We protect all the gas tank openings with masking tape so that paint does not get inside;
- apply 4-5 layers of primer, taking into account chips, dry each one and sand it;
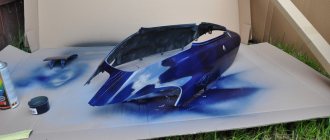
- apply several layers of paint, dry, glue airbrushing or stickers;
- coat with varnish in 3-4 layers, protecting the coating from gasoline during operation.
Please note: Rubber car paint and its use
It is better to carry out all manipulations in a shadow-free, ventilated room with a temperature of at least 20 degrees and a humidity below 50%. You cannot use acrylic paints; alkyd or nitro-enamel compositions are suitable. Painting the plastic of a motorcycle is also done taking into account the plastic coating. You will need special soil and a well-equipped room protected from dust. If possible, it is better to paint the plastic of a motorcycle with your own hands in a special chamber (capsule), so you will achieve a high-quality result.
Painting and drying the tank
Briefly about the work procedure
1. Remove damaged parts from the scooter and wash them thoroughly with laundry soap, leaving no traces of oils.
2. Glue the cracks according to the repair kit instructions.
3. Using polyester putty, achieve final evenness of the seam.
4. Apply one thin coat of adhesion promoter to the exposed plastic.
5. After ten minutes of exposure, apply 2-3 layers of acrylic primer.
6. Sand the primer with P 800 abrasive and apply 2 layers of paint.
7. If you have metallic or pearlescent paint, you need to apply a clear varnish after 40 minutes.
Most often, scooters are painted in two or three colors. To speed up the process, you must first apply different enamels one at a time, and then 40 minutes after using the last one, apply varnish to all parts at the same time. The difference in waiting time before applying enamel does not matter for each individual paint.
And one more important note. During preparatory work for painting a scooter, clean gloves should always be worn on your hands.
This will protect the skin of your fingers from being rubbed by rough abrasives.