After some mileage of the scooter, the efficiency of the drum brake begins to decrease, as a result of which the braking distance increases; adjust the drum brakes . This is especially true for Chinese scooters.
This happens due to stretching of the brake system drive cable, and also because the brake pads wear out over time, and this leads to an increase in the free play of the brake lever .
When to adjust a drum brake
Adjustment and maintenance of the scooter's drum brake is necessary in the following cases:
- Braking performance is lower than usual
- The wheel continuously brakes independently without pressing the handbrake lever
- You need to put a lot of force on the brake handle, but the handle doesn’t press down and the scooter doesn’t brake well.
- The brake handle does not fully or partially return on its own to its initial state, which is why the wheel slows down after the handle is released
- You can hear a squeaking sound in the scooter's drum brake
Drum Brake Adjustment
Adjusting the drum brake involves setting the free play of the rear brake lever.
The free play of the drum brake lever is determined by the distance from the beginning of the handle movement to the grip. Normal free play of the drum brake lever should be within 10 ... 20 mm.
Procedure for adjusting drum brakes on a scooter:
- Place the scooter on the center stand
- Clean the threaded part of the cable from dirt
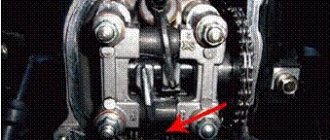
- Adjust the free play of the drum brake lever by rotating the adjusting nut, which is located at the end of the brake cable near the wheel hub. To decrease the free play, you need to rotate the adjusting nut clockwise, and to increase the free play, you need to rotate it counterclockwise. It may be necessary to hold the cable to prevent it from turning along with the adjustment nut
- After setting, you need to make sure that the wheel rotates freely and without jamming
- Check the serviceability of the brake drive (cable) and drum brake lever
If the threaded part is not enough to adjust the free play of the control lever, then you can adjust the brake by moving the brake lever by 1-2 slots.
If after tightening the drum brakes their performance has not increased, check the condition of the brake pads and change them if necessary.
World of scooters.
Models, selection, tuning, repair and driving. >> Brake system. Chassis. Contents :: Next >>
Brake system
The braking system is used to slow down or stop the scooter. The requirements for the efficiency and performance of this system are obvious. The principle of operation of brake mechanisms (or, more simply, brakes) is based on the friction forces that arise when pads with linings made of friction materials are pressed against brake drums or discs rotating with the wheels. In this case, the mechanical energy of a moving scooter is converted into thermal energy and dissipated in the air. The vast majority of scooters have front and rear wheel brakes that are operated independently of each other. The front brake is operated by a lever on the right handlebar, the rear - on the left (rarely - by a pedal under the right foot). Only recently, and only on scooters with a large engine displacement, have they begun to install the so-called combined brake drive. On the Honda Silver Wing, the right lever on the steering wheel controls two brake cylinders on the front wheel (15). The left lever on the handlebar controls the other two brake cylinders of the front caliper and the rear brake mechanism. The front brake needs to be more effective because it bears most of the load when braking. In addition to service brakes, which are used by the rider to slow down, some scooters have a parking brake, which is used to hold the machine on an incline.
Diagram of a combined brake system (Honda Silver Wing): 1 - lever that operates the brake mechanisms of the front and rear wheels; 2 - lever that operates the brake mechanism of the front wheel only; 3 — parking brake lever.
Scooters today use disc and drum brakes. Disc brakes have higher efficiency and quicker response; they are more often placed on the front wheels. Drum brakes are prone to overheating during heavy braking at high speeds. 50cc scooters with low weight and relatively low speeds do not have such problems, and drum brakes are sufficient for them (at least for the rear wheels). The transition to disc brakes could be considered a tribute to fashion, but they have another undeniable advantage - self-supplying of the pads when worn out (more on this will be said a little later). Scooter drum brakes do not have this property.
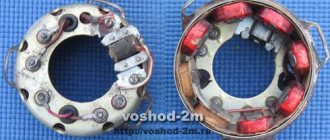
Drum brake
The brake drum is integral with the wheel hub. Inside it there is a support disk on which two semicircular pads (16) are mounted. Their outer surface with linings made of friction material corresponds in shape to the inner working surface of the drum.
Drum brake: 1 - brake drum; 2 - rotary cam; 3 - spring; 4 - block; 5 — block support; 6 — wear indicator arrow; 7 — lever; 8 — support disk.
One side of each pad rests on the stop, and the other on the expanding cam, while the pads are tightened by one or two springs. The cam is connected to the brake levers on the steering wheel through an axle, lever and cable. When driving without braking, the pads are closed and do not touch the inner surface of the rotating brake drum. When you press the brake lever, the expansion cam rotates, the pads move apart and are pressed against the drum. The resulting friction forces slow down the wheel. When the force is removed, the pads return to their original position thanks to tension springs. Often, an additional return coil spring is installed on the brake cam axis outside the support disk.
Drum brake: 1 - brake drum; 2 - rotary cam; 3 - spring; 4 - block; 5 — block support; 6 — wear indicator arrow; 7 — lever; 8 — support disk.
PARKING BRAKE
. Its purpose is to ensure that the scooter remains stationary on a slope and when stopping if the driver wants to free both hands. Having a parking brake on scooters is optional, and most scooters do not have one.
There are at least two designs of such a brake. The first, common in the past on Japanese domestic market scooters with drum brakes, is the brake lever retainer. After pressing the lever, the driver lowers the latch with the fingers of his left hand into the resulting gap between the lever and the brake lever bracket, and then releases the brake lever. In this case, the latch is clamped by the lever (due to the action of the springs in the drive) and the scooter is braked. To release the parking brake, simply press the lever again. In this case, the latch, thanks to the additional spring, will come out of the gap between the lever and the bracket. Modern “heavy” scooters with disc brakes have a design where a drum brake is built into the hub with a service brake disc attached to it. It is driven by a cable, and the parking brake drive lever is located on the front shield of the scooter.
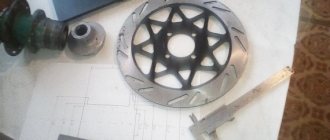
Standard disc brake pad
BRAKE FAULTS
. If water and dirt regularly get on the surface of the working cylinder, its piston may lose mobility (“sour”) and the brake will no longer release the brake. In addition, deterioration in brake performance is associated with oiling of the pads or their wear. Drive malfunctions are also possible - increased resistance to cable movement or cam rotation.
The simplest and most common type of drum brake is the single-cam brake, where a single cam moves both shoes apart. Since the cam rests on the top of the pads, and the bottom parts simply rotate around a stationary support, the pads do not fully contact the drum, which reduces braking efficiency. Two-cam brakes do not have this drawback, where each pad is actuated by its own cam, and the cams are located on different sides of the pads. Due to this, both blocks are “active” - the direction of the force pressing the block and the direction of rotation of the drum coincide. As a result, the drum seems to jam itself, increasing the braking force. The drum brake on all scooters is driven by a cable. The degree of wear of the pads can be judged by the position of the wear indicator arrow. The indicator scale is applied to the brake support disc, and the arrow is attached to the cam.
Two-piston hydraulic brake working cylinder with a fixed bracket: 1 - pistons; 2 — brake caliper; 3 — “floating” disk; 4 — wheel hub with splines; 5 - bleeder fitting.
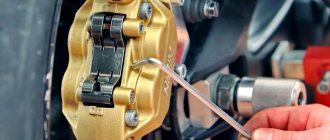
Disc brake
A steel disc is rigidly attached to the wheel hub, which is clamped on both sides by flat brake pads (23) during braking. They are located inside the brake caliper and have the ability to move in a direction perpendicular to the plane of the disc. The working surface of the brake pads is formed by friction linings, which are molded to the steel base of the pads. The brake disc has holes of different shapes, which improve disc cooling, facilitate the removal of water and dirt, and reduce the weight of the disc. The brake caliper is attached to the front wheel fork or rear wheel swingarm. Based on the method of fastening, structures with a fixed (18) or “floating” (20) bracket are distinguished. In the first case, each brake pad is acted upon by its own piston. In the second case, a single piston acts on one pad, and the brake caliper, being able to move (“float”) along the guide pins, presses the second pad to the disc. When the pressure is removed, the bracket takes a neutral position, ensuring uniform clearances between both pads and the disc.
Working brake cylinder with self-supplying pads: a - when pressing the brake lever; b - when releasing the brake lever; 1 - working cylinder; 2 - seal; 3 - piston; 4 - brake pad.
Hydraulic disc brake drive
It consists of the main and working brake cylinders, as well as the hose connecting them. The brake master cylinder is located on the handlebar near the brake lever. If the drive of both brakes is hydraulic, then there are two main brake cylinders (both on the steering wheel), their hydraulic systems (circuits) in most cases are not interconnected except in cases of a combined brake system.
Working brake cylinder with self-supplying pads: a - when pressing the brake lever; b - when releasing the brake lever; 1 - working cylinder; 2 - seal; 3 - piston; 4 - brake pad.
Inside the master brake cylinder there is a piston assembly with cuffs, and a hermetically sealed reservoir with brake fluid (21) is located above the cylinder. The body and lid of the tank are sealed by a diaphragm, which also compensates for changes in the liquid level when the piston moves. An electrical brake light switch is installed in the master cylinder housing, which turns on the brake light in the rear light when braking.
Main brake cylinder of a hydraulic disc brake: 1 - brake fluid level indicator eye; 2 - cover; 3 - diaphragm; 4 — brake lever; 5 — protective cover; 6 - piston; 7 - main cuff; 8 — return spring; 9 — bracket for fastening to the steering wheel; 10 — cylinder body; 11 — brake hose fitting.
When the brake is applied, the piston in the master cylinder moves, closes the hole connecting the cylinder to the reservoir, and begins to compress the brake fluid. Because the fluid is very dense, the pressure in the system is instantly transmitted through the brake hose to the brake wheel cylinder, the piston (or pistons) of which presses the pad (or pads) to the disc. The piston in the working cylinder is sealed with a rubber ring of rectangular cross-section (19). When the piston moves, the ring is deformed and, after removing the force, returns the piston to its original position. As the brake pad linings wear, the piston, in order to be able to press against the brake disc, deforms the ring more and more. At some point, further deformation becomes impossible, and the piston moves relative to the ring, selecting a gap between the pad and the disc. This ensures self-supply of the pads when they wear out. Since there are no return springs in a disc brake, the brake pads diverge after braking due to the elasticity of the rubber ring of the working cylinder, and partly due to the slight runout of the brake disc (22). Installing two discs on the front wheel eliminates the fork torque that occurs when using a single disc. The twin-disc design is more common on motorcycles, but cruiser scooters are also starting to see dual brake discs on the front wheel. An example is the Italian Gilera Nexus 500 scooter, although in fact, almost all 500 cc scooters made in Italy and Japan are equipped with a double-disc front wheel brake. Oddly enough, the exception is the Honda Silver Wing 600 cruising scooter, which has only one brake disc on the front wheel. True, ABS can be installed on request in the brake system.
Hydraulic brake with a “floating” caliper: 1 — caliper; 2 - finger; 3 - seal; 4 - bleeder fitting; 5 - piston; 6 — boot; 7 — brake pad; 8 — brake disc.
Anti-lock braking systems (ABS)
These systems allow you to avoid stopping (blocking) the wheels during sudden braking, and therefore maintain the trajectory of movement during braking, which significantly increases the active safety of the scooter. They are increasingly being installed on scooters with large displacement engines capable of moving at high speeds. There are several types of ABS, common to all systems is the end result - a short-term release of the wheel when signs of blocking appear. ABS is usually installed on scooters with disc brakes, with the exception of the Honda Dio ST scooter with drum brakes and cable drive. Hydraulic ABS includes:
1. inductive wheel speed sensors installed near the brake discs (24);
2. a system of hydraulic valves built into the brake lines and releasing the wheels when signs of blocking appear;
3. electronic control unit.
Double-disc front brake of the Gilera Nexus 500 scooter
The disadvantages of ABS include complexity, which increases the cost of the scooter. At the same time, situations where ABS brings real benefits are rare, and an inexperienced driver may simply not know about it. In addition, a scooter, even one equipped with ABS, is not immune to falling.
Single disc front brake
BRAKE FLUID
. When braking, a significant amount of heat is released, which can increase the temperature of the brake fluid, where gas bubbles form as a result. In addition, brake fluid is hygroscopic, meaning it can absorb moisture from the air. Both of these significantly reduce its properties. With this in mind, brake fluid has a limited lifespan and must be replaced regularly.
Anti-lock braking system sensor: 1 - disc with slots, mounted on the wheel hub; 2 - inductive wheel rotation sensor.
The main problem with hydraulic disc brakes is air getting into the brake line. To eliminate this, you need to bleed the brake drive.
Contents :: Next >>