We are trying to inflate a tubeless tire ourselves. Several ways to inflate a tubeless tire)))) — DRIVE2
Why is everything so complicated? The problem is that usually after mounting the wheel between the tire and the rim of the disk there remains a gap of 5 millimeters to 5 centimeters or, as professionals say, the tire “does not sit in place.” There is simply no point in inflating such a tire with a foot pump, or even more so with a hand pump - all the air pumped by the pump will exit through the above-mentioned gap. At tire service centers, this issue is solved simply: using pneumatic shock devices, powerful compressors, boosters or inflators into the gap between the rim and the tire A large amount of air is supplied in a short period of time. After the tire “slams shut” and sits on the mounting site, air is pumped in the usual way - through the tire nipple using a standard hose with a pressure gauge. What if there is simply no equipment for pneumatic shock? Over the years of operation, motorists have invented several ways to inflate tubeless tires. From safe to risky, from labor-intensive to effortless. Which method is more acceptable is up to you. We use flammable liquids and place the fully assembled and mounted wheel on the ground. The spool from the nipple must be unscrewed. Apply a small (from 10 to 20 ml) amount of gasoline, WD-40 or carburetor cleaner in a circle into the gap between the tire and the rim of the wheel. Next, you need to set fire to the vapors of the flammable liquid in a safe way (using a torch from a newspaper or throwing a match from afar , formed inside the tire, which, when ignited, will increase the volume of air and after a noticeable bang, the tire will sit tightly in its seat. It is possible that in this case the wheel can jump to a height of up to half a meter above the ground. Therefore, be prepared for such effects and be careful. We screw the spool into the nipple and inflate the tire in the usual way using a pump. We resort to using an inflated wheel. Inflate the spare tire or wheel on the car with a pump to a pressure of about 4 atmospheres. We remove the hose from the pump and put the side that was removed from the pump tube onto the nipple of the tubeless tire that needs to be inflated. We remind you: the spool must be unscrewed from the tire. We put the second end of the hose with a lock onto the fitting of the tire with excess pressure and fix it. Air from the “inflated” tire will flow under pressure through the hose into the empty tire and it will “sit back into place” quite quickly. All that remains is to disconnect the hose first from the donor wheel, and then from the recipient tire, screw the valve valve into the nipple and pump up both wheels to the required pressure. We use a rope. If you wrap a piece of sling or rope around the tire in a circle, along the line of the treads, and then pull the rope and fix it , its working surface will be slightly deformed, but the edges of the tire will be pressed against the rim of the disk. After this, you can screw in the spool and inflate the wheel without worrying about the rope - it will slide off the wheel itself as it fills with air.
These methods, simple and not so simple, will always help in a difficult situation, far from service points, and inflating a tubeless tire will no longer be a difficult and overwhelming task for you. May everything always work out for you!
How to inflate a tubeless tire.
Drivers know that it will not be possible to inflate a tubeless tire with a conventional pump after installing it on the rim - the air will simply come out of the gap between the rim and the tire rim. In order for the tire to “sit” tightly in its place on the rim, you need to supply a large portion of air in a short time, for example from a compressor receiver, as is done at a service station. But not everyone has such compressors in their garage, so how can you get out of the situation and pump up the “tubeless”, using what is called “improvised means”?
It's actually not that difficult to do.
To do this you will need some gasoline, carburetor cleaner, WD-40, or any other flammable liquid. Place the fully assembled wheel on the ground and spray a very small amount of flammable liquid in a circle into the gap between the tire and the rim. Do not pour too much gasoline, about 10 grams is enough. After this, quickly ignite the resulting flammable liquid vapors in the tire (just throw a lit match into the area of the gap between the tire and the rim). There will be a popping sound and the tire will snap into place tightly. Now the tire can be inflated with a conventional pump to the required pressure.
If this method seems too extreme to you (after all, you need to be careful with fire and gasoline so as not to burn the entire car), you can use another method. Inflate any car wheel or spare tire to a pressure of about 4 atm. Remove the hose from the pump and connect its free end (the one without the fitting) to the nipple of the tubeless tire that needs to be inflated (the spool from the nipple must be removed). Now connect the other end of the hose, on which the fitting is located, to the “inflated” wheel. As a result, the air from the inflated wheel will very quickly be distributed into the tubeless tire, and it will fall into place on the rim. Now you can remove the hose, screw the spool valve into the tubeless nipple, and pump it up in the usual way to the required pressure.
Scooter tires 130 60 R13
This size is most often found in scooters. It is suitable for moderately cold regions, icy and snowy roads. Typically, this size is made with Velcro, not spikes.
Characteristic of such rubber are deep longitudinal grooves with a system of outlet channels. It is better not to use spikes with this standard size, because... they will produce noticeable vibrations, which will lead to poor control.
Characteristics of tires for scooter 120 70 12
The standard size of winter tires for scooters 120 70 12 is no less common, both on domestic and foreign scooters. It is well suited for country roads, but less effective on city roads.
It has good cross-country ability if you prefer to ride a scooter through the forest or grove. The size is perfect for deep snowdrifts, but copes worse with loose snow. As in the case of the previous standard size, Velcro rubber is predominantly found here, rather than studded.
How to inflate a tubeless tire yourself?
Any motorist will confirm that it is very problematic to inflate an empty tubeless tire on your own, unless you have a high-pressure compressor in the garage, which is used in tire shops and service stations. In order for the tire to fit tightly to the rim of the disk without a gap, you need to supply a large amount of air into it in a short period of time, which is impossible to do with a conventional pump. What to do in a situation where there is no service station nearby and the tire is empty?
There are several ways to inflate a tubeless tire using available tools. The main task is to install the tire at the mounting location. When it closes tightly, it can be inflated using a conventional pump.
Flammable liquids
The wheel must be placed on the ground and the spool must be twisted off it. Inject a small amount of flammable liquid (5-10 ml) into the gap between the disk and the tire and set it on fire. The vapors will ignite and create pressure in the air, which will help the tire get into place. Then it can be easily pumped up with a conventional pump, having first screwed in the spool.
Gasoline, carburetor cleaner, WD-40 and other flammable liquids can be used as fuel. The main thing is not to overdo it with the quantity and have time to move to a safe distance, since the clap can cause the wheel to bounce above the ground.
We use the spare tire
If you have a serviceable, inflated spare tire, you can use it to inflate the tire. The spare tire must be “pumped” to approximately a level of up to 4 atm. Remove the hose from the pump and connect it to an empty tire on which the spool is pre-twisted. Then connect the end with the fitting to the spare tire, as a result of which air under pressure will begin to flow into the empty tire, and it will slam shut. Then you need to screw the spool into it and continue pumping.
Rope or cable
Before inflating, the wheel can be tightened lengthwise with a regular rope or string, thus reducing the gap between the rim and the tire. Then screw it into the spool and pump it up with a conventional pump. When the gap disappears, the rope can be removed and the inflation process can continue to the desired pressure level.
Using the above methods for inflating tubeless tires, you can “fit” the tire onto the rim yourself and then inflate it. But in order to use them successfully, you need to have practical skills, since some of them are unsafe. It’s better to practice in a calm environment and choose the most suitable option for yourself than to panic and make mistakes later.
How to inflate a tubeless tire yourself. Several ways to inflate a tubeless tire
After mounting a tubeless tire on a wheel rim, it is not so easy to inflate it. Tire shops and service stations do not count. We are interested in how to inflate a tubeless tire yourself.
Why is everything so difficult
The problem is that usually after mounting the wheel between the tire and the rim of the disc there is a gap of 5 millimeters to 5 centimeters or, as professionals say, the tire “does not sit in place.” There is simply no point in inflating such a tire with a foot pump, or even more so with a hand pump - all the air pumped by the pump will exit through the above-mentioned gap.
At tire service centers, this issue is solved simply: using pneumatic shock devices, powerful compressors, boosters or inflators, a large amount of air is supplied into the gap between the rim and the tire in a short period of time. After the tire “slams shut” and sits in its mounting location, air is pumped in the usual way - through the tire nipple using a standard hose with a pressure gauge.
What to do if there is simply no equipment for pneumatic impact? Over the years of operation, motorists have invented several ways to inflate tubeless tires. From safe to risky, from labor-intensive to effortless. Which method is more acceptable is up to you to choose.
We use flammable liquids
Place the fully assembled and mounted wheel on the ground. The spool from the nipple must be unscrewed. Apply a small (10 to 20 ml) amount of gasoline, WD-40 liquid or carburetor cleaner in a circle into the gap between the tire and the rim of the wheel.
Next, you need to safely (using a torch from a newspaper or throwing a match from afar) ignite the vapors of flammable liquid formed inside the tire, which, when ignited, will increase the volume of air and after a noticeable bang the tire will sit tightly in its seat.
How to quickly and effortlessly inflate a scooter and motorcycle tire?
Many bicycles come with compact hand pumps. I think you know as well as I do that as long as you “breathe” one and a half to two atmospheres into the tire with such a “magic wand”, you will be so tired that you won’t even want to go anywhere. And then, you know, there’s still a second wheel on the way! And the degree of reliability of this kind of plastic compressors leaves much to be desired: some part will fall off, the rod will bend, or the check valve will stick. In one season on my bike, I scrap a couple of these “arm trainers”. And an eight-year-old son, without the help of adults, is not able to pump up the tire on his “buddy” with such a device.
Oh, I wish I could combine the ease of use of a car compressor with the compactness of a hand bicycle pump... And while I was dreaming about this miracle, the manufacturer of electric compressors Berkut, well known to all motorists, had already created such a “device”! Just imagine, it looks like an ordinary bicycle pump, except that it is packaged in an aluminum case and does not have a handle, which you traditionally have to pull up and down. At one end of the Berkut Specialist VL-1000 there is a hole for screwing on a small hose, and at the other there are two buttons and a connector for charging the pump from a 220 Volt network. At both ends of the pump everything is closed with dust- and moisture-proof rubber plugs.
There is a mechanical pressure gauge on the hose, thanks to which you can determine the degree of inflation of your bicycle tires not by touch, but with the help of a precise instrument. At the end of the hose there is a fitting for the wheel valve (in common parlance “nipple”). In fact, there are two fittings, one is screwed onto the other: this design allows you to use the compressor to inflate tires with nipples of different standards.
The Berkut Specialist VL-1000 is turned on and off using a large red button, “settled”, as we said earlier, at the end of the pump. There is a smaller button nearby - it is responsible for the operation of the LED flashlight. Why does a compressor need a lantern? Well, don’t tell me... If the need to inflate the wheel arose after sunset, the built-in LEDs will help you quickly find the “nipple” and screw the fitting onto it. And finding the same nipple cap or some other “lost” thing in the dark is much easier with a flashlight than without it.
Does Berkut Specialist inflate a 27-inch bicycle tire quickly? Almost instantly. This battery-powered compressor inflated a flat bicycle tire to the rims to two “points” in 13 seconds! The instructions for this “gadget” say that it is not recommended to inflate more than two wheels up to 28 inches at a time, as this can lead to overheating of the pump. And if the wheels are larger in diameter, then you need to take a break after “inflating” each wheel. Well, I don’t know, having pumped up two “twenty-sevenths” wheels in a matter of seconds, the pump was still at a cool outside temperature. By the way, you can use the pump in a temperature range from minus 10 to plus 45 Celsius.
If we continue the topic of technical characteristics of the Berkut Specialist VL-1000, it should be noted that in one minute the pump is capable of pumping up to 10 liters of air from the atmosphere into the tire, and the maximum pressure produced by the device is as much as 8 bar!
Although the Berkut Specialist VL-1000 is positioned as a bicycle compressor, we decided to check whether it can become a friend for motorcycle tires. A pit bike wheel has approximately the same diameter as a bicycle tire, but due to its higher profile and wider width, it requires a significant amount of air. But in just 34 seconds, our test subject filled the rear tire of the pit bike to two atmospheres. It took ten seconds longer to inflate the front tire from 0 to 2 units (the fact is that the front wheel is one and a half times larger than the rear).
Winter wheels for scooters 10 and 12 inches
The diameter of the wheels is fundamental, because... actually determines the efficiency of the scooter on the road.
10-inch wheels on a scooter have better traction, which is logical: a small diameter increases controllability and maneuverability. They are better suited for city asphalt. At the same time, they are contraindicated for rural areas. Any pothole can lead to a sharp zigzag on the road, which will end in a fall.
12-inch wheels are more efficient off-road. This makes it easier to avoid potholes, and the shock absorption will be much better. On the other hand, handling on a city road is much worse, which is simply dangerous to health in icy conditions.
What pressure should be in scooter tires?
Pressure indicators are also important:
- If the pressure is too high, the size of the contact spot will be reduced. This will significantly reduce grip, which is unacceptable in winter.
- Low pressure, on the contrary, creates too large a contact spot, which can lead to “chewing” of the asphalt and an accident.
Normally, the pressure on the front wheel should be 1.8 atm, and on the rear wheel - 2. In winter, if the temperature is too low, the tires become tanned, it is allowed to reset it by 0.1-0.2 atm.
Correct scooter tire pressure
To improve tire performance, increase engine efficiency, and ensure road stability, it is necessary to maintain the correct tire pressure. They are designed in such a way that their shape must be maintained by internal pressure. If a tire is inflated correctly, it wears evenly and there is no deformation of the tread or sidewall of the tire.
An overinflated tire has a smaller contact patch, which negatively affects directional stability, especially when cornering. The center portion of the tread will experience the most wear. The tire becomes very rigid and transfers vibrations from bumps on the road more strongly to the body of the scooter. The suspension suffers: bearings and silent blocks, as well as shock absorbers.
If the tire is underinflated, then the grip on the road is also insufficient, wear occurs on the side parts of the tread. Due to increased friction, the tire overheats, which leads to the destruction of the carcass. A 20% lack of pressure results in a 30% reduction in tire service life. In addition, rolling resistance increases, resulting in increased fuel consumption.
Therefore, the pressure must be maintained at the recommended level. If the tire fits well to the rim and has no punctures, then it practically does not deflate. However, the pressure must sometimes be checked, at least visually. If you get on a scooter and the tire is noticeably deformed, it means that it urgently needs to be inflated.
To measure pressure, instruments called pressure gauges are used. They can be mechanical (pointer) or digital electronic. Pressure gauges built into compressors are usually not very accurate. But they are suitable for a scooter.
To how many atmospheres should a scooter wheel be inflated?
The following figures are usually used: the front wheel of a scooter is inflated to 1.8 atm, and the rear wheel - to 2 atm. In winter, the pressure can be reduced by 0.1-0.2 atm.
You should always inflate a “cold” tire, that is, after a long period of inactivity, since when driving it heats up and the pressure increases.
Please note: This article and the images in it are subject to copyright. Partial or complete reproduction on other resources without permission is prohibited.
How to choose tires for a scooter
There are several criteria by which you should choose tires. The first is the presence of a camera:
- Tube tires are equipped with an inflatable bladder and are therefore more prone to punctures. At the same time, they provide good natural shock absorption.
- Tubeless, on the other hand, are more resistant to punctures, but their shock absorption is poor.
It is also worth paying attention to the tire design:
- In radial tires, the cords are perpendicular to the wheel. They have less rolling resistance, but also cost less.
- In diagonal cords, the cord is located diagonally, the angle of which is set by the manufacturer. They are more resistant to rolling, but the price is higher.
- Mixed models combine the arrangement of threads, so they are most resistant to punctures, rolling and hernias.
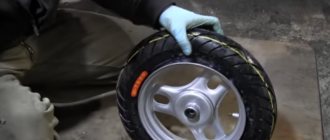
How to inflate a tubeless tire.
Drivers know that it will not be possible to inflate a tubeless tire with a conventional pump after installing it on the rim - the air will simply come out of the gap between the rim and the tire rim.
In order for the tire to “sit” tightly in its place on the rim, you need to supply a large portion of air in a short time, for example from a compressor receiver, as is done at a service station. But not everyone has such compressors in their garage, so how can you get out of the situation and pump up the “tubeless”, using what is called “improvised means”? It's actually not that difficult to do.
To do this you will need some gasoline, carburetor cleaner, WD-40, or any other flammable liquid. Place the fully assembled wheel on the ground and spray a very small amount of flammable liquid in a circle into the gap between the tire and the rim. Do not pour too much gasoline, about 10 grams is enough. After this, quickly ignite the resulting flammable liquid vapors in the tire (just throw a lit match into the area of the gap between the tire and the rim). There will be a popping sound and the tire will snap into place tightly. Now the tire can be inflated with a conventional pump to the required pressure.
If this method seems too extreme to you (after all, you need to be careful with fire and gasoline so as not to burn the entire car), you can use another method. Inflate any car wheel or spare tire to a pressure of about 4 atm. Remove the hose from the pump and connect its free end (the one without the fitting) to the nipple of the tubeless tire that needs to be inflated (the spool from the nipple must be removed). Now connect the other end of the hose, on which the fitting is located, to the “inflated” wheel. As a result, the air from the inflated wheel will very quickly be distributed into the tubeless tire, and it will fall into place on the rim. Now you can remove the hose, screw the spool valve into the tubeless nipple, and pump it up in the usual way to the required pressure.
How to properly change a tire on a scooter, step-by-step guide
- Place the scooter on the center support.
- If you don't know how to remove the wheel you need, check out the following tutorials: How to Remove the Front Wheel of a Scooter. How to remove the rear wheel of a scooter.
- So, we have the wheel in our hands. Remove the cap from the valve and unscrew the spool. We need to relieve the tire pressure.
- The tire beads usually fit well in the seats. It is not always easy to put them under siege. We will need two hammers, one of which must be of this type:
We bring the wedge-shaped part (it should under no circumstances be sharpened) to the part of the tire that is located at the very bottom of the disc (be careful, it is important not to damage the disc) and strike it with a second hammer. The blows must be confident. After one of the sides settles out of the seat, it will be easier to settle the rest of the circumference. - Now you will need special mounting blades.
If you think that you can remove a tire with a large screwdriver, as you did with bicycle tires before, you are mistaken. Tire blades only. You can buy them at any spare parts and automotive tools store. On the side opposite the valve, insert two blades at a distance of 10 cm from each other and take the tire rim out. - Now we smoothly bend the entire radius.
- The tire can be tubed or tubeless. In the first case, we will need to remove the camera. To do this, remove the air supply valve from the hole in the disk and remove the chamber itself. If the tire is tubeless, you do not need to touch the valve.
- Remove the tire from the rim.
- Now you need to install a new tire. If the tire uses a tube, we put one side of the tire on the disk, then put the tube in it, after sprinkling it with talcum powder. The valve must fit clearly into the hole without distortion. After this, you need to carefully bead the tire with the same mounting blades. If the camera is not in use, we skip the installation process.
- Now the important point. With a tubeless tire, the tire cannot be properly seated without a compressor. It is important to supply a large amount of air in a short period of time. If a chamber is used, it can be inflated with a conventional pump to the required pressure (usually up to 2 Atm for the rear wheel and 1.75 for the front).
- Check the quality of the fit of the rim on the disc. Check for leaks at the landing sites.