Engine QMJ 157 - characteristics and general description
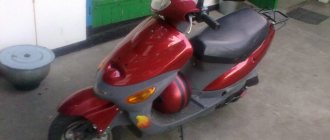
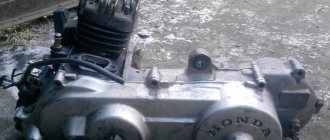
Like most equipment produced by Chinese manufacturers, the QMJ 157 four-stroke engine is reproduced from its Japanese counterpart. The power unit installed on a Honda scooter was taken as a prototype. The motor has undergone long-term testing under various operating conditions, proving itself to be reliable, trouble-free and durable.
Various two-stroke and four-stroke engines are used to power Chinese scooters
All that remains for Chinese engineers is to adopt a proven design and begin mass production. How successful the motor turned out can be judged by its area of application. The one hundred and fifty-seventh engine model, the power of which is enough to accelerate a full-size two-seater scooter, is today installed both on expensive scooter models - Honling, Forsage, and on budget scooters like the Viper Storm 150. This power plant has become legendary among fans of Chinese scooters.
The limited speed threshold of the scooter, associated with the relatively small cubic capacity of the engine and the developed power, forces tuning enthusiasts to modernize the engine.
When planning to improve a fairly good motor, you should first familiarize yourself with its technical characteristics. Let's consider the operating parameters of the engine.
Compared to 50cc four-strokes, it has quite good cubic capacity and power. The cylinder has a volume of 149.6 cm3, and the maximum power reaches 6.8 kW. The piston has a diameter of 57.4 mm and a stroke of 57.8 mm. At maximum power, the revolutions reach 7.5 thousand per minute. At 6 thousand revolutions per minute, the maximum torque is 9.8 Nm. Idle speed ranges from 1600 to 1700 per minute. The engine weighs a little - 27 kg.
Before you start using it, you should break in the engine and drive the scooter for 2000 km in compliance with the speed limit. With proper running-in, the engine service life reaches 25,000 km. The motor quickly and dynamically accelerates the scooter with the driver and passenger. A run-in engine does not require intervention and can operate for a long time without major repairs. Then it will be necessary to replace the rings, which does not require a major investment.
This power plant has become legendary among fans of Chinese scooters.
Air filter
It is not recommended to completely remove the filter element or replace it with a zero-resistance filter - this can lead to contamination of the carburetor. Experts usually recommend removing the plug that is installed at the inlet of the air filter.
Many reviews that affected the assembly of the 139QMB engine after tuning talk about installing a zero-resistance air filter. Despite the fact that this solution is one of the most popular, it is not always appropriate and justified.
The reason lies in the fact that installing such a filter leads to rapid contamination of the carburetor. The main reason for using a zero resistance filter is the need for a richer fuel mixture after installing a larger piston. However, this can be avoided by installing a new camshaft and replacing the jets in the carburetor.
Separately, it is worth noting that a standard carburetor equipped with a 16 mm diffuser is installed together with a 62–72cc piston system, while the 82cc piston system is equipped with a carburetor with an 18 mm diffuser.
For replacement, it is advisable to purchase a set of jets, since several different options may be needed to adjust the carburetor.
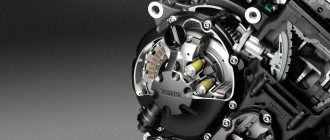
Engine device
Beginning scooter riders, if they need to repair the motor, try to understand its design. Diagram 157QMJ will help you obtain information about the structure of the power unit and its components. Having dealt with it, you can not only purchase the necessary spare parts for the 157 QMJ engine, but also correctly perform the work of assembling and disassembling the engine. Structurally, the motor is practically no different from its GY6 counterpart. The 157 QMJ has the same cylinder-piston group, clutch, crankcase, camshaft and muffler.
The bearing numbers, sizes of silent blocks and gears, diameters of the variator pulleys and the design of the kickstarter, generator and electric starter also correspond. The engine is cooled by the oncoming air flow. Starting is carried out from an electric starter or kickstarter. Torque is transmitted through a variator, which is an automatic integral transmission.
Depending on the design features of the scooter on which the engine is installed, it can be equipped with a CVT having an extended box. The engine is equipped with a standard power system, providing fuel consumption reduced to 2.5-3 liters per hundred. The power unit operates quite quietly, providing almost silent acceleration of the scooter during maneuvers.
The motor is equipped with a standard power supply system
Preliminary work
Before repair work, the most initial, necessary diagnostics of engine components, inspection of repair accessories, assessment of weather conditions, etc. are carried out. To summarize, the list of preliminary work is as follows:
- The motor of the bike must be cold; it is advisable not to ride it before repairing;
- It is necessary to clean the engine elements from soot and dirt in advance, since dirt can get inside the valves;
- The temperature in the garage (or other place where repair work is carried out) must be above zero;
- The bike is rigidly fixed on the stand or in other convenient ways;
- The necessary set of keys and containers are prepared and are at hand.
Engine tuning QMJ 157
Why do they tune a fairly reliable engine? Those who like to modernize their scooter explain the need for tuning by the limited speed threshold and the desire to increase power. The fact is that the engines of most scooters, having reached maximum speed, begin to run wild. This not only increases fuel consumption, but also significantly reduces the service life of the engine.
The design of the engine makes it possible to increase its cubic capacity from 150 to 170 cubic meters. To modernize, it is necessary to purchase a number of spare parts, as well as correctly perform the work of disassembling and assembling the motor.
It is important to properly break in the power unit after tuning. Let us dwell in detail on the complex of these issues.
Required spare parts
To carry out engine modernization work, you must purchase the following spare parts:
- four-valve cylinder head with a sports camshaft. The head includes rubber seals, a set of studs, a gasket and a camshaft chain;
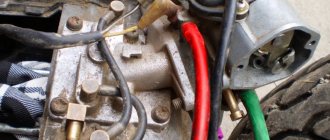
- carburetor having an intake manifold with a diameter of 30 mm and equipped with a gasket. Installing a CVK Racing sports carburetor will provide power to the engine after increasing the cubic capacity;
- working cylinder with a sleeve with a diameter of 61 mm and a piston of the appropriate size. You will also need a piston pin, a pair of circlips, compression rings, an oil ring with a retainer and a paper gasket.
After tuning, it is important to properly break in the power unit
. By performing simple calculations, you can make sure that replacing a standard piston with a diameter of 57.4 mm with one increased to 61 mm will increase the volume of the working chamber to 169 cubes. At the same time, the piston stroke length, equal to 57.8 mm, remains unchanged.
Disassembly
Having purchased all the spare parts necessary for tuning, you should study the procedure for disassembling the engine. It is technically possible to complete the entire scope of work without dismantling the power unit itself from the scooter frame.
The work must be performed according to the following algorithm:
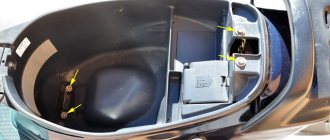
- remove the rubber mat and dismantle the seat. You will also need to remove the trunk, the plastic trim around the driver's seat and the exhaust pipe. The muffler remains in the same place. It is important not to confuse the locations of bolts of different lengths;
- dismantle the air purification filter assembled with the power supply system. Instead of the standard filter, which has a reduced throughput, you will need to install a Uni Filter. It will ensure the purification of the required amount of air for a 170 cm3 engine. To remove the carburetor, you will need to disconnect the throttle cable and remove the clamps from the gasoline hoses;
- unscrew the plastic covers that protect the engine from contamination and provide additional circulation of cooling air flows. The plastic casing is removed by unscrewing a group of screws. The plastic is then easily removed. Don't forget to cover the floor with old rags to absorb any oil that drips during disassembly;
Before tuning, study the procedure for disassembling the engine - Unscrew the 4 M4 bolts securing the cylinder head cover. After this, the cover, under which the rubber gasket is located, will quickly be removed. Don't forget to disconnect the breather hose from the air filter. It will then be mated to the new oil trap;
- unscrew the M12 nuts securing the camshaft and cylinder heads. Remove the upper camshaft mounting elements, ensuring that it does not move. Unscrew the chain tension adjustment cover and loosen the tensioner fastening with a screwdriver. Next, you need to remove the timing chain from the camshaft sprocket;
- unscrew a pair of M8 bolts securing the cylinder head. Carefully remove the cylinder by moving it along the studs. The metal gasket will require replacement as it cannot be reused. Use thin pliers to remove the piston pin retaining ring, after which the piston can be disconnected from the connecting rod.
Remember that the increased height of the four-valve head will require replacing the four studs that secure the cylinder-piston group to the cylinder head.
Assembly work is performed in reverse order
How should the studs be installed?
To unscrew the original studs, a standard technique is used, which is used by engine tuning enthusiasts. Screw two nuts onto the threads of the stud and use wrenches to press them tightly together. Then you need to unscrew the bottom nut by rotating it counterclockwise. Before screwing in new studs, apply blue sealant to the threads to prevent turning. The pair of cylinder fixing fasteners on the right side of the engine does not need to be removed.
Assembly
Assembly work is carried out in reverse order. Procedure:
- install gaskets and rings. It is important not to block the channel in the cylinder intended for lubrication of the cylinder head. When installing compression and oil scraper rings, they should be placed so as to ensure that the gaps are located at an equal angular distance;
- Carefully install the piston inside the cylinder complete with rings. A small amount of lubricant will make the piston installation operation easier;
- Apply sealant to the heat-resistant paper gasket, align with the cavities and channels, and then install the cylinder along the studs. The IN marking on the piston should point towards the intake manifold;
- connect the piston after the connecting rod and pin holes match. Install the cotter pins and make sure the retaining rings are secure. They must coincide with the grooves of the piston. Before starting work, it is necessary to apply lubricant to the piston pin.
All that remains is to install a new timing chain, making sure that the marks on the engine housing and the generator match. Then you will need to put the cylinder head on the studs, install and fix the camshaft, and also adjust the valve clearance in the range of 0.05-0.1 mm. The final steps are installation of spark plugs, oil catcher, carburetor and air filter. Now you can try to start the engine and start running it in.
Air filter
It is not recommended to completely remove the filter element or replace it with a zero-resistance filter - this can lead to contamination of the carburetor. Experts usually recommend removing the plug that is installed at the inlet of the air filter.
Many reviews that affected the assembly of the 139QMB engine after tuning talk about installing a zero-resistance air filter. Despite the fact that this solution is one of the most popular, it is not always appropriate and justified.
The reason lies in the fact that installing such a filter leads to rapid contamination of the carburetor. The main reason for using a zero resistance filter is the need for a richer fuel mixture after installing a larger piston. However, this can be avoided by installing a new camshaft and replacing the jets in the carburetor.
Separately, it is worth noting that a standard carburetor equipped with a 16 mm diffuser is installed together with a 62–72cc piston system, while the 82cc piston system is equipped with a carburetor with an 18 mm diffuser.
For replacement, it is advisable to purchase a set of jets, since several different options may be needed to adjust the carburetor.
Cylinder-piston group.
Finally, the most effective improvement for any engine is replacing the CPG. But not just a replacement, but the installation of a new, larger piston. Fortunately, there are now many ready-made kits on the market; you don’t have to sharpen or adjust anything, as with Soviet equipment. Moreover, there is even a lot to choose from. For example, for various models with a volume of 50 cubic meters, they offer kits to increase to 63, 72, 82 and even 90+ cubic cm. In some cases, this is an almost double increase in power.
The situation is similar with larger engines, for example, for 125 cubic meters, sets of 150 or 170 cubic meters are sold. Some, in the process of tuning a scooter, manage to increase 150 cubic meters with their own hands to 225 cubic meters. Choosing the right part is not the most difficult thing, the most difficult thing is installing it. After all, this process involves almost complete disassembly of the engine. You will be faced with the need to have several special removable keys in your arsenal; you can ask them from friends or borrow them for the evening at auto repair shops. We strongly recommend studying the technical component in order to properly disassemble, replace the necessary elements and assemble the motor.
Alas, for some, increased power does not promise anything other than breakdowns or inadequate performance. This is because by significantly increasing power, you inevitably entail work on all other nodes. Let's imagine that we installed a new 92 cc CPG on an old 50 cc engine. The first thing to check is the condition of the connecting rod, crankshaft and bearings. Otherwise, they will fly first, followed by our new system of both cylinder and piston.
Great, we added new bearings to the CPG, an elbow with a connecting rod, now we can be sure of reliability. But the engine does not go faster, and we decide to purchase a new carburetor. Now the mixture is too rich, and we understand that the exhaust needs to be changed. After such modifications, the engine sounds loud, accelerates perfectly, but the maximum speed is slightly higher than before and the variator sounds strange. After installing a high-speed CVT, for example from the Italian manufacturer Polini, the engine will be able to fully realize its new power. The last stage is an inspection of the brake system; you don’t want to find out at a speed of 60 km/h that the brakes are now comparable to bicycle ones.
As a result, after replacing almost all the components, we got a very fast “flea” that can surprise your friends and experts in this technology. Over time, you can make changes to the chassis system, replace shock absorbers, and install more attractive wheels. Often, the modernization process does not stop there, and after tuning a scooter 50, 150 with your own hands, impressive improvements in appearance are made. The moped is repainted, panels are changed, new devices, lighting, and so on appear.
Scooter ignition switches
This type of switch often has an engine speed limiter, which allows you to increase its service life. From us you can buy standard scooter switches:
- CDI GY6 125/150СС 152QMI/157QMJ;
- CDI GY6 50CC 139QMB;
- CDI HondaDio AF18;
- CDI Honda Dio AF-27;
- CDI Honda Dio ZX AF-34;
- CDI Honda Dio ZX AF-35;
- CDI Honda Dio ZX AF-34 small. plug;
- CDI JH70 Delta;
- CDI Yamaha Jog 3KJ;
- CDI SuzukiLet's AS50;
- CDI switch Honda Dio AF-27;
- CDI JH110 Delta;
- CDI Honda Lead 90CC;
- CDI JH70 Delta;
- CDI GY6 with wire;
- CDI Yamaha Jog 3KJ;
- CDI GY6 139QMB/152QMI/157QMJ;
Also on sale are CDI switches combined with an ignition coil:
- CDI TB50 Suzuki Ran (BM Style/Joy) - suitable for Chinese scooter engines with chain drive;
- CDI E0120 Suzuki Address AD50 50CC.
Liquid cooling system
The option is similar to what is installed on cars. The coolant here is antifreeze, which is low-freezing (from minus forty to minus sixty degrees Celsius) and high-boiling (from one hundred twenty to one hundred and thirty degrees Celsius). In addition, antifreeze achieves an anti-corrosion and lubricating effect. Pure water cannot be used in this capacity.
Overheating of the cooling system can be caused by overload or contamination of the surfaces that dissipate heat. Also, individual elements in it may break, causing liquid to leak out. Therefore, the cooling operation must be constantly monitored.
Removing the variator
Remove the variator cover. There is nothing complicated about this: we unscrew all visible bolts and remove the cover from the engine. On the 157QMJ engine, in order not to bend the kickstarter return spring bracket, first remove the crank, remove the retaining ring from the kickstarter shaft, and only then remove the cover itself. You can, in principle, remove it this way, but then you will have to trim the bracket a little.
Removing a variator is not much easier than removing a generator. As with a generator, you need a good puller. Fortunately, you can make a puller yourself: for a 139QMB engine, instead of a puller, you can use a metal plate: remove the bendix from the niche, insert the plate into it, press the variator impeller tooth against the plate and unscrew the nut.
You can also make a more advanced puller: look for an unnecessary clutch disc from an IZH motorcycle, weld a rod and several hooks for the impeller teeth to it
For the 157QMJ engine, the puller is made according to a slightly different principle
You can go to the nearest tool store and buy a universal key for the grinder. It is very suitable for removing the variator of the 157QMJ engine and costs a penny
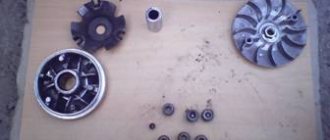
The principle of removing the variator is identical to the principle of removing the generator: fix the impeller with a puller, unscrew the nut, remove the variator from the axle. After removal, we completely disassemble the variator and check all its parts for wear.
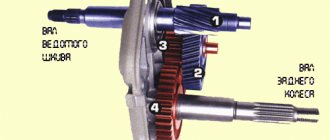
On the 157QMJ engine there is a kickstarter gear behind the CVT. It is not so easy to remove, but if you are going to subsequently halve the engine, you will have to remove it.
This gear can only be removed with a suitable puller.
Adjustment procedure
Proper engine operation depends on compliance with operating rules and strict compliance with technical inspection requirements. Before you start setting up the carburetor on the Alpha moped, you need to first carry out a number of works:
- Clean the carburetor body.
- Replace the spark plug.
- Replace the air filter.
- Make sure the connections are tight.
Now you need to accurately set the gasoline level in the float chamber by bending the float tongue. By connecting a transparent hose to the drain fitting, it is possible to determine the absolute fuel level. To do this, the hose is lifted up. Typically the height is at the junction of the carburetor caps.
The next step is to adjust the idle speed system using quantity and quality screws. The whole process takes place on a warm engine. The quality screw is screwed in until it stops and then unscrewed two turns. Start the engine and, by rotating this screw in both directions, achieve maximum speed. Then use the quantity screw to reduce the speed to the minimum stable speed. It is possible that the procedure may need to be repeated several times until the desired result is achieved.
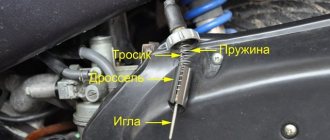
Adjustment of the middle speed range occurs by raising or lowering the needle. To do this, you need to unscrew the throttle nut, remove the needle and move the corkscrew into one of the grooves: above the middle division to lean the mixture and below to enrich it.
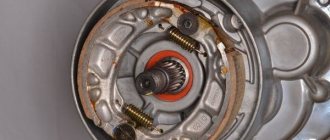
Removing the generator
But with a generator it’s not so simple. The generator can only be removed with a puller. All your attempts to knock down the rotor with a hammer or pry it out with a crowbar are doomed to failure.
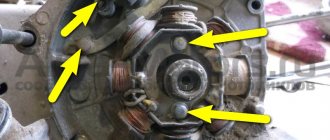
Unscrew the bolts on the cooling impeller and remove it and the rotor
Fix the rotor with a puller and unscrew the nut (right-hand thread)
Install the puller and pull the rotor off the crankshaft journal
We blow out the generator, unscrew the bolts and put it somewhere away