Do-it-yourself replacement of rear wheel bearings on a Honda cb 400 motorcycle.
Everyone knows that the Honda cb 400 suffers from several childhood diseases, one of which is weak wheel bearings. My bearings failed literally every season, and I didn’t install some Chinese ones, but All Balls, that is, high-quality expensive bearings. Of course, someone will say that it’s no use driving around tank training grounds. But I will object! After all, after they helped me figure out the markings of the wheel bearings, with the same driving characteristics, the bearings began to run much longer.
Installation
Everything would be fine, but the crankshaft has a collapsible design and also does not have a central axis. And if you stuff a new bearing without placing some kind of base under the axle cheek, then there is a high probability that the alignment of the crankshaft axes will be disrupted and then its place will only be in the trash.
Therefore, we are looking for a piece of some kind of iron sheet and cutting out a wedge in it for the connecting rod.
We pass the sheet between the cheeks and, using a mandrel, without fear of disturbing the centering of the axes, we stuff a new bearing, then we stuff the sprocket there. To make the installation process easier, the crankshaft can be frozen in the freezer, and the sprockets and bearings can be heated with a hairdryer or in the oven (no more than 250 degrees!!!) and then everything will fit literally by hand and there will be no need to stuff anything.
Replacing the rear wheel bearing of a Honda cb 400 motorcycle.
What wheel bearings to put on a motorcycle. So, we are talking about the fact that wheel bearings are the weak point of the Honda cb 400 motorcycle. Returning from Estonia last year, I even stopped on the highway in the Vyshny Volochok area because the bearing cracked and fell apart. Of course, you can periodically wobble the wheels back and forth to identify play and replace them in a timely manner, but, as practice shows, bearings still fly completely suddenly and without warning. No, it’s good when, before dying, the bearing starts to howl, and it’s good when you don’t drive with direct flow and are able to hear this howl! And if not? And if not, you need to initially install good bearings and do it correctly, which is what we will discuss.
To replace wheel bearings we need... bearings! In the amount of 3 pieces. Two of them are directly hub bearings and one is a rear sprocket bearing.
What bearings to take? I highly recommend the All Balls kit. This is, of course, very convenient when you don’t have to think about and assemble separate bearings and anthers, and yet this is a world-famous company that produces high-quality products. But such sets don’t last long. The fact is that the wheel bearing gets very hot during operation. When metal heats up, what? That's right, it's expanding! And All Balls, as far as I know, does not produce bearings with expansion tolerance that would be suitable for the Honda cb 400 motorcycle (steering column bearings, for example, which do not heat up during operation, are simply excellent from All Balls!).
This very expansion tolerance I’m talking about has its own index C3. Bearings with index C3 are specially produced with clearances larger than normal, so the metal has room to expand when heated, and such bearings become square more slowly. I installed Polish NSK bearings with the corresponding marking 6303DDUC3. The flight is normal!
The driven star bearing is Koya. Stupid, I forgot to rewrite the markings!
Yes, and here's another thing. Despite the fact that all bearings are of a closed type, still lubricate them with Lithol during installation, because if the boot does leak somewhere, Litol will at least retain some moisture and prevent the balls from rusting ahead of time (especially important during winter storage in an unheated garage).
Let's move on to replacing the wheel bearings.
We hang up the motorcycle and remove the wheel.
We pull out the axle, remove the driven sprocket, we see the anthers. We pry them off with a screwdriver and remove them.
Bearings are found underneath them. Some of them are in good condition.
And for some, a scribe came. Because of this, I drove home at a speed of 40 km/h for an hour and a half))
We knock out the old bearings from the inside. If the bearing is completely dead, like mine, knock it out carefully, because... if it falls apart, it will be very difficult to knock out the outer axis later.
We lubricate the new bearings with Lithol (optional, as already mentioned), and press them into place. There are a couple of tricks here. First, when disassembling the wheel, you noticed that there is a spacer between the two wheel bearings. So, under no circumstances should you press new bearings close to this bushing. The fact is that the bushing rests against the inner axis of the bearing. If you overdo it and press it too hard, this bushing will create unnecessary unnecessary stress on the inner axle. A bearing with this approach will not last long. Therefore, leave a couple of millimeters, let the spacer dangle a little.
Secondly, it is better to press the bearings with a special blank, which will simultaneously put pressure on both the outer and inner axis of the bearing. In the absence of one, I use a large head that presses only on the outer axis. And I press it in with a hammer.
If you don’t have a head at hand, you can press the bearing in simply with a hammer, but you need to hit it crosswise and not too hard so that the bearing is pressed in as evenly as possible. This is not the best method and I recommend using it only if there is no choice. The numbers in the photograph indicate the location and order of impacts when pressing using this method.
After replacing the bearings, we assemble the motorcycle.
Share “Replacing the rear wheel bearings of a Honda cb 400 motorcycle with your own hands.”
Bearing arrangement in a scooter wheel
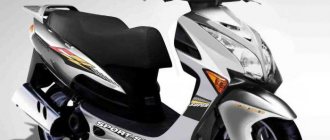
A scooter's rear wheel bearing has one job: rotation. The quality and design of the bearing must withstand the most difficult loads and operate stably throughout the entire life of the scooter. Regardless of its location in the front or rear wheel, the bearing may sooner or later wear out. In this case, the controllability of the scooter is significantly lost and the acceleration dynamics disappear. The malfunction is especially noticeable when overtaking, sharp maneuvers, or reaching maximum speed. In such cases, the steering wheel begins to move, it is difficult to control the scooter, and the condition of the tires and other important elements is normal.
Diagnostics
You can check for bearing faults as follows:
- Place the scooter on the main stand;
- Point the scooter so that the rear wheel is raised;
- Spin the wheel as you wish;
- Pull the wheel to the sides.
If there are extraneous sounds, the wheel moves too tightly, or there is noticeable play, you can assume that the bearings on the wheel are faulty. The difference between the rear wheel and the front is that there is a gearbox on the rear wheel, which means the scooter gearbox bearings will have to be replaced.
Results
Every scooter needs repairs from time to time. Malfunctioning of a vehicle not only interferes with a comfortable ride, but also endangers the life of its driver. Repairing a scooter with your own hands is quite simple, if you sit down first and properly understand the details. Sometimes the process may stall at some element, then it is recommended to carefully follow the entire sequence of steps from the very beginning - perhaps a mistake was made somewhere. When replacing a rear wheel, you need to take your time and be careful, and then you will succeed.
Replacing scooter gearbox bearings
In most scooter models, bearings are located in the same places; let's give an example of removing and installing bearings on a Honda Dio. The first step is to pull out the old bearings that are tightly pressed into the gear housing. In most cases, you will have to find a puller to remove it.
It is very important to carefully remove old parts and not touch important parts of the gearbox. On the Honda Dio scooter, three bearings are installed in the gearbox:
- on the body;
- on the intermediate shaft;
- on the gearbox cover.
It is extremely important not to tear the gaskets on the gearbox; they are extremely difficult to find in stores. Otherwise, you can make it yourself from paranit or thick cardboard. The replacement process is carried out as follows:
- We place the scooter on its side for better access to the gearbox, if necessary, remove the plastic;
- Afterwards, the old bearings are dismantled;
- Installation of new ones is carried out by preheating the seat, while the bearings themselves need to be cooled;
- We check the integrity of all gaskets, if damaged, replace them, do them yourself, or fill the gasket area with high-quality sealant.
- In the next 100-300 km after the replacement, it is recommended to change the oil in the gearbox.
Recommendations from mechanics
You can find many recommendations and discussions on how to remove the rear wheel on a scooter. To make repairs easier, experienced motorists recommend using penetrating lubricant WD-40 (or gasoline in extreme cases), and thoroughly clean the parts from dirt and degrease before installing them. It is also strongly recommended to lubricate the splines with grease. After installing the nut, it is recommended to tighten it firmly, jerkily, but without striking. To hold the wheel in place, instead of a beam, you can use a CVT cover, which will prevent it from turning.
As a last resort, if you are unable to dismantle the wheel yourself, experts recommend contacting the nearest trusted service center. The same should be done if, after removing the parts, you find serious damage to one of them.
Replacing front wheel bearings
On the front wheel, the replacement process is much simpler; on most scooter models, the bearing is located on a spacer sleeve. After removing the wheel and if there is a brake disc, it is enough to install and fix the wheel as securely as possible with the ability to rotate in a circle. Next, we need a punch or a simplified analogue - a screwdriver and a hammer. The next stage is to apply an accurate and strong blow to the punch located in the inner side of the sleeve. You need to knock along the entire perimeter of the hub so that it comes out evenly from the wheel. Together with the bushing, the bearing will be dismantled, which needs to be replaced.
Video
Reasons for withdrawal
There are usually several reasons why an owner has to remove a wheel:
- after a long ride, balancing is required;
- the disc is cracked or bent;
- drum brakes have stopped working properly (worn out pads, problems with the brake system, etc.);
- complete replacement of spare parts;
- restoring a tire after a puncture or replacing it completely;
- scheduled maintenance;
- failure of internal bearings;
- removing the gearbox;
- The bushing axle is cracked.
Correct replacement of wheel bearings in motorcycles
1. Wheel bearings on motorcycles are maintenance-free! They have a special lubricant and the walls are not removable. Any manipulations with the bearings themselves are pointless. 2. Most motorcycles with a conventional fork and swingarm have only 5 wheel bearings. Two in front and three in back. At the back there are two for the wheel and one for the hub to which the star is attached. 3. Anthers. There are two identical boots on the front (if the speedometer readings are taken from the wheel, then they are different). There are two different ones at the back - one of the wheel bearings is covered by the hub. 4. Both wheel bearings need to be replaced. Exception: star bearing. But since you have to take it apart anyway, it’s easier to change everything at once. 5. In principle, there are no original bearings. When ordering an original for a Japanese motorcycle, you will receive KOYO, NSK, NTN, etc. in a bag with your brand. Hence there are two options: either don’t bother and order the original, or buy the same thing or better, only much cheaper and without a nameplate. But here you need to be careful when choosing, for example, if you have 6004 bearings, then there are a million variations for these sizes, differing in letter symbols (also by manufacturer). The right choice deserves a separate article. 6. Anthers. It's the other way around here. Even if you can choose the size, it is still better to take the original. 7. Wheel bearings are serious. The destruction or wedging of a bearing while driving is a very unpleasant situation. According to the manual, for example, Honda instructs its motorcycles to check the wheels, tires and fork bearings every 12 thousand km. with replacement due to wear. This means that at least once every 12 thousand kilometers you must hang the wheels, rotate them for lightness and extraneous sounds, and also try to turn them up and down; if there is even the slightest play, the bearing requires immediate replacement. Despite the manual, just be attentive to your equipment, for example, you can also check the bearings during tire fitting, on a removed wheel with your finger (rotation, play).
Real life story: when one of my front bearings died, I heard it while rolling the motorcycle into the garage.
So, let's get down to business, for replacement we will need: - A set of new bearings and anthers. — A set of tools for wheel removal. — A large, long, flat screwdriver with a handle designed for impact. - Hammer. — A set for pressing bearings or nut heads exactly to the size of the outer race of the bearing.
— Litol lubricant or any similar waterproof lubricant, even cannon fat will do.
— Not necessary, but a puller for the internal bearings will make life easier.
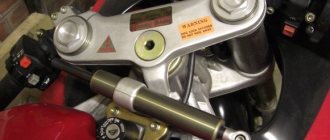
Front wheel. 1. Remove the wheel. In order not to damage the brake discs and the wheel itself, it is better to carry out all manipulations by placing the wheel on an old tire. 2. Remember the location of the outer bushings (left/right) even if they are the same (Fig. 1)
3. Use a screwdriver to pull out the anthers. Obviously, any boot becomes unusable after removal. 4. Place the wheel. Take a long screwdriver. We move the inner sleeve slightly to the side and hit the inner race of the lower bearing, sometimes on one side or the other. We try to do this so that the bearing does not warp. After several blows, if there is any, then you can already use the puller. If not, then we’ll knock him out completely. There is one point at this stage: if previously the bearings were installed incorrectly and the inner sleeve was pinched, then it will need to be knocked to the side; a steel rod half the thickness of the axle is best suited for this. Insert it to the level of the inner sleeve and hit it with a hammer with a fulcrum against the inner race of the bearing. In this case, the inner surface of the hub may be damaged, but this is not a problem - it only serves to prevent overtightening the bearings when tightening the main wheel nut. 5. So, we have a wheel without boots of bearings and bushings. Using a screwdriver, a cloth and some kerosene, we wipe off all the dirt, rust, etc. where they were. 6. Take lubricant. Lubricate the bearing seat with it. 7. Take the bearing, take a pressing tool of the required size or a regular head to match the size of the outer race (just check in advance that they are at least a micron smaller than the seat). And slowly, without fanaticism, hammer in the bearing until it stops. attention! Do not hit the inner race of the bearing! its device is not designed for lateral loads, much less shock. Therefore, any knocked out bearing goes into the trash. 8. Turn the wheel over and replace the inner hub. 9. We drive the second bearing in the same way, while making sure that the inner sleeve is not pinched! The wheel stops do not correspond to these dimensions! 10. Original boots usually already contain lubricant. If not, then you can also use any waterproof lubricant. The anthers are driven all the way in the same way as the bearings. 11. The bearings and boots are in place, we assemble everything, check it and ride.
Rear wheel. With wheel bearings everything is the same, the only difference is the star bearing. Usually it is pressed not only itself, but also an additional bushing into it. You can also knock it out with a suitable sized head from the kit. You can hammer in the new bearing without damaging it by using the old one as a backing and hitting the bushing through a piece of wood. rice. 2
Sequence and features of work execution
Before removing the rear wheel from a moped or scooter, you need to have all the necessary tools. If you have a special case with keys in your garage or home, you can immediately start doing the work. The procedure is not complicated, somewhat reminiscent of a similar operation with a car. The only difference is that there are a large number of other structural parts inside that prevent quick disassembly. Although the part itself is fixed with only one nut.
Work should begin by placing the vehicle on the step. It is important to choose a flat, stable surface so that when dismantling the scooter does not fall on its side. If you have performed this procedure a long time ago, we strongly recommend treating all threaded connections with WD-40 spray. If there is rust, you will have trouble unscrewing it. Therefore, the use of this spray will greatly facilitate the procedure, since all the bolts and nuts will be easy to unscrew. To prevent the wheel from spinning when dismantling, press the brake pads by securing the brake handle with a regular belt, as in the photo:
The design of most models requires preliminary removal of the muffler along with the exhaust pipe. If you do not do this and immediately unscrew the nut securing the wheel, it will not come off, since the muffler will rub against the tire. To remove the clamps, you need to loosen the fixing bolts and then unscrew the two nuts located under the power unit. Having done this, carefully remove the muffler and leave it in a convenient place.
For example, in some cases, Chinese scooters do not require preliminary removal of the exhaust pipe (for example, on the Viper 150 model with a drum brake system). Much depends not only on the design, but also on the width of the tire/air pressure inside it. On the other hand, having removed the exhaust after all, removing the wheel rim will be significantly simplified.
Note! A paronite gasket is installed between the exhaust elbow and the cylinder. Don't forget to put it aside so you can put it back in its original place later. Otherwise, the exhaust sound will deteriorate. In addition, the absence of a paronite gasket increases the risk of getting a leg burn from exhaust gases that have a high temperature.
After removal, unscrew the bolt holding the shock absorber at the bottom. Move the stand to the side. Some scooter models have only one shock absorber, located where the CVT is. There is no need to unscrew the latter (only if you plan to further remove it and overhaul/replace it). If your scooter has a rear disc brake, be sure to unscrew the caliper and move it to the side.
A flat tire, repair of shock absorbers, brakes or muffler make many drivers wonder how to remove the rear wheel on a scooter. This is more difficult to do than it seems at first glance. Although the second wheel is secured with only one nut, this operation may require special skills and knowledge.