So, let's look at how to replace wheel bearings efficiently and correctly at home without unnecessary steps, in compliance with safety rules, and also without damaging other parts of the motor vehicle through your actions.
Let's replace the bearings using the example of an IZH motorcycle. It can be immediately noted that all models and modifications of this brand of motorcycle are identical in terms of wheelbase, regardless of the year of manufacture. First, let's look at what a wheel is made of.
The motorcycle wheelbase includes:
- hub with brake drum;
- rim;
- a set of spokes and a tire with a tube. The standard for newer models is 18 radius; on earlier models, 19 wheel radius is also found.
Attention!
It is important to know that the bearings go to size 203 wheels, two per wheel.
Preparation for repair
When starting work, initially prepare the place where you will disassemble your pet. Wash the area where you will park the motorcycle thoroughly so that unnecessary objects and dirt do not interfere with your further actions. You also need to wash the motorcycle before disassembling, although many do not want to do this, but for your own convenience and the comfort of removing vehicle spare parts, this must be done.
To disassemble a motorcycle, you need to prepare the necessary tools, without which it is impossible to replace the bearings.
Tools that will be required to work with the Soviet motorcycle IZH:
- Phillips screwdriver;
- flat screwdriver;
- hammer;
- wooden block;
- open-end wrenches for 10,12.13,14,17,19,22,24,27;
- pliers;
- breakdown.
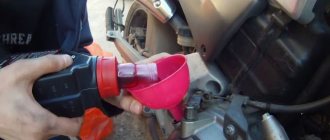
You will also need lubricating oil. You can use regular diesel oil to lubricate bolts and during assembly; solid oil or litol-24 - for impregnation of a new bearing. Decarbonizing WD-40 (or a similar penetrating lubricant) may be useful to remove rust from bolts that are difficult to remove.
Installing the motorcycle at the workplace
Once you are fully prepared for disassembly, start by placing the motorcycle on the cross stand, first removing the sidecar if you have one. This action is performed solely for the convenience of repair, therefore, if for some reason you do not want to disconnect the stroller or it is not possible, you can replace the bearings along with it.
Before repairing the motorcycle, it must be placed on a cross stand.
If you do not have a central stand, then install a beam (stump) under the frame in the engine area to secure the device so that when removing the wheel it does not fall on the front fork or rear suspension, depending on which wheel you remove. A fall or load on the chassis can damage it, which in the future will only complicate your repairs, both financially and physically.
How can you replace a motorcycle part yourself?
The correct bearing replacement depends on many conditions.
Especially if you are doing home renovations in your garage.
Repairs can be made at a service station. However, you will need to spend money.
It is not a fact that the repairs will be carried out efficiently.
Save money.
Decide to repair and replace the bearings yourself.
To do this, diagnose bearing failure.
Do it like this:
Get behind the wheel of your motorcycle and pick up speed along a straight, flat road.
Keep the steering wheel straight.
If the wheel wobbles in different directions, then this is the first sign of worn-out parts in the bearings.
Pick up speed.
An imbalance will appear in the front wheel - the second sign of a product malfunction.
Now listen at speed.
Hear a grinding sound, a whistle, a howl - you are on the right track - repairs and replacement are needed.
For greater confidence, place the motorcycle on a stand.
Spin the wheel by hand. Make sure you don't make a mistake on your first survey.
Grinding and scratching noises are heard when you rotate it.
Rock in different directions perpendicular to the axis of rotation.
Do this to make sure there is any play in the bearing.
If you feel any play, you definitely need to change it.
Removing the rear wheel
Let's move on to removing the rear wheel. We remove the seat by pressing the lever, which is located in the front part of the base of the seat, open it and see that there are wires connected to it, connected on chips, which go to the brake light mounted in the pencil case, located at the back. We disconnect them, and, pulling the seat back, remove the seat along with the frame wing.
Removing the seat from an IZH motorcycle
Now nothing bothers us. We proceed to loosen the drum, tension bolts with lugs, which are located on both sides of the wheel and are tightened with a bolt (axle), then carefully knock out the axle itself and take it out, after which we screw the nut back onto the bolt and put it in a clean box or cloth. We also put a spacer sleeve there. Do not forget that the threads are left-handed everywhere, that is, they unscrew clockwise.
The process of dismantling the axle of an IZH motorcycle
We remove the wheel by lifting it up and, slowly rocking it, moving it left and right out of the drum. The drum can be left on the suspension if it does not require any intervention.
Removing the rear wheel
Removing the front wheel of an IZH
Use the cross stand to support the motorcycle.
If you have a stroller, you need to disconnect it.
Let's say your motorcycle doesn't have a kickstand.
No problem.
Place an old wheel or a wooden stump under it.
This is necessary for insurance purposes and also to avoid damage to the fork.
We unscrew the bolt that secures the fork axle at the front.
Turn it all the way in any direction.
The brake drum cover must be removed.
No need to bother and disconnect the cable that goes to it.
Next, loosen the nut of the bolt that tightens the wheel axle.
Turn the axle out from the left side, while you need to rotate it from right to left.
We remove the axle itself.
Place the wheel on a flat surface.
Removing the stroller wheel
1 — front adjustable rod; 2 — middle adjustable fastening rod; 3 — rear collet clamp; 4 - front collet clamp
Removing the wheel on the stroller also does not take much time. It is recommended to remove the sidecar from the motorcycle and then carry out repairs. To do this, you need to unscrew the two bolts of the lower fastening cams (3 and 4 in the figure), which, when unscrewed, are loosened and make it possible to disengage.
You also need to unscrew the two control rods (in the figure - 1 and 2), which go to the top of the frame. They are fastened with bolts that go into special ears. Having unscrewed the lower and then the upper links, we simply move the stroller to the side.
During this operation, the motorcycle must be placed on a cross stand to avoid falling. You can also prop it up with another convenient object if there is no footrest, or you can simply put the motorcycle at speed and, lifting the sidecar, place a stump - in the future, this will ensure safe removal of the wheel.
In order to unscrew the axle nut, you need to pull out the cotter pin. Only after this do we unscrew and remove the wheel. The axle, along with the drum and brake pads, remains in place. To avoid losing the nut, screw it back onto the axle.
Removing the sidecar wheel of an IZH motorcycle
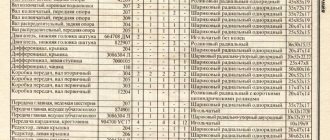
Bearings IZH-7.107 “Planet-5”. Catalog 2002
Attention: The electronic auto parts catalog is intended for reference purposes! Our company only sells those products that have prices listed.
| Number | 203 |
| Name | Bearing GOST8338-75 |
| Quantity per "for IZH 7.107 (Planet 5); for IZH 7.107-01 (Planet 5-0" | 2 |
| OKPO class | 46 Rolling bearings |
| Number | 203 |
| Name | Bearing GOST8338-75 |
| Quantity per "for IZH 7.107 (Planet 5); for IZH 7.107-01 (Planet 5-0" | 2 |
| OKPO class | 46 Rolling bearings |
Part number on drawing: 1
Bearing GOST8338-75
Serial number: 203 Quantity per model: 2
| Number | 304 |
| Name | Radial ball bearing (d=20, D=52, B=15) |
| Quantity per "for IZH 7.107 (Planet 5); for IZH 7.107-01 (Planet 5-0" | 1 |
| OKPO class | 46 Rolling bearings |
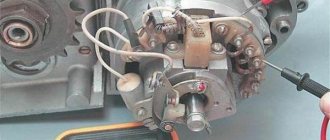
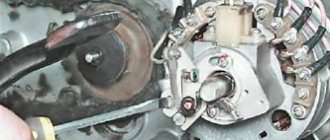
Removing the wheel bearings
We disassemble the wheel itself in the following sequence:
- Having unscrewed the oil seal housing, remove the cover (decorative) and the washer;
Using a family wrench, remove the oil seal housing (the first washer will be in it), then remove the decorative cover, if any. - remove the retaining ring, then the washer from the hub;
- carefully knock out the bearing.
The left bearing is pressed through the hole of the right one using a drift and a hammer.
Having removed the spacer sleeve, we knock out the right bearing with careful blows of a hammer on a wooden block, which should easily fit into the base of the wheel (bearing seat). You can also use a breakdown or a metal tube, but the main thing is not to damage the landing site, since it will be difficult to fix anything later.
We knock out the first bearing, then turn the wheel over and knock out the second bearing.
Attention!
An important factor when operating a motorcycle is that you need to constantly monitor the tension of the spokes, as this is the first reason for the rapid wear of the wheel bearing. The tightening can be done without removing the wheel using a special wrench.
Once you have everything taken apart, start cleaning all the parts that were removed, except for the old unnecessary bearings (these can be set aside or simply thrown away). All seats should be thoroughly wiped and dirt and dust should not be allowed to enter the subsequent assembly, as this will lead to accelerated wear of parts.
Installing wheel bearings
Pressing the bearings is done in the reverse order, but there are some nuances here. You need to act more responsibly, since performance and durability will depend on how correctly you do everything.
Assembly sequence:
- install the right bearing (having previously lubricated it with lithol-24);
Press in the first bearing. To do this, place an old unnecessary bearing on top of it and gently hit it with a hammer (as in the figure below)
- insert the spacer sleeve;
Insert a spacer on the back of the wheel
- install the left bearing and lubricate it well;
The process of pressing new bearings
- put the hub washer on and lock it, put on the retaining ring;
- install the decorative cover and washer;
- install seals;
- tighten the oil seal housing.
Once the bearings are in place, we move on to the final process.
Crankshaft bearings Izh Planet (2505KM 2 pieces metal cage)
Characteristics of bearing 2505 / N2205
| Parameter | Designation | Meaning | Units |
| Bearing inner diameter | d | 25 | mm |
| Bearing outer diameter | D | 52 | mm |
| Bearing width | IN | 18 | mm |
Please note, these are new bearings. They are declared to be manufactured in Russia, although in fact it is impossible to verify the manufacturer of the components, since often modern Russian factories are only assembly sites.
Reinstalling the wheel
The consequences of this operation determine how many times you will twist the nuts. As a rule, everyone is in a hurry to tighten the brake drum - this is not worth doing.
So, first of all, of course, we put our wheel into the drum, then we need to get the bolt into all the necessary holes and tighten it with a nut. Now we proceed to tensioning the chain with special tension bolts. It should not be overtightened, but it should not be loosened either, as it will quickly stretch and may eventually fall off while moving. After making sure that the chain is tensioned correctly and the wheel is level (see suspensions accordingly), proceed to tighten the drum, then tighten the wheel. Well, the very last moment - put the seat on, not forgetting to connect the wiring, and remove the motorcycle from the stand.
This completes your repair. In all this, do not forget to monitor the tension of the spokes and do not allow the tire to be flat.
Replacing motorcycle wheel bearings
5 (100%) 4 votes