Small engine two-wheelers are growing in popularity. On the Russian market you can find models from various manufacturers from around the world. Equipment made in Japan is always famous for its quality, reliability and durability. One of the world leaders in the sale of scooters is Japanese. Many other manufacturers rely on its products. It accounts for thirty percent of all motorcycle sales on the market.
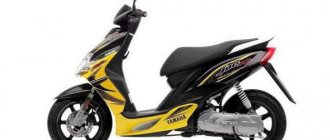
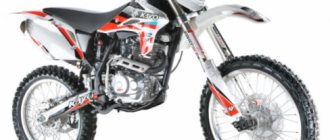
A prominent representative of the manufacturer’s model range is the Yamaha Grand Axis 100, the technical characteristics of which classify it as a motorcycle. That is why this scooter requires documented documents and a driver’s license to drive vehicles.
Model features
Yamaha Grand Axis 100 resembles its “smaller brother” with a volume of fifty cubic meters. The only things that catch your eye are the speedometer with a larger scale (up to one hundred kilometers per hour) and the large cover of the CVT gearbox.
Another feature is one lock for all systems of the bike. It is used to turn on the ignition, lock the steering wheel, activate the anti-theft lock, and open the trunk (hidden under the seat).
The dynamics of the Yamaha Grand Axis 100 are similar to other models in this class. But when it comes to fuel and oil consumption, there are differences. In this model, due to the installed exhaust gas catalyst, the consumption of gasoline and oil increases.
Detailed review
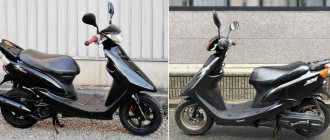
In general, the technical characteristics are as close as possible to the Japanese “brother” Yamaha Jog. But, in this model, all the “sins” were not transferred from Jog, but rather were eliminated. The Axis design is standard and not very noticeable. The only thing worth noting is the spoiler located at the rear, the purpose of which is purely decorative. There is also a small trunk for light loads. The model is “sheathed” in plastic, all components and parts are hidden. Its quality is at the proper level, well secured with special clips.
Yamaha Grand Axis 100: powertrain characteristics
The motorcycle of this model is equipped with a two-stroke Minarelli engine. The same motor is used for the Aerox-100 and BWS-100 models. Its power is ten horsepower at seven thousand revolutions per minute.
The engine volume is 101 cubic centimeters. One cylinder with a size of 52 millimeters. The piston stroke is 47.6 millimeters. Fuel is supplied according to the carburetor principle. At four thousand revolutions per minute, the maximum torque is 9.6 nM.
Air cooling system. Electric engine start. There is a kick starter.
At the same time, the large size is a big plus - a person “two meters” tall can sit comfortably and at ease behind the wheel, which is very problematic on the Joga.
The chassis and suspension and brakes match. There is a hydraulic disc brake (09) at the front and a standard drum at the rear. Suspension: front - hydraulic fork (instead of the usual spring) (09b), and rear - one reinforced shock absorber (10).
There is also a glove compartment under the steering wheel (11-12) and a classic “toilet bowl” under the seat (13).
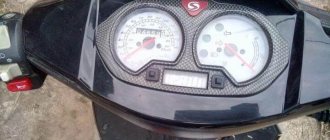
Pleasant to the eye and hands, switches and instrument panel (14-17).
Probably, one of the disadvantages is the location of the oil tank, more precisely, the filler neck itself (18) - pouring oil from simple packages (without a spout) is quite problematic - inevitably some of the oil will flow down the body and settle on the engine, frame and air filter box; the second is the low location of the exhaust pipe of the muffler (an old “disease” of the 3KJ engine) - it can easily be torn off on a curb or on a tram rail (19). But, as we wrote earlier, this can be treated with a spacer for the shock absorber and “thick” tires - size 3.50-10. By the way, such tires simply need to be installed on the Axis - firstly, you greatly benefit in handling and stability, and secondly, the appearance of the scooter changes significantly for the better. Let me explain about stability and controllability: tires of greater thickness have more mass, and, consequently, the gyroscopic moment will increase - as the vehicle gains speed, it gains more and more stability and is less likely to stray from the trajectory on bumps; high-quality tires 3.50-10 have more (relative to standard 3.00 -10 tires) width and a larger contact patch with the road surface, and plus it is less sloping - this in total makes it possible to accurately measure the depth of lean in a turn and adds confidence when maneuvering. One more thing - when riding on thin “donuts”, the scooter responds very sharply to manipulations of the steering wheel - it literally breaks in turns; in the case of large, wide wheels, the handling is stable and much more predictable (pay attention to photo 07, the difference is obvious).
However, let’s return straight to the insides of the scooter, or more precisely, to how to get inside and evaluate the advantages and disadvantages of the model. Let's start, as usual, with the plastic body kit - remove the decorative panel under the brake light (20-21), behind it are the screws securing the “skis” (22),
Having unscrewed two more screws from the sides of the scooter (23), remove the plastic (24).
The following become available: vacuum valve (25), battery compartment (26) and fuse (27).
It is worth remembering that without a fuse, the scooter will work, but you will not be able to use the lighting and sound signal. Remove the seat (28) and trunk trim (29).
Unscrew three screws (30-31), two more on each side (32-33)
and two “under the tail” (34), remove the gas tank cap (35) and dismantle the plastic body kit (36). Now you can, for example, change the starter relay or switch (37).
Using a “10” tube, remove the “toilet bowl” (38-41), using a “12” head and a tube, remove the trunk (42-43).
We unscrew the two screws that hold the rear wing in the block with lighting equipment (44) and disconnect the terminals (45-46).
Remove the rubber mat (47), the floor mounting bolts are hidden under it, unscrew them (48-49) and remove the floor (50).
From below, the scooter frame is covered with a solid plastic “trough”; our attention was drawn to the bracket for the side stand, and one interesting thing is that the plastic has a chamfer made for the future window for the footrest (51) - the usual foresight of the Japanese.
In a circle, we unscrew all the screws on the outer and inner sides that secure the front plastic (52-55), the screws in the “beak” (56) are nothing more than plugs, they do not hold anything, but simply cover the holes intended for attaching the basket.
For our purposes, there is no need to turn them away. Now you can remove the “trough” (57) and the front plastic (58). There is a bolt (59) under the glove compartment cover; after unscrewing it, you need to remove the decorative trim on the ignition switch by turning it counterclockwise (60).
And now you can dismantle the “interior” (61). There is plastic left on the steering wheel - it consists of two halves - upper and lower - unscrew the screws from the bottom (62-65) and remove the upper part (66).
Now you can dismantle the headlight-turn signal unit; to do this, unscrew the remaining fasteners (67-68) and disconnect the chips (69).
So we “stripped” the scooter - this is how it looks without plastic (70-73).
After a careful inspection of the insides, we noticed one annoying thing - the rubber apron, which protects the filling from dirt flying from the wheel, will gradually wipe the oil tank (74) - this is easy to fix, just cut off the extra piece of rubber in this case.
Let's start preparing the scooter for removing the engine. Let's remove the oil tank - it is secured with two bolts (75-76), then take out the tank and turn it over so that the fitting is on top - remove the hose.
You can drain the oil and wash the reservoir (77). The throttle cable can be disconnected when approaching the steering column - a very useful thing (78-79).
Disconnect the rear brake cable - unscrew the adjusting nut (80) and pull out the cable. Then we disconnect all the hoses from the vacuum valve (81), disconnect all the wires going to the engine (82), remove the spark plug cap (83).
All that remains are the bolts securing the subframe to the frame (84) and the shock absorber (85), now you can safely “roll out” the engine, i.e. in our case, remove the frame from the engine - lift it and roll it forward (86).
Here it is, the engine is in our hands (87-88). First, remove the air filter (89-90) and open the box (91-92).
Is the foam clean and oiled? Great. If it is old or torn, or if it is not there at all, then install a new one, after soaking it in oil for air filters. Now remove the carburetor by loosening the clamp (93). Read about disassembling the carburetor, cleaning and tuning it in the following issues of the magazine. Next, remove the reed valve, because Since its task is to admit the fuel-air mixture and prevent it from escaping, you should check the fit of the petals to the surface of the valve body. Fuel additive deposits should also be cleaned. Dismantling the valve is simple - first we clean the engine surface from dirt so that it does not get into the crank chamber, then we unscrew four bolts (94) with a hexagon and remove the inlet pipe (95), and after that the valve itself (96). You can take a look at the crankshaft (97). Cover the hole with a clean rag.
To remove the CPG (cylinder-piston group), it is necessary to dismantle the muffler - first we unscrew the screws that attract the exhaust pipe to the cylinder (98), and then we use a wrench to unscrew the two bolts holding the muffler body to the crankcase (99) and remove the part.
Because the motor is cooled by forced air flow, then in order for it to optimally blow through all surfaces of the cylinder, a plastic casing is provided - it must be removed, for this we arm ourselves with a screwdriver and unscrew the screws (100-102).
Now we have the opportunity to remove the cylinder - only four nuts (103) - and the head is in our hands (104). Remember, we talked about the inconvenient filler neck of the oil tank - here are the consequences - the cylinder is thickly covered with oil and dirt adhering to it - and this, by the way, greatly impairs cooling, so it is better to fill the oil carefully.
A sealant (105) is visible between the crankcase halves - a direct hint that the engine was rebuilt; on the one hand, this indicates a considerable mileage, and on the other, that new main bearings and, possibly, a crankshaft were installed, and this is already a plus! Well, having assessed the wear (most likely, its absence means severe wear of the CPG, which is rare on normal scooters from Japan), close the cylinder and move on to the variator.
To get into the depths of the variator it is absolutely not necessary to remove the engine! First of all, we remove the kick starter lever (106) - note that the bolt must be completely unscrewed. After this, remove the decorative plastic cover - it is held on by two rubberized bolts (107), and then, unscrewing all the bolts in a circle, remove the cover itself (try not to damage the gasket).
Before us is a very attractive picture - a fresh variator with minimal wear (108). Let us remind you once again about a convenient way to remove the variator itself (i.e., the drive pulley) - we block it with a suitable hexagon - the photo shows how this can be done, and unscrew the nut (109). Having removed the variator and pulled out the weights, we were slightly surprised - their wear had already become critical (110), so we decided to change them to normal ones (111). A lot depends on the integrity of the weights - if they are worn out, then dips appear during acceleration, and the variator may not open to its full working diameter at all. It is necessary to monitor this if you want to enjoy your ride.
From my own experience I will say that the resource of “native” Japanese cargo is at least 10 thousand kilometers. I don’t want to talk about Chinese ones at all, but Korean and tuning Italian ones have proven themselves well.
That's all, in fact, the scooter, according to our impressions, is very good, it is comfortable, practical, very easy to fine-tune, does not require special maintenance, is not capricious and can easily (in case of emergency) use 80-octane gasoline to This was not said by numerous supporters of the erroneous theory - the lower the octane number, the worse the gasoline... not worse, but has less energy output, while containing much fewer additives (often harmful to the engine), but this is a digression from the topic - of course, better pour 95, but if you stop on the highway with an empty tank, don’t be afraid to catch the Cossacks - their fuel is quite suitable for your pet - you’ll get to the gas station without any problems! Go for it!
Chassis, transmission and brakes
CVT transmission with automatic gearbox and chain drive. The front suspension is represented by a telescopic fork (26 mm). A monoshock absorber is installed at the rear. The front fork travel is seventy millimeters, the rear fork travel is only fifty millimeters.
The brake system on the front wheel is disc. Disc diameter 155 millimeters. The rear wheel has a drum with a diameter of 135 millimeters.
Wheel tires with a diameter of twelve inches. Front wheel 110/70, rear 120/70.
The length of the Yamaha Grand Axis 100 bike is 1850 millimeters. Its width is 680 millimeters. The total height is 1085 millimeters. The height of the saddle at its minimum position is 770 millimeters. The wheelbase is 1275 millimeters. Minimum ground clearance 110 millimeters.
With these dimensions, the motorcycle weighs 93 kilograms. Dry weight 89 kilograms. The fuel tank capacity is six and a half liters. The oil tank capacity is 1.2 liters.
The scooter allows you to carry one more passenger along with the driver.
Yamaha Grand Axis 100: reviews
Scooter owners have differing opinions. Many are completely satisfied with the characteristics of the two-wheeled “friend”. Others are trying in every possible way to modify it and adjust it “to suit themselves.”
The scooter is good during use. It is easy to maintain. Most spare parts are similar to other models and are interchangeable with them. The vehicle is suitable for tuning. It can affect both appearance and technical characteristics. Replacing individual parts of the power unit increases engine power. Accordingly, the maximum speed increases. And it is worth noting that in the basic model it is about eighty kilometers per hour.
The most common repair work carried out is changing the transmission, removing the catalyst, and adjusting the carburetor. The main types of work are carried out with the aim of increasing the same maximum speed. A small amount of repairs performed allows us to obtain a motorcycle with the necessary characteristics. And this is possible with relatively low financial costs.
As can be seen from the above, the Yamaha Grand Axis 100 motorcycle is a good option for transportation. It is economical, accelerates up to eighty kilometers, and allows two people to ride.