Modern scooters made in China have a similar layout. The engineers of the Celestial Empire did not bother and assembled all the critical components according to a single scheme. Even if there are differences, they are minimal.
This statement is also true for the electrical components of the moped. Any owner periodically encounters problems associated with these nodes. The electrical circuit of a Chinese 4t scooter is not a complex system; it contains only the main elements necessary for the full operation of the unit.
Knowing the main electrical wiring components and their purpose, you can quickly find the problem and fix it.
Electrics and electrical equipment of a scooter
Dedicated to all owners of Chinese scooters...
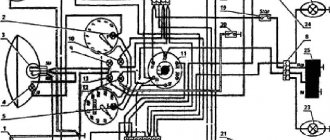
First, I would like to present a wiring diagram for a Chinese scooter.
Since all Chinese scooters are very similar, like Siamese twins, their electrical circuits are practically no different.
The diagram was found on the Internet and is, in my opinion, one of the most successful, since it shows the color of the connecting conductors. This greatly simplifies the diagram and makes it more comfortable to read.
(Click on the image to enlarge. The image will open in a new window).
It is worth noting that in the electrical circuit of a scooter, just like in any electronic circuit, there is a common wire . On a scooter, the common wire is the minus ( - ). In the diagram, the common wire is shown in green . If you look more closely, you will notice that it is connected to all the electrical equipment of the scooter: headlight ( 16 ), turn relay ( 24 ), instrument panel backlight lamp ( 15 ), indicator lamps ( 20 , 36 , 22 , 17 ), tachometer ( 18 ), fuel level sensor ( 14 ), horn ( 31 ), tail light/brake light ( 13 ), start relay ( 10 ) and other devices.
First, let's go over the main elements of the Chinese scooter circuit.
Egnition lock.
Ignition switch ( 12 ) or “Main switch”. The ignition switch is nothing more than a regular multi-position switch. Even though the ignition switch has 3 positions, the electrical circuit uses only 2.
When the key is in the first position, the red and black wires are connected. In this case, the voltage from the battery enters the electric circuit of the scooter, the scooter is ready to start. The fuel level indicator, tachometer, sound signal, turn relay, and ignition circuit are also ready for operation. They are supplied with power from the battery.
If the ignition switch malfunctions, it can be safely replaced with some kind of switch like a toggle switch. The toggle switch must be powerful enough, because the entire electrical circuit of the scooter is, in fact, switched through the ignition switch. Of course, you can do without a toggle switch if you limit yourself to short-circuiting the red and black wires, as the heroes of Hollywood action films once did.
1 is shorted to the housing (common wire). In this case, engine operation is blocked . Some scooter models have an engine stop button ( 27 ) to block the engine, which, like the ignition switch, connects the white- black and green (common, body) wires.
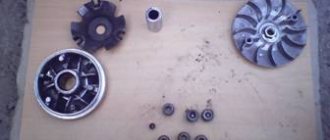
Generator.
The generator ( 4 ) produces alternating electric current to power all current consumers and charge the battery ( 6 ).
There are 5 wires coming from the generator. One of them is connected to a common wire (frame). The alternating voltage is removed from the white wire and supplied to the relay regulator for subsequent straightening and stabilization. The yellow wire removes voltage, which is used to power the low/high beam lamp, which is installed in the front fairing of the scooter.
Also in the design of the generator there is a so-called hall sensor . It is not electrically connected to the generator and there are 2 wires coming from it: white- green and red - black . The hall sensor is connected to the CDI ignition module ( 1 ).
Relay regulator.
Regulator relay ( 5 ). People may call it a “stabilizer”, “transistor”, “regulator”, “voltage regulator” or simply “relay”. All these definitions refer to one piece of hardware. This is what the relay regulator looks like.
The relay regulator on Chinese scooters is installed in the front part under a plastic fairing. The relay-regulator itself is attached to the metal base of the scooter in order to reduce the heating of the relay radiator during operation. This is what the relay regulator looks like on a scooter.
In the operation of a scooter, the relay regulator plays a very important role. The task of the relay regulator is to convert the alternating voltage from the generator into direct voltage and limit it to 13.5 - 14.8 volts. This is the voltage required to charge the battery.
The diagram and photo show that there are 4 wires coming from the relay-regulator. Green is the common wire. We have already talked about it. Red is the output of positive DC voltage 13.5 -14.8 volts.
The regulator receives alternating voltage from the generator through the white wire to the relay. Also connected to the regulator is yellow wire coming from the generator. It supplies the regulator with alternating voltage from the generator. Due to the electronic circuit of the regulator, the voltage on this wire is converted into a pulsating one, and is supplied to powerful current consumers - the low and high beam lamps, as well as the dashboard backlight lamps (there may be several of them).
The supply voltage of the lamps is not stabilized, but is limited by the relay regulator at a certain level (about 12V), since at high speeds the alternating voltage supplied from the generator exceeds the permissible limit. I think those who have had their dimensions burned out due to malfunctions of the relay-regulator know this.
Despite all its importance, the device of the relay regulator is quite primitive. If you pick apart the compound with which the printed circuit board is filled, you will find that the main relay is an electronic circuit consisting of a thyristor BT151-650R , a diode bridge on 1N4007 , a powerful diode 1N5408 , as well as several wiring elements: electrolytic capacitors, low-power SMD transistors, resistors and a zener diode.
Due to its primitive circuitry, the relay-regulator often fails. Read about how to check the voltage regulator here.
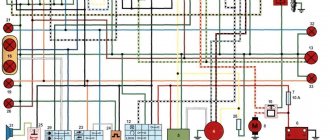
Delta moped wiring diagram china
The electrical circuit diagram of Chinese scooters is shown in the figure:
As with other electrical connections, there is a common wire on all cube mopeds. In this diagram it is the negative tire running along the entire body. The corresponding battery terminal is also connected to the scooter's frame, ensuring that each electrical component's ground is in constant contact with the power source.
Electrics and electrical equipment of a scooter
The main components in the 4t moped circuit are:
- central locking;
- battery charging source – generator;
- voltage limiter;
- spark formation and control systems;
- control elements for headlights, brake lights, turns;
- fuel level indicator in the tank.
All circuits are connected together using wiring.
Depending on the modifications and dimensions of the scooter, the instrument panel may include a tachometer - a device for monitoring the number of engine revolutions.
All of the listed nodes of the general scheme perform a strictly assigned role. Failure of at least one of them leads to the cessation of operation of the connected devices. Therefore, monitoring the serviceability of the main elements must be done every certain period for the purpose of prevention.
Ignition circuit elements.
One of the most important electrical circuits in a scooter is the ignition circuit. It includes the CDI ignition module ( 1 ), ignition coil ( 2 ), spark plug ( 3 ).
CDI ignition module.
The CDI ignition module ( 1 ) is made in the form of a small box filled with compound. This makes it difficult to disassemble the CDI unit if it malfunctions. Although the modular design of this unit simplifies the process of replacing it.
There are 5 wires connected to the CDI module. The CDI module itself is located in the bottom of the scooter body near the battery compartment and is secured to the frame with a rubber clamp. Access to the CDI block is made difficult by the fact that it is located in the bottom part and is covered with decorative plastic, which has to be completely removed.
Why is there no spark on my scooter?
There are different types of scooter breakdowns, and if you notice that it simply won’t start, you should start looking at the fault in the most common parts. One of these is the spark plug.
The spark plug is the main source from which any vehicle runs and so if you see that your scooter has gas but is still broken, check the spark plug. In any case, you should carry tools with you. Also, be sure to stock up on an extra spark plug so that if the main one breaks, you can immediately replace it. But how can you determine the condition of such an important scooter part?
General diagnostics
If the moped engine stalls, you should first find out why this happened. Indeed, among the main reasons why an engine stalls on the road or refuses to start, only two are the lack of fuel or the inability to ignite the mixture. Often, during the first diagnosis, it turns out that there is gasoline in the tank, and the fuel mixture is supplied to the cylinders due to vacuum. And therefore, the reason for everything is that the spark on the scooter disappeared. To verify this, you simply need to unscrew the spark plug from its standard hole in the cylinder head. Then it is inserted into the cap, its end is applied to the motor body.
Next, start the engine and look at the electrodes. You should also check the element not only for the presence of a spark, but also for the condition of the electrodes. The candle can be dry or wet. If the electrode is wet, then the fault is not the power system and carburetor, but the lack of a spark. If there is no spark on a 4T scooter, the reasons may be different. We will look at the most likely ones below.
How to check the spark on a spark plug?
If you have never checked a scooter's spark plug for a spark, then this procedure is more than simple. You need to unscrew the spark plug itself from the cylinder and insert it into the armored wire (connected to the spark plug). Then turn on the ignition of the scooter and touch the spark plugs to any iron surface. Press the kickstarter several times and look at the candle. If there is a spark, the ignition system and the spark plug itself are fully functional. In sunlight the spark may not be visible, so choose a dimmer light.
Cleaning the elements correctly
Every owner of motorcycle and automobile equipment should know how to properly clean spark plugs from carbon deposits. Most beginners try to restore parts themselves and then wonder why they don't work.
A better effect can be achieved if you use a sandblaster. If there is none, you can try cleaning with just sand. To do this, you should purchase an electric drill and sand in a bucket. Next, take the candle and clamp it in the drill chuck by the thread on the top. Large threads are wrapped with tape. The part is then lowered into the bucket and the tool is started. After some time, the electrodes and insulator will be cleaned. If the spark is lost for this reason, the scooter spark plug will work properly again.
Ignition switch and its features
The operating principle of supplying a spark to fuel in a moped is approximately the same as in a car. The task of this system is to ignite the mixture, which is supplied by the carburetor to the engine. The candle itself produces the ignition itself, but before that, other parts also participate in the process.
To activate the system, a so-called lock is used, from which a signal is sent to other parts. A key is required to use it on most vehicles. In the off position, the switch is shorted to ground using a special “leg”. In general, the design of the system on Alpha and other scooters and mopeds is not too different from that on cars. As mentioned above, in addition to the lock, the main role is played by the ignition coil and switch.
Device with high voltage wire
The video below demonstrates the repair of a lock (the author of the video is RECOVER PSR).
Check by appearance
A serviceable part must be clean. Only slight soot on it is allowed. However, if the electrodes are melted or black, then the spark will not occur. Spark plugs deteriorate if the fuel mixture is too rich. If the insulator is white, but there are small black spots on it and signs of erosion on the electrode, this indicates overheating. This is also evidenced by melted electrodes and insulator in bubbles. If there are oil deposits on the part, it can be considered faulty and it is better to replace it with a new one. This simple DIY scooter repair will help you use this vehicle again.
About adjusting the ignition of a 4t scooter
Knowing how to set up the ignition of a 4T scooter on your own, you can save time and money, since you will not need to contact a motorcycle repair shop. The procedure is simple, even if you have no experience it takes a little time, but you will need to be patient. Regardless of the type of ignition, an important role is played by how the marks are set.
Correct adjustment is a guarantee of stable and smooth engine operation even in cold weather conditions. Often, in used vehicles, the ignition is broken: this can happen for various reasons, ranging from elementary shaking when driving to improper handling of the equipment. In order for the scooter not to let you down and for you to be able to start it whenever you want, you will need to learn how to carry out this procedure yourself. To do this, you will need to have several keys that allow you to remove the valve cover if the engine is four-stroke.
Setting up the Vision scooter ignition system
If the ignition is knocked out, this may be the reason the scooter does not work. Restoring it is not difficult if you understand how it is done.
Advice: before starting work, carefully check and clean the carburetor: this may be the reason. Adjust the quality of the mixture. In addition, it doesn't hurt to check the spark plugs.
Make sure the spark plug is working properly
You need to start adjusting by setting the timing belt in the desired position. As a rule, there are marks on it for this purpose; they are set at the factory. The cylinder must be installed at dead center. The mark may be indicated by the letter T or another symbol. Now make sure that the mark installed on the rotor matches the mark found on the magneto. To do this, you need to gently press the kickstarter. The rotor can also be turned using your hands, but this is more difficult.
There are also marks on the timing star in the form of holes or dots; they must be set so that the largest hole is on top and located exactly in the center. The remaining points should be below and located horizontally opposite each other. Setting the ignition advance makes sense if you want to increase the engine's power a little and make it start easily. The adjustment will help make the spark plug produce a spark earlier than the standard time. That is, a spark will appear even before the piston reaches the dead center. In cold weather, a moped configured in this way will start better.
In order to configure the scooter in this way, you will need to repeat the procedure described above. However, there is a difference: the marks should not coincide clearly, and not reach each other by about 0.5 cm. The main difficulty lies in connecting the marks.
Breaks in the spark plug cap
This reason can also be considered simple. If there is no spark on the scooter, you should remove the cap and then check its resistance level. After disconnecting the cap from the wire, take measurements. The multimeter probe is inserted into the spark plug hole. The other is attached to the pin that the wires go to. If the cap is working properly, the multimeter will show about 5 kOhm. On most modern scooters, the high-voltage wires, spark plug cap and ignition coil are made one-piece.
Pinout
If you have a 4T motor installed on your scooter, the pinout of the switch will depend on what type the scooter requires. For DC it will be as follows:
The leftmost terminal on top should connect to the generator sensor. Ground is connected to the terminal located under it.
You can tie the negative wire, for example, to the body of a moped; it is important that the part is metal. The upper terminal, located in the center, is connected to the wire leading to the ignition coil drive. The one located under it is also connected to the negative wire (ground). The wire from the ignition switch is connected to the upper rightmost terminal, which is needed to turn off the engine. The power wire is connected to the terminal located under it; it also comes from the ignition switch. If you have an AC type, the location of the terminals is the same, but they are connected differently:
If you have an AC type, the location of the terminals is the same, but they are connected differently:
- We move from left to right, first the top row, then the bottom.
- Here the wire from the generator sensor goes, as in the previous version.
- Next comes the ignition coil wire.
- And at the end there is a “silencer” for the ignition switch.
Bottom row:
- The first two terminals are the negative wire, “ground”.
- To the last remaining terminal we connect the power wire from the high-voltage winding of the generator. This point is the main difference when connecting an AC switch from a DC one.
Scooter Honda Dio AF 18 27
The Honda Dio AF 18 has a slightly different switch, made in Japan, which is why the pinout of the scooter is a little unique, and the mounts on the switch are different. It is connected as follows: from left to right, first the upper, then the lower terminals. Location:
- Hall Sensor.
- Ignition coil.
- Weight.
- Ignition lock.
- Power wire from a high voltage coil.
Yamaha Jog Scooter
Several types of generator can be installed on this type of motor vehicle. The most common option has 5 contacts, with wires already coming out of it. Therefore, if you have original wiring, you need to connect as follows:
- Orange should lead to the ignition coil and alternator.
- Black - to the ignition switch.
- Purple – Hall sensor.
- The remaining two wires are connected to the ignition coil.
Chinese scooters
Typically, such vehicles have standard switches, which were described above. The connection diagram depends on whether the AC or DC device is installed on your vehicle. It is worth remembering that different types of switches are not interchangeable.
Failure of ignition system components
This is not a common reason. But if the spark on the scooter disappears and there are no visible reasons, then it is necessary to test the switch, coil, and generator winding. You can check all these devices with the same multimeter. To make sure that the winding and pulse sensor are working properly, you need to connect one tester probe to the wire from the sensor, and the second to the engine crankcase.
A normally operating pulse sensor has a resistance of about 500 ohms. The generator winding resistance is two to three times less. If the multimeter shows infinity, then one of the components has failed. It should be replaced with a new one. If the value is less than 150-200 ohms, then the problem is in the supply coil, and therefore the spark is lost on the scooter. What to do in this situation? Buy a new generator. Such a device can be repaired, but if there is no time, it is better to simply replace it. Fortunately, the cost of the generator is low.
No spark on the scooter - causes and solutions
There is no spark on the scooter or it disappears at the most inopportune moment, saddening the driver with a stalled engine. Not a common, but quite possible malfunction, especially on Chinese scooters. In this article, more aimed at beginners, we will look in detail at the reasons for the loss of spark and consider methods for eliminating this malfunction (return the spark).
When your scooter's engine stalls, you should first find out why it stalled. After all, there are only two main reasons why the engine stalls somewhere along the way, or does not start at all: either there is nothing to burn in the combustion chamber of a scooter engine (no fuel is supplied), or there is nothing to ignite (no spark).
I hope that everything is in order with the power system of your scooter, there is gasoline in the tank and fuel enters the combustion chamber due to the discharge from the piston (this is the topic of a separate article, but in this article we are looking at the lack of a spark). And the reason that the engine stalled is precisely because there is no spark on the scooter.
It is, of course, very easy to verify this, just unscrew the spark plug from the spark plug hole in the head and insert the spark plug into the spark plug cap, all that remains is to attach the spark plug body to the engine body, pull the kickstarter and look at the electrodes.
By the way, I advise you to pay attention to the spark plug electrodes not only for the presence or absence of a spark, but also whether the electrodes are wet or dry. If the electrodes are wet, this means that most likely everything is in order with the power system (carburetor) of your scooter and the motor has stalled (or will not start) precisely because of the lack of a spark at the spark plug electrodes.
If there is no spark, there may be several reasons and specific reasons will be described below. And let's start looking at the simplest ones and move on to more complex reasons for the lack of spark. Well, of course, it will be described how to troubleshoot and return the spark.
There is no spark on the scooter - reasons and methods for doing it yourself.
1. The first and most common reason for the lack of a spark at the spark plug electrodes is the failure of the spark plug itself. This happens often, since our gasoline, to put it mildly, is not very good in quality and due to the presence of all sorts of nasty things in gasoline, the spark plugs often fail.
You can verify that the spark plug is to blame for the lack of spark by replacing it with a new or known good spark plug. But if suddenly you do not have a new spark plug at the moment, then you can check the normal operation of the ignition system using a regular piece of wire or a nail of suitable diameter (so that it fits into the hole of the cap and does not fall out).
It is inserted into the hole of the spark plug cap, then a wire pin or nail inserted into the cap is brought to the engine crankcase at a distance of approximately 5 - 7 mm and then we crank the engine crankshaft using the kickstarter. A spark jumping between the pin and the engine crankcase (ground) will confirm that the ignition system itself is in perfect order and there is no spark on the scooter just because of a faulty spark plug.
By the way, the spark plug can be cleaned and brought back to life (at least to get a new spark plug to the auto parts store). But many beginners do not clean the spark plugs correctly, and as a result, if a spark appears on the spark plug after improper cleaning, it does not last long.
2. The next common reason for the lack of a spark is a break in the wire (or oxidation of its terminal) that connects the engine to the frame (after all, the motor hangs on silent blocks and must be connected to the frame). This means that after checking the spark plug, we check the integrity of this wire and the reliability (cleanliness) of connecting the terminal to the motor and the frame of the scooter.
3. Another simple reason for the lack of a spark is a break (burnout) in the high-voltage cap of the noise suppression resistor. We remove it from the spark plug and test it with a tester turned on in resistance measurement mode (ohmmeter).
We disconnect the cap from the wire and insert the probe into the hole for the spark plug, and connect the second probe to a sharp pin (the one on which the wire is put) or to the wire, and measure the resistance. A working cap with a intact resistor should have a resistance of 5 kilo-ohms.
On modern scooters (unlike older mopeds), the high-voltage wire, cap and ignition coil are integral parts, as they are filled with rubber or compound. This means you should check the cap, wire and coil at the same time.
To do this, we again insert one ohmmeter probe into the hole in the cap intended for the spark plug, and alternately connect the second probe to the ignition coil terminals to determine the resistance of the primary and secondary windings, along with the cap and the high-voltage wire.
The resistance of the primary winding of the ignition coil (we check by connecting the probes to the coil terminals as in the photo) is approximately from 0.1 to 0.4 Ohms (for example, on a Honda Dio it is 0.2 - 0.3 Ohms).
Well, we check the resistance of the secondary winding of the ignition coil (we connect one probe to one of the coil terminals - green - see photo below), and the second probe to the hole for the spark plug in the cap) is 6.35 - 9.7 kOhm on most mopeds , but you can check the manual of your scooter (Honda Dio has approximately 8.2 - 9.3 kOhm). This is the total resistance of both the secondary winding of the ignition coil and the resistor in the cap (after all, the resistance of the noise suppression resistor is 5 kOhm).
Without the spark plug cap (if it is removed), the resistance of the secondary winding of the ignition coil will be approximately 2.7 - 3.4 kOhm. Well, if the ohmmeter shows infinity (break), then of course we replace the ignition coil with a new one, but do not forget that the resistor in the cap can also burn out, so to make sure that the ignition coil is correct, I advise you to measure the resistance of the secondary winding without the spark plug cap.
4. Another simple reason that there is no spark on the scooter is a break in some wire in the ignition system, disconnection of some terminal (rarely, but it happens), but most often it is oxidation of the contacts (terminals) of the wires coming to the system components ignition and, as a result, loss of contact and lack of spark (or there is a spark, or there is not). When the contacts oxidize, a transition resistance occurs at the terminals and, because of this, insufficient voltage.
This is interesting: A plastic bottle on the wheel of your car is a safety hazard
The fault can be fixed quite simply - we remove the plastic of the scooter and then check all the wires (their integrity and insulation from ground), which are marked with the letters A, B, C, D on the electrical diagram on the left, as well as the terminals of these wires coming to the components of the ignition system (switch , ignition coil, pulse sensor (Hall sensor)).
If the terminals are oxidized or do not hold tightly, then of course we clean them until they shine and tighten them. We especially pay attention to the cleanliness and reliability of the connection to the frame from the ground terminal from the green wire D of the ignition coil. And if other terminals have reliable terminals with latches, then this terminal often oxidizes on the frame and this causes the coil to stop working (of course, the spark disappears).
We also check the wire going from the switch to the frame (as a rule, it is green), the reliability of its connection and the cleanliness of its terminal, which is connected to the frame of the scooter.
5. Well, there may also be a reason for the loss of the spark, this is due to the failure of some component of the ignition system (coil, switch, sensor, and sometimes the generator winding - it’s rare, but sometimes they fail). You can check the integrity of the pulse sensor and the integrity of the winding of the generator supply coil with a multimeter turned on in resistance measurement mode (ohmmeter).
As a rule, two wires come out of the engine crankcase in the area of the generator. Usually the one that is black with a red stripe is the wire from the pulse sensor, and the wire of the other color (usually blue with a white stripe) is the wire from the generator supply winding.
So, to ensure the integrity of the winding, both the pulse sensor and the generator winding, you should connect one ohmmeter probe to the sensor wire (red-black), and connect the second probe to the engine crankcase (we also connect one probe to the generator winding wire, and the second to the crankcase to check the integrity of the generator winding).
The resistance of the pulse sensor may differ slightly for different scooters - it is approximately 500 Ohms (the exact value can be found in the manual), but the main thing to remember is that the resistance of the pulse sensor is approximately two to three times greater than that of the generator winding (the resistance of the generator winding is approximately 150 - 200 Ohm). If, when measuring the resistance (both of the sensor and the generator winding), the ohmmeter shows a break (infinity), which is rare, but still, then of course the generator winding should be replaced, or the pulse sensor and the spark will be restored.
The switch is easy to find even for a beginner. It is a small plastic rectangular box that has a terminal block (connector), to which five or six wires of different colors are connected through a terminal block with a latch.
The switch itself controls the ignition system of a modern scooter. On some scooters (for example, Italian, or on the Japanese Suzuki Sepia scooter), the switch and ignition coil are located in the same unit, but on most scooters the switch and coil are separate components of the ignition system.
Both the switch and the ignition coil are non-separable (filled with compound) and when they fail, they are simply replaced with new ones and are not expensive. The main element of an electronic switch (in addition to other radio components) is a thyristor, which switches (interrupts) the electric current.
The thyristor has three terminals, and when a current pulse arrives from the sensor at one of the terminals, the thyristor connects the other two terminals (becomes a conductor), opening the path for electric current through the capacitor (more about it below) to the primary winding of the ignition coil.
As the voltage drops to a certain value, the thyristor interrupts the current until the next time. Simply put, a thyristor is an electronic interrupter of the current flowing to the ignition coil.
After a full revolution of the scooter’s crankshaft, the protrusion on the crankshaft again approaches the sensor, which again gives a voltage pulse to one of the three terminals of the thyristor and everything repeats again.
Another important element of the scooter switch is the capacitor, which accumulates electricity. energy, which, after commutation (connection) of its two terminals by the thyristor, is sent to the primary winding of the ignition coil.
And then the voltage in the coil is increased to several kilovolts in the secondary winding of the ignition coil, and through a high-voltage wire and a spark plug cap, the discharge is supplied to the electrodes of the spark plug, between which a discharge (spark) occurs, which ignites the combustible mixture in the combustion chamber of the scooter engine.
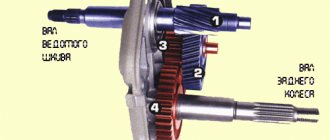
To explain it in a shorter and simpler way for beginners, we can say this: the voltage flows through the wires from the scooter generator 7 (see the wiring diagram above) to the switch 2 and accumulates in the capacitor, which is located inside the switch. When the protrusion on the crankshaft approaches sensor 8 and the signal from it, the capacitor is discharged into the primary winding of the ignition coil in a split second.
And then in the secondary winding of the ignition coil, the voltage rises to several kilovolts and is discharged through a high-voltage wire to the spark plug electrodes. In general, the entire process of spark formation in the ignition system occurs in a split second.
In order to turn off the engine, a separate wire (usually black) comes from the switch, which goes to ignition switch 1 (see wiring diagram above), and when the ignition key is turned to the off position, this wire shorts to ground, the spark disappears and the engine stalls.
And if everything has been checked as described above, but there is still no spark on the scooter, then I advise you to remove the front trim and check whether the black wire has come off and whether it is shorting to ground (frame). The likelihood of this is very low, but still.
By the way, you can check the normal operation of the jammer (and make sure that everything is in order and this is not the problem) without removing the plastic. To do this, disconnect the terminal block from the switch and locate the terminal connected to the black wire that goes from the switch to the ignition switch. We connect one ohmmeter probe to the terminal of this black wire, and the second probe to the scooter frame.
When the ignition key is turned off, the ohmmeter should show zero, and when the key is turned to the on (start) position, the ohmmeter should show infinity.
If the spark plug, sensor, generator winding, wires and terminals described above, the ignition coil are checked, but there is no spark, then to make sure that the problem is in the switch, simply replace it with a new one (I advise you to buy a spare one and carry it with you). Since it is impossible to check the serviceability of the switch at home.
Some reputable services have electronic devices that can check the serviceability of the switch, but in order not to bother searching for a service, it is much easier to buy a new one to check that it is the reason for the lack of spark. In addition, a spare switch will give you confidence on the road that you will return home under your own power.
And finally, a couple of useful tips.
When something on your elderly scooter starts to fall off (most often in Chinese) and you need to fix something, remember the advice on how not to damage the ignition system, and indeed the electrical equipment of your scooter. When welding (even if you just need to drip a small tack with electric welding), I strongly advise you to disconnect the terminal block of the voltage stabilizer and the switch block from the electrical circuit of the scooter and put these devices on a shelf. Otherwise, the electronics of these devices will simply burn out.
I also recommend connecting the alligator clamp from the welding machine to the welding site as close as possible. Otherwise, the huge welding current will follow the path of least resistance - that is, along the wire connecting the engine of your scooter and the frame (after all, the motor hangs on silent blocks). What happens next can be called a smoke attack in your garage - that is, the wire will instantly melt under the load of a huge welding current.
If it is not possible to connect the ground of the welding machine close to the welding site, then I advise you to disconnect all the ground wires on your scooter.
That seems to be all. I hope this article will help beginners find and eliminate the reason why there is no spark on the scooter, good luck to everyone!
Switch
Even a beginner will find its location. This is a plastic box with a terminal block. Multi-colored wires are connected to it. The switch is necessary to control the operation of the ignition system. Both the switch and the ignition coil are made non-separable. If the element fails, then the problems can only be solved by replacement. The price of these parts is low - up to 500 rubles. Some service stations have special instruments that allow you to test the switch. However, in order to avoid searching for the appropriate services for a long time, the easiest way is to purchase a new switch. In the process of searching for the reason for the failure of the switch, you do not need to listen to “experts” who claim that the failure occurred due to driving without a battery. This is an unreliable opinion. The fact is that in modern scooters the power supply system and the ignition system do not depend on each other in any way.
What is advance ignition
The quality of the mixture supplied to the engine cylinder determines the behavior of the scooter in cold weather, as well as how high the wear of the cylinder itself will be. For example, with a rich mixture, the engine starts better, but carbon deposits form; with a lean mixture, the cylinder quickly wears out and traction is lost.
In order to facilitate the process of starting the engine, you can set the ignition to advance, this will make it easier to start the engine regardless of the weather outside, slightly increase engine power, and significantly increase traction. The peculiarities of such settings are that a charge is formed in the spark plug before the piston reaches the dead center. This makes it easier to start the engine and increases engine power. However, it is worth remembering that cylinder wear may increase.
The procedure is carried out in approximately the same way as a regular ignition adjustment, but has its own nuances. To do this, all the same actions are carried out, only the tags are not completely connected. The discrepancy should be approximately half a centimeter. This is enough to get the desired effect.
How to set the lead angle (video)
Spark plug gap
Spark plug gap is an important factor for proper engine operation. This parameter plays an important role in the process of spark formation, ignition of the fuel mixture, and efficient operation of the scooter throughout the entire speed range. The gap should be specified in the documentation for the specific scooter - this parameter may vary among manufacturers. Generally speaking, for most modern four-stroke Chinese and Japanese mopeds, the gap on the spark plugs is from 0.5 to 0.8 millimeters. It is necessary to monitor this parameter. For this reason, the spark may disappear. She leaves because the gap is too big.
Reasons for failure of a 4-stroke scooter engine
If the engine, then the reasons can be very different:
1. There is no fuel supply to the combustion chamber.
2. Air supply is not adjusted.
3. There is no compression. Burnt and deformed valves do not provide compression. The reason for the lack of compression may be improper assembly or a malfunction of the cylinder itself.
4. The one responsible for the operation of the valves is faulty.
5. Defective
6. An ignition spark is not produced during the mechanical operation of the generator.