Engine tuning and adjustment
Precise adjustment plays an important role in successful carburetor repair. If you don't already know how to adjust the carburetor on a scooter, then it should be noted that this process consists of three main parts: adjusting the idle speed, adjusting the mixture quality (using a screw or needle) and adjusting the fuel level in the float chamber.
Idle speed adjustment
Idle adjustment is performed after fixing the scooter on the central stand, which will provide unhindered access to the adjusting elements of this device. A prerequisite for effective adjustment is to warm up the engine, after which you can begin direct adjustment. First of all, find the special adjusting screw that is present in any unit. By tightening this screw, you will increase the speed, and by unscrewing, you will decrease it. Once the scooter has warmed up well (10-15 minutes should be enough), use the indicated screw to ensure stable operation of the motor at idle.
We adjust the quality of the mixture with a special screw
Setting up the carburetor on a scooter also involves performing one more type of adjustment - adjusting the quality of the fuel-air mixture
It is very important that it matches the proportions specified by the engineers when developing the scooter. An excessively lean mixture will cause the vehicle to overheat or lose power, while a too rich mixture will result in increased fuel consumption and carbon deposits in the combustion chamber.
As in the previous version, a special adjustment screw will help you make the adjustment, and if it is not provided for in the design, then you can use a needle, but more on that a little later. By turning the screw clockwise, you will enrich the fuel mixture, and by turning it counterclockwise, on the contrary, you will lean it. The sequence of actions performed is as follows:
1. The scooter warms up for 10 minutes, after which the engine must be turned off.
2. Then tighten the screw clockwise until it stops.
3. Then unscrew it again 1.5 turns back, that is, counterclockwise.
4. Start the power unit and turn the screw another 1/3 turn, allowing the engine to run in this mode for another 2 minutes.
5. If the speed increases, you should unscrew the adjusting screw another ¼ turn counterclockwise, leaving the engine to run for 2 minutes.
6. The previous step is repeated until the speed begins to drop (before each change in the “command” the engine must be allowed to run for 2 minutes). If the speed begins to drop, tighten the screw clockwise ¼ turn.
Thus, you can achieve stable engine operation at any permissible speed. Ideally, the motor should work well with the mixture quality adjustment screw unscrewed by 1.5-2 turns, but due to wear of parts, the specified range may vary slightly. The scooter should accelerate smoothly, and any jerks during normal operation of the vehicle are completely eliminated.
We adjust the quality by moving the needle
If you are really interested in how to properly adjust the carburetor of a scooter, then you should consider the possibility of adjusting the quality of the fuel mixture using the throttle needle. Some scooter models do not have a screw by design, but this does not mean that you will have any difficulties during the adjustment process. When the needle is raised up, the fuel mixture becomes richer, and lowering it causes the fuel to become leaner.
Adjusting the fuel level in the float chamber
You can check the fuel fluid level in the float chamber using a transparent tube located at the very bottom of the carburetor. The adjustment process itself is simple. First you need to unscrew the oil screw, lift the tube up (in the opposite direction from the carburetor) and check the fuel level.
It should be noted that in the case when the carburetor has not been washed for a long time, there are all signs of clogging of its channels and jets, especially if fuel with an octane rating lower than that recommended by the manufacturer was used, then before performing the adjustment it is worth eliminating the inconsistencies, otherwise the the work will only give a temporary effect. In general, adjusting the carburetor on a scooter is not a very difficult task, but it is still necessary to have basic knowledge of the design of this type of vehicle.
Subscribe to our feeds on Facebook, Vkontakte and Instagram: all the most interesting automotive events in one place.
Purpose and principle of operation of the carburetor
The carburetor is an important component of an internal combustion engine, responsible for preparing the air-fuel mixture and supplying it to the working cylinder in the required ratio. A scooter engine with an unadjusted carburetor cannot function properly. The stability of speed, the power developed by the engine, gasoline consumption, response to turning the throttle, as well as ease of starting in the cold season depend on the correct settings of the engine power supply.
This unit is responsible for preparing the air-gasoline mixture, the concentration of the components of which affects the nature of the operation of the power plant. The standard ratio is 1:15. Leaning the mixture to a ratio of 1:13 ensures stable engine operation at idle. Sometimes it also becomes necessary to enrich the mixture by maintaining a ratio of 1:17.
Thanks to a properly configured carburetor, easy and quick starting of the vehicle engine is ensured, as well as stable operation of the engine, regardless of the ambient temperature. Any carburetor is equipped with jets with calibrated holes, a float chamber, a needle that regulates the cross-section of the fuel channel, as well as special adjusting screws.
The adjustment process involves specially rotating the screw in a clockwise direction or in the opposite direction, which causes, respectively, the enrichment or depletion of the working mixture. Adjustment measures are carried out on a warmed-up engine. In this case, the carburetor unit must first be thoroughly washed and cleared of blockages.
Adjusting carburetor settings
UAZ 3909 Hunter Logbook Synchronous carburetor K-88A from Zila
Adjusting the carburetor on a scooter consists of several stages, which include: adjusting the idle speed, adjusting the mixture quality and adjusting the fuel level in the float chamber.
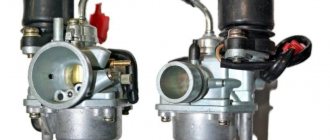
Setting up the carburetor of 2t and 4t scooters has no fundamental differences, except that on some carburetor models there may be no screw for adjusting the mixture quality and therefore the mixture quality has to be adjusted only by adjusting the needle and float in the scooter carburetor
Idle speed adjustment
Carburetor 2-stroke scooter (Honda Dio)
Carburetor 4-stroke scooter
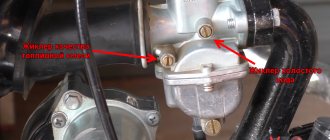
1 — idle speed screw, 2 — mixture quality screw
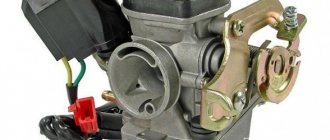
1 — mixture quality screw, 2 — fuel inlet fitting, 3 — fitting for draining fuel from the float chamber, 4 — float chamber plug screw.
Adjusting the mixture quality
The quality of the mixture is a very important point when adjusting the carburetor, since with a lean mixture the engine can overheat and lose power, and with a rich mixture carbon deposits will form in the combustion chamber.
We adjust the quality of the mixture using the adjusting screw. The mixture becomes richer if we turn the screw clockwise and becomes leaner when we turn it counterclockwise.
The adjustment diagram looks like this:
- Warm up the scooter for 10 minutes, turn off the engine,
- Tighten the screw fully clockwise,
- Unscrew 1.5 turns back counterclockwise
- Start the engine and turn the screw back another 1/3 turn. Let the engine run for 2 minutes.
- If the speed increases, then unscrew the screw another 1/4 turn counterclockwise. We also let the engine run for 2 minutes.
- Repeat the previous step until the speed starts to drop (remember to let the engine run for 2 minutes before each change)
- If the speed begins to drop, then screw the screw clockwise 1/4 turn.
This ensures stable engine operation at any permissible speed. Ideally, the engine should work well with the mixture quality adjustment screw unscrewed by 1.5 - 2 turns. However, due to wear and tear of engine parts, this range may change. If your scooter’s carburetor does not have a screw for adjusting the mixture quality, then the adjustment must be made only by adjusting the position of the carburetor needle. Raise the needle - the mixture becomes richer, lower the needle - the mixture becomes leaner.
You can tell by the carbon deposits on the spark plug that the quality of the mixture has been incorrectly adjusted. If the carbon deposits on the candle are black and there is a lot of it, the mixture is too rich. If the carbon deposits are almost white, the mixture is too white.
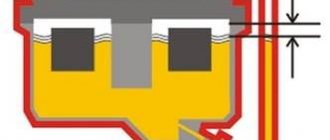
Adjusting the fuel level (in the float chamber)
The fuel level in the float chamber can be checked using a transparent tube located at the bottom of the carburetor. In order to do this, you need to unscrew the butter screw and lift the tube towards the top of the carburetor. Now we check the fuel level with the scooter engine running. It should be located just below the protruding skirt at the point where the float chamber cover is attached to the carburetor.
If the level is low or, as is more often the case, too high, then it is necessary to remove the cover and adjust the timing of the locking game by bending the needle holder (a small tendril) in a very small range.
It is worth remembering that if the carburetor malfunctions or its internal elements are dirty, adjusting the carburetor may only temporarily solve the problem.
This is the whole principle of setting up a carburetor on a Chinese and Japanese (Honda, Suzuki, Yamaha, etc.) scooter. Now you can independently repair and adjust the carburetor on 2t and 4t scooter engines with a volume of 50 and 150 cubic meters.
Thursday, September 28, 2021
Carburetor diagram for 139qmb
Check all O-rings for damage.
Replace if necessary. When cleaning the carburetor, remove the vacuum diaphragm before using purge air or cleaning solvents. This will prevent damage to the diaphragm.
Possible malfunctions of the CVK carburetor
1.The engine is difficult to start
— No spark - Poor compression
2. There is no fuel in the carburetor
-Closed fuel line -Closed fuel filter -Blocked vacuum line -Damaged Broken vacuum line -Clogged inlet needle -Float level set too high
3. Too much fuel for the engine
-Dirty air filter -Air leak in the manifold -Faulty enrichment valve -Blocked air passage in the carburetor
4. Air/fuel mixture too rich or too pale
-Faulty enrichment valve -Tightened idle screw -Float needle stuck or dirty -Float height too high or too low -Blocked carburetor air passage -Dirty air filter -Carburetor or manifold air leak
5. Engine does not accelerate
-Bad spark -Air mixture screw too tight -Accelerator pump faulty
6. Almost does not respond to the throttle
-Weak spark/poor ignition -Blocked fuel line -Blocked fuel filter -Bad fuel -Water in fuel -Air leak in carburetor or manifold -Faulty enrichment valve -Fuel flow difficult in carburetor -Vacuum choke stuck -Damaged vacuum diaphragm -Dirt in carburetor
Removing the carburetor
1. Remove the seat and container underneath. 2. Remove the right side panel. 3. Disconnect the starter cable connector. 4. Loosen the carburetor drain screw and drain the fuel from the float chamber. 5. Loosen the clamps in the intake pipe and intake manifold. 6. Loosen the throttle cable and pull it out of the caliper and out of the throttle control sector. 7. Disconnect the fuel line from the carburetor. 8. Remove the air intake tube and pull the carburetor straight back out of the intake manifold. 9. Remove the starter enricher from the carburetor.
Checking the enrichment valve
1. Check the resistance level. 2. The standard value is below 5 if it is cold. 3. Connect the enricher to a 12 V battery. 4. The plunger should extend 3/8 inch (approximately 10 mm) after 5 minutes.
5. Check the needle and its working place in the carburetor. 6. Replace if necessary. 7. Place the enrichment valve in the installation location and press down. 8. Install the retaining ring and tighten the screws.
Air shut-off valve
1. Unscrew the two screws of the traverse, the throttle cable, and remove it. 2. Unscrew the two screws of the air shut-off valve. 3. Remove the spring and vacuum membrane. 4. Check for membrane wear, replace if necessary. 5. Clean the channels, remove dirt.
Vacuum chamber
1. Remove two screws and remove the cover. 2. Remove the spring and membrane flap. 3. Remove the fuel needle. Be especially careful not to damage the membrane. Replace if damaged.
1. Check the needle for wear and replace if necessary.
Float chamber.
1. Remove the three screws and float chamber pan. 2. Remove the pin that holds the float. 3. Remove the main fuel jet, idle speed jet and idle mixture quality adjustment screw.
Be careful not to break the fuel jets and mixture screw. Count the number of revolutions when removing the mixture quality screw. When reinstalling the jets and screw, do not tighten them.
4. Clean the jets with solvent and compressed air. 5. Clean the carburetor body and all passages with compressed air.
1. Check the float needle and its seat and blow off any dirt. 2. Install the idle jet, fuel needle nozzle, main fuel jet into the carburetor.
3. Install the float. Adjust the fuel quality screw. Standard setting is 2 turns, plus or minus 1/4 turn. 4. After installing the float chamber pan, check the fuel level using a small ruler or calibrator. The correct fuel level is 20.5 mm (0.807 in).
Adjusting the fuel level in the float chamber.
How to clean a carburetor with your own hands
You can check the fuel level in the float chamber using a transparent tube located at the very bottom of the carburetor. Unscrew the butter screw,
lift the tube up opposite the carburetor and check the fuel level
Please note that the fuel level must be checked with the scooter engine running, and the tube should always be located above the carburetor. The fuel level should be just below the cap curb
If there is little, or usually a lot, remove the cover and adjust the moment of operation of the locking needle by bending the needle holder in very small ranges.
It should be noted if the carburetor has not been washed for a long time and there are signs of contamination of its channels and jets, if gasoline has been or is being filled with an octane rating lower than that recommended by the manufacturer (for example, A-80), if the installed jets and other parts do not correspond to those recommended by the factory parameters, then before adjusting the carburetor you need to eliminate all this, since further adjustment will only be temporary and you will not achieve the desired result.
Our production
Follow this link and choose the carburetor you need, which you can purchase in our online store at a low price.
Having bought a motorcycle, scooter or other motorized equipment, owners have to become familiar with the operation and adjustment of their main components. One of the important elements of a two-stroke or four-stroke power unit is the carburetor, which is responsible for supplying fuel to the combustion chamber and mixing gasoline with air in the required ratio. Many people do not know how to adjust the carburetor on a scooter using the adjusting screw. This need arises if the device does not start well, shows increased appetite, or the tachometer needle indicates unstable speed.
How to adjust the carburetor on a scooter yourself
139Qmb manual russian
Its adjustment begins with maintenance:
- the device must be removed, purged and cleaned of contaminants, the channels and jets are recommended to be washed with gasoline, and any remaining contaminants must be removed by blowing with compressed air;
- if the rubber pipe has already “acquired” cracks, then they can be covered with sealant;
- all contamination of the air filter should be removed or replaced with a new one;
- the exhaust system must be inspected and cleaned;
- Assemble the cleaned device and install it in place.
The performance of a scooter engine largely depends on the quality of the fuel mixture. The engine overheats, operates incorrectly and loses power with a lean mixture, while a rich mixture provokes excessive fuel consumption, carbon deposits and fuel overflow. You can check the operation of the carburetor by the color of the removed spark plug - if it is black, this indicates that the fuel mixture used is too rich, and white indicates a lean mixture; their quality will have to be adjusted during tuning. The brown color of the spark plug indicates normal fuel quality; in this case, the mechanism does not need adjustment.
To adjust you need:
- Screw the fuel mixture quality bolt (FMC) first all the way, then unscrew it up to 0.5 turns, while the idle speed is set to the middle position;
- start the scooter - if the equipment does not start or the speed is low or high, then increase it (at low speed) or reduce it (at high speed) by setting the idle speed;
- gradually unscrew the KTS bolt until the engine reaches maximum idle speed and tighten it again by 0.25-0.5 turns;
- start the engine and drive - if there are interruptions and dips when starting to move, then you need to tighten the KTS bolt again by 0.25 turns.
When the bolt is turned clockwise, the mixture becomes richer, and when turned counterclockwise, it becomes leaner. If excessive fuel consumption is detected, the spool needle moves down one notch and the adjustment is carried out from the very beginning. If there is a shortage of fuel, on the contrary, the needle moves up one notch and the adjustment procedure is repeated again.
Correctly configured operation of the engine system of any vehicle should ensure smooth operation, without jerks or dips. A specialist will tell you how to most accurately adjust the carburetor on your scooter, however, we hope that our recommendations will help you cope with this simple job yourself.
Why do you need to regulate?
During the adjustment process, the scooter carburetor needle is adjusted, the position of which affects the proportions of the air-fuel mixture, as well as a number of other adjustments.
Each tuning operation has a different effect on engine operation and fuel preparation:
- adjusting the idle speed ensures stable operation of a running engine when the transmission is turned off;
- changing the quality of the air-gasoline mixture using a special screw allows you to deplete or enrich it;
- adjusting the position of the carburetor needle affects the change in the quality of the fuel mixture;
- Ensuring a stable level of gasoline inside the float chamber avoids flooding of spark plugs.
A power unit with an adjusted carburetor operates stably in any conditions, is economical, throttle response, develops rated power and maintains speed, and does not cause problems for its owner.
Carburetor structure
It is worth noting that the location of the carburetor is also different in different scooter models. Therefore, before you start adjusting it, you need to thoroughly study all the components and assemblies of your vehicle, their characteristics and location. The structure, in contrast to the location, of the carburetor is approximately the same.
The carburetor includes the following components:
- Venturi tube;
- valve with needle;
- float chamber;
- idle system;
- starting enrichment;
- spool;
- accelerator pump.
Venturi tube
So, the first element of the carburetor, called the Venturi tube, plays the most important role in its operation. This part is characterized by a diameter that varies throughout the entire length of the tube. This is due to the fact that it narrows towards the center, after which expansion follows again. It is the narrowest point of the tube that is intended for the air flow to pass through it.
The characteristic narrowing of the tube contributes to the formation of low air pressure, which is aligned to the point of expansion of the tube. If another smaller tube with gasoline is placed inside this tube, then the gasoline, on its way to the low-pressure zone, will begin to leave the small tube, spraying and evaporating, interacting with the air flow inside the large tube.
Flap with needle
The valve with the needle is installed directly in the center of the Venturi tube described above. It is necessary in order to regulate the amount of mixture that enters the combustion chamber. This adjustment is carried out by pressing the gas. However, the damper cannot operate without a needle. It is this that determines the volume of fuel entering the engine. So, when the pilot presses on the gas, the damper begins to move, thereby raising the needle, due to which the required amount of gasoline is supplied. In a word, the harder you press on the accelerator pedal, the more the damper opens, and, accordingly, the more fuel enters the combustion chamber.
Float chamber
To prevent the engine from stalling, it must be constantly supplied with fuel, a certain amount of which must be in the tube. For this purpose, a float chamber was invented, the operation of which is carried out on the principle of a toilet tank. Those. There is a float inside the chamber that moves to its lower part immediately after the gasoline level in the tube drops. Thus, the displacement of the float ensures the opening of a special valve through which fuel enters. After filling, the float rises, thereby closing the valve. This ensures a continuous and correct supply of fuel.
Idle system
The idle system in the carburetor is responsible for idling. However, its work is carried out not only at idle, but also at low speeds. In the case of idle speed, fuel is supplied through another channel of the carburetor, which is located behind the limiter. The idle system consists of:
Screw system
It is responsible for the volume of air that passes through the entire system, thereby regulating the quality of the mixture entering the combustion chamber. By tightening and unscrewing this screw, the pilot can adjust the amount of air. Accordingly, the less air volume enters the system, the tighter the screw is tightened, and vice versa. It turns out that when there is a lot of air, the fuel is leaner, when there is little, it is richer, since it contains more gasoline than air.
Special channel
The fuel mixture leaves the carburetor through it. This channel is closed by a special valve at the moment when the carburetor throttle valve opens
The valve is an important part because it prevents the system from negatively affecting the operation of the scooter's power unit at high speeds
Jet
Responsible for configuration.
It is worth noting that the carburetor idle system is its most vulnerable part. In this regard, faulty jets with a small cross-section are often the cause of carburetor malfunction. This is due to the fact that they are prone to clogging very quickly.
Thus, knowing the structure and principle of operation of the carburetor, you can begin to adjust it.
Main problems with carburetor operation
• The engine is unstable at idle
Let's say if you set the idle speed at 800, drove some distance and the idle speed increased to 1500, then this is a reason to look under the hood and make the correct carburetor adjustment. Perhaps in this case the problem is not in the “carb” itself, but in the wire connecting it and the accelerator pedal, but still, it’s worth a look.
• Spark plugs are constantly dirty and wear out more often
This happens when there is an excessive supply of the combustible mixture, which can occur for two reasons, the first is a burnt-out valve or the second is an incorrect fuel level. If in the first case it is necessary to replace the valve, then in the second case there is a problem with the float, excessive pressure or the float chamber itself.
Carburetor setting 139qmb
The mixture prepared by the carburetor, depending on the ratio of gasoline and air, can be rich, enriched, normal, lean and lean. I listed them in descending order of the percentage of gasoline (that is, a lean mixture contains the least gasoline and the most air). The engine cannot operate normally on rich and lean mixtures - they are too far from the optimum. The mixture with the maximum amount of gasoline on which the engine can still operate without interruption is called enriched. Accordingly, with a minimum - depleted. The middle between them is conventionally considered normal. Notice the nuance? The composition of the mixture is not tied to numbers - so many grams of gasoline per liter of air, but to the operation of the engine. That is, this is to some extent a relative parameter. For example, a mixture that is rich for a cold engine will become rich for a hot engine.
The composition of the mixture, logically (well, since it consists of gasoline and air), can be adjusted either by changing the amount of gasoline supplied or the amount of air sucked in. But to achieve maximum power, you need to give the engine the opportunity to suck in as much air as possible, and to match this amount, select such a proportion of gasoline so that the mixture turns out to be normal or slightly enriched.
There is a proboscis on the front of the filter cover through which air is sucked in. And at its end there is a plug with four holes. It was needed for the break-in period, and after the break-in is completed, it can be removed. We pull it out. The next thing that is in the way of air entering the engine is a foam filter. You can't remove it, but you can reduce the resistance. To do this, you need to wash it in a certain way. We prepare a mixture of motor oil and gasoline in a ratio of 1:10, wash the filter in this mixture, then squeeze it forcefully in your fist without twisting it, put it in to dry for about five minutes (not in the sun), then put it back. With this method of washing, the filter has low resistance and at the same time retains sufficient filtering properties. We increased the amount of air. Now we need to increase the amount of gasoline.
It is adjusted by a needle on the air damper (spool). The higher the needle is raised, the more gasoline. The needle rises with the spool, and its position relative to the spool can also be changed. The spool is located under a plastic cover in the center of the carburetor, the needle is inserted into a hole in the bottom of the spool, it can be removed with tweezers. But first, the lid. In its center there is a protrusion (pin) on which the spool spring is fixed. But with such a length (about 20mm), it also makes it difficult to lift the spool all the way up, which is quite justified during break-in and is completely unnecessary after it. To fix the spring, 6 - 7 mm is enough. We bite off the excess. The photo shows the cover with a pin up to
And here she is after:
Now nothing prevents the spool from rising to its maximum limit.
The last object of adjustment is the needle. In the carburetor of GX scooters, it does not have adjusting grooves, so it can be raised by putting on washers of appropriate thickness, for example from M2.5 fasteners. The maximum by how much it makes sense to raise it is 1.5 mm, in increments of approximately 0.25 mm.
The photo shows a needle with two textolite washers of approximately 0.5 mm each:
Now you can move on to fine tuning. To begin with, place a 0.5mm washer under the needle stop, assemble, and close the carburetor
and start it up. Let's warm up. If the engine runs smoothly, but when accelerating it changes its tone to a hoarse tone (dr-dr-dr instead of oo-oo-oo, this is working through a stroke) - the mixture is rich, you need to lower the needle, that is, put a thinner washer. To clarify, insert a plug into the proboscis. It got even worse - as if the mixture was rich. And if the engine operates with dips, especially noticeable at high speeds, and after the dip there is often a jerk (oo-oo-bu-bubu-oo!) - the mixture is poor. Let’s clarify again with the plug: it’s better with her - just like she’s poor. Raise the needle. Finally we find a position in which there are no symptoms of either a rich or lean mixture.
And the last thing is idle speed adjustment. This is done on a warm engine. We start it, release the gas and use the quality screw (it’s on the side, see the last photo of the article) to achieve the maximum increase in speed. Then use the quantity screw to reduce the speed to the minimum stable and again
we use the quality screw to raise them to the limit (in principle, this second iteration may not be needed). That's it, the carburetor adjustment is complete. You can go for a ride. You will see that your dynamics have improved and your maximum speed has increased by 3 or even 5 km/h.
How to change the quality of the fuel mixture
For all scooter engines, it is important to receive fuel with an adjusted ratio of gasoline to air. A lean mixture leads to improper engine operation, a drop in power and engine overheating, while a rich mixture leads to increased consumption and the formation of soot.
Adjustment operations are performed by changing the position of the quality screw and moving the throttle needle.
Turning the screw to the right causes the mixture to become richer, and unscrewing in the opposite direction causes it to become leaner. The same happens with the needle: when the needle is raised, the mixture becomes richer, and when lowered, it becomes poorer. The integrated use of both methods allows you to achieve optimal results during setup. However, not all carburetors have this feature, so, as a rule, one of two options is used.
Adjustment
The carburetor of a scooter can be located in different places. It depends, first of all, on the brand of the scooter. For example, on the Honda Dio-35 this element is located on the left side, closer to the rear wheel. A throttle cable and a fuel hose lead to it. Everything is clearly visible and you won’t have to look for the carburetor for long.
Adjusting the scooter carburetor is necessary in the following cases:
- The engine does not start or it takes a long time to start;
- The equipment loses its former dynamics and acceleration;
- With unstable idle;
- When the scooter engine speed is too high;
- With increased fuel consumption;
- When black smoke appears from the muffler.
The adjustment should be made with the engine warm. But before starting it, it is recommended to rinse and thoroughly clean the carburetor. First of all, the idle speed is adjusted, then the mixture quality is adjusted and the fuel level is adjusted.
The idle speed is adjusted using a screw. This adjustment will come in handy if the scooter has been sitting idle for a long time. After it, the carburetor will seem to gain a new life.
- If you need to increase the speed, the screw must be tightened.
- To reduce the speed, unscrew it.
We remind you that the adjustment is carried out after warming up the engine for at least ten minutes!
Adjusting the mixture quality
Adjusting the quality of the mixture is also very important. It is recommended to always adjust it according to the factory proportions. If the mixture is too lean, the scooter will often overheat and lose power and dynamics. On the contrary, if the mixture is too rich, fuel consumption will increase and carbon deposits will accumulate in the chamber more often.
This parameter is adjusted using a special screw or by moving the needle in the throttle valve. Often adjustment is carried out in the second way, since the screw responsible for this parameter may be damaged or simply missing in this model.
- Clockwise ? the mixture becomes richer.
- Counter-clockwise ? depleted.
In the case of a needle:
- Does the needle rise? enriches itself.
- Does the needle go down? depleted.
The most noticeable results can be achieved by combining these two adjustment methods.
Again, before making adjustments, the scooter engine must be warmed up for several minutes, and the carburetor must be clean inside.
The quality of the mixture is correctly adjusted in the following cases:
- The scooter began to accelerate smoothly;
- While driving, there are no failures in engine operation;
- There are no jerks;
How to find out the degree of enrichment of a mixture using a candle
- What if the scooter's spark plug is black and has a lot of carbon on it? mixture is too rich.
- If the spark plug of the scooter is white and looks like it’s brand new? mixture is too lean.
Level setting
The fuel level is adjusted after checking. At the very bottom of the scooter carburetor there is a transparent tube, by which you can determine the level.
- Unscrew the butter screw;
- We lift the handset up;
- Checking the level;
- If the level is just below the carburetor cap curb, everything is fine.
- If not, then adjustments are made: The cover is removed;
- The tendril of the needle, which acts as a locking mechanism, is bent. This type of tuning must be done in very small ranges.
Let us remind you once again that the carburetor must be clean during adjustment. It is necessary to fill only with fuel with the octane number recommended by the manufacturer, and the jets and other parts must be standard, and not homemade or removed from the carburetor of another scooter.
https://youtube.com/watch?v=a0rMb8efxkM
Tips and tricks
When performing adjustment operations, it is important to follow a number of rules:
- perform adjustments only after the engine reaches operating temperature;
- rotate the adjusting elements smoothly, observing the operation of the engine;
- Make sure there is no debris inside the fuel chamber and the jets are clean.
Before starting work on setting up the carburetor, you must study the operating instructions and clearly determine the location of the quality and idle screws. If you have a 150cc scooter, the carburetor adjustment is done in a similar way. After all, the process of regulating the fuel system is the same for engines of different powers.
Adjusting the carburetor on a scooter
Timely and correct maintenance of a vehicle is the key not only to its long life, but also to its proper operation and safety. In addition to the fact that there are certain conditions under which vehicle maintenance should be carried out, regardless of the presence of specific malfunctions (for example, long downtime, cold season, mileage and much more), there are also certain “symptoms” that indicate urgent the need for maintenance. This rule applies to absolutely all motor vehicles, including scooters.
It is worth saying that the key to the proper operation of all scooter mechanisms is the proper functioning of the carburetor.
Absolutely every scooter owner should have an idea of how to adjust it. If a beginner has never had the opportunity to adjust a scooter, then for help you can turn to experienced mechanics, relevant literature and advice on the Internet.
First of all, you need to know what exactly a carburetor is and what it is intended for. First of all, it is the place where the fuel mixture is prepared by mixing gasoline and air. It is this fuel mixture that is subsequently supplied to the engine cylinder. If the carburetor is set correctly, the scooter will have the appropriate speed and power, as well as correct and economical fuel consumption. All this, in turn, ensures a safe ride for the pilot.
What is this scooter?
All the advantages of scooters over other vehicles apply to the Suzuki Let's 2 model. Appearing on sale for the first time in 1996, this scooter quickly gained popularity. Many Chinese scooter manufacturers have borrowed the technical characteristics and design of this model for their products.
Even then, the scooter was stylish, comfortable and popular. And in 1999, the company updated the design. Now this bike is equipped with modern lighting technology and has acquired beautiful streamlined shapes. In addition, its technical characteristics and driving performance have noticeably improved.
The Suzuki Let's 2 moped is an ideal vehicle for city roads. It is maneuverable and obedient, takes turns well, and has a smooth ride. Even a person unfamiliar with motorcycles can easily operate it. The scooter can comfortably accommodate two people of average build. This is an excellent choice for active young people who do not like to sit in traffic jams and want to be mobile.
Scooter variator belt maintenance
Scooter variator belt is a consumable item. The belt, so to speak, directly pulls the scooter on itself, and accordingly wears out over time. Typically, the service life of the belt is 8-12 thousand km. Much depends on the manufacturer of the belt, as well as on the riding style of the scooterist. Read more about servicing the scooter's variator belt. In general, you can keep a notebook and note the mileage in it every time you change the belt, engine and transmission oils. This is to make sure you don’t forget - a short pencil is better than a long memory.
Maintenance of cables, locks and other scooter mechanisms
Over time, the scooter's cables become increasingly tight, and the locks become increasingly difficult to operate. This is due to the production of lubricating components, which either dry out or simply lose their properties. So, for example, by the next season the throttle cable may begin to “get stuck”, and the gas will jam, or maybe even get stuck in the “pressed” position. Therefore, to avoid this, it is recommended to perform a simple procedure to lubricate this mechanism annually. Read more Maintenance of cables, locks and other scooter mechanisms
Scooter oil
Modern scooters usually use 2 types of oil - motor and transmission, for the engine and transmission, respectively. For the normal operation of these components, the oil, of course, should be changed regularly, using the oil class recommended by the manufacturer (Read more about scooter oils). Engine oil change intervals
The scooter is also installed by the manufacturer, but on average every 3000 km (when using really high-quality oil). During the break-in period of a scooter (or a new engine), the oil is changed more often. That is, for a new scooter, the frequency of replacing the motor (and, by the way, the transmission too) is approximately the following:
after the 300 km mark after the 1000 km mark after the 2000 km mark then every 2-4 thousand km.
After break-in, the transmission oil is changed a little less frequently than the engine oil, approximately every 4-6 thousand km. The process of changing the engine and transmission oils of a scooter.
Trouble on the road
A scooter (like a motorcycle), if a tire is punctured, completely loses the ability to move independently. But carrying a pump or a spare tire with you is not a luxury that every scooter model can afford. But the situation is not as hopeless as it seems. The solution is a special sealant for repairing motorcycle tires. One can both seals and inflates a motorcycle tire, and what is especially important does not take up much space in the glove compartment of a scooter. Also see the article: Scooter's emergency suitcase
Equipment, etc.
Various insects cause quite a lot of inconvenience when riding a scooter. They constantly strive to break on the visor of the helmet and dry on it for a long time. In this case, as well as to protect the helmet glass from water, dirt and fogging, a helmet cleaner can be used. For leather lovers, there are leather care products. These are lotions that make the skin softer, prevent it from drying out and cracking, protect the skin from water and improve its appearance. Skin treated with this lotion is cleansed and looks like new.
For lovers of fabric clothing, there are various means of impregnating clothing and tents. They will save you from getting wet and dirty in bad weather, maintain the breathability and softness of the fabric, and prevent the formation of oil and grease stains. Such aerosols are suitable not only for fabric, but also for impregnating suede.