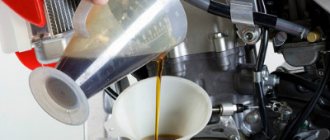
"Wet" double
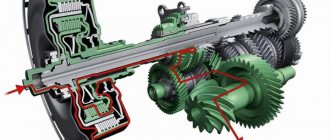
There are two types of clutch, dry and wet (also multi-plate in oil). The so-called “wet” has better cooling. Most often it is installed on gearboxes with a torque of 250 Nm and above. An example would be the Bugatti Veyron, whose torque reaches 1250 Nm.
The second set of discs is mounted on separate hubs, which are located on the input shaft of the corresponding row of gears. In the normal position the mechanism will be open. As for the closure, this is done thanks to hydraulic cylinders controlled by an electrohydraulic module. The disks take their initial position due to springs.
Depending on the design of the double clutch, the friction disc packs can be arranged differently, concentrically or parallel. Concentrically, when the couplings are located in the same plane and perpendicular to the input shaft. In this position the couplings are more compact. Typically used in gearboxes with front-wheel drive and a transverse engine.
As a rule, the internal clutch is responsible for shifting even-numbered gears, and the external clutch is responsible for shifting odd-numbered gears. It becomes clear that such a set is designed to transmit high torque.
Parallel - when the couplings are located one behind the other. As a rule, this arrangement is used for rear-wheel drive cars.
Clutch faults
Possible malfunctions that may appear during operation of IZ motorcycles.
The clutch of IZH Jupiter IZH Planet is slipping reasons
The malfunction is noticeable during sudden acceleration. We increase the speed, but the motorcycle does not accelerate. The same thing happens when driving on a steep hill as the load increases. The motorcycle cannot overcome the obstacle and stops, although the crankshaft speed does not drop. The discs get very hot and wear out quickly. It is impossible to operate the equipment in this condition; the cause must be found and eliminated.
This malfunction indicates that the disks are poorly pressed against each other.
There may be several reasons:
- The adjustment was not carried out correctly
- The springs have lost their former elasticity
- The discs have worn out and become thinner.
- Wear of drive parts
A serious problem could be a jammed control cable. The reason is damage to the shell and the resulting rust underneath. Gentle cleaning and lubrication, better replacement.
Check and wash the adjustment mechanism itself located in the right engine cover. Small particles of road sand that get into the mechanism with water can slow down the operation. After squeezing the lever, the parts do not return to their original position.
Drives clutch IZ Planet IZ Jupiter reasons
The clutch is driving - this is when the lever is squeezed all the way, and when the speed is turned on, the motorcycle immediately starts moving and cannot be stopped. You press the brake, the engine stalls. This indicates that the clutch is not completely disengaged.
The main reason is the springs that compress the discs. The discs are not evenly weakened and in some places are in strong contact with each other. The springs need to be adjusted correctly.
There is too much free play in the control lever on the steering wheel. If adjustment is not possible, replace worn control parts.
You need to check the pusher, which is located inside the input shaft of the gearbox. Perhaps the rod has become shorter.
Be sure to check the presence of the ball. Often during disassembly it rolls out and gets lost.
The ball is located inside the input shaft of a two-cylinder engine between the pusher and the thrust rod.
For a single-cylinder unit, the ball is located in the right cover between the screw with a control nut and the thrust rod in the input shaft of the box.
- IZH Planet 5 characteristics review power weight video
- Rectifier-voltage regulator
- Ignition installation
- Generator IZH 281.3071
- IZH Planet 4 ignition switch
- Malfunctions of the IZh motorcycle
- Air filter for IZH Planet 4 motorcycle
- Motorcycle IZH 56 technical specifications
- Motorcycle IZH Jupiter disassembly and assembly of gearbox
Purpose of the clutch IZ Planet and IZ Jupiter
Clutch - the name speaks volumes about the job it does.
In our case, the crankshaft engages the gearbox of the IZH Planet and IZH Jupiter engines. The connection should occur smoothly without jerking, this is necessary to start moving and smoothly change gears. In case of heavy loads, it protects engine parts from damage. The clutch is located in the left half of the crankcase, under the left engine cover.
To get to the clutch, you need to drain the oil and remove the cover with the gasket, first remove the levers and unscrew the mounting bolts.
The basket is constantly in working condition, the discs are tightly compressed by springs.
The motor transmission consists of two sprockets. The small drive is located on the crankshaft. A large star driven on a drum. The connection is made by a motor chain.
The engine gear ratio is 2.17 for all single-cylinder IZh models. For IZ Jupiter, the gear ratio is 2.57.
When assembling the motor transmission, the planar arrangement of the stars is controlled. No more than 0.4 millimeters are allowed.
Switching off occurs using a special device. The shutdown mechanism is installed in the right engine cover. This mechanism is used to make adjustments.
Adjusting the IZH Jupiter clutch
On IZH-Yu and IZH-YUK motorcycles, adjusting the clutch release mechanism begins with adjusting the machine, for which the adjusting screw is screwed in all the way and released 1/4.1/2 turn, then tighten the lock nut. Correct adjustment is checked by pressing the switch pedal in any direction. Moving the front end of the shift pedal 5-5.5 mm from the neutral position should not lead to movement of the pressure plate. Then adjust by manually pressing the adjustment screw located in the left column of the clutch lever
on the steering wheel (free play 5-10 mm)
CLUTCH OF MOTORCYCLE “MINSK” MMVZ 3.111
The clutch is designed to disconnect the engine and transmission when changing gears, during a short stop with the gear engaged, and when braking.
The adjustment is made as follows:
1. Unscrew the screws of the right cover plug 39 (Fig. 3). 2. Loosen the adjusting screw locknut. 3. By screwing in or out the adjusting screw, set the free play at the end of the clutch lever on the steering wheel to 5-10 mm. It must be remembered that when screwing in the screw, the free play decreases, and when turning it out, it increases.
If the clutch “leads,” that is, when the lever is fully depressed, the motorcycle tends to move, then the adjusting screw must be screwed in. If the clutch “slips,” that is, when the lever is completely released, the motorcycle stands still, or the engine speed does not correspond to the speed of the motorcycle in a given gear, which is especially noticeable when driving on an incline, then the adjusting screw must be unscrewed.
After adjusting the clutch, the adjusting screw should be locked.
Rice. 12. Clutch: 1 — driven discs; 2 - drive disk; 3 — pressure disk; 4 - pressure spring; 5 — rod fungus; 6 — driven drum nut; 7 — lock washer; 8 — driven drum; 9 — driving drum; 10 — intermediate washer; 11 — driven gear of the motor transmission; 12 - ratchet; 13 — ratchet gear of the trigger mechanism; 14 - spring of the ratchet gear; - 15 - bushing of the driven gear; 16 — bearing retaining ring; 17 — input shaft bearing; 18 — input shaft; 19 — clutch release rod; 20 - worm spring; 21 — worm lever; 22 — right crankcase cover; 23 - ball; 24 - worm; 25 — worm thrust washer; 26 - lock nut; 27 — adjusting screw; 28 — secondary shaft nut; 29 — oil seal; 30 - lock washer.
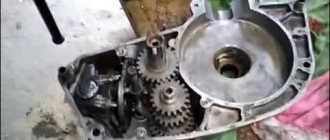
Disassembling and assembling the clutch.
1. Using a wire hook (or knitting needle), disconnect the springs from the pressure plate and remove the disc. 2. Remove the clutch fungus and remove the discs. 3. Use a screwdriver to bend the lock washer. 4. Secure the clutch drum with a special device (Fig. 13), or, in the absence of one, with a screwdriver (which is highly undesirable), and unscrew the driven drum nut. It should be remembered that the thread is left-handed!
Rice. 13. Device for disassembling the clutch.
5. Without removing the special device from the clutch, unscrew the nut securing the gear on the crankshaft journal. 6. Remove the clutch together with the motor chain and gear. 7. Remove the driven gear bushing and thrust washer. 8. Remove the key from the crankshaft journal. Reassemble in reverse order.
Clutch care involves lubricating the cable, lever and worm, as well as timely and correct adjustment of the free play of the lever.
The most common clutch malfunctions are:
1. The clutch is not adjustable - the pressure springs may weaken, the cable may stretch out, or the pressure plate may bend. 2. The clutch does not disengage - possible jamming of the worm due to poor lubrication or sand ingress, jamming of the rod due to its bending, welding of the rod to the input shaft due to insufficient lubrication of the gearbox, misalignment of the discs, jamming of the discs on the splines or in the grooves of the drum, self-unscrewing of the driven drum nut.
content .. 11 12 17 ..
How many clutch discs on Izh Jupiter 5
Motorcycle IZH-Planet. Operation, maintenance and repair. >> Motor transmission, clutch, trigger mechanism. Clutch - disc replacement
LLC "World of Autobooks"
Clutch - disc replacement
Before replacing the clutch discs, motor chain or drive sprocket, it is necessary to remove the left muffler from the left driver's footrest (with a two-pipe exhaust system), drain the oil from the power unit crankcase, or (for repairs on the road) place the motorcycle on its right side. If the fuel tank is full, the fuel must be drained or the tank removed.
The work is shown on a removed power unit.
Removing the clutch discs
1. Using a 12 mm wrench, loosen the pinch bolt of the gear shift lever.
2. Remove the lever.
3. Remove the washer.
4. Remove the O-ring.
4. Use a 14 mm wrench to loosen the pinch bolt of the kick starter lever.
5. Remove the lever.
6. Using a slotted screwdriver, unscrew the eight screws securing the left crankcase cover. If necessary, you can use an impact screwdriver.
Please note that the screws vary in length and some have aluminum sealing washers underneath.
7. Remove the cover along with the paronite gasket. Be careful not to tear the gasket.
8. Using a large slotted screwdriver, unscrew the five nuts of the clutch pressure springs.
9. Remove the five springs along with the caps from the inner clutch drum.
10. Remove the pressure plate.
11. We take out the driven and driving disks.
12. We lay out the disks in the order of removal, so that (in case of assembly without replacement) install them in their original places.
13. Inspect the clutch discs. The driven (steel) discs must not be deformed as a result of overheating, and the driving (plastic) discs must be free of cracks, burns and visible wear of the contact surfaces. The outer protrusions of the discs must not be damaged. If defective disks are found, we replace the entire set.
Installing clutch discs
We install the clutch discs in the reverse order.
Uniform compression of the springs is ensured by equal protrusion of the ends of the nuts above the ends of the studs. It should be equal to 4.0-4.5 mm (for new disks) and is measured with a caliper depth gauge.
The pressure plate should move without distortion or jamming. Otherwise, it is necessary to eliminate the distortions by additional adjustment with nuts.
Before installing the crankcase cover, it is recommended to degrease its seating surface and the crankcase seating surface, and apply a thin layer of sealant to them or to the oil-free gasket (on both sides).
The holes in the cover for the screws should also be degreased, and sealant should also be applied to the back of the screw heads.
Attention!
After installing all the removed parts, you should adjust the clutch drive (see below), and, in addition, repeat this adjustment after several hundred kilometers of the motorcycle, when the clutch discs have become accustomed to each other.
Functional purpose of the gearshift clutch
Before you adjust the clutch on the Izh-Jupiter 5 motorcycle, it’s a good idea to understand its purpose and principle of operation. The essence of the transmission clutch:
- Ensuring the transmission of torque from the large gear of the motor transmission to the gearbox input shaft.
- Short-term separation and smooth connection of transmission elements to each other.
Izh motorcycles were equipped with a mechanical clutch, the operation of which is based on the friction force between the driven and driving disks. It is a multi-disc design operating in an oil bath - a classic arrangement that the Izhevsk Machine Plant used until 2008. Working in tandem, the main chain drive and four-speed gearbox are reliable and proven by many generations of motorcyclists.
How many clutch discs on Izh Jupiter 5
Motorcycle IZH-Planet. Operation, maintenance and repair. >> Motor transmission, clutch, trigger mechanism. Clutch - disc replacement
LLC "World of Autobooks"
Clutch - disc replacement
Before replacing the clutch discs, motor chain or drive sprocket, it is necessary to remove the left muffler from the left driver's footrest (with a two-pipe exhaust system), drain the oil from the power unit crankcase, or (for repairs on the road) place the motorcycle on its right side. If the fuel tank is full, the fuel must be drained or the tank removed.
The work is shown on a removed power unit.
Removing the clutch discs
1. Using a 12 mm wrench, loosen the pinch bolt of the gear shift lever.
2. Remove the lever.
3. Remove the washer.
4. Remove the O-ring.
4. Use a 14 mm wrench to loosen the pinch bolt of the kick starter lever.
5. Remove the lever.
6. Using a slotted screwdriver, unscrew the eight screws securing the left crankcase cover. If necessary, you can use an impact screwdriver.
Please note that the screws vary in length and some have aluminum sealing washers underneath.
7. Remove the cover along with the paronite gasket. Be careful not to tear the gasket.
8. Using a large slotted screwdriver, unscrew the five nuts of the clutch pressure springs.
9. Remove the five springs along with the caps from the inner clutch drum.
10. Remove the pressure plate.
11. We take out the driven and driving disks.
12. We lay out the disks in the order of removal, so that (in case of assembly without replacement) install them in their original places.
13. Inspect the clutch discs. The driven (steel) discs must not be deformed as a result of overheating, and the driving (plastic) discs must be free of cracks, burns and visible wear of the contact surfaces. The outer protrusions of the discs must not be damaged. If defective disks are found, we replace the entire set.
Installing clutch discs
We install the clutch discs in the reverse order.
Uniform compression of the springs is ensured by equal protrusion of the ends of the nuts above the ends of the studs. It should be equal to 4.0-4.5 mm (for new disks) and is measured with a caliper depth gauge.
The pressure plate should move without distortion or jamming. Otherwise, it is necessary to eliminate the distortions by additional adjustment with nuts.
Before installing the crankcase cover, it is recommended to degrease its seating surface and the crankcase seating surface, and apply a thin layer of sealant to them or to the oil-free gasket (on both sides).
The holes in the cover for the screws should also be degreased, and sealant should also be applied to the back of the screw heads.
What does a clutch consist of?
In order not to break the clutch, you need to know not only how it works superficially and what its functions are, but also what parts it consists of. The main components include the driven and driven parts, the shutdown mechanism and the pressure system.
The engine rotational torque is transmitted from the flywheel to the drive parts, which in turn transmit torque to the gearbox drive shaft. The frictional moment is provided thanks to a pressure mechanism, which, thanks to the tight coupling of the driven and driven parts, gives the long-awaited result of movement.
Disengaging the clutch is considered important. So one disk, on which springs are located peripherally, is located in a cast-iron crankcase, which in turn is located in the engine block crankcase.
The drive part includes the clutch housing and flywheel, the latter in turn is attached to the crankshaft flywheel using six special bolts. The pressure plate is located in the middle part of the casing. The torque of the pressure plate is transmitted from the flywheel through three protrusions that are located in the disk and enter the casing windows. The driven disk, hub, and drive shaft of the gearbox are the main and mandatory components of the driven part of the clutch.
On both sides of the driven disk there are friction linings made of a copper-asbestos composition (or another metal-asbestos composition), which can withstand unusually high temperatures and are known for their friction properties. The driven disk is connected to the hub with rivets or through springs. These springs are an integral part of the spring-friction damper of rotating vibrations (that is, the damper)
CLUTCH MECHANISM
Clutch mechanism
is a device in which torque is transmitted due to the work of friction forces. The clutch mechanism allows you to briefly separate the engine and gearbox, and then smoothly connect them. The elements of the mechanism are enclosed in a clutch housing, which is attached to the engine crankcase.
The clutch mechanism consists of
:
- crankcase and casing,
- drive disk (which is the engine flywheel),
- pressure plate with springs,
- driven disk with wear-resistant linings.
The driven disk is constantly pressed against the flywheel by the pressure disk under the influence of strong springs. Due to the enormous frictional forces between the flywheel, driven and pressure plates, they all rotate together when the engine is running. But only when the driver does not touch the clutch pedal, regardless of whether the car is moving or standing still.
To start the machine moving, it is necessary to press the driven disk connected to the drive wheels to the rotating flywheel, that is, engage the clutch.
And this is a difficult task, since the angular speed of rotation of the flywheel is 20 - 25 revolutions per second, and the speed of rotation of the drive wheels is zero. Clutch engaged
In the first stage
work to engage the clutch - slightly release the pedal, i.e. We allow the springs of the pressure plate to bring the driven disk to the flywheel until they lightly touch. Due to frictional forces, the disk, slipping for some time relative to the flywheel, will also begin to rotate, and the car will slowly crawl.
At the second stage
– we hold the driven disk from any movement, i.e. hold the clutch pedal in the middle position for two to three seconds so that the speed of rotation of the flywheel and disc is equal. At the same time, the machine increases its speed.
At the third stage
— the flywheel, together with the pressure and driven disks, already rotates together without slipping and at the same speed, transmitting 100% torque to the gearbox and then to the drive wheels of the car. This corresponds to the state of the clutch mechanism - engaged, the car is moving. Now all that remains is to completely release the clutch pedal and remove your foot from it.
If you release the clutch pedal sharply when starting to move, the car will “jump” forward and the engine will stall.
To release the clutch
The driver presses the pedal, and the pressure plate moves away from the flywheel and releases the driven disk, interrupting the transmission of torque from the engine to the gearbox.
Press the clutch pedal fairly quickly, but not abruptly, with a calm movement until the end of the pedal stroke. The clutch is disengaged
after mastering the operation of the clutch pedal in three stages
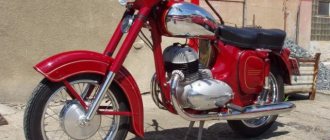
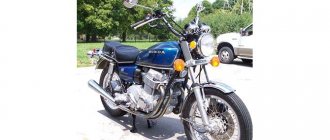
Restoration of Izh Planeta 5, as it was.
Hello reader, before you start reading this, I recommend stocking up on more than one cup of tea and a lot of cookies, because the article, in my opinion, is included in the “dull” group because there is a lot to write, and I would like not to miss anything in order in the future, the person who read this did not make the mistakes that I made. So, let's begin. I didn’t write about all this in the description, because there’s a lot to write, and there’s no point, it doesn’t fit into the description, but it’s in a separate article, and so, as was written earlier, the motorcycle was “revived” after a long 5 -year-long downtime, as I remember now, the weather was bad, it was raining, in general it was early spring, my friend and I remembered it, and something became interesting, is it true that our motorcycle industry is as bad as they say, that motorcycles are not reliable, they say, as long as you ride, you lie under it for as long... However, closer to the point, the motorcycle started up almost immediately, it was necessary to do basic things, pour fresh gasoline, blow out the spark plug, check the ignition and electrics in general, because the downtime was not he was small, and anything could have happened, and he stood up for this downtime for a reason, I knew that too. But strangely enough, the motorcycle started up immediately, without problems or complaints, it worked smoothly, and it smelled, truly smelled like our two-stroke engine smell, I think everyone who lived in a village or region knows what our Planet or Jupiter smells like when passing by , this is a smell that takes you somewhere to childhood or something, but let’s return to the topic. They started the motorcycle, I rode literally 2 kilometers and it stopped, the coil got hot and eventually burned out, I had to roll it, I struggled with it for about a week or two, took it to mechanics and just knowledgeable people, but no one could understand what was wrong, but there was a person who could still do it. The problem was in the wires on the generator, they were mixed up in phases, anyone who knows the structure of the generator on the Sovki will understand what I mean. Because of this, the ignition coils (popularly called "women") burned, and often also the spark plugs. Then the season went on, the whole season without a single breakdown or a single complaint, the motorcycle surprised me more and more every day, and completely
crossed out
all the stereotypes and myths about him. During this season, I made the necessary conclusions for myself, conclusions, first of all, about the people who “bad” our motorcycle industry, either they didn’t ride, or they exploited God knows what and how. During the season, the motorcycle gave me a lot of emotions, bright colors, impressions and memories. For which I was very grateful to him, and one day, sitting on the stairs of the house, in the fall, when all the other horses were already being preserved, I thought about restoration, because something needs to be done in the winter, and you can’t ride it, there was no snowmobile at that time, but I was drawn to motorcycles, the last project on a moped was already ready, and there was only nothing left to do, there was definitely not enough work for 3 months, and I said to myself: That’s it, you, my friend, will be next . We must somehow repay our two-wheeled friend for his gratitude :) And here the essence begins. The motorcycle was placed on stumps, because there was no tackle either, but it had to be disassembled; everything that was at hand was used. On frosty winter evenings, my friends and I unscrewed nuts and bolts, getting closer and closer to the “Completely Disassembled” stage. The motorcycle was disassembled down to the frame, only the steering wheel remained, but I didn’t touch it later, I’ll explain why later. But time passed, and the frost of -30 degrees did not give me the opportunity to work, and then I went crazy, I decided to drag all this mass of spare parts, bolts, nuts into the house. So I did, for a long time the cat will remember me , for the inconvenience caused to him. However, we will continue. The motorcycle was disassembled, and everything I wanted to get to was already in my hands. (Below is a photo of what he looked like at that time)
Such things, no engine, no wheels, nothing. Everything was as I needed, only it was all at home, and it was a little cleaner than here (I then managed to connect the sink and wash it with foam). I started with the engine, it gave me no complaints, it worked perfectly, there was no knocking, and it wouldn’t have had time, the mileage was 5000 km, which for the Planets is “Ugh, okay.” Only failed rubber bands, seals, anthers, etc. were subject to replacement. I didn’t change what worked fine, because I’m a proponent of the idea that if something works fine, then there’s no point in touching it. It was for the engine that the following were replaced:
1) Oil seal, on the right side of the engine, which is installed behind the drive sprocket, as well as the clutch rod oil seal.
2) The sprocket with 14 teeth was replaced with a 19 sprocket, because I wanted to drive a little faster.
3) Because of the large sprocket, I had to change the chain and put in a longer chain.
4) The box oil was replaced, from the much praised “Avtol” to Motul Transoil expert, I think that’s what it’s called.
5) The spark plug also had to be replaced, everything was strictly according to the manual, I installed an NGK, an analogue of our USSR spark plug, I don’t remember the exact model, but it was like an analogue in the instruction book.
6) The ignition cap was replaced with a USSR one, from storage, where I got it, it’s a secret, but if you’re interested, ask
7) The coil was also replaced.
 Ignition cams.
I think that’s all, if I remember anything else, I’ll definitely write it down.
This was with an engine, but I still had a whole frame and lining left, which also had to be “fighted”. I started with the frame, or rather with examining it, I really didn’t want to get into the steering column, and you can’t paint the frame without removing it, in the end I didn’t do anything with it, and it’s in perfect condition, not bent anywhere, not it was cracked, but for the paint I did this: I took aerosol paint and picked it up, then tinted it, it turned out not bad, not perfect, but not bad either. As a result, in the future I still removed the front stays, that is, the shock absorbers (the fork, although calling the front stays a fork is not correct). For a long time I did not dare to do anything with them, because they were talking about the disease of their oil seals, they liked to leak, but I overcame my fear and began to drain the old oil, well, like oil, some kind of “left-handed” liquid, and what you wanted, the motorcycle doesn’t have much for quite a few 26 years, and I’m SURE no one changed the oil in them, of course. That’s the kind of ZHIIIZH that was in my feathers.
I poured oil into the feathers as indicated, again, in the book, oil for automatic transmissions, namely, I filled it with Toyota oil. Because there was no other, but the oil is very good. In general, it’s quite strange, of course, the feathers contain oil for automatic transmissions... But that’s why it’s “Scoop”, that’s what made our motorcycles different from others, there were no other oils at that time, but something had to be poured, so they poured it , which was appropriate :).
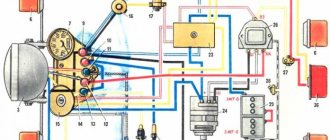
Next came the wiring, there was a very bad remote control on the right side, which was responsible for stopping the engine, as well as the light switch from “ON” to “OFF”. I also replaced it, but not with a Chinese one, with a native, new Soviet remote control, where I got it, again I’ll tell you if it’s interesting :).
The dashboard was also disassembled, the direction indicator section did not work, the light bulb burned out, so it was replaced. Next, the wires were used, which can be seen like a garland on the Planets and Jupiters, everything was carefully wrapped in a single chain with black electrical tape, and hidden from the eyes of the caretaker, for a long time I decided how and where to hide it, but in the end I was able to make a decision. That's it for the wiring, all that remains is the cladding and troubleshooting of individual parts, such as the rear swingarm, rear shock absorbers, etc. As for troubleshooting, everything is simple, all the cables were lubricated, all the damaged ones were replaced, lubricated with silicone grease, everything was according to the manual. The chain was lubricated with road chain lubricant from MOTUL, it turned out just right. We also bought new chain covers, our production, the quality is 4+, but I don’t know how they will behave further, so far they’re not bad. All the bolts and nuts were tightened, “Bolt, washer, engraver, nut” were strictly observed everywhere, I lubricated every threaded connection, I did not spare any effort or time, because I am really troublesome when approaching such matters. Next we will have the most delicious. Facing . The tank, fairings, front covers of the feathers, everything that was in sight of the caretaker was carefully prepared for painting, 3 layers of primer, 3-4 layers of paint, 2-3 layers of varnish, paint, and no effort or time was spared. I decided on the color right away, red, but I didn’t try to get into the factory color, because in the catalog I found something I liked better, so I chose it, I won’t tell you the paint code, it’s huge, I couldn’t remember, alas. Next, alloy wheels were purchased, one of the most expensive pleasures for such motorcycles, one Soviet used wheel cost me about 3-4 thousand rubles, yes, these are the prices for them, but there are comrades who pay 7-10 for Chinese ones They charge for one wheel, it’s terrible. I bought three wheels, found them with difficulty, from different parts of Russia, why 3? The answer is simple, a side trailer, but more on that later, at this stage I completely forgot about it. Later, later. One of the disks was defective, it had broken bearing seats, it was necessary to sharpen the bushing and install the bearing a little deeper, it turned out cheap and cheerful, this disk was later installed on a side trailer, but its story does not end there, it was nerve-wracking He also gave me a hard time, but more on that later. By the way, the bearings in all the disks were changed, and the bearings were filled with new elastic grease, as in the manual.
The wheels were of different shades, but for some reason people like to paint them white, or a “RASING” color, or maybe it’s fashion...:) This is what they looked like initially.
They were the most exciting thing to paint, because the idea was not simple, you will see for yourself at the end of the article :) But you will go to great lengths for the sake of beauty and food for the eyes :)))
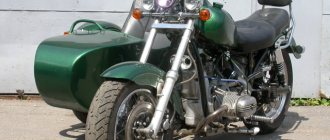
Then we are already approaching the end of my stories, and I simply don’t have enough time to describe everything, there are a lot of little things, and I’ve already forgotten about everything, but I will describe the most important thing. Next, I went on a search, searching for the goodies that were produced with the “Lux” motorcycles, that’s what they were called, I already found the castings, there were various little things left, for example, a chrome neck cover, air stays and a disc brake, BY THE WAY, knowledgeable people will ask why no air feathers? I answer. Air feathers are quite expensive, firstly, a pleasure, and secondly, they are not necessary for me, because my feathers work very, very softly, many simply either have no oil there, or it is already so stale from years that it simply does not allow the shock absorbers to function normally , change it, and you will be happy. So, air feathers also cost a lot of money, about 14,000 thousand rubles, is it worth it? For what? Left my family. If there are no air springs, there is no disc brake, and I don’t need it, because all the hydraulics cost 5,000 rubles, the disc costs 2,500 rubles, the drive without a speedometer cable costs 1,600 rubles, and in total with little things it’s also about 10,000 rubles, expensive and not worth it, I thought, I left my dear drum brakes, this is not a motorcycle that needs a disc brake. Let's continue. All the goodies were purchased, the muffler remained, I had it slightly dented, but not clogged, and it worked perfectly, but still I decided to replace it, for my own, Soviet muffler they didn’t ask for much, 3,500 thousand rubles, but desire and curiosity I was devoured by new Soviet spare parts, so I placed an order. The pipe arrived and was ready for assembly, I cannot convey with the keyboard what I saw, new Soviet spare parts, these are like toys under the Christmas tree in childhood, very memorable things, especially in our time. Next, let's move on. Next was the installation of the painted parts of the motorcycle, the arches, the covers of the compartments, the compartments themselves, and so on. All the chrome was also mirror polished.
These are not all the details, I’m tired of loading them all, but believe me, this is the feeling of freshly painted parts, you can’t confuse them with anything! :) Next is installation, installation of everything, trim parts, muffler, wings, and of course the engine. And here the story begins, and one of my mistakes. I had the engine polished, all the way to the mirror, polishing is a very sensitive matter that requires time and patience, in the end it turned out like this:
Not ideal? I agree, I was still finishing it at home, but I forgot to take a photo... But the mistake was this, REMEMBER, if someone polishes an aluminum engine, cover it with heat-resistant varnish, or on the edge with any varnish, otherwise after the first wash, the aluminum will begin to reaction, will oxidize, after which it will again become the same simple in appearance, I made a face for a long time when I washed the motorcycle for the first time... Don’t make my mistakes. Next was assembling everything that I filmed, it took about a week, but there was no rush. Eh, I think I told you everything, there will be a separate article about the side trailer, because it deserves it. Thanks to everyone who paid attention to this article, I hope it was interesting and useful for you, ask your questions, I will be happy to help;) Photos of the motorcycle as it was and what it became are, of course, attached, THANKS FOR YOUR ATTENTION! :)))
These are not all the photographs, and not all of the works listed, but it’s not realistic to list everything, because I can’t remember everything, and the photos are mostly stored on the phone, and transferring them is quite a pain, after a while I’ll post more... Once again, everyone Thank you!!!
Tags
- IZHPLANETA5
- PLANET5
- PLANK
- bar
- Izhplanet5
- planet5
- planet 5
Clutch Spring Adjustment
Adjusting the springs is not difficult, that's the main thing. understand correctly. Let's start by mounting the motorcycle on the center step. Then remove the cap before draining the oil. The clutch lever is compressed to the limit and will definitely lock. Next comes speed, preferably first. Take the wheel and start spinning. We are trying to determine how much effort we are making. We look at the clutch as it rotates and determine which springs are loose. We mark them with chalk and then tighten them. We start turning the wheel again, and if you feel that the wheel is turning easier, that means everything is done correctly. The process must be repeated to achieve the best result. After that, we check the result while moving. If the load starts to clip when the load increases. All springs must be tightened using nuts. In this case, all nuts must have the same number of turns.
Clutch adjustment
The clutch is the connecting link between the gearbox and the control lever, so you need to know how to adjust the clutch on a walk-behind tractor. When the clutch fails, its failures are immediately visible:
- in this case, the clutch is fully depressed, and the walk-behind tractor breaks away. To eliminate these problems, tighten the adjustment screw;
- If the clutch is in the released state, but the walk-behind tractor still does not produce the required speed or stands still, then it is necessary to loosen the screw.
If you hear a strange sound from the gearbox during use, promptly stop all work. The most common problem is insufficient oil or poor quality. It is necessary to check the oil level every time before starting work. If the oil is changed, but the noise does not stop, then you need to contact a service center for diagnostics. If problems with gear shifting are detected, the causes must be sought in the correct settings of the clutch, worn gearbox parts or worn shaft splines.
Knowledge of the correct adjustment of the clutch on a walk-behind tractor will ensure your safety and efficiency of the work process. To purchase new products, you can go to!
The Neva MB-2 walk-behind tractor is an agricultural unit designed to work on a wide variety of soil types, including previously uncultivated soil.
Motoblock "Neva" MB 2B-6.5RS
Available in various modifications with different types of engines:
- MB-2B-6.0,
- MB-2B-6.5Pro,
- MB-2B-7.5Pro,
- MB-2K-7.5,
- MB-2N-5.5,
- MB-2S-6.0Pro,
- MB-2S-7.0Pro,
- MB-2S-9.0Pro,
The main work that can be performed on the Neva MB-2 walk-behind tractor is:
- plowing the soil;
- cultivation, milling;
- watering (pumping station);
- hilling;
- cleaning areas from grass, snow, etc.;
- harvesting potatoes, onions, etc.
Types of clutch
By type of friction.
The type described above has the so-called “dry” type of friction. That is, all structural elements do not have any lubrication; moreover, it is not allowed at all, since it can affect the adhesion properties of the interacting surfaces of the disks.
But there are types in which the components are in an oil bath - the so-called “wet”.
But this type is practically not used on cars, although it can be found in the design of some motorcycles.
In general, the essence of the operation of this clutch is no different from the “dry” one, with the only difference being that the crankcase in which the components are located is filled with oil.
By number of threads.
As for the number of flows, here friction type clutches are divided into single-flow and double-flow.
In the first case, rotation from the engine is transmitted to only one element. In the type described above, it is the gearbox input shaft.
But special equipment often uses a double-flow clutch.
A distinctive feature from single-flow is the transmission of rotation to two shafts. But for this, another driven disk has been added to the design.
Most often it is found on tractors (the second flow ensures the rotation of the power take-off shaft).
As for passenger vehicles, this type has found application in cars with a robotic gearbox (more about it below).
By the number of driven disks.
Regarding the number of driven discs, in addition to single-disc clutches, there are also double-disc and multi-disc clutches.
The first version of the double-disc clutch is used on the double-flow type. In it, rotation from one driven disk is transmitted to the gearbox shaft, and from the second - to the PTO.
This design made it possible to increase the functionality of the equipment (for example, on tractors, thanks to the power take-off shaft, it is possible to aggregate it with various mechanisms).
But a double-disc clutch can also be single-flow (rotation from two driven discs is transmitted to only one element - the gearbox shaft).
This design has found application in cargo vehicles (in most cases, although this type can also be found on sports cars, as well as some motorcycles), where, due to the high power of the motors, the transmission of high torques is required.
Multi-disc clutches are a package of discs - driving and driven, alternating with each other. This package is placed in a basket consisting of two drums - a leader and a slave.
Otherwise, the essence of this type of design is no different from a conventional clutch - the discs are connected to the corresponding drum springs, pressed against each other, due to which friction occurs between the discs.
When the drive is activated, one of the drums moves away, thereby interrupting the flow. This type of clutch can only be found on motorcycles.
By drive type.
Several types of drives are used to control the unit:
- Mechanical (the transfer of force from the pedal to the bearing fork is done using a system of levers or a cable);
- Hydraulic (force is transmitted through two cylinders - the main and the working, connected to each other by a pipeline filled with liquid);
- Electric (used in systems with automatic clutch control. The clutch elements are acted upon here by means of electric motors with servo drives);
- Combined (the drive combines several of the above types, for example, hydromechanical).
Additionally, special equipment often uses a variety of drive amplifiers.
When does the clutch need adjustment?
Clutch adjustment of IZH Planet 5 is required in two cases:
- The clutch is slipping . In this case, the clutch discs are not tightly connected to each other, which causes slippage of the drive discs and incomplete transmission of torque. You can notice this in the lag in actual engine speed and motorcycle acceleration. Especially noticeable during sudden acceleration or driving uphill. This situation can occur if the springs do not create enough force or there is no free play in the drive mechanism. Less commonly, slippage may indicate wear on the disc pack. Most often, the problem is solved by a simple adjustment; in other cases, disassembly, replacement of the package and assembly of the IZH Planet 5 clutch are carried out.
Common clutch malfunctions and their symptoms
- Incomplete engagement of the clutch (with “slipping”) is a consequence of oiling or wear of the friction linings of the driven disk, broken springs, and incorrect amplitude of the pedal stroke (its small free play). To eliminate this malfunction, it is necessary to replace the driven disk, eliminate scuffs on the disks, and inspect the drive for malfunctions. When “slippage” occurs, when the clutch pedal is fully released, the disks slip one against the other. Due to prolonged slipping, the discs begin to heat up significantly, the steel driven disc may become warped, and the cast-iron flywheel and pressure plates (or pressure plates) may become cracked. Friction linings wear out and burn at an accelerated rate, and this burnt smell reaches the cabin. If not repaired, the process gradually progresses, first at high, then at low speeds. To the point where it becomes impossible to even move away in first gear.
- Incomplete disengagement of the clutch (when the clutch “drives”) is a consequence of large free play of the clutch, broken springs, a warped driven disk or an incorrectly installed pressure disk. This is also possible when the release levers are deformed; or the release bearing jams and does not move with the pressure clutch. It is possible that the clutch driven disc does not move along the splines (the lubricant has thickened or become dirty). To eliminate this malfunction, it is necessary to remove air from the hydraulic drive, adjust the free travel of the pedal, and replace inoperative disks and springs. Incomplete shutdown is manifested by the crunching sounds of gears when changing gears and, accordingly, leads to accelerated wear of gearbox parts.
- Jerks when engaging the clutch. When the car, despite the smooth release of the clutch pedal, starts jerking, this indicates the destruction of the friction linings, warping of the driven disk, or the breakdown of the damper springs, or wear of the friction washers. It is also possible that the driven disk may jam when moving along the splines of the gearbox input shaft, as well as jamming of the push clutch or destruction of the release bearing.
- Malfunctions of the hydraulic drive system. If air gets into the hydraulic clutch release drive, the pedal may “sink”, and as a result, the clutch may not be completely released. In this case, it is necessary to remove air bubbles with some of the fluid (bleed the clutch) and add fresh fluid. When in cable-driven mechanisms the clutch does not disengage at all, the cable may have broken. When the clutch pedal does not return to its original position, the return spring has become disconnected. If, when the clutch is disengaged, there is a strong noise generated by the release bearing, this indicates its wear.
If the clutch drive is mechanical (lever or cable), then as the friction linings wear out, the clutch pedal will gradually rise, but with a hydraulic drive, the pedal does not change its position, and the fluid level in the reservoir decreases.
So, the clutch mechanism plays a huge role in the functioning of any car or tractor. The technical condition of the entire vehicle largely depends on its serviceability and performance.
Therefore, to ensure long and reliable operation of all elements of the clutch mechanism, it is important to use it smoothly, and without the need to practice excessively long presses on the pedal. Under such gentle operating conditions, the clutch will last a long time