Characteristics of the IZH-P5 motor
| engine's type | Single-cylinder, carburetor, two-stroke, air cooled. |
| Working volume, cm3 | 346 |
| Maximum power, l. With. | 22 (20.9…23.1 at 4850±10% rpm |
| Cylinder diameter, mm | 72 |
| Piston stroke, mm | 85 |
| Compression ratio | 8,2-8,7 |
| Cylinder-piston group lubrication system | mixture of fuel and oil. On later motorcycle models, oil supply is used by an oil pump, which proportions the oil supply depending on the crankshaft speed and engine load in ratios of 1/25-1/100 to the gasoline supply. The filling capacity of the Izh P-5-01 motorcycle engine crankcase is 0.7 l, oil M-8V, M-10V2, MS-14, MS-20, MGD-14M or their foreign analogues. |
| Carburetor | K-65I (in earlier ones - K-62I) |
| Fuel used | motor gasoline with an octane number of at least 76. With a joint lubrication system, gasoline is used in a mixture with motor oils M-8V, M-10V, aviation oil MS-20 in a ratio of 25: 1, or a mixture of gasoline and oil for two-stroke engines MGD-14M (or its foreign analogues) in a ratio of 50:1. |
| Gas tank capacity | 18 l. |
| Air filter | contact-oil |
| Oil filling capacity in the air filter | 0.15 l engine oil |
| Generator | Generator - a three-phase electric machine with electric machine excitation and an electronic rectifier-voltage stabilizer BPV-14-10 (BPV-21-15), with a power of initially 100, then 140 W, or a single-phase generator with excitation from permanent magnets and an electronic regulator RNM-1, power 90 W. |
| Ignition | battery contact capacitor, on later models electronic non-contact, with automatic control of ignition timing based on crankshaft speed and independent of the battery. |
| Spark plug | A23B (or foreign analogues) |
| Accumulator battery | lead acid, type 6MTS-9, 12 volt 9 Ah |
| Transmission | |
| Transfer from engine to clutch | double-row bushing drive chain (reinforced) in an oil bath |
| Clutch | multi-disc in oil bath |
| Gearbox housing filling capacity | 1.0 l, oil M-8V, M-10V2, MS-14, MS-20 or their foreign analogues. |
| Transmission | three-shaft four-speed in one unit with engine and foot gear shift. |
| Transmission from gearbox to rear wheel | closed bushing single row chain |
| Gear ratio from engine to clutch | 2,17 |
| Gear ratio from gearbox to rear wheel | 2,33 |
| Gearbox ratios in gears: | |
| I | 3,88 |
| II | 2,01 |
| III | 1,26 |
| IV | 1,0 |
Preparing for assembly
Preparation for assembly can be divided into two main stages: measuring and, if necessary, eliminating the axial play of the tracer shaft and checking the suitability of the secondary shaft bearing for further operation.
The first stage is measuring and eliminating the axial play of the copy shaft
We put adjusting washers on the tracking shaft from the locking side. In my case, there were four adjusting washers, but you may have more or less, or maybe not... We move the locking bar to the side and install the copy shaft in its place. We put a standard thrust washer on the second end of the tracing shaft.
We place a new gasket (required) on the plane of the gearbox cover connector, on which you will later finally assemble the gearbox, and tighten the gearbox cover fastening screws with the required force.
We turn the engine over and measure the axial play of the copy shaft, the norm is 0.2-0.4 mm, but it will be better if you can ensure the axial play at a level of no more than 0.2 mm. Adjustment of axial play is accomplished by simply adding or removing shims.
I measure the play with an indicator. If you don’t have one, try measuring the backlash with a caliper; if you don’t have a caliper, so be it - measure by eye...
Second stage: checking the suitability of the secondary shaft for further use
Under normal operating conditions, the secondary shaft bearing runs for quite a long time. But no matter how much we want and try, it wears out. It would be nothing if it weren’t for safety: if your secondary shaft bearing falls apart while driving, and it will certainly fly apart if you don’t change it in time, the gearbox sticks together with the rear wheel, and it’s tight and you’re grinding the asphalt with your butt...
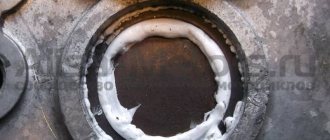
Carefully, take out the secondary shaft over some tray and carefully inspect the shaft bearing raceway, the races and the rollers themselves. The working surfaces of the bearing and rollers should be free of holes, edges, signs of wear or overheating
The path must have a perfectly flat working surface.
Example of a secondary shaft race and race in perfect condition.
To facilitate reassembly, apply some kind of lubricant, such as lithol, to the treadmill and carefully place the rollers on the track and, turning it a little, insert the shaft into the cage. As soon as the sprocket splines rest against the edge of the oil seal, use a thin screwdriver in a circle to straighten the edge of the oil seal and push the shaft until it stops. And immediately, so that the shaft does not fall out, put the sprocket on it and secure it with a nut.
How to change gears in Izh Planet-5
For beginners, changing gears on a motorcycle is difficult.
In fact, thanks to the existing gearbox, this is not so difficult. Attention! On motor vehicles, there are two types of gear shifting: “up” and “down”. In this case, the first is used to engage a higher gear, and the second – a low one.
In order to increase the speed on Izh Planet-5, you need to follow several steps:
- engage first gear and gradually increase speed;
- quickly release the gas while simultaneously lowering the speed. At the same time, you should squeeze the clutch lever;
- engage the next gear;
- release the clutch, after which you can immediately increase the speed and increase the revolutions.
When going uphill, it may be necessary to engage a low gear using the down shifter to increase power from the rear wheel. In this case, the action algorithm will be as follows:
- slow down and squeeze the clutch lever;
- engage low gear;
- The clutch can be released and the gas applied.
The Izh Planet gear shift shaft has the following speed modes: first (goes with downward pressure), second and the rest up to four (goes up), and between the second and third there is a neutral position.
Clutch faults
Possible malfunctions that may appear during operation of IZ motorcycles.
The clutch of IZH Jupiter IZH Planet is slipping reasons
The malfunction is noticeable during sudden acceleration. We increase the speed, but the motorcycle does not accelerate. The same thing happens when driving on a steep hill as the load increases. The motorcycle cannot overcome the obstacle and stops, although the crankshaft speed does not drop. The discs get very hot and wear out quickly. It is impossible to operate the equipment in this condition; the cause must be found and eliminated.
This malfunction indicates that the disks are poorly pressed against each other.
There may be several reasons:
- The adjustment was not carried out correctly
- The springs have lost their former elasticity
- The discs have worn out and become thinner.
- Wear of drive parts
A serious problem could be a jammed control cable. The reason is damage to the shell and the resulting rust underneath. Gentle cleaning and lubrication, better replacement.
Check and wash the adjustment mechanism itself located in the right engine cover. Small particles of road sand that get into the mechanism with water can slow down the operation. After squeezing the lever, the parts do not return to their original position.
Changing the oil in the Izh Planet-5 gearbox
Changing the Izh Planet-5 gearbox oil is mandatory periodic maintenance. This means that a similar procedure will have to be carried out more than once during operation. If the Izh Planet-5 is new, then replacement will need to be done after the first 500 km, then this must be done every 10,000 km. It is better to carry out all activities immediately after using the motorcycle, while the oil is still warm. Replacement algorithm:
- For convenience, the motorcycle can be mounted on a central stand.
- It is necessary to place a container with a volume equal to 1.5-2 liters under the engine crankcase. This is where the already used oil will be drained.
- At the bottom of the crankcase there is a button that can be freely unscrewed with a 22 mm wrench. This is exactly what needs to be done and then drain the oil.
- The drain button is screwed back in.
- Now work is done with the hatch-emblem located on the left crankcase cover. The rear fastening screw is loosened, and the front screw is completely unscrewed.
- The retaining hatch on the rear screw is turned. After this, a “window” in the crankcase cover will open. Engine oil is poured in there. Then, in the same sequence, everything is put in place and tightened.
Important! It is better not to use transmission oil in the Izh Planet-5 gearbox. Due to the thickness and viscosity of the fluid, clutch discs may stick together, this is especially noticeable on frosty days or when the motorcycle is parked for a long time.
A video on changing the oil can be viewed at the link:
Familiar problems
"Gazelle": disassembling the box. “Gazelle Next”: disassembling and assembling the gearbox
Reviews from owners indicate that, regardless of the version and year of manufacture, the Izh Planet-3 motorcycle had the same disadvantages:
- Engine vibration associated with its design features. Almost all single-cylinder engines suffer from this.
- Problematic electrical equipment. Almost identical to the Jupiter of the same years of production, the 6-volt wiring installed on Izh Planet-3 was not of very high quality. An insufficiently powerful generator created problems when driving at night.
Completely eliminating engine vibrations is almost impossible. Even serious engine tuning does not completely solve the problem. You have to put up with this feature of technology. As for electrics, motorcycle lovers who are interested in tuning Izh Planet-3 often ask the same questions:
- How to detect ignition system malfunctions?
- What to do if charging is lost?
- How to replace the relay regulator?
- Does it make sense to install electronic ignition?
- How to replace a failed generator?
- Where can I find the wiring diagram for Izh Planet-3 at 6 volts?
- How to install BSZ?
These questions are countless and it is simply impossible to answer them in one review article. This requires digging deeper. And therefore we will try to answer as briefly as possible.
- Since the wiring diagram on Izh Planet-3 was repeatedly changed even depending on individual series, one cannot count on an exact match of its description. Sad but true.
- Replacing electrical wiring, switching electrical equipment operating from 6 volts to 12 volts and installing contactless ignition are completely justified steps to improve the performance of a motorcycle. After such modernization, ignition installation is simplified, and engine operation becomes more stable. At the same time, you will know exactly how the electrical circuit of your Izh Planet-3 works!
But it’s clearly not worth getting down to business without the necessary skills or suitable tools. As for DIY tuning enthusiasts, for them the Izh Planeta-3 motorcycle is an unplowed field for activity. There is room to expand here. Go for it!
Most common problems
Most often, the motorcycle in question loses or shifts poorly in second gear. This may be due to careless turning on of speeds. For example, when picking up high speeds in first gear without neutral, when engaging the second speed gear, an impact occurs, which contributes to intensive wear of the unit. Therefore, it is not recommended to “spin” the first speed too much. If, nevertheless, problems with the second position continue, there are several options for resolving them.
- Crafts from cardboard boxes for tea, juice and milk, shoes - interesting master classes, photo ideas and tips
In some cases, the simplest method will help, without completely disassembling and then reassembling the Izh-Planet 5 box. It is necessary to place the motorcycle on the right side, and then remove the kick starter and gear shift foot along with the shaft. Next, the crankcase cover and clutch basket along with the discs are dismantled.
When the gears of the box wear out, the meshing of the teeth deteriorates. In turn, this leads to slipping, jerking and failure of the second gear. Another reason could be wear on the input shaft bearings. Since it moves slightly to the left due to vibration, it is necessary to move it into place with light blows using a mallet. The installation of washers of suitable diameter will allow you to fix the element in the desired position. Then the bearing stopper and other dismantled parts are reassembled in the reverse order.
It happens that disassembling/assembling the Izh-Planet 5 box may be necessary if the fourth speed disappears. This is often due to broken bearings on the output shaft. Such a nuisance occurs due to the presence of axial play, displacement of the bearing assembly, or its failure. You can try to fix the problem in the same way as repairing the second gear. If this does not help, you will need to completely disassemble the unit.
When the speed switch jams from a high range to a low mode, the spring system of the switching mechanism has failed. It needs to be replaced. Strained operation of the unit after assembling the Izh-Planet 5 gearbox indicates incorrect installation of the adjusting washers. To avoid this, it is necessary to mark and record the previous placement of these elements during the process.
Repair
Detailed instructions and connection diagram for a pioneer car radio
After the unit has been gutted, you can begin to determine the parts to be replaced. As a rule, you have to buy a set of shims, a set of gaskets and sealant. This is the case if there are no more serious damage. Once you have decided on the elements to be replaced, you will need to adjust the worm shaft axis, and after final assembly, the clearance along the axis of the primary, intermediate and secondary shafts.
Adjusting washers are placed on the far ledge of the copy roller; they should be lubricated with a special compound. A support washer is mounted on the near edge, and the shaft is put in place. It should be turned so that the neutral sensor with its protrusion fits into the deepest groove. Then, using a ruler (without the gearbox cover yet) on the plane of the crankcase, measure the gap between the washer and the dipstick. It should be no more than 0.2 mm. Depending on the indicator, regulators are added or removed. If it is impossible to accurately set the gap, it is better to make it smaller.
"Sores"
There are three problems in the planetary checkpoint:
I solve the problem with oil leakage very easily and simply: I take out the retaining ring; I remove the intermediate shaft bearing, degrease the plug, retaining ring, mounting hole, then apply sealant to the outer edge of the plug, put it in place and immediately press it with the bearing and voila - the leak is eliminated!
Due to a factory defect, the gear-carriage for engaging the first-third gear does not fully engage the first-gear gear with its cams, but only in a small part, barely catching the gear with its cams, which is why the edges quickly wear out and the first gear begins to knock out.
Installation of the cylinder-piston group
It is not advisable to remove the gearbox cover until the sealant has dried; there is no need to rush in this matter. It’s better not to rush things and install the cylinder while the sealant dries.
Add some motor oil:
- into the upper head of the connecting rod
- lower connecting rod head
- into both oil channels of the crank chamber
To improve lubrication, it is advisable to drill holes in the piston bosses. But you don’t have to drill - it depends on your desire.
Install the piston pin retaining ring into the boss. Before installation, it is advisable to bend the locking ring a little and be sure to check how it fits after installation:
- If the retaining ring dangles, straighten it or replace it with a new one.
- If the retaining ring is not completely flat, replace it with a new one.
We heat the piston with a hairdryer and, using a mandrel, drive the finger into the piston so that it comes out no more than 5-6mm.
We look for an arrow-shaped mark on the bottom of the piston.
We orient the piston with the arrow towards the exhaust port of the cylinder (“towards the exhaust”), put the piston on the connecting rod, hammer in the piston pin and install the second retaining ring.
We insert the rings into the cylinder and measure the gap between the locks with a feeler gauge:
- If the gap is less than 0.3-0.45, sharpen the ring locks with a file
- If the gap is greater than 0.3-0.45, install new rings; if that doesn’t help, bore the cylinder to the repair size
To improve the wearability of the rings and reduce noise from engine operation, it is advisable to chamfer the edges of the rings. If hunting gets too much trouble: place the ring on a flat surface and use a file to slightly round the edges.
We put the rings on the piston, fill the piston with the rings with oil, install a gasket under the cylinder (preferably with sealant), tighten the rings with a clamp. We cut the clamp out of tin and from the same tin we bend the bracket with which we will fix it.
We put on the cylinder.
After the rings go into the cylinder, unfasten the clamp, lower the cylinder and screw it to the crankcase.
We turn the crankshaft several times and if the piston moves in the cylinder easily and without grinding, lower it down a little, pour a little engine oil into the cylinder, install a new gasket on the cylinder and screw the head on.
We install the additional crankshaft support bearing in its place, place the required number of adjusting washers on top and secure it with a retaining ring. The adjusting washers must ensure axial play of the crankshaft within 0.1 mm.
Before installation, sealed bearings must be opened! The usual 304 goes here.
On the other side of the crankshaft we install a flange with a main oil seal.
Pay attention to the oil channel through which oil flows to the right main bearing of the crankshaft. According to the good old collective farm tradition, this channel is sealed with sealant and the lubrication of the bearing stops. To avoid this problem, place the flange dry without sealant and everything will be fine
To avoid this trouble, place the flange dry without sealant and everything will be fine.
After the sealant has dried, you can begin adjusting and assembling the gearbox and replacing the clutch basket.
Numbers of bearings and oil seals for the Izh-Planet motorcycle engine 2, 3, 4 and fifth model.
- Crankshaft main bearings 2505k
- Additional crankshaft support bearing 304
- Right oil seal IZH-yu sb. 1-48-3
- Left main oil seal IZH-yu sb. 1-50
Final stage
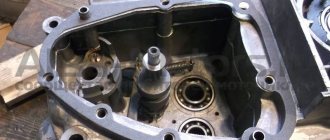
Next, the second and third speed gears are removed from the input shaft, after which the input shaft is dismantled. To do this, you will need to carefully knock it out using a stopper and a light hammer. The upper and lower forks are removed.
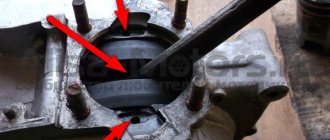
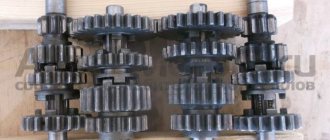
Next comes the intermediate shaft assembly. Using a screwdriver or other suitable tool, bend the clamp with the neutral indicator and carefully pull out the worm wheel. On its far side there are shims that could stick to the crankcase. They need to be collected and stored with the rest of the removed parts. Next is the turn of the copy shaft. Check the edges of the shaped sockets in which the guide forks move. They should not have chips or dents. We unscrew a couple of screws securing the switching mechanism, which is also removed. Now you can replace unusable parts and assemble the Izh-Planet 5 gearbox according to the scheme. The figure below shows: retaining cap (1), bolt (2), crankshaft sprocket (3), double-row chain (4), clutch drum (5), input shaft (6).
Maintenance
The owner can independently perform some maintenance procedures:
- check the motorcycle generator if the battery loses charge;
- set the gap between the breaker contacts;
- adjust the quality of the sound signal.
The need to inspect and adjust the wiring arises if:
- the motorcycle moves in the rain for a long time, as this causes oxidation of the contacts;
- a motorcyclist rides in an area with a lot of vegetation that damages wiring;
- The driver rides in snow in winter, which can stick to electrical wiring parts and damage them.
Self-check of the Planet 5 motorcycle generator in case of loss of charge
The cause of loss of charge in the IZH Planet 5 battery is most often a breakdown of the generator.
To check it yourself you need:
- multimeter device;
- straight screwdriver.
Step-by-step instruction
The following steps must be followed:
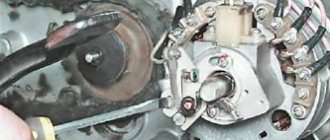
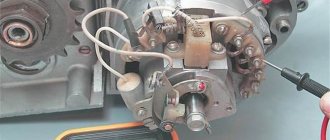
- Disconnect the wires from the battery and remove the generator cover.
- Disconnect the top 5 wires from the generator, first unscrewing their fastenings. In order not to mix up the wires during assembly, it is worth marking them.
- Measure the winding resistance using a multimeter in ohmmeter mode. To do this, you need to touch the body with one probe, and the other should be connected in turn to the 3 wires of the winding. There should be no short circuits, as indicated by the inscription on the multimeter screen.
- Test the resistance between the stator contacts: you need to touch them one by one with the multimeter probes. The value on the screen should be 8 ohms.
The presence of a short circuit in the 3rd stage or a discrepancy in the indicators in the 4th will indicate problems with the generator.
Photo gallery: stages of checking the IZH Planet 5 generator in case of loss of charge in pictures
How to correctly set the gap between the contacts of the breaker?
In order to set the gap between the breaker contacts, you will need:
- straight screwdriver;
- wrench 10;
- candle key;
- probe 0.4 mm thick (+/– 0.05 mm).
Next, you need to follow the steps sequentially:
- Place the motorcycle on a stand and place the gearbox in neutral.
- Remove the right crankcase cover and unscrew the spark plug.
- Using a 10mm wrench, grab the generator rotor mounting bolt and turn the crankshaft to a position where the contacts are as far apart as possible.
- Loosen the screw securing the contact.
- Place the probe between the contacts and adjust the tightening of the eccentric screw until the probe passes the contacts with little resistance.
- Tighten the contact fixing screw.
Photo gallery: adjusting the gap between the breaker contacts
Troubleshooting the audio signal and improving signal quality
Poor sound signal quality is mainly caused by improper adjustment.
The following tools will be needed for setup:
- wrench 7;
- a simple screwdriver.
Step-by-step instruction
To adjust, do the following:
- Loosen the locknut with a wrench.
- Turn on the ignition.
- Press the button to turn on the sound signal.
- Adjust the sound by rotating the adjusting screw.
- When the desired result is achieved, tighten the locknut.
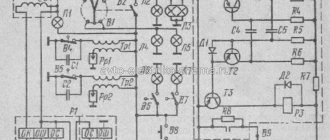
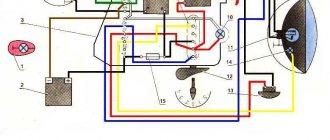
Electrical circuits of the ignition systems of the IZH Jupiter 5 motorcycle
1 - parking light lamp - A 12-4; 2 - high beam - low beam headlight - A 12-45:40; 3 - indicator lamp for generator operation - A 12-1; 4, 5 — speedometer scale illumination lamps — AMN 12-3; 6, 16, 17, 20, 23, 30 — lamps for the direction indicators of the motorcycle and side trailer; 7 - combination switch (right switch); 8 — brake light switch for the front wheel brake; 9 - breaker; 10 — spark plug; 11 — ignition coil; 12 - generator; 13 — rectifier-voltage regulator BPV14-10; 14 — brake light switch for the wheel brake; 15, 19 — side trailer clearance lamps — A 12-5; 18 — brake light lamp for side trailer — A 12-21-3; 21 — motorcycle brake light lamp — A 12-21-3; 22 — motorcycle rear marker lamp — A 12-5; 24 - battery; 25 - fuse; 26 — neutral lamp switch; 27 — ignition switch; 28 — sound signal; 29 — alarm switch (left switch); 31 — turn signal switch; 32 - high beam headlight control lamp - A 12-1; 32 — control lamp “neutral” — A 12-1; 33 - control lamp for direction indicator lights - AMN 12-3; Symbols on the BPV14-10 block (items 12,13): XI - “-” excitation windings; X2 - “-” battery (“ground”); ХЗ - “+” output to the control lamp; X4, X5, X7 - phases of the stator winding of the generator; X8 - “+” of the battery.
Important
When performing these operations, follow the mark in the middle part of the sector. It should coincide with a similar mark on the shaft. The last step is to install the crankcase cover. If the work is carried out correctly, it will sit in its place without problems.
It is necessary to ensure that all rods and shafts coincide with their original mounting sockets. They should rotate freely without creaking or jamming. Use moderate force when tightening the screws as the threads in a soft metal crankcase can easily be stripped. All fasteners are tightened evenly to avoid distortion.